Transcript
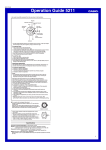
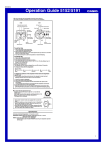
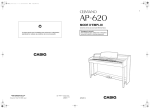
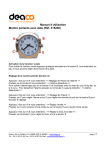
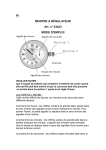
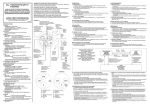
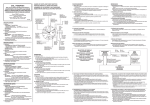
MA0907-EA
Operation Guide 4358/5009 (EFX)
Getting Acquainted
Using the Stopwatch
Congratulations upon your selection of this CASIO watch. To get the most out of your
purchase, be sure to read this manual carefully.
• Be sure to keep all user documentation handy for future reference.
The stopwatch lets you measure elapsed time up to 59 minutes, 59 seconds.
50
10
• For a watch with an elapsed time bezel
mark with
Rotate the elapsed time bezel to align the
the minute hand. After certain amount of time elapsed,
read the graduation on the elapsed time bezel which the
minute hand points to. The elapsed time is indicated.
20
40
Stopwatch second hand
Stopwatch minute hand
30
Elapsed time bezel
• Some water resistant models are equipped with a
screw lock crown.
• With such models, you must unscrew the crown in the
direction noted in the illustration to loosen it before
you can pull it out. Do not pull too forcibly on such
crowns.
• Also note that such watches are not water resistant
while their crowns are loosened. Be sure to screw the
crowns back in as far as they will go after making any
setting.
About This Manual
• Button operations are indicated using the letters shown
in the illustration.
• The configuration of your watch may differ somewhat
from that shown in the illustration.
General Guide
Crown Positions
First click
(Setting day and
day of the week)
To measure elapsed time
1. Press A to start the stopwatch.
2. Press A to stop the stopwatch.
• You can resume the measurement operation by pressing A again.
3. Check the elapsed time.
• The example below shows an elapsed time of two minutes, 44 seconds.
Stopwatch minute hand
[2 minutes]
Stopwatch second hand
[44 seconds]
• Press B to reset the stopwatch. This will enter the Timekeeping Mode.
Notes:
• Do not try to perform stopwatch operations while the crown is pulled out either to the
first or second click. If you try to press a button, you might accidentally cause the
crown to rotate and change the current time or day setting.
• If the starting positions of the stopwatch minute hand and second hand become
misaligned, use the following procedures to adjust the positions of the hands so they
point to 12 o’clock when the stopwatch is reset.
To adjust the positions of the stopwatch hands
1. Press B to reset the stopwatch, and check the alignment of the stopwatch minute
hand and second hand.
2. Pull out the crown to the second click.
3. Press A to move the stopwatch minute hand and second hand.
4. If the stopwatch minute hand is aligned correctly, proceed to step 5. To return the
minute hand to the 12 o’clock position, press B.
5. After making the adjustments you want, push the crown back in to its normal
position.
• Note that pulling the crown out also stops the timekeeping second hand. After
performing the above procedure, you should also adjust the timekeeping setting.
Second click
(Setting time)
Crown
(Normal position)
Specifications
Accuracy at normal temperature: ±20 seconds a month
Display: 3 analog hands (timekeeping hour and minutes, stopwatch seconds),
3 dials (timekeeping seconds, day of the week, stopwatch minutes), day
Stopwatch function: Measuring capacity: 59'59''/Measuring unit: 1 second
Measuring modes: Elapsed time
Timekeeping
Minute hand
Hour hand
First click
(Setting day and
day of the week)
Battery: One silver oxide battery (Type: SR626SW)
Approximately 2 years on type SR626SW (assuming one stopwatch
operation 60 min./day)
Second click
(Setting time)
Second hand
Day
Crown
(Normal position)
Day of the week
To set the time
1. Pull the crown out to the second click when the second hand is at 12 o’clock
position and the second hand stops.
2. Set the hands by rotating the crown. Rotate the crown to move the hands
clockwise. Move the minute hand four or five minutes past the time you want to set,
and then back it up to the proper setting.
• Carefully set the time, making sure to distinguish between AM and PM.
3. Push the crown back in to the normal position to restart timekeeping.
To set the day
1. Pull the crown out to the first click.
2. Set the day by rotating the crown away from you (in the
direction indicated by the arrow in the illustration).
3. Push the crown back in to the normal position.
• Avoid changing the date setting while the current time is
between 9:00 p.m. and 1:00 a.m.
To set the day of the week
1. Pull the crown out to the first click.
2. Set the day of the week by rotating the crown towards
you (in the direction indicated by the arrow in the
illustration).
3. Push the crown back in to the normal position.
• Avoid changing the day of the week setting while the
current time is between 9:00 p.m. and 1:00 a.m.
1