1
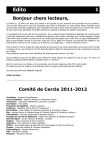
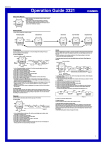
USER’S GUIDE G’MIX 5A
General Guide
• Press C to change from mode to mode.
• Pressing E in any mode besides the Alarm Mode illuminates the display for about
three seconds. The backlight is disabled while a setting screen is on the display.
Timekeeping Mode
• If you do not perform any operation for a few minutes while a setting screen (with
flashing digits) is on the display, the watch automatically exits the setting screen.
• If you do not perform any operation for a few minutes in any mode besides Stopwatch Mode, the watch automatically reverts to the normal timekeeping screen.
Alarm Mode
Day Counter Mode
Memo Mode
Stopwatch Mode
Press C.
Timekeeping Mode
Day
Month
Day of week
• Pressing B plays a randomly selected melody. To stop
a playing melody, press any button besides E.
• Pressing E while a melody is playing toggles the display between an animated character and the name of
the melody.
Seconds
Hour
About the Backlight
Press D to toggle between 12-hour and 24-hour timekeeping.
• With 12-hour timekeeping, times between midnight and
noon are indicated by A (am), while times between noon
and midnight are indicated by P (pm).
• The A and P indicators do not appear for 24-hour timekeeping.
• Press E to illuminate the display for about three seconds. When 12-hour timekeeping is being used, pressing E also displays an animated character.
Minutes
PM indicator
Pressing E in any mode besides the Alarm Mode illuminates the display for about
three seconds. The backlight is disabled while a setting screen is on the display.
• The backlight of this watch employs an electro-luminescent (EL) light, which loses
its illumination power after very long term use.
• Frequent use of the backlight shortens battery life.
• The illumination provided by the backlight may be hard to see when viewed under
direct sunlight.
• The backlight automatically turns off an alarm sounds.
• The watch emits an audible sound whenever the display is illuminated. This does
not indicate malfunction.
Day Counter Mode
Mode indicator
DST indicator 2
Text
Timekeeping Mode Settings
In addition to settings for the current time and date, the Timekeeping Mode setting
screen also lets you turn button tones and melody play on and off, adjust tones and
melody volume, and adjust display contrast.
Year
To make Timekeeping Mode settings
Month
1. While in the Timekeeping Mode, hold down A until the second’s digits flash on the
display, indicating the setting screen.
2. Press C to move the flashing in the sequence shown below. Press E to move
the flashing in the opposite direction.
Press
. Press
Seconds
.
Number of days
DST
Contrast
(CNT)
Hour
Volume
(VOL)
DST indicator 1
DST indicator 2
Minutes
Sound
(SOUND)
Year
Day
Month
3. While the second’s setting is selected (flashing), press
D or B to reset it to 00.
• If you press D or B while the second’s setting is in the
range of 30 to 59, the seconds are reset to 00 and 1 is
added to the minutes. If the second’s setting is in the
range of 00 to 29, the minute’s count is unchanged.
• While the DST∗ (Daylight Saving Time) setting is selected, press D or B to toggle it on and off.
• DST indicator 1 is displayed in the Timekeeping Mode
setting screen only when the DST setting is selected. It
shows ON when the DST setting is on, and OFF when
the DST setting is off.
• DST indicator 2 is displayed in the Timekeeping Mode,
Day Counter Mode and Alarm Mode when the DST setting is turned on.
∗Daylight Saving Time (DST), which is also sometimes
called “summer time” advances the time for one hour, as
is the custom in some areas during the summer. Remember that not all countries or even local areas use
Daylight Saving Time.
. Press
.
Recalling Day Counter Data
In the Day Counter Mode, press D to scroll through the Day Counter record screens.
• The day count is a negative value whenever the target date comes before the current date.
To set the target date
1. In the Day Counter Mode, press D to display a record number you want to set.
2. Hold down A until the first (leftmost) text character starts to flash on the display.
This indicates the input screen.
3. Press C to move the flashing in the sequence shown below. Press E to move
the flashing in the opposite direction.
Press
Off
• While the VOL setting is selected, press D or B to toggle it between loud and soft.
Loud
.
Character 1
Day
Press
Press
. Press
Character 12
Month
Year
4. While the flashing is located within the text area, use D or B to scroll through
characters at the current location of the flashing. Holding down either button scrolls
through characters at high speed.
Musical tone
Beep
DAYS indicator
The Day Counter Mode lets you count the number of days from the Timekeeping
Mode’s current date to a specific target date.
• There are five Day Counter records, each of which can be assigned up to 12 characters of text and a target date.
• When a target date is reached, the DAYS indicator flashes on the display in the
Timekeeping Mode. The DAYS indicator also flashes in the Day Counter Mode
when the screen for the target date is on the display.
• The DAYS indicator flashes on the target date each year, regardless of the year
setting of the target date.
• The initial default date for a Day Counter record is 2001/1/1, and the text area
contains All spaces. (All spaces for the text display a series of hyphens “ – – – – – ”.)
• While the SOUND (button tones) setting is selected, press D or B to turn the
beep and musical tone on and off, as shown below.
• Changing the SOUND also changes the Hourly Time Signal tones.
Press
Target Date
Day
Day counter
record number
or
.
. Press
.
Space
A to Z
Hyphen
Numbers
Punctuation
Symbols
Japanese
characters
∗See the “CHARACTER LIST” for details.
Soft
• With some models, changing the volume setting affects volume very little.
• While the CNT setting is selected, press D to make the display darker, or B to
make it lighter.
• While any other setting is selected (flashing), press D to increase it or B to decrease it. Holding down either button changes the setting at high speed.
4. After you make the settings you want, press A to exit the setting screen.
• The day of the week is automatically set in accordance with the date.
• The date can be set within the range of January 1, 2000 to December 31, 2039.
• The watch's built-in full automatic calendar automatically makes allowances for different month lengths and leap years.
Once you set the date, there should be no reason to change it except after the
replacement of the watch's battery.
5. While any other setting is selected, press D to increase it or B to decrease it.
Holding down either button changes the setting at high speed.
• Pressing D and B at the same time while the flashing is located within the text
area clears any input text and resets the date setting to the current date. At this
time the message “CLEAR” appears on the display.
• Pressing D and B at the same time while the flashing is located within the date
area resets the date setting to the current date without affecting the text.
6. After you make the settings you want, press A to exit the input screen.
• The date can be set within the range of January 1, 1940 to December 31, 2039.
1
USER’S GUIDE G’MIX 5A
Alarm Mode
Stopwatch Mode
Mode indicator
Mode indicator
Current time
Melody name
The Stopwatch Mode lets you measure elapsed time, split
times, and two finishes. The range of the stopwatch is
23 hours, 59 minutes, 59.99 seconds. You can use the
EL backlight by pressing E at any time while the stopwatch is operating.
Current time
Alarm number
Hours
Minutes
Hour
Seconds
Minutes
You can set up to five melody alarms. When a daily alarm is turned on, its melody
alarm sounds for about 20 seconds at the preset time each day. In the Timekeeping
Mode, press any button (except E) to stop the melody alarm after it starts to sound.
Pressing E while a melody is playing toggles the display between an animated character and the name of the melody that is playing. When the Hourly Time Signal is
turned on, the watch beeps every hour on the hour.
1/100 second
Elapsed time measurement
Stop
Start
Re-start
Stop
Clear
Split release
Stop
Clear
Split
Stop
Split release
Clear
First runner
finishes.
Second runner
finishes.
Record time of
first runner.
Record time of
second runner.
Split time measurement
To set the alarm time
1. While in the Alarm Mode, press D to display the alarm number you want to set.
Alarm 1
Alarm 2
Alarm 3
Alarm 4
Alarm 5
SIG: 00 (Hourly Time Signal)
2. Hold down A until the melody setting starts to flash on the display, indicating the
setting screen. The alarm is automatically turned on at this time.
3. Press C to change the selection in the sequence shown below.
Melody Setting
Hour
Split
Start
Split time and 1st-2nd place times
Start
Minutes
4. While melody setting is selected, use D or B to scroll through melody names.
Memo Mode
The Memo Mode lets you store up to five memos, each
with an eight-character title and 16 characters of data.
Mode indicator
Press
.
Press
.
Setting
–0
–1
–2
–3
–4
–5
–
Alarm Sound
Random play of melodies 1, 2, 3, 4 and 5
Melody 1
Melody 2
Melody 3
Melody 4
Melody 5
Beeper
Title
Recalling a Memo
In the Memo Mode, press D to scroll through the Memo
titles. When you find the title you want, press B, and the
screen alternates between the title and data.
• The display can show only five characters at a time.
Longer text scrolls continuously from right to left. The
symbol “ ” indicates that the character or digit to the
left is the last, and the character or digit to the right is
the first.
• A series of hyphens “ – – – – – ” is displayed for a memo
that does not contain any data.
∗See the “MELODY LIST” for the names of melodies.
∗Some melody alarms tune names may be displayed in abbreviated format.
• While any other setting is selected, press D to increase it or B to decrease it.
Holding down either button changes the setting at high speed.
5. After you make the settings you want, press A to exit the setting screen.
• The format (12-hour and 24-hour) of the alarm time matches the format you select
for normal timekeeping.
• When setting the alarm time using the 12-hour format, take care to set the time
correctly as morning or afternoon.
To stop a melody alarm
• Press any button (except E) to stop a melody alarm after it starts to sound.
Memo number
To input a memo
1. In the Memo Mode, press D to display the memo number you want to set.
2. Hold down A until the first (leftmost) character of the memo title starts to flash on
the display. This indicates the input screen.
3. Press C to move the flashing in the sequence shown below. Press E to move
the flashing in the opposite direction.
Press
. Press
.
To turn a daily alarm or the Hourly Time Signal on and off
1. Use D to display the alarm you want to turn on or off, or the screen for turning the
Hourly Time Signal on or off.
2. Press B to toggle the displayed alarm or Hourly Time Signal on and off.
• Alarm indicator 1 is displayed in the Alarm Mode only.
Alarm indicator 1
It indicates the on/off status of the currently displayed
alarm only. Note that this indicator is used for different
purposes in other modes.
• Alarm indicator 2 is displayed in all modes when any of
the five alarms is turned on.
• Alarm indicator 3 is displayed in the Alarm Mode only.
It shows on when the currently displayed alarm is on,
and OF when the currently displayed alarm is off.
Title Character 1
Title Character 8
Data Character 16
Data Character 1
4. Use D or B to scroll through characters at the current location of the flashing.
Holding down either button scrolls at high speed.
Press
. Press
.
Space
A to Z
Hyphen
Numbers
Punctuation
Symbols
Japanese
characters
∗See the “CHARACTER LIST” for details.
• Pressing D and B at the same time while inputting memo title or data clears all
title and data. At this time the message “CLEAR” appears on the display.
5. After you input the data you want, press A to exit the input screen.
Alarm indicator 3
Alarm indicator 2
Hourly Time Signal
indicator 1
• Hourly Time Signal indicator 1 is displayed in the Alarm
Mode only when the Hourly Time Signal is turned on.
Note that this indicator is used for different purposes in
other modes.
• Hourly Time Signal indicator 2 is displayed in all modes
when the Hourly Time Signal is turned on.
• Hourly Time Signal indicator 3 is displayed in the Alarm
Mode only. It shows on when the Hourly Time Signal is
on, and OF when the Hourly Time Signal is off.
Character List
To test the alarm
Hourly Time Signal
indicator 3
In the Alarm Mode, display the alarm you want to sound,
and then press E to play its melody or beep. You can
also press E to play an alarm’s melody while setting the
alarm time.
• To stop a playing melody or beep, press any button.
Hourly Time Signal
indicator 2
2
USER’S GUIDE G’MIX 5A
Melody List
2252
Displayed Melody Name
Song Name
1
BEST OF MY LOVE
Best of my love
2
SEPTEMBER
September
3
DSCHINGHIS KHAN
Dschinghis khan
4
NEVER GONNA …
Never gonna give you up
5
I SHOULD BE SO …
I should be so lucky
2449
Displayed Melody Name
Song Name
1
HONEY
Honey
2
ALL FOR YOU
All for you
3
EVERYDAY IS • • •
Everyday is a winding road
4
BABY ONE MORE • • •
…Baby one more time
5
DON’T TELL ME
Don’t tell me
2489
Displayed Melody Name
Song Name
1
PIECES OF • • •
PIECES OF A DREAM
2
MY ALL. .
my all..
3
KISS OF LIFE
KISS OF LIFE
4
THE ONLY ONE
The Only One
5
I’M HERE SAYING •
I’m here saying nothing
2560
Displayed Melody Name
Song Name
1
DEAREST
Dearest
2
TRAVELING
traveling
3
YOU GO YOUR WAY
You Go Your Way
4
FRAGILE
fragile
5
REMAIN
remain
2624
Displayed Melody Name
Song Name
1
I WANT YOU BACK
I want you back
2
I’M EVERY WOMAN
I’m every woman
3
MANIC MONDAY
Manic monday
4
DON’T GET ME • • •
Don’t get me wrong
5
BREAKOUT
Breakout
3