1
Start Here
Easy Setup Instructions
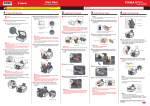
Unpack the Machine
Office All-In-One
• Please confirm the included items against the illustration printed on the lid of the packing box.
• A USB cable is necessary to connect the machine with your computer.
1 Prepare the Machine
aLift the Scanning Unit (Printer Cover)
until it locks into place, open the Paper
Output Tray, then take out the Print
Head, ink tanks and power cord from
inside the machine.
Caution
• Before turning on the machine, remove all of the
shipping tapes and protective material.
• For your safety, always firmly grip the areas illustrated when lifting the Scanning Unit (Printer
Cover).
Important
When cleaning the exterior of the machine, use a soft cloth to wipe it gently. For details, refer to “Cleaning Your Machine” in the Quick Start Guide.
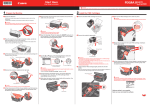
2 Install the Print Head
dPlug the power cord in the back of the
machine and connect the other end to
the wall outlet.
aRemove the Print Head from its
package.
Do not touch!
Document Cover
aPull the orange tape in the direction of
Important
• Make sure that the Document Cover is closed.
• Do NOT connect the USB cable at this stage.
The machine will initialize. Wait until the COPY
button stops flashing and remains lit green.
Caution
There may be some transparent or light blue ink
on the inside of the bag the print head comes in,
or the inside of the protective cap - this has no
effect on print quality. Be careful not to get ink on
yourself when handling these items.
bRemove the orange protective cap from
Electrical Contacts
Operation Panel to select the language
for the LCD, then press the OK button.
Protective Cap
Print Head Nozzles
Important
Do not touch the print head nozzles or the electrical contacts.
Protective Material
(1) Press the { or }
button to select the
language.
Protective Cap
Ink Port
Do not press!
Important
• Do not touch the electrical contacts.
• Do not touch the ink port.
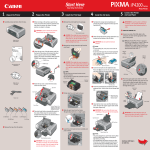
cInsert the ink tank into the right-hand
slot and press the
mark on the ink
tank until it clicks into place.
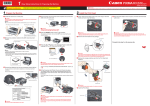
You can connect an external device (telephone
or answering machine) if necessary.
Remove the Telephone connector cap to
connect the external device.
Extension
If you are unsure of your telephone line type,
contact your telephone company.
until it stops. The Print Head Lock
Lever may feel heavy.
Important
If an unintended language is displayed on the
LCD, press the Back button on the Operation
Panel to return to the Language selection screen.
Once the message “Install the print head and
set the ink tank.” appears, go to g.
gLift the Scanning Unit (Printer Cover)
until it locks into place. The Paper Output
Tray will open automatically and the Print
Head Holder moves to the center. Then
open the Output Tray Extension.
→ FAX priority mode
• When you have a dedicated telephone line
for fax use only:
bLoad two sheets of supplied paper
(MP-101) into the Rear Tray with the
printing side (whiter side) facing up,
align the paper with the Cover Guide
on the right side, then slide the Paper
Guide against the paper stack.
Paper Guide
Print Side
Cover Guide
→ FAX only mode
• When you receive mainly voice calls and
sometimes faxes:
→ TEL priority mode
• When you subscribe to a ring pattern
detection service provided by your
telephone company, and you want to
receive a fax only if the machine detects
the pattern for fax:
→ DRPD
For details on how to confirm and change
the settings, refer to the Quick Start Guide.
cMake sure that Yes is selected in the
message requesting head alignment,
then press the OK button.
dMake sure the ink lamp lights red.
Important
• Make sure that the machine is turned on and the
COPY button lights green.
• Make sure that the Print Head Holder has moved
to the center.
dInsert the Print Head.
If the Paper Output Tray does not open
automatically, press the Open button to open it.
Refer to the color
guide on the Print
Head Lock Lever.
eClose the Inner Cover and the
Scanning Unit (Printer Cover).
Note
Print Head alignment takes about 13 minutes to
complete. Do not start another operation until the
machine has stopped making operating noises.
The pattern is printed. And Print Head is aligned
automatically.
Do not touch!
Telephone connector cap
Select the receive mode according to your
needs.
• When you receive mainly faxes and
sometimes voice calls:
cFirmly raise the Print Head Lock Lever
(2) Press the OK button.
necessary external device.
To use a fax, you need to set the telephone
line type setting properly on the machine.
bTwist off and discard the orange
protective cap located on the bottom of
the ink tank.
For fax users
Paper Support
If the air hole is blocked with the remaining film, ink
may leak out or may not eject properly.
Electrical Contacts
fPress the { or } button on the
ADF (Auto Document Feeder).
cConnect the telephone line and any
Paper Support, then pinch the Paper
Guide and slide it to the left end.
Rear Tray Cover
the Print Head and discard it.
Note
The tape or the protective material position is subject
to change.
aOpen the Rear Tray Cover, pull out the
Paper Guide
machine.
bRemove the protective material in the
Note
For the ink tanks compatible with this machine, refer to
the back cover of the Quick Start Guide.
4 Align the Print Head
the arrow to peel off the protective film
and remove the film completely.
ePress the ON/OFF button to turn on the
Important
If the Document Cover is opened, you cannot open
the Scanning Unit (Printer Cover). Be sure to open
the Scanning Unit (Printer Cover) with the Document Cover closed.
3 Install the Ink Tanks
OK
Connect the telephone
line cable to the wall jack.
ePush the Print Head to hold it in place,
Connect external devices as follows:
External Device Jack
Telephone Line Jack
and lower the Print Head Lock Lever.
Telephone or answering machine
Telephone or
answering machine
Telephone
line
Machine
Built-in computer modem and telephone
Telephone
line
LINE TEL
Computer
Telephone
Machine
Caution
For your safety, always firmly grip the areas illustrated when closing the Scanning Unit (Printer
Cover).
hOpen the Inner Cover. Write down
the serial number located inside the
machine. You will need this to register
your product.
Important
Be sure to use the bundled telephone line cable.
Inner Cover
Serial Number Location
Important
If the Scanning Unit (Printer Cover) is left open
for more than 10 minutes, the Print Head Holder
moves to the right. Close and reopen the Scanning
Unit (Printer Cover) to return the Holder to the
center.
Important
The machine starts the preparatory operation.
It takes about two minutes. Do not start another
operation until the machine has stopped making
operating noises.
Note
If the Alarm lamp lights and an error message is
displayed on the LCD, refer to “An Error Message Is
Displayed on the LCD” in the Quick Start Guide.
Note
• The pattern is printed in black and blue.
• When Automatic Print Head Alignment cannot be
executed correctly, the message “Auto head align
has failed.” is displayed on the LCD. Refer to “An
Error Message Is Displayed on the LCD” in the Quick
Start Guide.
Hardware setup and Print Head
alignment are complete.
For USB connection, proceed to the
Step 5 on the reverse side.
For wired LAN connection, refer to the
Network Setup Guide.
USB connection is explained here. For wired LAN connection, refer to the Network Setup Guide.
5 Software Installation
Note
• The screens below refer to Windows Vista™ operating system Ultimate Edition
(hereafter referred to as “Windows Vista”) installation.
Screens may vary depending on the operating system you are using.
• Quit all running applications before installation.
• Log into a user account with the administrator privilege.
• Do not switch users during the installation process.
• A message asking for your confirmation to restart your computer may appear
during the installation process. If this message is displayed, follow the on-screen
instructions and click OK.
The installation resumes from where it left off when your computer has been
restarted. While restarting, do not remove the Setup CD-ROM.
aBe sure to TURN THE MACHINE OFF before continuing.
5 Software Installation
gWhen the list of applications to install appears, confirm the
contents, then click Install.
Note
Move the cursor over items to display explanations of each application.
hRead the License Agreement carefully and click Yes. The
software installation screen may appear during the installation
process. Read the contents on the screen and follow the onscreen instructions to install the software.
iWhen the Setup Method screen appears, select Use the
printer via USB, then click Next.
Note
• Since Mac® OS 9, Mac OS X Classic environments, or Mac OS X v.10.3.8 or earlier
are not supported, do not connect the machine to these.
• The screens below refer to Mac OS X v.10.4.x installation. Screens may vary
depending on the operating system you are using.
• Log on as an Administrator.
• Quit all running applications before installation.
aConnect one end of the USB cable to the computer and the
other to the machine.
Note
Make sure the machine is turned on.
iWhen the User Registration screen appears, click Next.
Note
To register later, click Cancel and go to Step j. After software installation is complete,
double-click
on the desktop.
If your network is connected to the Internet, the registration screen will
appear. Follow the on-screen instructions to register your product. You
will need your product serial number, which is located on the inside of the
machine. See Step 1- h on the front page.
jWhen the Installation completed successfully screen
appears, click Restart.
After the computer restarts, remove the Setup CD-ROM.
(1) Press the ON/OFF button.
(2) Make sure that all the lamps on the Operation Panel have gone out.
bTurn the computer on and start Windows®.
Important
If the Found New Hardware or Found New Hardware Wizard screen appears
automatically, remove the USB cable connected to your computer. Click Cancel
to quit the screen. In Windows Vista, the screen may close automatically when
the USB cable is unplugged. Then turn off the machine and proceed from Step
c to install the software.
one end of the USB cable to the computer, the other to the
machine, then TURN THE MACHINE ON.
The software will begin identifying the printer port being used.
Important
If you cannot go to the next procedure after three minutes, refer to “Cannot
Install the MP Drivers” in the Quick Start Guide.
cInsert the Setup CD-ROM.
bTurn on your Mac and insert the Setup CD-ROM.
Note
If the CD-ROM folder does not open automatically, double-click the CD-ROM icon
on the desktop.
cDouble-click the Setup icon.
dWhen the Authenticate screen appears, enter your
administrator name and password. Click OK.
If you do not know your administrator name or password, click
, then follow the on-screen instructions.
The setup program should run automatically.
In Windows Vista, go to Step d. In Windows XP and Windows 2000, go to
Step f.
Note
If the setup program does not run automatically, refer to “Cannot Install the MP
Drivers” in the Quick Start Guide.
dIf the AutoPlay screen appears, click Run Msetup4.exe.
USB
jWhen the Printer Connection screen appears, connect
←
To Computer
USB
kWhen the Setup Complete screen appears, click Next.
eWhen the main menu appears, click Easy Install.
The MP Drivers, On-screen Manuals, and application software are installed
automatically.
eIf the User Account Control screen appears, click Continue.
If the same screen reappears in subsequent steps, click
Continue.
This screen will not appear in Windows XP and Windows 2000.
Note
To register later, click Cancel and go to Step m. After software installation is complete,
double-click
on the desktop.
If your network is connected to the Internet, the registration screen will
appear. Follow the on-screen instructions to register your product. You
will need your product serial number, which is located on the inside of the
machine. See Step 1- h on the front page.
mWhen the PIXMA Extended Survey Program screen
fWhen the main menu appears, click Easy Install.
The MP Drivers, On-screen Manuals, and application software are installed
automatically.
appears, confirm the message. We would appreciate it if
you would take part in the PIXMA Extended Survey Program
regarding the use of Canon printers. If you can agree, click
Agree.
Note
Keep the CD-ROM in a safe place in case you need to reinstall the software.
When using Mac OS X v.10.3.9:
Restarting the computer while connected to the machine may cause the
machine not to be detected. To resolve this, either unplug the USB cable
then plug it back in again, or turn the machine off then back on again.
Note
XXX FAX (where “XXX” is your machine’s name) is shown in the Printer Name list
(Product list in Mac OS X v.10.3.9), but you cannot add XXX FAX. You cannot send
faxes from your computer via the machine.
kWhen the Canon IJ Network Tool screen appears, select
USB connection, then click OK.
This screen will not appear in Windows XP and Windows 2000.
lWhen the User Registration screen appears, click Next.
When the computer restarts, the Canon IJ Network Tool will start up
automatically.
Note
If you want to select particular items to install, click Custom Install and follow the onscreen instructions to proceed with the installation.
Note
When using Mac OS X v.10.3.9, before using the Operation Panel on the
machine to save scanned originals to the computer, it is necessary to select MP
Navigator EX as the launch application on Image Capture under Applications.
For details, refer to “Scanning Images” in the User’s Guide on-screen manual.
fWhen the list of applications to install appears, confirm the
contents, then click Install.
Note
Move the cursor over items to display explanations of each application.
Software installation is now complete.
gRead the License Agreement carefully and click Yes. The
software installation screen may appear during the installation
process. Read the contents on the screen and follow the onscreen instructions to install the software.
hWhen the Setup Complete screen appears, click Next.
If Do not agree is clicked, the PIXMA Extended Survey Program will not be
installed but you can use the machine normally.
nWhen the Installation completed successfully screen
appears, click Exit.
The Setup CD-ROM will be ejected.
If it is not ejected automatically, remove it manually.
Note
If you want to select particular items to install, click Custom Install and follow the onscreen instructions to proceed with the installation.
If Restart is displayed, make sure that the Restart the system now
(recommended) check box is selected, then click Restart. After the
computer restarts, remove the Setup CD-ROM.
Note
Keep the CD-ROM in a safe place in case you need to reinstall the software.
Software installation is now complete.
Part no. QT5-1138-V01 © 2008 Canon Inc. “Microsoft” is a registered trademark of Microsoft Corporation. “Windows” is a trademark of Microsoft Corporation, registered in the U.S. and other countries. “Windows Vista” is a trademark of Microsoft Corporation. “Macintosh” and “Mac” are trademarks of Apple Inc., registered in the U.S. and other countries.
XXXXXXXX
Printed in THAILAND