1
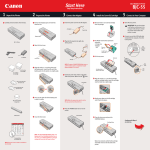
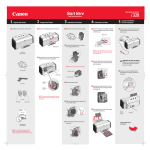
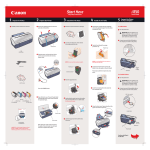
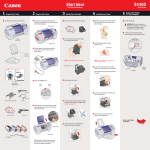
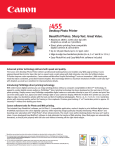
40-43131 i70_QuickRefSheet
10/24/02
3:50 PM
Page 1
i70 Series
Color Bubble Jet Printer
1. DPOF Image Selection
1. Without the printer connected to the camera, use the Play menu,
select Print Order and press SET.
2. Select the [ORDER] button and press SET. If the Print Type is set
to [Standard] or [Both], use the
(left) or
(right) and select
single images and (up) or (down) to set the number of copies.
3. For [Index] Print Type, use the
(left) or
(right) to select
images and
(up) or
(down) to mark or remove the mark from
the images. Press the MENU button when selections are complete.
4. While in Print Order menu, press the [Set up] button and select
the following:
Print Type
Date
File No.
Standard
Index
Both
Bubble Jet Direct Quick Reference Sheet
What is Bubble Jet Direct ?
Bubble Jet Direct is a product feature that allows you to
print photos directly from a compatible Canon Digital
Camera without the use of a computer.
Prints one image per page
Prints the selected images together at a reduced size in an index format
Prints the images in both the Standard and Index formats
Adds the Date to the print
Adds the file number to the print
For a listing of compatible Bubble Jet Direct digital
cameras visit our Web site at
www.usa.canon.com/consumer/bubblejetdirect.
5. When finished, press the MENU button.
1. Connecting Your Camera
2. DPOF Printing
1. TURN THE PRINTER ON.
2. Make sure the digital camera is TURNED OFF.
1. Connect your camera to the i70 Color Bubble Jet Printer.
2. In the Play menu, select [Print Order] and press SET.
3. Select [PRINT] and press SET. Select [Style] and press SET to
choose Print Style settings described in the “Selecting Paper and
Options” section of this document. Then, press MENU to return to
the previous screen.
4. Select [OK] and press SET to begin printing.
You can use a household power supply or battery pack to power the camera when
connecting it to the printer. If using a battery pack, ensure that it is fully charged.
3. Connect the digital camera to the i70 printer using the USB interface cable
provided with your camera.
Troubleshooting and Support
Printing Errors
• A message may appear on the LCD monitor if an error occurs
during the printing process. Use the
(left) or
(right) arrow to
select [Stop] or [Resume] and press the SET button. The printing
will resume automatically after the error is corrected.
• The type of error will determine whether the [Continue]
and [Stop] options appear.
USB Interface
Cable
The camera’s cable connector is located under the terminal cover on the camera.
Make sure the ‘Canon’ logo on the cable faces front of the camera (lens side).
For a complete listing of frequently asked questions and technical support visit:
www.canontechsupport.com.
©2002 Canon U.S.A., Inc. Canon and BCI are registered trademarks of Canon Inc. CompactFlash is a trademark of SanDisk Corporation.
All other product and brand names are trademarks of their respective owners.
4. TURN THE CAMERA ON.
5. Set camera on Replay Mode. The
printer is connected correctly.
40-43131-0902
QA7-2534-VO1
will appear on the LCD monitor when the
40-43131 i70_QuickRefSheet
10/24/02
3:50 PM
Page 3
2. Selecting Images and Number of Copies
1. In Replay Mode select the image to print by
using the
(left) or
(right) arrow on
the camera. Press SET.
2. From the Print Setting menu, select the
[Copies] option using the
(up) or
(down) arrow on the camera. Select the
number of copies using the
(left) or
(right) arrows.
To crop your photos, use the Trimming or
Printing area feature displayed in the
Replay mode.
3. Selecting Paper and Options
1. From the [Style] menu choose Paper, Borders and
Date using the
(up) or
(down) arrows on the camera.
Set the selection using the
(left) or
(right) arrows.
4. Printing
Basic printing
1. Use the
(up),
(down),
(left)
or
(right) arrows to select [Print].
2. Press the SET button to start printing.
Canceling printing
1. Press the SET button to stop printing.
A confirmation message will display.
2. Use the
(left) or
(right) arrows to select [OK] and press
the SET button.
3. The printer will stop printing and eject the paper.
5. Disconnecting Your Camera
1. Disconnect the camera from the printer.
When disconnecting the cable from the camera, hold the plug
(closest to the camera) and pull. Never pull on the cable. Some
digital cameras require that you [Push] a button on the connector
to remove the cable.
2. When the camera is disconnected the
logo will disappear
from the LCD monitor and the camera will revert to the standard
replay mode.
3. TURN THE CAMERA OFF.
Select the paper size from the following:
•
•
•
•
Paper
Card # 1 –
Card # 2 –
Card # 3 –
LTR
–
• A4
Photo Paper Pro 4” x 6”
Photo Paper Plus Glossy 4” x 6”
Photo Paper Plus Glossy 5” x 7”
Photo Paper Pro 8.5” x 11” or
Photo Paper Plus Glossy 8.5” x 11”
– Photo Paper Pro (European size) or
Photo Paper Plus Glossy (European size)
Borderless
Prints right to the edge of the paper
Bordered
Prints with a border
Borders
Date
Prints the photo’s creation date
2. When finished, press the MENU button.
With borderless printing, your image will be automatically sized to
fit the selected paper size. Slight image cropping may occur.
What is Digital Print Order Format (DPOF™)?
Digital Print Order Format allows users to mark images on DPOF
compatible digital cameras with special instructions. Using DPOF
settings, you can:
•
•
•
•
Print one image per page of all or selected images
Print an index sheet (thumbnail images) of selected images
Add file number and (or) date information to selected images
Print only selected images on a CompactFlash™ card or print all
images on a CompactFlash card