1
English
Français
Deutsch
Italiano
Español
Português
Nederlands
Quick Start Guide
Guide de démarrage rapide
Schnellstart-Referenz
Guida rapida all’installazione
Guía de inicio rápido
Guia de Início Rápido
Aan de Slag gids
QT5-0618-V03
©CANON INC. 2007
PRINTED IN CHINA
IMPRIME EN CHINE
English
Quick Start Guide
Please read this guide before operating this scanner. After you finish reading this guide, store it in
a safe place for future reference.
Table of Contents
Package Contents ........................................ 1
Using the Scanner Buttons .......................... 5
Installing the Software ................................ 2
Scanning Film ............................................... 6
Preparing the Scanner ................................. 3
Specifications ............................................... 9
Try Scanning ................................................. 4
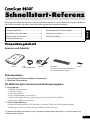
Package Contents
Scanner and Accessories
Scanner
USB Cable
AC Adapter
Film Guide*
(for 35mm film strip/slide )
Shield
*Built into the document cover
Documentation
• Quick Start Guide (this document)
• Additional Documents
CanoScan Setup Utility CD-ROM
• Software Programs
- ScanGear (scanner driver)
- CanoScan Toolbox
- ArcSoft PhotoStudio
- Presto! PageManager (Windows only)
- ScanSoft OmniPage SE (not supported for Windows 98 First Edition)
- Adobe RGB (1998) (Windows only)
• On-screen Manuals
- Scanning Guide (for ScanGear, CanoScan Toolbox, and troubleshooting)
- Manuals for bundled application programs
*In this guide, Windows XP screenshots are used to illustrate explanations common to all
operating systems.
1
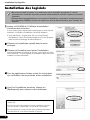
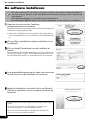
Installing the Software
Installing the Software
• Do NOT connect the scanner to a computer before installing the software. If you
connect the scanner and the Found New Hardware Wizard appears, click [Cancel].
• Quit all running applications before installation, including anti-virus software.
• For Windows 2000/XP, log in as an administrator to install the software.
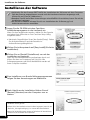
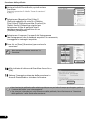
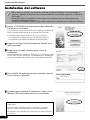
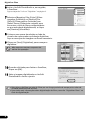
1 Place the CanoScan Setup Utility CD-ROM in the
drive.
If prompted, select your language and place of residence.
CanoScan Setup Utility program starts.
• For Macintosh: Double-click the [Setup] icon. Enter the
administrator ID and password on the authentication dialog
box.
2 Click [Easy Install] on the main menu.
3 Click [Install] to start installation.
Carefully read the License Agreement, and then click [Yes] to
proceed. All the software programs and on-screen manuals will
be installed on your computer.
4 For the bundled applications, follow the on-screen
instructions to perform the installation.
5 When the installation is complete, click [Restart] to
restart your computer.
• Make sure to remove the CD-ROM from the drive and store it in a
safe place.
• If you encounter a problem during installation, see
"Troubleshooting" in the Scanning Guide.
• If you later upgrade your OS to Windows XP, reinstall the software.
2
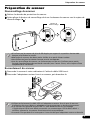
Preparing the Scanner
English
Preparing the Scanner
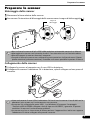
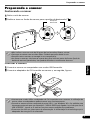
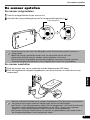
Unlocking the Scanner
1 Peel the seals off the scanner.
2 Slide the lock switch on the bottom of the scanner toward the unlock mark (
).
Unlock Mark
• Do not tilt the scanner more than 90 degrees from horizontal when releasing the lock.
• Handle the scanner with both hands. Be careful not to drop the scanner.
• Always lock the scanner when carrying or transporting it.
• When locking the scanner, do not lift up the back and tilt the front (scanner button
location) downward. You may be unable to set the lock.
Connecting the Scanner
1 Connect the scanner to your computer with the supplied USB cable.
2 Connect the supplied AC adapter to the scanner, and then plug in.
• Only use the USB cable and the AC adapter provided with the scanner. Use of other
cables or adapters may lead to a malfunction.
• When the scanner is connected to the USB 1.1 port on Windows XP and "HI-SPEED USB
Device Plugged into non-HI-SPEED USB Hub" message appears, ignore the message. The
scanner operates in this condition without problems.
• The scanner does not have a power switch. The power is activated as soon as the AC
adapter is plugged in.
3
Try Scanning
Try Scanning
This section explains the basic scanning procedures using the image editing program, ArcSoft PhotoStudio,
and the scanner driver, ScanGear.
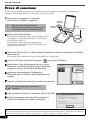
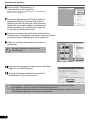
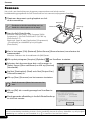
1 Place a document on the document glass and
close the document cover.
Top
When opening the document cover,
support it with your hand until it stops.
Bottom
Alignment
Mark
2 Start ArcSoft PhotoStudio.
For Windows: Select [start] - [(All) Programs] [ArcSoft PhotoStudio 5.5], then click [PhotoStudio 5.5].
For Macintosh: Open [Applications] - [PhotoStudio]
folders, then double-click the [PhotoStudio] icon.
3 From the [File] menu, click [Select Source] and select the scanner model.
For Windows: Do not select the one that includes [WIA] in the model name.
4 Click the [Acquire] icon
to start ScanGear.
5 Select the type of document you are scanning in
[Select Source] and click [Preview].
6 Set [Destination] and/or [Output Size] as needed.
7 Click [Scan] to start scanning.
Do not touch the scanner while it is
operating.
8 When prompted to close ScanGear, click [OK].
9 Save the scanned image in ArcSoft PhotoStudio and
close the window.
• For more information on scanning using ScanGear, bundled applications, and troubleshooting, see the on-screen
manual Scanning Guide. To open the Scanning Guide, double-click the Scanning Guide icon on the desktop, or click
on
in ScanGear or CanoScan Toolbox.
4
Using the Scanner Buttons
English
Using the Scanner Buttons
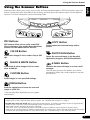
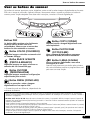
Scanner buttons allow you to copy, scan, e-mail, and save scanned images in PDF format with a press of a
button. Simply place your document on the scanner, and then press the scanner button for the required
function. For more information, see the Scanning Guide.
P DF
C O PY
PDF Buttons
PDF buttons allow you to easily create PDF
files according to your needs. Note that these
buttons are not labeled on the scanner.
COLOR Button
P HOTO/F
IL M
E - MA
IL
COPY Button
Prints (copies) the scanned image with a
printer.
PHOTO/FILM Button
Scans color images in A4 or Letter size at 300
dpi.
*
BLACK & WHITE Button
Scans black & white images in A4 or Letter
size* at 300 dpi.
CUSTOM Button
Opens the scanned image in the bundled
application program, ArcSoft PhotoStudio.
E-MAIL Button
Attaches the scanned image to a new e-mail
message.
The first time you press this button, you will be
prompted to select the e-mail program to use with
this function.
Scans images in user-specified settings.
FINISH Button
Ends the operation and saves the scanned
image in a PDF file.
*The size may differ depending on your system
environment.
• Before using scanner buttons, make sure that all the software programs are installed on your computer using the [Easy
Install] option of the CanoScan Setup Utility program. See "Installing the Software" on page 2.
• For Mac OS X 10.3 and 10.2.8: Before using the scanner buttons, you need to set Image Capture (in [Applications]
folder) to open CanoScan Toolbox automatically when a scanner button is pressed.
Start Image Capture, and then perform the following.
- Mac OS X 10.3: Click [Options] and select CanoScan Toolbox in [When a scanner button is pressed, open:].
- Mac OS X 10.2.8: Select [Other] in [When a scanner button is pressed, open:]. Select CanoScan Toolbox and click [Open].
Click [OK] and quit Image Capture. For more information, see "Troubleshooting" in the Scanning Guide.
5
Scanning Film
Scanning Film
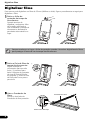
This scanner can scan 35 mm film (film strip or slide). Follow the procedure below when scanning film.
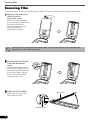
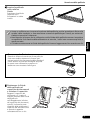
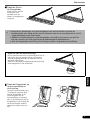
1 Remove the protective
sheet from the
document cover.
When you finish scanning,
put the protective sheet back
by aligning it with the
grooves in the document
cover and sliding it
downward into place.
Always put the protective sheet back when you are not scanning film to protect the
light source in the document cover.
2 Remove the Film Guide
from the document
cover.
a
b
Hold the document cover so
that it doesn't close, then a
press down and hold the tab
at the Film Guide's top left
and b tilt the Film Guide
outward to lift it up.
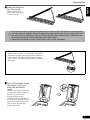
3 Open the Film Holder.
Film Holder
Pinch the both side of the
Film Holder to open.
Calibration Slot
6
Scanning Film
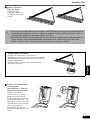
4 Insert the film into
English
the Film Guide.
Place the film face
down with the frames
in reverse order.
• Use a blower brush to remove any dust from the film, which will affect the image quality,
and take care to hold the film by its edges to avoid transferring dirt or fingerprints to it.
• Do not block the calibration slot on the Film Guide when scanning film. Colors will not
be scanned correctly if the calibration slot is obstructed.
• Close the Film Guide securely. Press lightly until it clicks into place.
How to Use the Shield
When scanning short or curled film, extra light
may enter through gaps and produce bands of
color around the edges of the scanned image.
If this occurs, use the supplied shield as shown in
the figure.
5 Set the Film Guide to the
document cover, and
close the document
cover.
a
b
Hold the document cover and
a insert the bottom edge of
the Film Guide into the
bottom groove in the
document cover, and then b
tilt the top of the Film Guide
up into the document cover
until it locks securely into
place with a click.
7
Scanning Film
6 Start ArcSoft PhotoStudio, then start
ScanGear.
Follow the steps 2 to 4 in "Try Scanning" on page 4.
7 Select [Negative Film (Color)] or [Positive
Film (Color)] in [Select Source] to match the
type of film you are scanning, then click
[Preview].
8 Place a check mark beside the number(s) of
the frame(s) you want to scan. Perform
image corrections as needed.
9 Click [Scan] to start scanning.
Do not touch the scanner while it is
operating.
10 When prompted to close ScanGear, click [OK].
11 Save the scanned image in ArcSoft PhotoStudio
and close the window.
• Do not leave the film strip in the film guide for an extended period of time as heat from
the unit may damage the film.
• For more information on scanning film, see “Scanning Film” in the Scanning Guide.
8
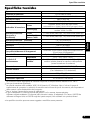
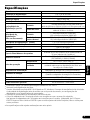
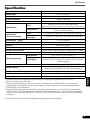
Specifications
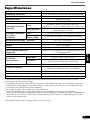
Scanner Type
Flatbed
Scanning Element
CCD 6-line color
Light Source
Cold cathode fluorescent lamp
Optical Resolution
4800 x 9600 dpi
*1
Selectable Resolution
25–19200 dpi (ScanGear)
Color
Scanning Bit Depth
48 bit input (16 bit for each color)
48 bit or 24 bit output (16 bit or 8 bit for each color)
48 bit input (16 bit for each color)
16 bit *2 or 8 bit output
Grayscale
Scanning Speed *3
(Photo or Document)
Scanning Speed
Preview Speed
English
Specifications
*3
Color
7.7 msec./line (2400 dpi), 14.8 msec./line (4800 dpi)
Grayscale, B&W
7.7 msec./line (2400 dpi), 14.8 msec./line (4800 dpi)
7.4–74.0 msec./line
(Film)
Approximately 5 sec.
*3*4
Interface
USB 2.0 Hi-Speed
Maximum Document Size
A4/Letter: 216 x 297 mm
Film Type/Number of Frames
35 mm strip (6 frames max)/35 mm slide (4 frames max)
Scanner Buttons
7 buttons (PDF x 4, COPY, PHOTO/FILM, E-MAIL)
Temperature
Operating Range
Humidity
10qC to 35qC (50qF to 95qF)
10% to 90% RH, 20% to 80% RH for film scanning
without condensation formation
Power Requirements
AC adapter (100/120/230/240V)*5
Power Consumption
In operation: 17 watts maximum, Stand-by: 4 watts
(Using supplied AC adapter)
Maximum Exterior Dimensions
Weight
Optional Accessory Kit
259 x 474 x 83 mm
Approximately 2.8 kg
Accessory Kit CSAK-4400F
Optical Resolution represents the maximum sampling rate based on ISO 14473.
For film scanning only.
*3
The fastest speed in USB 2.0 Hi-Speed mode on Windows PC. Transfer time is not included. Scanning
speed varies according to the document types, scan settings, or specifications of the computer.
*4
Calibration processing time is not included.
*5 AC adapter type varies according to the region in which the scanner is purchased.
Use only AC adapters listed in the user instructions.(Canon AC Adapter: K30279 is for United Kingdom
and K30278 is for other EU countries). Do not use them for other products
*1
*2
• Specifications are subject to change without notice.
Model Number: K10293 (CanoScan 4400F)
9
European Union (and EEA) only.
This symbol indicates that this product is not to be disposed of with your household waste,
according to the WEEE Directive (2002/96/EC) and your national law. This product should be
handed over to a designated collection point, e.g., on an authorized one-for-one basis when you
buy a new similar product or to an authorized collection site for recycling waste electrical and
electronic equipment (EEE). Improper handling of this type of waste could have a possible
negative impact on the environment and human health due to potentially hazardous substances
that are generally associated with EEE. At the same time, your cooperation in the correct disposal
of this product will contribute to the effective usage of natural resources. For more information
about where you can drop off your waste equipment for recycling, please contact your local city
office, waste authority, approved WEEE scheme or your household waste disposal service. For
more information regarding return and recycling of WEEE products, please visit
www.canon-europe.com/environment.
(EEA: Norway, Iceland and Liechtenstein)
For Customers in Europe, Middle-East, Africa and Russia only
For Canon Customer Support contacts, please see the back cover of the European Warranty System (EWS) Booklet or visit
www.canon-europe.com.
The socket-outlet shall be installed near the equipment and shall be easily accessible.
Warning
When you use this product, you should pay attention to the following legal issues:
• Scanning of certain documents, such as bank notes (bank bills), government bonds and public certificates, may be
prohibited by law and may result in criminal and/or civil liability.
• You may be required under law to obtain authorization from a person possessing copyrights or other legal rights to
the item being scanned.
If you are uncertain of the legality of scanning any particular item, you should consult your legal adviser in advance.
®
®
• Adobe and Adobe RGB (1998) are either registered trademarks or trademarks of Adobe Systems Incorporated in the United States
and/or other countries.
®
®
• Microsoft and Windows are either registered trademarks or trademarks of Microsoft Corporation in the U.S. and/or other
countries.
• Macintosh, Mac and the Mac logo are trademarks of Apple Computer, Inc., registered in the U.S. and other countries.
• ©ArcSoft, Inc. All rights reserved for PhotoStudio.
• Other names and products not mentioned above may be registered trademarks or trademarks of their respective companies.
10
Lisez ce guide avant d’utiliser ce scanner. Quand vous avez terminé la lecture de ce guide, rangezle en lieu sûr afin de pouvoir le consulter ultérieurement.
Table des matières
Contenu de l’emballage .............................. 1
Utilisation des touches du scanner ............. 5
Installation des logiciels .............................. 2
Numérisation d’un film ............................... 6
Préparation du scanner ............................... 3
Fiche technique............................................ 9
Essai de numérisation .................................. 4
Contenu de l’emballage
Scanner et accessoires
Scanner
Câble USB
Adaptateur
secteur
Guide de film*
(pour pellicule/diapositive
35 mm )
Protection
*Intégré dans le couvercle du
Documentation
• Guide de démarrage rapide (le présent document)
• Documents supplémentaires
CD-ROM de l’Utilitaire d’installation CanoScan
• Logiciels
- ScanGear (pilote du scanner)
- CanoScan Toolbox
- ArcSoft PhotoStudio
- Presto! PageManager (Windows uniquement)
- ScanSoft OmniPage SE (non pris en charge par Windows 98 Première Edition)
- Adobe RGB (1998) (Windows uniquement)
• Manuels en ligne
- Guide de numérisation (pour ScanGear, CanoScan Toolbox et le dépannage)
- Guides des applications livrées
*Dans ce guide, des captures d’écran provenant de Windows XP sont utilisées pour illustrer les
explications communes à tous les systèmes d’exploitation.
1
Français
Guide de démarrage rapide
Installation des logiciels
Installation des logiciels
• Ne connectez PAS le scanner à un ordinateur avant d’installer les logiciels. Si vous le
raccordez et si l’Assistant Ajout de nouveau matériel détecté s’affiche, cliquez sur [Cancel]
(Annuler).
• Quittez toutes les applications en cours avant l’installation, notamment le logiciel antivirus.
• Sous Windows 2000/XP, ouvrez une session en tant qu’administrateur pour installer les
logiciels.
1 Insérez le CD-ROM de l’Utilitaire d’installation
CanoScan dans le lecteur.
Si vous y êtes invité, sélectionnez votre langue et votre lieu de
résidence. L’Utilitaire d’installation CanoScan démarre.
• Sous Macintosh : cliquez deux fois sur l’icône [Setup]
(Installation). Entrez l’ID d’administrateur et le mot de passe
dans la boîte de dialogue d’authentification.
2 Cliquez sur [Installation rapide] dans le menu
principal.
3 Cliquez sur [Installer] pour lancer l’installation.
Lisez attentivement le contrat de licence, puis cliquez sur [Oui]
pour continuer. Tous les logiciels et manuels en ligne vont être
installés sur votre ordinateur.
4 Pour les applications livrées, suivez les instructions
qui s’affichent afin de procéder à leur installation.
5 Une fois l’installation terminée, cliquez sur
[Redémarrer] pour relancer votre ordinateur.
• N’oubliez pas de retirer le CD-ROM du lecteur et de le ranger à un
endroit sûr.
• Si vous rencontrez des problèmes lors de l’installation, reportezvous à la section « Dépannage » du Guide de numérisation.
• Si vous mettez par la suite à niveau votre système d’exploitation
vers Windows XP, vous devez réinstaller les logiciels.
2
Préparation du scanner
Préparation du scanner
Déverrouillage du scanner
1 Retirez les bandes de protection du scanner.
2 Faites glisser le bouton de verrouillage situé sur le dessous du scanner vers le repère de
).
Français
déverrouillage (
Repère de
déverrouillage
• N’inclinez pas le scanner de plus de 90 degrés par rapport à sa position horizontale
lorsque vous libérez le verrou.
• Manipulez le scanner des deux mains. Veillez à ne pas le laisser tomber.
• Verrouillez toujours le scanner lorsque vous le transportez.
• Lors du verrouillage du scanner, ne soulevez pas son dos et n’inclinez pas sa partie
frontale (emplacement des touches du scanner) vers l’avant. Sinon, vous risquez d’être
incapable de le verrouiller.
Raccordement du scanner
1 Raccordez le scanner à votre ordinateur à l’aide du câble USB fourni.
2 Raccordez l’adaptateur secteur fourni au scanner, puis branchez-le.
• Utilisez exclusivement le câble USB et l’adaptateur secteur fournis avec le scanner.
L’utilisation d’autres câbles ou adaptateurs peut provoquer un dysfonctionnement.
• Si le scanner est raccordé au port USB 1.1 sous Windows XP et si le message
« Périphérique USB à haut débit connecté à un concentrateur USB à débit réduit »
s’affiche, ignorez-le. Le scanner fonctionne ainsi sans problème.
• Le scanner n’est pas doté d’un interrupteur. Il est activé dès que l’adaptateur secteur est branché.
3
Essai de numérisation
Essai de numérisation
Cette section explique les procédures de numérisation de base à l’aide du programme de retouche d’image,
ArcSoft PhotoStudio, et du pilote du scanner, ScanGear.
1 Posez un document sur la vitre du scanner et
fermez le couvercle du scanner.
Haut
Lors de l’ouverture du couvercle du
scanner, soutenez-le avec la main
jusqu’à ce qu’il soit en place.
Bas
Repère
d’alignement
2 Lancez ArcSoft PhotoStudio.
Sous Windows : sélectionnez [start] (Démarrer) - [(All)
Programs] ((Programmes) (ou [Tous les programmes])) [ArcSoft PhotoStudio 5.5], puis cliquez sur
[PhotoStudio 5.5].
Sous Macintosh : ouvrez les dossiers [Applications] [PhotoStudio], puis cliquez deux fois sur l’icône [PhotoStudio].
3 Dans le menu [Fichier], cliquez sur [Sélectionner la source] et sélectionnez le modèle du
scanner.
Sous Windows : ne sélectionnez pas un nom de modèle contenant [WIA].
4 Cliquez sur l’icône [Acquisition]
pour lancer ScanGear.
5 Sélectionnez le type de document que vous
numérisez dans [Sélectionner source] et cliquez sur
[Aperçu].
6 Définissez éventuellement les paramètres
[Destination] et/ou [Format sortie].
7 Cliquez sur [Numériser] pour lancer la numérisation.
Ne touchez pas le scanner pendant son
fonctionnement.
8 Si vous êtes invité à fermer ScanGear, cliquez sur [OK].
9 Enregistrez l’image numérisée dans ArcSoft
PhotoStudio et fermez la fenêtre.
• Pour plus d’informations sur la numérisation à l’aide de ScanGear, sur les applications livrées et sur le dépannage,
reportez-vous au manuel en ligne Guide de numérisation. Pour ouvrir le Guide de numérisation, double-cliquez sur
l’icône correspondante sur le Bureau, ou cliquez sur
dans ScanGear ou CanoScan Toolbox.
4
Utilisation des touches du scanner
Utilisation des touches du scanner
Français
Les touches du scanner permettent, d’une simple pression, de copier, de numériser, d’envoyer par courrier
électronique et d’enregistrer des images numérisées au format PDF. Il vous suffit de poser le document sur le
scanner, puis d’appuyer sur la touche correspondant à la fonction souhaitée. Pour plus d’informations,
reportez-vous au Guide de numérisation.
P DF
Touches PDF
Les touches PDF vous permettent de créer
aisément des fichiers PDF selon vos besoins.
Remarquez que les noms de ces touches ne
sont pas indiqués sur le scanner.
Touche COLOR (COULEUR)
Numérise les images couleur au format A4 ou
Lettre* à 300 ppp.
Touche BLACK & WHITE
(NOIR & BLANC)
Numérise les images en noir et blanc au
format A4 ou Lettre* à 300 ppp.
Touche CUSTOM
(PERSONNALISER)
C O PY
IL M
P HOTO/F
E - MA
IL
Touche COPY
Imprime (copie) l’image numérisée à l’aide
d’une imprimante.
Touche PHOTO/FILM
Ouvre l’image numérisée dans l’application
livrée, ArcSoft PhotoStudio.
Touche E-MAIL
Joint l’image numérisée à un nouveau
message électronique.
Lorsque vous appuyez pour la première fois sur
cette touche, vous êtes invité à sélectionner
l’application de messagerie à utiliser avec cette
fonction.
Numérise les images à l’aide des paramètres
définis par l’utilisateur.
Touche FINISH (TERMINER)
Met fin à l’opération et enregistre l’image
numérisée dans un fichier PDF.
*Le format peut varier selon votre environnement
système.
• Avant d’utiliser les touches du scanner, vérifiez que tous les logiciels sont installés sur l’ordinateur à l’aide de l’option
[Easy Install] (Installation rapide) de l’Utilitaire d’installation CanoScan. Reportez-vous à la section « Installation des
logiciels », page 2.
• Sous Mac OS X 10.3 et 10.2.8 : avant d’utiliser les touches du scanner, vous devez configurer Capture d’images
(dans le dossier [Applications]) afin que CanoScan Toolbox s’ouvre automatiquement lorsque vous appuyez sur une
touche du scanner.
Lancez Capture d’images, puis procédez comme suit.
- Mac OS X 10.3 : cliquez sur [Options] et sélectionnez CanoScan Toolbox dans [When a scanner button is pressed,
open:] (Quand vous appuyez sur un de ses boutons, ouvrir :).
- Mac OS X 10.2.8 : cliquez sur [Other] (Autre) dans [When a scanner button is pressed, open:] (Quand vous appuyez
sur un de ses boutons, ouvrir :). Sélectionnez CanoScan Toolbox et cliquez sur [Open] (Ouvrir).
Cliquez sur [OK] et quittez Capture d’images. Pour plus d’informations, reportez-vous à la section « Dépannage » du
Guide de numérisation.
5
Numérisation d’un film
Numérisation d’un film
Ce scanner permet de numériser un film 35 mm (pellicule ou diapositive). Lors de la numérisation d’un film,
procédez comme suit.
1 Retirez la feuille de
protection du couvercle
du scanner.
Une fois la numérisation
terminée, remettez la feuille
de protection en place en
l’alignant sur les rainures du
couvercle du scanner et en la
faisant glisser vers le bas pour
la mettre en place.
Remettez toujours la feuille de protection en place lorsque vous ne numérisez pas de
film afin de protéger la source lumineuse située dans le couvercle du scanner.
2 Retirez la guide de film
du couvercle du scanner.
a
b
Soutenez le couvercle du
scanner afin qu’il ne se ferme
pas, puis a abaissez et
maintenez la patte de la
partie supérieure gauche du
guide de film et b inclinez le
guide de film vers l’extérieur
pour le soulever.
3 Ouvrez le porte-film.
Porte-film
Pincez les deux côtés du
porte-film pour l’ouvrir.
Fente de calibrage
6
Numérisation d’un film
4 Insérez le film
dans le guide de
film.
Français
Posez le film face vers
le bas en plaçant les
cadres dans l’ordre
inverse.
• Utilisez une brosse soufflante pour éliminer les poussières éventuellement présentes sur
le film et susceptibles d’affecter la qualité de l’image, puis veillez à saisir le film par ses
bords afin d’éviter de transférer de la poussière ou des traces de doigts sur celui-ci.
• Lors de la numérisation d’un film, ne bloquez pas la fente de calibrage du guide de film.
En effet, les couleurs ne sont pas correctement numérisées si la fente de calibrage est
obstruée.
• Fermez convenablement le guide de film. Appuyez légèrement jusqu’à ce qu’il se bloque
en émettant un déclic.
Comment utiliser la protection
Lors de la numérisation de films courts ou
recourbés, de la lumière extérieure peut pénétrer
par les fentes et produire des bandes de couleur
autour des bords de l’image numérisée.
Si c’est le cas, utilisez la protection fournie de la
manière illustrée.
5 Installez le guide de film
sur le couvercle du
scanner, puis fermez ce
dernier.
a
b
Maintenez le couvercle du
scanner et a insérez le bord
inférieur du guide de film
dans la rainure inférieure du
couvercle du scanner, puis b
inclinez le haut du guide de
film vers le haut pour l’insérer
dans le couvercle du scanner
jusqu’à ce qu’il se mette
solidement en place en
émettant un déclic.
7
Numérisation d’un film
6 Démarrez ArcSoft PhotoStudio, puis
ScanGear.
Conformez-vous aux étapes 2 à 4 de la section
« Essai de numérisation », page 4.
7 Sélectionnez [Film négatif (couleur)] ou
[Film positif (couleur)] dans l’option
[Sélectionner source] en fonction du film
que vous numérisez, puis cliquez sur
[Aperçu].
8 Activez la case à cocher en regard du ou des
numéros de cadres à numériser. Effectuez les
corrections d’image éventuelles.
9 Cliquez sur [Numériser] pour lancer la numérisation.
Ne touchez pas le scanner pendant son
fonctionnement.
10 Si vous êtes invité à fermer ScanGear, cliquez sur
[OK].
11 Enregistrez l’image numérisée dans ArcSoft
PhotoStudio et fermez la fenêtre.
• Ne laissez pas le film dans son guide pendant une période prolongée, car la chaleur
provenant de l’appareil risque d’endommager le film.
• Pour plus d’informations sur la numérisation d’un film, reportez-vous à la section
« Numérisation d’un film » du Guide de numérisation.
8
Fiche technique
Fiche technique
Type de scanner
A plat
Elément de numérisation
CCD couleur 6 lignes
Source lumineuse
4 800 x 9 600 ppp
Résolution au choix
Nombre de bits de
numérisation
25–19 200 ppp (ScanGear)
Couleur
Niveaux de gris
Couleur
Vitesse de numérisation *3
Niveaux de gris,
(Photo ou Document)
N/B
Entrée 48 bits (16 bits pour chaque couleur)
48 bits ou Sortie 24 bits (16 bits ou 8 bits pour chaque couleur)
Entrée 48 bits (16 bits pour chaque couleur)
sortie 16 bits *2 ou 8 bits
7,7 ms/ligne (2 400 ppp), 14,8 ms/ligne (4 800 ppp)
7,7 ms/ligne (2 400 ppp), 14,8 ms/ligne (4 800 ppp)
7,4–74,0 ms/ligne
Vitesse de numérisation *3 (Film)
Vitesse d’aperçu
Environ 5 s
*3*4
Interface
USB 2.0 Hi-Speed
Taille de document maximale
Type de film/Nombre de cadres
Touches du scanner
Plage de
fonctionnement
A4/Lettre : 216 x 297 mm
Pellicule 35 mm (6 cadres max.)/diapositive 35 mm
(4 cadres max.)
7 touches (PDF x 4, COPY, PHOTO/FILM, E-MAIL)
Température
Humidité
Alimentation
Consommation électrique
10 qC à 35 qC (50 q F à 95 qF)
10 % à 90 % HR, 20 % à 80 % HR pour la numérisation
d’un film sans formation de condensation
Adaptateur secteur (100/120/230/240V)*5
En fonctionnement : 17 Watts maximum, en veille :
4 Watts (à l’aide de l’adaptateur secteur fourni)
Dimensions extérieures maximales
259 x 474 x 83 mm
Poids
Kit d’accessoires en option
Environ 2,8 kg
Kit d’accessoires CSAK-4400F
La résolution optique représente le taux d’échantillonnage maximal conformément à la norme ISO 14473.
Pour la numérisation d’un film uniquement.
*3
Vitesse la plus rapide en mode USB 2.0 Hi-Speed sur un PC Windows. La durée du transfert n’est pas
fournie. La vitesse de numérisation varie selon les types de documents, les paramètres de numérisation ou
les caractéristiques techniques de l’ordinateur.
*4
La durée du processus de calibrage n’est pas fournie.
*5
Le type d’adaptateur secteur varie selon la région dans laquelle vous avez acheté le scanner.
Utilisez exclusivement les adaptateurs secteur stipulés dans les instructions d’utilisation. (Adaptateur
secteur Canon : K30279 pour le Royaume-Uni et K30278 pour les autres pays de l’UE). Ne les utilisez pas
pour d’autres produits.
*1
*2
• Fiche technique susceptible d’être modifiée sans avis préalable.
9
Français
Résolution optique
Lampe fluorescente à cathode froide
*1
Union européenne (et EEE) uniquement.
Ce symbole indique que, conformément à la directive DEEE (2002/96/CE) et à la réglementation
de votre pays, ce produit ne doit pas être jeté avec les ordures ménagères. Vous devez le déposer
dans un lieu de ramassage prévu à cet effet, par exemple, un site de collecte officiel des
équipements électriques et électroniques (EEE) en vue de leur recyclage ou un point d’échange de
produits autorisé qui est accessible lorsque vous faites l’acquisition d’un nouveau produit du
même type que l’ancien. Toute déviation par rapport à ces recommandations d’élimination de ce
type de déchet peut avoir des effets négatifs sur l’environnement et la santé publique car ces
produits EEE contiennent généralement des substances qui peuvent être dangereuses.
Parallèlement, votre entière coopération à la bonne mise au rebut de ce produit favorisera une
meilleure utilisation des ressources naturelles. Pour obtenir plus d’informations sur les points de
collecte des équipements à recycler, contactez votre mairie, le service de collecte des déchets, le
plan DEEE approuvé ou le service d’enlèvement des ordures ménagères. Pour plus d’informations
sur le dépôt et le recyclage des produits DEEE, consultez le site
www.canon-europe.com/environment.
(EEE : Norvège, Islande et Liechtenstein)
Pour les clients en Europe, au Moyen-Orient, en Afrique et en Russie uniquement
Pour connaître les contacts du support clientèle Canon, reportez-vous à la dernière page de couverture de la brochure European
Warranty System (EWS) ou visitez le site suivant :
www.canon-europe.com.
La prise doit être installée à proximité de l’appareil et être facilement accessible.
Avertissement
Lorsque vous utilisez ce produit, vous devez être attentif aux aspects légaux suivants :
• La numérisation de certains documents, notamment les billets de banque, les emprunts d’état et les certificats publics
peut être interdite par la loi et peut constituer un délit ou entraîner une responsabilité civile.
• La loi peut exiger que vous obteniez l’autorisation du détenteur des droits d’auteur ou d’autres droits légaux avant
de numériser un document.
Si vous n’êtes pas certain qu’il est légal de numériser un document particulier, adressez-vous au préalable à votre
conseiller juridique.
®
®
• Adobe et Adobe RGB (1998) sont des marques ou des marques déposées d’Adobe Systems Incorporated aux Etats-Unis et/ou
dans d’autres pays.
®
®
• Microsoft et Windows sont des marques ou des marques déposées de Microsoft Corporation aux Etats-Unis et/ou dans d’autres
pays.
• Macintosh, Mac et le logo Mac sont des marques d’Apple Computer, Inc., déposées aux Etats-Unis et dans d’autres pays.
• ©ArcSoft, Inc. Tous droits réservés pour PhotoStudio.
• Les autres noms et produits non mentionnés ci-dessus sont susceptibles d’être des marques ou des marques déposées appartenant à
leurs propriétaires.
10
Schnellstart-Referenz
Bitte lesen Sie dieses Handbuch vor der Inbetriebnahme des Scanners. Bewahren Sie das Handbuch
nach dem Durchlesen gut auf, damit Sie später darauf zurückgreifen können!
Verpackungsinhalt ....................................... 1
Verwenden der Funktionstasten................. 5
Installieren der Software ............................. 2
Scannen von Filmen..................................... 6
Vorbereiten des Scanners ............................ 3
Technische Daten ......................................... 9
Deutsch
Inhalt
Testen des Scanners ..................................... 4
Verpackungsinhalt
Scanner und Zubehör
Scanner
USBSchnittstellenkabel
Netzteil
Filmleiste*
(für 35-mm-Filmstreifen/Diapositive)
Schirm
*Im Vorlagendeckel integriert
Dokumentation
• Schnellstart-Referenz (dieses Dokument)
• Weitere Dokumente
CD-ROM mit dem CanoScan-Installationsprogramm
• Programme
- ScanGear (Scannertreiber)
- CanoScan Toolbox
- ArcSoft PhotoStudio
- Presto! PageManager (nur Windows)
- ScanSoft OmniPage SE (keine Unterstützung für Windows 98 First Edition)
- Adobe RGB (1998) (nur Windows)
• Online-Handbücher
- Scanner-Benutzerhandbuch (für ScanGear, CanoScan Toolbox und Störungsbeseitigung)
- Anleitungen für die im Lieferumfang enthaltene Bundle-Software
*In diesem Handbuch werden Punkte, die alle Betriebssysteme betreffen, mit Screenshots von
Windows XP illustriert.
1
Installieren der Software
Installieren der Software
• Verbinden Sie den Scanner ERST NACH der Installation der Software mit dem Computer.
Falls der Scanner angeschlossen wurde und der Hardware-Assistent angezeigt wird,
klicken Sie auf [Cancel] (Abbrechen).
• Beenden Sie alle laufenden Anwendungen einschließlich Viruswächter, bevor Sie mit der
Installation beginnen.
• Bei Windows 2000/XP müssen Sie sich zur Installation der Software ggf. mit
Administratorrechten anmelden.
1 Legen Sie die CD-ROM mit dem CanoScan-
Installationsprogramm in das Laufwerk ein.
Wenn Sie dazu aufgefordert werden, wählen Sie Ihre Sprache
und geben Ihren Wohnsitz an. Das CanoScan Setup UtilityProgramm startet.
• Macintosh: Doppelklicken Sie auf das Symbol [Setup]. Geben
Sie die Administrator-ID und das Passwort im
Authentifizierungsdialogfeld ein.
2 Klicken Sie im Hauptmenü auf [Easy Install] (Einfache
Installation).
3 Klicken Sie auf [Install] (Installieren) um mit der
Installation zu beginnen.
Lesen Sie die Lizenzvereinbarung aufmerksam durch und
klicken Sie dann zur Fortsetzung auf [Yes] (Ja). Alle
Softwareprogramme und Online-Handbücher werden auf
Ihrem Computer installiert.
4 Zum Installieren von Bunde-Softwareprogrammen
folgen Sie den Anweisungen am Bildschirm.
5 Nach Abschluss der Installation klicken Sie auf
[Restart] (Neustart) um den Computer neu zu
starten.
• Vergessen Sie nicht, die CD-ROM auf dem Laufwerk zu nehmen.
Bewahren Sie sie gut auf.
• Sollten Sie bei der Installation einem Problem begegnen, lesen Sie den
Abschnitt „Störungsbeseitigung“ im Scanner-Benutzerhandbuch.
• Wenn Sie Ihr Betriebssystem später auf Windows XP aktualisieren,
müssen Sie die Software neu installieren.
2
Vorbereiten des Scanners
Vorbereiten des Scanners
Lösen der Scannerverriegelung
1 Ziehen Sie die Klebestreifen vom Scanner ab.
2 Schieben Sie den Verriegelungsschalter bis zur Markierung für Entriegelung (
).
Deutsch
Markierung für
Entriegelung
• Der Scanner darf zum Lösen der Verriegelung um höchstens 90 Grad von der
Horizontalen angehoben werden (nicht einfach umdrehen!).
• Den Scanner mit beiden Händen handhaben. Er darf nicht zu Fall kommen.
• Der Scanner muss immer wieder verriegelt werden, wenn er transportiert oder getragen
werden soll.
• Den Scanner zum Verriegeln nicht hinten anheben. Die Vorderseite (mit den Funktionstasten)
darf nicht nach unten weisen, da in dieser Lage eine Verriegelung unmöglich sein kann.
Anschließen des Scanners
1 Verbinden Sie den Scanner über das mitgelieferte USB-Schnittstellenkabel mit dem Computer.
2 Schließen Sie das mitgelieferte Netzteil an den Scanner und dann an eine Steckdose an.
• Verwenden Sie ausschließlich das mit dem Scanner gelieferte USB-Schnittstellenkabel
und Netzteil. Andere Kabel und Netzteile können Störungen zur Folge haben.
• Bei Anschluss des Scanners an einen USB-Port nach USB-Norm 1.1 kann bei Windows XP
die Meldung „Hi-Speed USB-Gerät an USB-Port angeschlossen, der diese
Geschwindigkeit nicht unterstützt“ erscheinen. Ignorieren Sie diese Meldung einfach.
Der Scanner arbeitet auch in diesem Fall ohne Probleme.
• Der Scanner hat keinen Ein/Aus-Schalter. Er wird beim Anschließen des AC-Adapters
automatisch eingeschaltet.
3
Testen des Scanners
Testen des Scanners
Dieser Abschnitt erläutert die grundlegenden Bedienschritte zum Scannen mit dem
Bildbearbeitungsprogramm ArcSoft PhotoStudio und dem Scannertreiber ScanGear.
1 Legen Sie eine Vorlage auf dem Vorlagenglas
an und schließen Sie den Vorlagendeckel.
Oben
Klappen Sie den Vorlagendeckel bis zur
Anschlagposition auf.
Unten
Anlegemarkierung
2 Starten Sie ArcSoft PhotoStudio.
Windows: Wählen Sie [start] - [(All) Programs] ((Alle)
Programme) - [ArcSoft PhotoStudio 5.5] und klicken Sie
auf [PhotoStudio 5.5].
Macintosh: Öffnen Sie die Ordner [Applications]
(Programme) und [PhotoStudio] und doppelklicken Sie
dann auf das Symbol [PhotoStudio].
3 Klicken Sie im Menü [File] (Datei) auf [Select Source] (Quelle wählen) und wählen Sie
das Scannermodell.
Windows: Wählen Sie nicht den Scanner mit [WIA] im Modellnamen.
4 Klicken Sie auf das Symbol
[Acquire] (Erfassen) um ScanGear zu starten.
5 Wählen Sie bei [Select Source] (Quelle wählen) die
Art der zu scannenden Vorlage und klicken Sie auf
[Preview] (Vorschau).
6 Richten Sie [Destination] (Ziel) und [Output Size]
(Ausgabeformat) wunschgemäß ein.
7 Klicken Sie auf [Scan] (Scannen) um den Scanvorgang
zu starten.
Während des Scanvorgangs den Scanner
nicht berühren.
8 Wenn der Computer zum Schließen von ScanGear
auffordert, klicken Sie auf [OK].
9 Speichern Sie das gescannte Bild in ArcSoft
PhotoStudio und schließen Sie das Fenster.
• Weitergehende Informationen über das Scannen mit ScanGear, die Bundle-Anwendungen und die Störungsbeseitigung
finden Sie im Online-Handbuch mit dem Titel Scanner-Benutzerhandbuch. Zum Öffnen des Scan-Handbuchs
doppelklicken Sie auf das Symbol Scanner-Benutzerhandbuch auf dem Desktop oder klicken in ScanGear bzw.
CanoScan Toolbox auf .
4
Verwenden der Funktionstasten
Verwenden der Funktionstasten
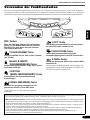
Mit den Funktionstasten des Scanners können Sie auf Tastendruck kopieren, scannen, eine E-Mail versenden
und gescannte Bilder im PDF-Format speichern. Sie legen die Vorlage einfach auf dem Scanner an und drücken
dann die betreffende Funktionstaste. Weitergehende Informationen finden Sie im Scanner-Benutzerhandbuch.
PDF-Tasten
Über die PDF-Taste können Sie auf einfache
Weise je nach Bedarf PDF-Dateien erstellen.
Beachten Sie, dass diese Taste am Scanner
nicht beschriftet sind.
COLOR (FARBE)-Taste
Scannt Farbbilder im A4- bzw. Letter-Format*
mit 300 dpi.
BLACK & WHITE
(SCHWARZWEISS)-Taste
Scannt Schwarzweißbilder im A4- bzw. LetterFormat* mit 300 dpi.
C O PY
P HOTO/F
IL M
E - MA
IL
Deutsch
P DF
COPY-Taste
Druckt das gescannte Bild mit einem Drucker,
so dass eine Kopie erhalten wird.
PHOTO/FILM-Taste
Öffnet das gescannte Bild im BundleAnwendungsprogramm ArcSoft PhotoStudio.
E-MAIL-Taste
Hängt das gescannte Bild an eine neue E-MailNachricht an.
Bei der ersten Betätigung dieser Taste werden Sie
aufgefordert, das E-Mail-Programm zu wählen, auf
das diese Funktion zugreifen soll.
CUSTOM
(BENUTZERDEFINIERT)-Taste
Scannt Bilder mit benutzerdefinierten
Einstellungen.
FINISH (BEENDEN)-Taste
Beendet den Vorgang und speichert die
gescannten Bilder in einer PDF-Datei.
* Das Format ist von der Systemumgebung
abhängig.
• Die Funktionstasten arbeiten nur, wenn Sie alle Softwareprogramme mit der Option [Easy Install] (Einfache Installation)
der CanoScan Setup Utility installiert haben. Siehe „Installieren der Software“ auf Seite 2.
• Mac OS X 10.3 und 10.2.8: Damit die Funktionstasten arbeiten, müssen Sie Digitale Bilder (im Ordner [Applications]
(Programme)) so einrichten, dass CanoScan Toolbox beim Betätigen einer Funktionstaste automatisch geöffnet wird.
Starten Sie Digitale Bilder und gehen Sie dann folgendermaßen vor:
- Mac OS X 10.3: Klicken Sie auf [Options] (Optionen) und wählen Sie bei [When a scanner button is pressed, open:]
(Öffnen, wenn Scannertaste gedrückt wird:) CanoScan Toolbox.
- Mac OS X 10.2.8: Klicken Sie bei [When a scanner button is pressed, open:] (Öffnen, wenn Scannertaste gedrückt
wird:) auf [Other] (Andere). Wählen Sie CanoScan Toolbox und klicken Sie auf [Open] (Öffnen).
Klicken Sie auf [OK] und beenden Sie Digitale Bilder dann Weitergehende Informationen finden Sie in der
„Störungsbeseitigung“ im Scanner-Benutzerhandbuch.
5
Scannen von Filmen
Scannen von Filmen
Der Scanner kann 35-mm-Filmstreifen (Negative oder Diapositive) scannen. Folgen Sie beim Scannen von
Filmstreifen den nachstehenden Anweisungen.
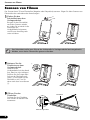
1 Ziehen Sie das
Schutzblatt aus dem
Vorlagendeckel.
Bringen Sie das Schutzblatt
nach dem Scannen wieder
an, indem Sie es wieder in die
Führungen am
Vorlagendeckel einpassen
und bis zum Anschlag nach
unten schieben.
Das Schutzblatt sollte zum Schutz der Lichtquelle im Vorlagendeckel stets angebracht
bleiben, wenn keine Filmstreifen gescannt werden.
2 Nehmen Sie die
Filmleiste aus dem
Vorlagendeckel.
a
b
Halten Sie den
Vorlagendeckel mit der Hand
fest, damit er nicht zuklappt.
Drücken Sie die Zunge oben
links an der Filmleiste nach
unten a und kippen Sie die
Filmleiste zu sich, um Sie
dann nach oben zu entfernen
b.
3 Öffnen Sie den
Filmhalter
Filmhalter.
Drücken Sie den Filmhalter
zum Öffnen an beiden Ende
zusammen.
Kalibrierungsschlitz
6
Scannen von Filmen
4 Legen Sie den
Filmstreifen in die
Filmleiste ein.
Deutsch
Legen Sie den Film mit
nach unten weisender
Vorderseite und den
Bildnummern in
umgekehrter
Reihenfolge ein.
• Entfernen Sie Staub, der eventuell auf der Filmoberfläche anhaftet und die Bildqualität
beeinträchtigt, mit einem Blasepinsel und halten Sie den Filmstreifen an den Kanten,
damit weder Schmutz noch Fingerabdrücke zurückbleiben.
• Achten Sie beim Scannen von Filmstreifen darauf, dass der Kalibrierungsschlitz an der
Filmleiste nicht blockiert wird. Bei verdecktem Kalibrierungsschlitz werden Farben nicht
ordnungsgemäß gescannt.
• Achten Sie darauf, dass die Filmleiste fest geschlossen wird. Drücken Sie leicht mit dem
Finger, bis sie hörbar einrastet.
Verwendung des Schirms
Beim Scannen kurzer oder gewölbter Filmstreifen
kann Streulicht durch Spalte eindringen und
farbige Streifen am Rand der gescannten Bilder
hervorrufen.
Verwenden Sie in diesem Fall den mitgelieferten
Schirm, wie in der Abbildung dargestellt.
5 Setzen Sie die Filmleiste
in den Vorlagendeckel
ein und schließen Sie
den Deckel.
a
b
Halten Sie den
Vorlagendeckel fest und
passen Sie das untere Ende
der Filmleiste in die Nuten im
Vorlagendeckel ein a, um
dann das obere Ende in den
Vorlagendeckel zu drücken,
bis die Filmleiste hörbar
einrastet b.
7
Scannen von Filmen
6 Starten Sie ArcSoft PhotoStudio und
danach ScanGear.
Folgen Sie nun den Schritten 2 bis 4 unter „Testen
des Scanners“ auf Seite 4.
7 Wählen Sie je nach Art des zu scannenden
Filmstreifens [Negative Film (Color)]
(Negativ-Film (Farbe)) oder [Positive Film
(Color)] (Positiv-Film (Farbe)) unter [Select
Source] (Quelle wählen). Klicken Sie danach
auf die [Preview] (Vorschau).
8 Markieren Sie die zu scannende(n) Bildnummer(n).
Führen Sie ggf. erforderliche Bildkorrekturen durch.
9 Klicken Sie auf [Scan] (Scannen) um den
Scanvorgang zu starten.
Während des Scanvorgangs den Scanner
nicht berühren.
10 Wenn der Computer zum Schließen von ScanGear
auffordert, klicken Sie auf [OK].
11 Speichern Sie das gescannte Bild in ArcSoft
PhotoStudio und schließen Sie das Fenster.
• Belassen Sie Filmstreifen nicht längere Zeit in der Filmleiste, das die vom Gerät erzeugte
Wärme den Film beschädigen kann.
• Weitergehende Informationen zum Scannen von Filmstreifen finden Sie im Abschnitt
„Scannen von Film“ im Scanner-Benutzerhandbuch.
8
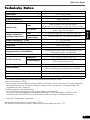
Technische Daten
Technische Daten
Scannertyp
Flachbett
Scanelement
CCD, 6-zeilig, Farbe
Lichtquelle
4800 x 9600 dpi
Wählbare Auflösung
25 – 19200 dpi (ScanGear)
Farbe
Scan-Bit-Tiefe
Graustufen
Scangeschwindigkeit *3
(Foto oder Dokument)
7,7 ms/Zeile (2400 dpi), 14,8 ms/Zeile (4800 dpi)
Graustufen,
Schwarzweiß
7,7 ms/Zeile (2400 dpi), 14,8 ms/Zeile (4800 dpi)
*3*4
Schnittstelle
7,4 – 74,0 ms/Zeile
Ca. 5 s
USB 2.0 Hi-Speed
Maximales Vorlagenformat
Filmtyp/Anzahl von Einzelbildern
Funktionstasten
A4/Letter: 216 x 297 mm
35-mm-Negativstreifen (max. 6 Einzelbilder)/35-mmPositivstreifen (max. 4 Einzelbilder)
7 Tasten (PDF x 4, COPY, PHOTO/FILM, E-MAIL)
Temperatur
Betriebsumgebung
48 Bit Eingabe (16 Bit pro Farbe)
16 Bit *2 oder 8 Bit Ausgabe
Farbe
Scangeschwindigkeit *3 (Film)
Vorscangeschwindigkeit
48 Bit Eingabe (16 Bit für jede Farbe)
48 Bit oder 24 Bit Ausgabe (16 Bit oder 8 Bit pro Farbe)
Deutsch
Optische Auflösung
Kaltkathoden-Leuchtstofflampe
*1
Luftfeuchtigkeit
Stromversorgung
Stromaufnahme
Abmessungen
Gewicht
Optionaler Zubehörsatz
10qC bis 35qC (50qF bis 95qF)
10% bis 90% rel., 20% bis 80% rel. beim Scannen von
Film (nicht kondensierend)
Netzteil (100/120/230/240V)*5
Beim Betrieb: max. 17 Watt; Standby: 4 Watt
(bei Verwendung des mitgelieferten Netzteils)
259 x 474 x 83 mm
Ca. 2,8 kg
Zubehörsatz CSAK-4400F
Die optische Auflösung steht für die maximale Abtastrate nach ISO 14473.
Nur zum Scannen von Film.
*3
Die schnellste Geschwindigkeit im Modus USB 2.0 Hi-Speed auf einem Windows-PC. Übertragungszeit
nicht berücksichtigt. Die Scangeschwindigkeit variiert je nach Vorlagentyp, Scaneinstellungen und
Spezifikationen des Computers.
*4
Kalibrierungszeit nicht berücksichtigt.
*5
Die Ausführung des Netzteils ist je nach Absatzgebiet unterschiedlich.
Nur in der Anleitung aufgeführte Netzadapter verwenden. (Canon Netzadapter: K30279 ist für
Großbritannien und K30278 für andere EU-Länder). Nicht für andere Produkte verwenden.
*1
*2
• Technische Änderungen vorbehalten.
Maschinenlärminformations-Verordnung 3. GPSGV:
Der höchste Schalldruckpegel beträt 70dB(A) oder weniger gemäss EN ISO 7779
9
Nur Europäische Union (und EWR).
Dieses Symbol weist darauf hin, dass dieses Produkt gemäß Richtlinie über Elektro- und
Elektronik-Altgeräte (2002/96/EG) und nationalen Gesetzen nicht über den Hausmüll entsorgt
werden darf. Dieses Produkt muss bei einer dafür vorgesehenen Sammelstelle abgegeben
werden. Dies kann z. B. durch Rückgabe beim Kauf eines ähnlichen Produkts oder durch Abgabe
bei einer autorisierten Sammelstelle für die Wiederaufbereitung von Elektro- und ElektronikAltgeräten geschehen. Der unsachgemäße Umgang mit Altgeräten kann aufgrund potentiell
gefährlicher Stoffe, die häufig in Elektro- und Elektronik-Altgeräte enthalten sind, negative
Auswirkungen auf die Umwelt und die menschliche Gesundheit haben. Durch die sachgemäße
Entsorgung dieses Produkts tragen außerdem Sie zu einer effektiven Nutzung natürlicher
Ressourcen bei. Informationen zu Sammelstellen für Altgeräte erhalten Sie bei Ihrer
Stadtverwaltung, dem öffentlich-rechtlichen Entsorgungsträger, einer autorisierten Stelle für die
Entsorgung von Elektro-und Elektronik-Altgeräten oder Ihrer Müllabfuhr. Weitere Informationen
zur Rückgabe und Entsorgung von Elektro- und Elektronik-Altgeräten finden Sie unter
www.canon-europe.com/environment.
(EWR: Norwegen, Island und Liechtenstein)
Nur für Kunden in Europa, im Mittleren Osten, in Afrika und in Russland
Ansprechpartner des Canon Customer Support finden Sie auf der hinteren Umschlagseite der EWS-Broschüre (European Warranty
System) oder bei www.canon-europe.com.
Die Netzsteckdose muss sich in der Nähe des Geräts befinden und leicht erreichbar sein.
Warnung
Beachten Sie beim Gebrauch des Geräts die folgenden gesetzlichen Regelungen:
• Das Scannen gewisser Vorlagen wie Geldscheine (Banknoten), Bundesobligationen und Urkunden ist untersagt und
kann straf- und zivilrechtlich verfolgt werden.
• Zum Scannen urheberrechtlich geschützten Materials kann die Genehmigung des Urheberrechtsinhabers erforderlich
sein.
In Fällen, in denen Sie sich bezüglich der rechtlichen Lage nicht sicher sind, fragen Sie vorsorglich Ihren Rechtsberater.
®
®
• Adobe und Adobe RGB (1998) sind entweder eingetragene Warenzeichen oder Warenzeichen von Adobe Systems Incorporated in
den Vereinigten Staaten und/oder anderen Ländern.
®
®
• Microsoft und Windows sind entweder eingetragene Warenzeichen oder Warenzeichen von Microsoft Corporation in den
Vereinigten Staaten und/oder anderen Ländern.
• Macintosh, Mac und das Mac-Logo sind Warenzeichen von Apple Computer, Inc., die in den Vereinigten Staaten und anderen
Ländern eingetragen sind.
• ©ArcSoft, Inc. Alle Rechte für PhotoStudio vorbehalten.
• Andere Produkt- und Markennamen, die oben nicht erwähnt sind, können ebenfalls eingetragene Warenzeichen oder Warenzeichen
des jeweiligen Herstellers sein.
10
Guida rapida all’installazione
Prima di usare lo scanner, leggere la presente guida. Terminata la lettura, conservare il manuale a
portata di mano per eventuali consultazioni future.
Indice
Verifica del contenuto della confezione .... 1
Uso dei pulsanti dello scanner .................... 5
Installazione del Software........................... 2
Scansione della pellicola.............................. 6
Preparare lo scanner .................................... 3
Specifiche tecniche ...................................... 9
Prova di scansione........................................ 4
Italiano
Verifica del contenuto della confezione
Scanner e accessori
Scanner
Cavo USB
Adattatore CA
Guida della pellicola*
(per diapositive/strisce di
pellicola da 35 mm)
Schermo
*Inserita nel coperchio dei
Documentazione
• Guida rapida all’installazione (questa guida)
• Documenti supplementari
CD-ROM del programma di installazione CanoScan
• Programmi Software
- ScanGear (driver dello scanner)
- CanoScan Toolbox
- ArcSoft PhotoStudio
- Presto! PageManager (solo per Windows)
- ScanSoft OmniPage SE (non disponibile per Windows 98 First Edition)
- Adobe RGB (1998) (solo per Windows)
• Manuali elettronici
- Guida alla scansione (per ScanGear, CanoScan Toolbox e risoluzione dei problemi)
- Manuali per programmi di applicazioni multiple
*In questa guida, per illustrare le spiegazioni comuni a tutti i sistemi operativi vengono utilizzare
le videate di Windows XP.
1
Installazione del Software
Installazione del Software
• Accertarsi di avere installato i programmi software PRIMA di collegare lo scanner al
computer. Se quando si collega lo scanner appare la finestra Installazione guidata nuovo
hardware, fare clic su [Cancel] (Annulla).
• Prima di inziare l’installazione chiudere tutte le applicazioni in uso, compreso l’antivirus.
• In Windows 2000/XP e’ necessario collegarsi al sistema con un nome utente di
amministratore per installare il software.
1 Inserire il CD-ROM del programma di installazione di
CanoScan nella relativa unita’.
Se richiesto selezionare la lingua desiderata e il paese. Il
programma di installazione CanoScan parte.
• Per Macintosh: Fare doppio clic sull’icona [Setup]
(installazione). Inserire ID e password dell’amministratore
nella finestra di dialogo di riconoscimento.
2 Fare clic su [Easy Install] (Installazione standard) nel
menu orincipale.
3 Fare clic su [Install] (Installa) per avviare l’installazione.
Leggere attentamente il Contratto di Licenza, quindi fare clic su
[Yes] (Si’). Tutti i programmi software e i manuali elettronici
verranno installati sul computer.
4 Per le applicazioni multiple seguire i messaggi sullo
schermo per eseguire l’installazione.
5 Quando l’installazione e’ completa fare clic su
[Restart] (Riavvia) per riavviare il computer.
• Rimuovere il CD-ROM dalla relativa unita’ e conservarlo in un
luogo sicuro.
• In caso di problemi durante l’installazione, fare riferimento a
“Risoluzione dei problemi” nella Guida alla scansione.
• Se si aggiorna il sistema operativo a Windows XP, sarà necessario
reinstallare il software.
2
Preparare lo scanner
Preparare lo scanner
Sbloccaggio dello scanner
1 Rimuovere le fasce adesive dallo scanner.
2 Far scorrere l’interruttore di bloccaggio dello scanner verso in segno di sbloccaggio(
).
Italiano
Segno di
sbloccaggio
• Non inclinare lo scanner di più di 90° dalla posizione orizzontale mentre lo si sblocca.
• Maneggiare lo scanner con entrambe le mani. Fare attenzione a non lasciarlo cadere.
• Bloccare sempre lo scanner durante il trasporto.
• Quando si blocca lo scanner non sollevare la parte posteriore inclinando verso il basso
quella anteriore (pulsante scansione). Potrebbe non essere possibile impostare il blocco.
Collegamento dello scanner
1 Collegare lo scanner al computer con il cavo USB in dotazione.
2 Collegare allo scanner l’adattatore CA in dotazione, quindi collegare ad una presa di
corrente.
• Usare unicamente il cavo USB e l’adattatore CA forniti con lo scanner. L’uso di altri cavi o
adattatori può causare un funzionamento non corretto.
• Se mentre si è collegati alla posta USB 1.1 su Windows XP compare il messaggio
“Periferica USB HI-SPEED collegata a hub di tipo non HI-SPEED”, ignorarlo. In queste
condizioni lo scanner funziona senza problemi.
• Lo scanner non ha un interruttore di alimentazione. L’apparecchio si attiva non appena
l’adattatore CA viene collegato alla presa di corrente.
3
Prova di scansione
Prova di scansione
Questa sezione illustra le procedure di base della scansione utilizzando il programma di elaborazione
immagini, ArcSoft PhotoStudio, e il driver dello scanner, ScanGear.
1 Posizionare un oggetto sul vetro dei
documenti e chiudere il coperchio.
Margine
superiore
Mentre si apre il coperchio dei
documenti, sostenerlo con la mano fino
a quando si trova in posizione stabile.
Margine
inferiore
Segno
di riferimento
2 Start ArcSoft PhotoStudio.
Per Windows: Selezionare [start] - [(All) Programs] ((Tutti
i) programmi) - [ArcSoft PhotoStudio 5.5], quindi fare
clic su [PhotoStudio 5.5].
Per Macintosh: Aprire le cartelle [Applications]
(Applicazioni) - [PhotoStudio], quindi fare doppio clic
sull’icona [PhotoStudio].
3 Dal menu [File] fare clic su [Select Source] (Seleziona origine) e selezionare il modello
dello scanner.
Per Windows: Non selezionare il nome del modello che include [WIA].
4 Fare clic sull’icona [Acquire] (Acquisisci)
per avviare ScanGear.
5 Selezionare il tipo di documento di cui si vuole
effettuare la scansione [Select Source] (Seleziona
origine) e fare clic su [Preview] (Anteprima).
6 Impostare eventualmente [Destination]
(Destinazione) e/o [Output Size] (Dimensioni di
output).
7 Fare clic su [Scan] (Scansione) per avviare la scansione.
Non toccare lo scanner mentre e’ in
funzione.
8 Alla richiesta di chiusura di ScanGear fare clic su [OK].
9 Salvare l’immagine ottenuta dalla scansione in
ArcSoft PhotoStudio e chiudere la finestra.
• Per ulteriori informazioni sulla scansione con ScanGear, sulle applicazioni multiple e sulla risoluzione dei problemi, fare
riferimento al manuale elettronico Guida alla scansione Per aprire la Guida alla scansione, fare doppio clic sull’icona
della Guida alla scansione sul desktop, oppure fare clic su
in ScanGear o CanoScan Toolbox.
4
Uso dei pulsanti dello scanner
Uso dei pulsanti dello scanner
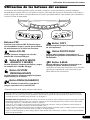
Il semplice tocco dei pulsanti dello scanner permette di copiare, eseguire la scansione e salvare le immagini
ottenute in formato PDF. Basta semplicemente posizionare il documento sullo scanner e premere il pulsante
relativo alla funzione desiderata. Per ulteriori informazioni fare riferimento alla Guida alla scansione.
Pulsanti PDF
I pulsanti PDF permettono di creare facilmente
file PDF in base alle proprie necessità. Si noti
che questi pulsanti non sono indicati sullo
scanner.
Pulsante COLOR (A COLORI)
Effettua la scansione di immagini a colori in
formato A4 o formato lettera * a 300 dpi.
Pulsante BLACK & WHITE
(BIANCO E NERO)
Effettua la scansione di immagini in bianco e
nero in formato A4 o formato lettera * a 300 dpi.
Pulsante CUSTOM
(PERSONALIZZATO)
C O PY
P HOTO/F
IL M
E - MA
IL
Pulsante COPY
Stampa (copia) l’immagine ottenuta dalla
scansione con una stampante.
Italiano
P DF
Pulsante PHOTO/FILM
Apre l’immagine ottenuta in ArcSoft
PhotoStudio, il programma per applicazioni
multiple.
Pulsante E-MAIL
Allega l’immagine acquisita a un nuovo
messaggio di posta elettronica.
La prima volta che viene premuto questo pulsante,
apparira’ la finestra di dialogo in cui selezionare il
programma di posta elettronica da utilizzare con
questa funzione.
Effettua la scansione di immagini in
impostazioni definite dall’utente.
Pulsante FINISH (FINE)
Termina l’operazione e salva l’immagine
ottenuta in un file PDF.
*Le dimensioni possono variare in base
all’ambiente di sistema.
• Prima di usare i pulsanti dello scanner, assicurarsi che tutti i programmi software siano installati sul computer
utilizzando l’opzione [Easy Install] (Installazione rapida) del programma di Installazione CanoScan. Fare riferimento a
“Installazione del software” a pag. 2.
• Per Mac OS X 10.3 e 10.2.8: Prima di usare i pulsanti dello scanner e’ necessario impostare Cattura immagine (nella
cartella [Applications] (Applicazioni)) per aprire automaticamente CanoScan Toolbox quando viene premuto un pulsante
dello scanner.
Avviare Cattura immagine, quindi adottare le procedure seguenti.
- Mac OS X 10.3: Fare clic su [Options] (Opzioni) e selezionare CanoScan Toolbox su [When a scanner button is
pressed,open:] (Quando un pulsante dello scanner viene premuto, apri:).
- Mac OS X 10.2.8: Selezionare [Other] (Altro) su [When a scanner button is pressed,open:] (Quando un pulsante dello
scanner viene premuto, apri:). Selezionare CanoScan Toolbox e fare clic su [Open] (Apri).
Fare clic su [OK] e uscire da Cattura immagine. Per ulteriori informazioni fare riferimento alla sezione “Risoluzione dei
problemi” nella Guida alla scansione.
5
Scansione della pellicola
Scansione della pellicola
Questo scanner può acquisire una pellicola da 35 mm (striscia o diapositiva). Per acquisire una pellicola
adottare le procedure seguenti.
1 Rimuovere il foglio di
protezione dal
coperchio dei
documenti.
Dopo aver acquisito
l’immagine, riposizionare il
foglio di protezione
allineandolo con le
scanalature del coperchio dei
documenti e facendolo
scorrere in posizione.
Riposizionare sempre il foglio di protezione quando non si acquisiscono pellicole, per
proteggere la fonte di luce nel coperchio dei documenti.
2 Rimuovere la Guida
della pellicola dal
coperchio dei
documenti.
a
b
Reggere il copercho dei
documenti perche’ non si
chiuda, quindi a tenere
premuta la linguetta in alto a
sinistra della Guida della
pellicola e b inclinare la
Guida della pellicola in avanti
per estrarla.
3 Aprire il contenitore
Contenitore della pellicola
della pellicola.
Premere entrambi i lati del
contenitore della pellicola per
aprirlo.
Fessura per la calibrazione
6
Scansione della pellicola
4 Inserire la pellicola
nella relativa
Guida.
Posizionare la pellicola
capovolta con i
fotogrammi in ordine
inverso.
Italiano
• Usare un soffietto per rimuovere la polvere dalla pellicola, poiche’ potrebbe influire sulla
qualita’ delle immagini, e fare attenzione a tenere la pellicola per i bordi, per evitare di
trasferirvi sporcizia o impronte.
• Non bloccare la fessura per la calibrazione sulla Guida della pellicola mentre si acquisisce
una pellicola. Se la fessura della calibrazione e’ ostruita, i colori non verranno acquisiti in
modo corretto.
• Chiudere acuratamente la Guida della pellicola. Premere leggermente fino a sentire un clic.
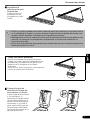
Come usare la Protezione
Quando si effettua la scansione di una pellicola
corta o arrotolata, attraverso le fessure puo’
entrare troppa luce che provocherebbe bande di
colore attorno ai bordi dell’immagine acquisita.
In questo caso utilizzare la protezione in
dotazione come mostrato nella figura.
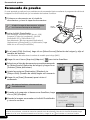
5 Risistemare la Guida
della pellicola nel
coperchio dei documenti
e chiudere il coperchio.
a
b
Reggere il coperchio dei
documenti e a inserire il
margine inferiore della Guida
della pellicola
nell’alloggiamento inferiore
del coperchio dei documenti,
quindib inclinare la parte
superiore della guida verso il
coperchio dei documenti fino
a quando si aggancia
correttamente con un clic.
7
Scansione della pellicola
6 Avviare ArcSoft PhotoStudio, quindi avviare
ScanGear.
Seguire le procedure 2-4 della “Prova di scansione”
a pag. 4.
7 Selezionare [Negative Film (Color)]
(Pellicola negativa (A colori)) o [Positive
Film (Color)] (Pellicola positiva (A colori)) in
[Select Source] (Seleziona origine) per
selezionare il tipo di pellicola che si
desidera acquisire, quindi fare clic su
[Preview] (Anteprima).
8 Selezionare il numero (i numeri) del fotogramma
(dei fotogrammi) che si desidera acquisire. Se necessario,
correggere le immagini acquisite.
9 Fare clic su [Scan] (Scansione) per avviare la
scansione.
Non toccare lo scanner mentre e’ in
funzione.
10 Alla richiesta di chiusura di ScanGear fare clic su
[OK].
11 Salvare l’immagine ottenuta dalla scansione in
Arcsoft PhotoStudio e chiudere la finestra.
• Non lasciare la pellicola nella relativa guida per un periodo di tempo prolungato, poiche’
il calore dell’unita’ puo’ danneggiarla.
• Per ulteriori informazioni sulla scansione delle pellicole, fare riferimento a “Scansione
della pellicola” nella Guida alla scansione.
8
Specifiche tecniche
Specifiche tecniche
Tipo
Piano fisso
Elemento di scansione
CCD 6 linee di colore
Sorgente luminosa
Lampada fluorescente a catodo freddo
Risoluzione ottica
4800 x 9600 dpi
*1
Risoluzione selezionabile
25–19200 dpi (ScanGear)
Colore
Profondita’ di scansione
Scala di grigi
Colore
7,7 msec./linea (2400 dpi), 14,8 msec./linea (4800 dpi)
Scala di grigi,
Bianco e nero
7,7 msec./linea (2400 dpi), 14,8 msec./linea (4800 dpi)
Velocita’di scansione *3 (Pellicola)
Velocita’di anteprima
Interfaccia
USB 2.0 Hi-Speed
Dimensione massima documento
Tipo pellicola/Numero di fotogrammi
Pulsanti dello scanner
Umidita’
Alimentazione
Consumi elettrici
Dimensioni esterne massime
Kit accessori opzionale
A4/Lettera: 216 x 297 mm
Striscia da 35 mm (max 6 fotogrammi)/diapositiva da
35 mm (max 4 fotogrammi)
7 pulsanti (PDF x 4, COPY, PHOTO/FILM, E-MAIL)
Temperatura
Peso
7,4–74,0 msec/linea
Circa 5 secondi
*3*4
Condizioni di
funzionamento
entrata a 48 bit (16 bit per ogni colore)
uscita a 16 bit *2 o 8 bit
Italiano
Velocita’di scansione *3
(fotografia o
documento)
entrata a 48 bit (16 bit per ogni colore)
uscita a 48 bit o 24 bit (16 bit o 8 bit per ogni colore)
10qC - 35qC (50qF - 95qF)
Da 10% a 90% di umidit’ relativa, da 20% a 80% di
umidita’ relativa durante la scansione della pellicola
(senza formazione di condensa)
Adattatore CA (100/120/230/240V)*5
n funzione: massimo 17 watt, in stand-by: 4 watt
(Con l’adattatore CA in dotazione)
259 x 474 x 83 mm
Circa 2,8 kg
Kit accessori CSAK-4400F
La risoluzione ottica rappresenta la massima frequenza di campionamento basata su ISO 14473.
Solo per la scansione di pellicole.
*3
La velocità massima nella modalita’ USB 2.0 Hi-Speed su PC Windows. Non e’ incluso il tempo di
trasferimento al computer. La velocita’ di scansione varia in base al tipo di documento, alle impostazioni
dello scanner o alle caratteristiche del computer.
*4
Non e’ incluso il tempo del processo di calibrazione.
*5
Il tipo di adattatore CA varia a seconda del paese in cui lo scanner viene acquistato.
Utilizzare soltanto adattatori CA elencati nelle istruzioni utente. (L’adattatore CA Canon: K30279 da
utilizzare nel Regno Unito e K30278 negli altri paesi europei). Non utilizzarli con prodotti diversi.
*1
*2
• Le specifiche tecniche possono essere soggette a modifiche senza preavviso.
9
Solo per Unione Europea (ed AEE)
Questo simbolo indica che il prodotto non può essere eliminato come rifiuto ordinario in
conformità alla Direttiva WEEE (2002/96/EC) e alla normativa locale vigente. Il prodotto deve
essere smaltito presso i centri di raccolta differenziata, ad esempio un distributore autorizzato che
applichi il principio del “vuoto a rendere”, ovvero del ritiro delle vecchie apparecchiature
elettriche al momento dell’acquisto delle nuove, o un deposito autorizzato allo smaltimento dei
rifiuti derivanti dal disuso delle apparecchiature elettriche ed elettroniche. La gestione impropria di
questo tipo di rifiuti può avere un impatto negativo sull’ambiente e sulla salute umana causato
dalle sostanze potenzialmente pericolose prodotte dalle apparecchiature elettriche ed
elettroniche. Un corretto smaltimento di tali prodotti contribuirà inoltre a un uso efficace delle
risorse naturali. Per ulteriori informazioni sui centri di raccolta e recupero dei rifiuti derivanti dal
disuso delle apparecchiature, consultare la Direttiva WEEE e rivolgersi alle autorità competenti. Un
corretto smaltimento di tali prodotti contribuirà inoltre a un uso efficace delle risorse naturali ed
eviterà di incorrere nelle sanzioni amministrative di cui all’art. 50 e seguenti del D.Lgs. 22/97. Per
ulteriori informazioni sullo smaltimento e il recupero dei prodotti WEEE, visitare il sito
www.canon-europe.com/environment.
(AEE: Norvegia, Islanda e Liechtenstein)
Solo per utenti in Europa, Medio Oriente, Africa e Russia
Per informazioni sui Centri Assistenza Clienti Canon fare riferimento al retro del fascicolo sulla Garanzia Europea (EWS) o visitare il sito
www.canon-europe.com.
La presa di corrente deve essere installata vicino all’apparecchio e deve essere facilmente accessibile.
Attenzione
Quando si utilizza questo prodotto, fare attenzione alle seguenti questioni legali:
• Effettuare scansioni di determinati documenti quali banconote, titoli di stato e certificati pubblici, puo’ essere vietato
dalla legge e puo’ comportare responsabilita’ penali e/o civili.
• Puo’ essere necessario ai termini di legge ottenere l’autorizzazione della persona che detiene il copyright o altri
diritti legali sul documento di cui si vuole eseguire le scansione.
In caso di incertezza sulla legalita’ della scansione di un documento e’ opportuno contattare preventivamente il proprio
consulente legale.
®
®
• Adobe e Adobe RGB (1998) sono marchi registrati o marchi di Adobe Systems Incorporated negli Stati Uniti e/o in altri paesi.
•
•
•
•
®
®
Microsoft e Windows sono marchi registrati o marchi di Microsoft Corporation negli U.S.A. e/o in altri paesi.
Macintosh, Mac e il logo Mac sono marchi di Apple Computer, Inc., registrati negli U.S.A. e in altri paesi.
©ArcSoft, Inc. All rights reserved for PhotoStudio.
Altri nomi e prodotti non citati potrebbero essere marchi registrati o marchi delle rispettive società.
10
Guía de inicio rápido
Lea esta guía antes de utilizar el escáner. Una vez leída, guárdela en un lugar seguro para futura
referencia.
Tabla de contenido
Contenido del paquete ............................... 1
Utilización de los botones del escáner ....... 5
Instalación del software .............................. 2
Escaneado de películas ................................ 6
Preparación del escáner .............................. 3
Especificaciones............................................ 9
Escaneado de prueba .................................. 4
Contenido del paquete
Español
Escáner y accesorios
Escáner
Cable USB
Adaptador de ca
Guía de películas*
(para diapositiva/tira de
película de 35 mm)
Protector
*Integrada en la tapa de documentos
Documentación
• Guía de inicio rápido (este documento)
• Documentos adicionales
CD-ROM de la Herramienta de instalación CanoScan
• Programas de software
- ScanGear (controlador del escáner)
- CanoScan Toolbox
- ArcSoft PhotoStudio
- Presto! PageManager (sólo para Windows)
- ScanSoft OmniPage SE (no compatible con Windows 98 First Edition)
- Adobe RGB (1998) (sólo para Windows)
• Manuales en pantalla
- Guía de escaneado (para ScanGear, CanoScan Toolbox y la sección Solución de problemas)
- Manuales de los programas de aplicación suministrados
*En esta guía, se utilizan las capturas de pantalla de Windows XP para ilustrar las explicaciones
comunes para todos los sistemas operativos.
1
Instalación del software
Instalación del software
• NO conecte el escáner al ordenador antes de instalar el software. Si ha conectado el
escáner y aparece el Asistente para nuevo hardware encontrado, haga clic en [Cancel]
(Cancelar).
• Antes de iniciar la instalación, cierre todos los programas que se estén ejecutando,
incluido el software antivirus.
• En Windows 2000/XP, deberá iniciar sesión como administrador para instalar el software.
1 Inserte el CD-ROM de la Herramienta de instalación
CanoScan en la unidad.
Si se le solicita, seleccione el idioma y el lugar de residencia. Se
inicia el programa Herramienta de instalación CanoScan.
• Para Macintosh: Haga doble clic en el icono [Setup]
(Configuración). Introduzca el ID de administrador y la
contraseña en el cuadro de diálogo de autenticación.
2 Haga clic en [Easy Install] (Instalación simple) en el
menú principal.
3 Haga clic en [Install] (Instalar) para iniciar la
instalación.
Lea atentamente el contrato de licencia y, a continuación, haga
clic en [Yes] (Sí) para continuar. Se instalarán en el ordenador
todos los programas de software y los manuales en pantalla.
4 Para instalar las aplicaciones suministradas, siga las
instrucciones en pantalla.
5 Cuando haya finalizado la instalación, haga clic en
[Restart] (Reiniciar) para reiniciar el ordenador.
• Asegúrese de extraer el CD-ROM de la unidad y guárdelo en un
lugar seguro.
• Si detecta algún problema durante la instalación, consulte la
sección “Solución de problemas” de la Guía de escaneado.
• Si actualiza el SO a Windows XP posteriormente, deberá reinstalar
el software.
2
Preparación del escáner
Preparación del escáner
Desbloqueo del escáner
1 Retire las etiquetas de sellado del escáner.
2 Deslice el mando de bloqueo de la parte inferior del escáner hacia la marca de desbloqueo (
).
Marca de
desbloqueo
Español
• Al desbloquear el escáner, no lo incline más de 90 grados respecto a la posición horizontal.
• Sujete el escáner con ambas manos. Procure no dejarlo caer.
• Bloquee siempre el escáner cuando lo mueva o transporte.
• Al bloquear el escáner, no levante la parte posterior ni incline la parte frontal (dónde se
encuentran los botones) hacia abajo. Es posible que no pueda ajustar el bloqueo.
Conexión del escáner
1 Conecte el escáner al ordenador mediante el cable USB suministrado.
2 Conecte el adaptador de ca suministrado al escáner y, a continuación, conéctelo a la
alimentación.
• Utilice únicamente el cable USB y el adaptador de ca suministrados con el escáner. La
utilización de otros cables o adaptadores puede provocar un fallo de funcionamiento en
la unidad.
• Si el escáner está conectado al puerto USB 1.1 en Windows XP y aparece el mensaje
“Dispositivo USB de alta velocidad conectado en un concentrador USB no de alta
velocidad”, ignórelo. El escáner funciona sin problemas en este estado.
• El escáner no dispone de interruptor de alimentación. La alimentación se activa al
conectar el adaptador de ca a la toma de corriente.
3
Escaneado de prueba
Escaneado de prueba
En este apartado se explican los procedimientos de escaneado básicos mediante el programa de edición de
imágenes ArcSoft PhotoStudio y el controlador del escáner ScanGear.
1 Coloque un documento en el cristal de
documentos y cierre la tapa de documentos.
Al abrir la tapa de documentos, sujétela
con la mano hasta que se detenga.
Parte
superior
Parte
inferior
Marca de
alineación
2 Inicie ArcSoft PhotoStudio.
Para Windows: Seleccione [start] (Inicio) - [(All)
Programs] ((Todos los) programas) - [ArcSoft
PhotoStudio 5.5] y [PhotoStudio 5.5].
Para Macintosh: Abra las carpetas [Applications]
(Aplicaciones) y [PhotoStudio] y, a continuación, haga
doble clic en el icono [PhotoStudio].
3 En el menú [File] (Archivo), haga clic en [Select Source] (Selección del origen) y elija el
modelo del escáner.
Para Windows: No seleccione el nombre de modelo que incluya [WIA].
4 Haga clic en el icono [Acquire] (Adquirir)
para iniciar ScanGear.
5 Seleccione el tipo de documento que está escaneando
en [Select Source] (Selección del origen) y haga clic en
[Preview] (Vista preliminar).
6 Ajuste las opciones [Destination] (Destino) y/o
[Output Size] (Tamaño de salida) según sea necesario.
7 Haga clic en [Scan] (Escanear) para iniciar el
escaneado.
No toque el escáner mientras está en
funcionamiento.
8 Cuando se le pregunte si desea cerrar ScanGear, haga
clic en [OK] (Aceptar).
9 Guarde la imagen escaneada en ArcSoft PhotoStudio
y cierre la ventana.
• Para obtener más información acerca del escaneado con ScanGear, las aplicaciones incluidas y los procedimientos de
solución de problemas, consulte el manual en pantalla Guía de escaneado. Para abrir la Guía de escaneado, haga
doble clic en el icono Guía de escaneado en el escritorio, o haga clic en
en ScanGear o CanoScan Toolbox.
4
Utilización de los botones del escáner
Utilización de los botones del escáner
Los botones del escáner permiten copiar, escanear, enviar por correo electrónico y guardar imágenes
escaneadas en formato PDF con sólo pulsar un botón. Sólo tiene que colocar el documento en el escáner y
pulsar el botón del escáner correspondiente a la función que desea realizar. Para obtener más información,
consulte la Guía de escaneado.
Botones PDF
Permiten crear archivos PDF fácilmente según
sus necesidades. Tenga en cuenta que el nombre
de estos botones no se indica en el escáner.
Botón COLOR
Permite escanear imágenes en color de
tamaño A4 o Carta* a 300 ppp.
Botón BLACK & WHITE
(BLANCO Y NEGRO)
Permite escanear imágenes en blanco y negro
de tamaño A4 o Carta* a 300 ppp.
Botón CUSTOM
(PERSONALIZADO)
C O PY
P HOTO/F
IL M
E - MA
IL
Botón COPY
Permite imprimir (copiar) la imagen escaneada
en una impresora.
Botón PHOTO/FILM
Permite abrir la imagen escaneada en el
programa de aplicación suministrado, ArcSoft
PhotoStudio.
Español
P DF
Botón E-MAIL
Permite adjuntar la imagen escaneada a un
mensaje de correo electrónico nuevo.
La primera vez que pulse este botón, se le solicitará
que elija el programa de correo electrónico que
desea utilizar con esta función.
Permite escanear imágenes según los ajustes
especificados por el usuario.
Botón FINISH (ACABADO)
Permite finalizar la operación y guardar la
imagen escaneada en un archivo PDF.
*El tamaño puede variar según el entorno del sistema.
• Antes de utilizar los botones del escáner, compruebe que se han instalado todos los programas de software en el
ordenador con la opción [Easy Install] (Instalación simple) del programa de la Herramienta de instalación CanoScan.
Consulte la sección “Instalación del software” en la página 2.
• Para Mac OS X 10.3 y 10.2.8: Antes de utilizar los botones del escáner, debe configurar Image Capture (en la carpeta
[Applications] (Aplicaciones)) para que CanoScan Toolbox se inicie automáticamente al pulsar un botón del escáner.
Inicie Image Capture y, a continuación, realice lo siguiente.
- Mac OS X 10.3: Haga clic en [Options] (Opciones) y seleccione CanoScan Toolbox en [When a scanner button is
pressed, open:] (Cuando se pulse un botón del escáner, abrir:).
- Mac OS X 10.2.8: Seleccione [Other] (Otros) en [When a scanner button is pressed, open:] (Cuando se pulse un botón del
escáner, abrir:). Seleccione CanoScan Toolbox y haga clic en [Open] (Abrir).
Haga clic en [OK] (Aceptar) y cierre Image Capture. Para obtener más información, consulte “Solución de problemas”
en la Guía de escaneado.
5
Escaneado de películas
Escaneado de películas
Este escáner puede escanear diapositivas o tiras de películas de 35 mm. Siga el procedimiento que se indica
a continuación para escanear una película.
1 Retire la hoja protectora
de la tapa de
documentos.
Cuando finalice el escaneado,
vuelva a colocar la hoja
protectora alineando los
bordes con las ranuras de la
tapa de documentos y
deslícela hacia abajo
totalmente.
Vuelva a colocar siempre la hoja protectora mientras no escanea películas para proteger
la fuente de iluminación de la tapa de documentos.
2 Retire la guía de
películas de la tapa de
documentos.
a
b
Sujete la tapa de documentos
para que no se cierre y, a
continuación, a mantenga
presionada la lengüeta de la
parte superior izquierda de la
guía de películas y b incline
la guía de películas hacia
fuera para levantarla.
3 Abra la unidad
Unidad adaptadora de
películas
adaptadora de películas.
Presione ambos lados de la
unidad adaptadora de
películas para abrirla.
Ranura de calibración
6
Escaneado de películas
4 Introduzca la
película en la guía
de películas.
Coloque la película
boca abajo con los
fotogramas en orden
inverso.
Español
• Utilice un cepillo soplador para retirar restos de polvo de la película, que podrían influir
en la calidad de la imagen, y procure sostener la película por los bordes para evitar que
queden huellas dactilares o suciedad en la superficie de la misma.
• No bloquee la ranura de calibración de la guía de películas durante el escaneado de una
película. Los colores no se escanearán correctamente si la ranura de calibración se
encuentra obstruida.
• Cierre la guía de películas asegurándose que quede bien cerrada. Presiónela ligeramente
hasta que encaje en su sitio.
Cómo utilizar el protector
Durante el escaneado de una película corta o
curvada, es posible que entre demasiada luz por
las aberturas y que aparezcan franjas de color
alrededor de los márgenes de la imagen
escaneada.
Si esto ocurre, utilice el protector suministrado tal
y como se muestra en la ilustración.
5 Coloque la guía de
películas en la tapa de
documentos y ciérrela.
a
b
Sujete la tapa de documentos
y, a continuación, a
introduzca el margen inferior
de la guía de películas en la
ranura inferior de la tapa de
documentos y b incline la
parte superior de la guía de
películas hacia arriba hasta
que encaje firmemente en la
tapa de documentos.
7
Escaneado de películas
6 Inicie ArcSoft PhotoStudio y, a
continuación, inicie ScanGear.
Siga los pasos del 2 al 4 de la sección “Escaneado de
prueba” en la página 4.
7 Seleccione [Negative Film (Color)] (Película
negativa (Color)) o [Positive Film (Color)]
(Película positiva (Color)) en [Select Source]
(Selección del origen) según la película que
desee escanear y, a continuación, haga clic
en [Preview] (Vista preliminar).
8 Coloque una marca de verificación al lado de los
números de los fotogramas que desea escanear. Realice
las correcciones de imagen que sean necesarias.
9 Haga clic en [Scan] (Escanear) para iniciar el
escaneado.
No toque el escáner mientras está
funcionando.
10 Cuando se le pregunte si desea cerrar ScanGear,
haga clic en [OK] (Aceptar).
11 Guarde la imagen escaneada en ArcSoft
PhotoStudio y cierre la ventana.
• No deje la tira de película en la guía de películas durante períodos de tiempo
prolongados, ya que el calor de la unidad podría dañarla.
• Para obtener más información acerca del escaneado de películas, consulte la sección
“Escaneado de películas” en la Guía de escaneado.
8
Especificaciones
Especificaciones
Tipo de escáner
Plano
Elemento de escaneado
Color de 6 líneas CCD (dispositivo de carga acoplada)
Fuente de iluminación
4.800 x 9.600 ppp
Resolución seleccionable
Profundidad de bits de
escaneado
25–19.200 ppp (ScanGear)
Color
Escala de grises
Velocidad de escaneado *3 Color
(fotografía o
Escala de grises,
documento)
blanco y negro
Entrada de 48 bits (16 bits para cada color)
salida de 48 o 24 bits (16 bits u 8 bits para cada color)
Entrada de 48 bits (16 bits para cada color)
salida de 16 bits *2 u 8 bits
7,7 ms/línea (2.400 ppp), 14,8 ms/línea (4.800 ppp)
7,7 ms/línea (2.400 ppp), 14,8 ms/línea (4.800 ppp)
De 7,4 a 74,0 ms/línea
Velocidad de escaneado *3 (película)
Velocidad de vista
Aproximadamente 5 segundos
preliminar*3*4
Interfaz
USB 2.0 Hi-Speed
Tamaño máximo del documento
Tipo de película/número de
fotogramas
Botones del escáner
Intervalo de
funcionamiento
A4/Carta: 216 x 297 mm
Tira de 35 mm (6 fotogramas máx.)/diapositiva de 35 mm
(4 fotogramas máx.)
7 botones: 4 botones PDF, COPY, PHOTO/FILM, E-MAIL
Temperatura
Humedad
Requisitos de alimentación
Consumo de energía
Español
Resolución óptica
Lámpara fluorescente de cátodo frío
*1
De 10qC a 35qC (50qF a 95qF)
HR del 10% al 90%, HR del 20% al 80% al escanear
películas sin formación de condensación
Adaptador de ca (100/120/230/240V)*5
En funcionamiento: 17 vatios como máximo; en espera: 4 vatios
(utilizando el adaptador de ca suministrado)
Dimensiones exteriores máximas
Peso
Kit de accesorios opcionales
259 x 474 x 83 mm
Aproximadamente 2,8 kg
Kit de accesorios CSAK-4400F
La resolución óptica corresponde a la máxima frecuencia de muestreo según la norma ISO 14473.
Sólo para el escaneado de películas.
*3
Velocidad máxima en el modo USB 2.0 Hi-Speed en ordenadores Windows. No se incluye el tiempo de
transferencia. La velocidad de escaneado varía en función del tipo de documento, la configuración de
escaneado o las especificaciones del ordenador.
*4
No incluye el tiempo de procesamiento de la calibración.
*5
El tipo de adaptador de ca puede variar según la zona geográfica de adquisición del escáner.
Utilice sólo los adaptadores de alimentación de ca que se indican en el manual del usuario. (Adaptador de
alimentación de ca Canon: K30279 para el Reino Unido y K30278 para otros países europeos.) No los
utilice con otros productos.
*1
*2
• Las especificaciones están sujetas a cambios sin previo aviso.
9
Sólo para la Unión Europea (y el EEA).
Este símbolo indica que este producto no debe desecharse con los desperdicios del hogar, de
acuerdo con la directiva WEEE (2002/96/EC) y con la legislación nacional. Este producto debería
entregarse en uno de los puntos de recogida designados, como por ejemplo, intercambiando uno
por otro al comprar un producto similar o entregándolo en un lugar de recogida autorizado para
el reciclado de equipos electrónicos (EEE). La manipulación inapropiada de este tipo de desechos
podría tener un impacto negativo en el entorno y la salud humana, debido a las sustancias
potencialmente peligrosas que normalmente están asociadas al EEE. Al mismo tiempo, su
cooperación a la hora de desechar correctamente este producto contribuirá a la utilización
efectiva de los recursos naturales. Para más información acerca de dónde puede desechar el
equipo para su reciclado, póngase en contacto con las autoridades locales, con las autoridades
encargadas de los desechos, con un plan WEEE autorizado o con el servicio de recogida de
basuras para hogares. Si desea más información acerca de la devolución y reciclado de productos
WEEE, visite la web
www.canon-europe.com/environment.
(EEA: Noruega, Islandia y Liechtenstein)
Sólo para los clientes en Europa, Oriente Medio, África y Rusia
Para ponerse en contacto con el Centro de ayuda al cliente de Canon, consulte la contraportada del folleto European Warranty System
(EWS) o visite
www.canon-europe.com.
La toma de corriente deberá estar instalada cerca del equipo y deberá ser de fácil acceso.
Advertencia
Cuando utilice este producto debe tener en cuenta los siguientes aspectos legales:
• El escaneado de determinados documentos, como billetes de banco (letras bancarias), bonos del estado y certificados
públicos, puede estar prohibido por ley y derivar en responsabilidades civiles o penales.
• Es posible que la ley le obligue a obtener la autorización de la persona titular del copyright u otros derechos legales
sobre el elemento que está escaneando.
Si no está seguro de la legalidad del escaneado de un determinado elemento, debería consultar con su asesor legal
previamente.
®
®
• Adobe y Adobe RGB (1998) son marcas comerciales registradas o marcas comerciales de Adobe Systems Incorporated en los
Estados Unidos o en otros países.
®
®
• Microsoft y Windows son marcas comerciales registradas o marcas comerciales de Microsoft Corporation en los Estados Unidos o
en otros países.
• Macintosh, Mac y el logotipo de Mac son marcas comerciales de Apple Computer, Inc., registradas en los Estados Unidos y en otros
países.
• ©ArcSoft, Inc. Reservados todos los derechos para PhotoStudio.
• Otros nombres y productos no mencionados anteriormente pueden ser marcas registradas o marcas comerciales de sus respectivas
compañías.
10
Guia de lnício Rápido
Leia este guia antes de operar o scanner. Após concluir a leitura deste guia, guarde-o em um lugar
seguro para referência futura.
Índice analítico
Conteúdo do pacote .................................... 1
Usar os botões do scanner........................... 5
Instalando o software.................................. 2
Digitalizar filme ........................................... 6
Preparando o scanner.................................. 3
Especificações............................................... 9
Digitalizar ..................................................... 4
Conteúdo do pacote
Scanner e acessórios
Cabo USB
Adaptador de
energia CA
Guia do filme*
(para diafilme/slide de 35mm)
Protetor
Português
Scanner
*Incorporada na tampa de
documento
Documentação
• Guia de lnício Rápido (este documento)
• Documentos adicionais
CD-ROM do Utilitário de instalação do CanoScan
• Programas de software
- ScanGear (driver do scanner)
- CanoScan Toolbox
- ArcSoft PhotoStudio
- Presto! PageManager (somente Windows)
- ScanSoft OmniPage SE (não suportado no Windows 98 Primeira Edição)
- Adobe RGB (1998) (somente Windows)
• Manuais na tela
- Guia de digitalização (para o ScanGear, CanoScan Toolbox e solução de problemas)
- Manuais para aplicativos incluídos
*Neste manual, foram usadas imagens do Windows XP para ilustrar explicações comuns a todos os
sistemas operacionais.
1
Instalando o software
Instalando o software
• NÃO conecte o scanner a um computador antes de instalar o software. Se conectar o
scanner e o Assistente para Configurar Novo Hardware Encontrado aparecer, clique em
[Cancel] (Cancelar).
• Feche todos os aplicativos em execução antes da instalação, incluindo o software antivírus.
• Para o Windows 2000/XP, efetue o login como um administrador para instalar o software.
1 Coloque o CD-ROM do Utilitário de instalação do
CanoScan na unidade.
Se solicitado, selecione o idioma e o local de residência. O
programa Utilitário de instalação do CanoScan é iniciado.
• No Macintosh: Clique duas vezes no ícone [Setup]
(Instalação). Digite o ID e senha de administrador na caixa de
diálogo autenticação.
2 Clique em [Easy Install] (Instalação fácil) no menu
principal.
3 Clique em [Install] (Instalar) para começar a
instalação.
Leia atentamente o Contrato de licença, e então clique em
[Yes] (Sim) para continuar. Todos os programas de software e
manuais na tela serão instalados no seu computador.
4 Para os aplicativos incluídos, siga as instruções na
tela para executar a instalação.
5 Quando a instalação estiver completa, clique em
[Restart] (Reiniciar) para reiniciar seu computador.
• Certifique-se de retirar o CD-ROM da unidade e guarde-o em um
local seguro.
• Se encontrar um problema durante a instalação, consulte “Solução
de problemas” no Guia de digitalização.
• Se depois você atualizar o seu SO para o Windows XP, reinstale o
software.
2
Preparando o scanner
Preparando o scanner
Destravando o scanner
1 Retire o selo do scanner.
2 Deslize a trava no fundo do scanner para a posição de destravado (
).
Posição de
destravado
• Não incline o scanner mais de 90 graus da horizontal ao liberar a trava.
• Carregue o scanner com as duas mãos. Cuidado para não deixá-lo cair.
• Sempre trave o scanner ao carregá-lo ou transportá-lo.
• Ao travar o scanner, não levante a parte de trás e incline a parte da frente (local do
botão do scanner) para baixo, isso poderá dificultar o movimento da trava.
Conectar o scanner
Português
1 Conecte o scanner ao computador com o cabo USB fornecido.
2 Conecte o adaptador de CA fornecido ao scanner e, em seguida, ligue-o.
• Use somente o cabo USB e o adaptador de CA fornecidos com o scanner. A utilização de
outros cabos ou adaptadores poderá causar mau funcionamento.
• Quando o scanner estiver conectado à porta USB 1.1 no Windows XP, e for exibida uma
mensagem avisando que um dispositivo “USB HI-SPEED está ligado a um hub que não é
USB HI-SPEED”, ignore-a. O scanner funciona nessa condição sem problemas.
• O scanner não tem um interruptor de alimentação. A alimentação é ativada logo que o
adaptador de energia CA é conectado.
3
Digitalizar
Digitalizar
Esta seção explica os procedimentos básicos de digitalização usando o programa de edição de imagem,
ArcSoft PhotoStudio, e o driver do scanner, ScanGear.
1 Coloque um documento sobre o vidro de
documentos e feche a tampa.
Parte
superior
Ao abrir a tampa de documentos, segurea com as mãos até que ela pare.
Parte
inferior
Marca de
alinhamento
2 Inicie o ArcSoft PhotoStudio.
No Windows: Selecione [start] (Iniciar) - [(All) Programs]
((Todos os) Programas) - [ArcSoft PhotoStudio 5.5] e
clique em [PhotoStudio 5.5].
No Macintosh: Abra as pastas [Applications]
(Aplicativos) - [PhotoStudio] e, em seguida, clique duas
vezes no ícone [PhotoStudio].
3 No menu [File] (Arquivo), clique em [Select Source] (Selecionar origem) e selecione o
modelo do scanner.
No Windows: Não selecione o modelo com [WIA] no nome.
4 Clique no ícone [Acquire] (Adquirir)
para iniciar o ScanGear.
5 Selecione o tipo de documento que está digitalizando
em [Select Source] (Selecionar origem) e clique em
[Preview] (Visualizar).
6 Defina o [Destination] (Destino) e/ou [Output Size]
(Tamanho de saída) conforme necessário.
7 Clique em [Scan] (Digitalizar) para começar a
digitalizar.
Não toque no scanner enquanto ele
estiver em operação.
8 Quando solicitado para fechar o ScanGear, clique em
[OK].
9 Salve a imagem digitalizada no Arcsoft PhotoStudio e
feche a janela.
• Para obter mais informações sobre digitalizar usando o ScanGear, aplicativos incluídos e solução de problemas, veja o
manual Guia de digitalização na tela. Para abrir o Guia de digitalização, clique duas vezes no ícone Manual de
digitalização na área de trabalho, ou clique em
no ScanGear ou CanoScan Toolbox.
4
Usar os botões do scanner
Usar os botões do scanner
Os botões do scanner permitem copiar, digitalizar, enviar e-mail e salvar imagens digitalizadas em formato
PDF com o toque de um botão. Apenas coloque o documento sobre o scanner e pressione o botão do
scanner para a função desejada. Para obter mais instruções, consulte o Guia de digitalização.
Botões PDF
Os botões PDF permitem criar facilmente
arquivos PDF de acordo com suas
necessidades. Observe que os nomes dos
botões não são rotulados no scanner.
Botão COLOR (COLORIDO)
Digitaliza imagens coloridas no tamanho A4
ou Carta* a 300 ppp.
Botão BLACK & WHITE
(PRETO-E-BRANCO)
Digitaliza imagens em preto-e-branco no
tamanho A4 ou Carta* a 300 ppp.
Botão CUSTOM
(PERSONALIZAR)
C O PY
IL M
P HOTO/F
E - MA
IL
Botão COPY (COPIAR)
Imprime (copia) a imagem digitalizada com
uma impressora.
Botão PHOTO/FILM
(FOTO/FILME)
Abre a imagem digitalizada no programa
aplicativo incluído, ArcSoft PhotoStudio.
Botão E-MAIL (E-MAIL)
Anexa a imagem digitalizada a uma nova
mensagem de e-mail.
Quando você pressionar este botão pela primeira
vez, será solicitado a escolher o programa de e-mail
para usar com esta função.
Digitaliza imagens usando as configurações
especificadas pelo usuário.
Botão FINISH (CONCLUIR)
Finaliza a operação e salva a imagem
digitalizada em um arquivo PDF.
* O tamanho pode ser diferente, dependendo do
ambiente de sistema.
• Antes de usar os botões do scanner, verifique se todos os programas de software estão instalados no computador
usando a opção [Easy Install] (Instalação fácil) do programa Utilitário de instalação do CanoScan. Consulte “Instalar o
software” na página 2.
• No Mac OS X 10.3 e 10.2.8: Antes de usar os botões do scanner, é necessário definir a Image Capture (Captura de
imagem) (na pasta [Applications] (Aplicativos)) para abrir o CanoScan Toolbox automaticamente quando um botão de
scanner é pressionado.
Inicie a Image Capture (Captura de imagem) e faça o seguinte.
- Mac OS X 10.3: Clique em [Options] (Opções) e selecione CanoScan Toolbox em [When a scanner button is pressed,
open:] (Ao pressionar um botão do scanner, abrir:).
- Mac OS X 10.2.8: Selecione [Other] (Outro) em [When a scanner button is pressed, open:] (Ao pressionar um botão do
scanner, abrir:). Selecione CanoScan Toolbox e clique em [Open] (Abrir).
Clique em [OK] e feche a Image Capture (Captura de imagem). Para obter mais instruções, consulte “Solução de
problemas” no Guia de digitalização.
5
Português
P DF
Digitalizar filme
Digitalizar filme
Esse scanner pode digitalizar um filme de 35 mm (diafilme ou slide). Siga os procedimentos a seguir para
digitalizar o filme.
1 Retire a folha de
proteção da tampa de
documentos.
Quando terminar de
digitalizar, recoloque a folha
de proteção, alinhando-a
com os entalhes na tampa de
documento e deslizando-a
para baixo até encaixá-la no
lugar.
Sempre recoloque no lugar a folha de proteção quando não estiver digitalizando filmes
para proteger a fonte de luz da tampa de documentos.
2 Retire a Guia de filme da
tampa de documentos.
a
b
Segure a tampa de
documentos para que não
feche, a pressione para
baixo e segure a alça na parte
de cima da Guia de filme e,
em seguida, b incline a Guia
de filme para fora e puxe-a
para cima.
3 Abra o Prendedor de
Prendedor de filme
filme.
Aperte os dois lados do
Prendedor de fime para abrir.
Abertura de calibração
6
Digitalizar filme
4 Insira o filme na
Guia de filme.
Coloque o filme
virado para baixo com
os quadros na ordem
inversa.
• Use uma escova de limpeza para remover poeira do filme (pois a poeira poderá afetar a
qualidade da imagem) e tenha o cuidado de segurar o filme pelas bordas para evitar a
presença de sujeira ou impressões digitais no filme.
• Não bloqueie a abertura de calibração da Guia de filme quando estiver digitalizando um
filme. As cores não serão digitalizadas corretamente se a abertura estiver obstruída.
• Feche a Guia de filme. Pressione levemente até que se encaixe no local.
Como usar o Protetor
Português
Quando um filme curto ou enrolado é
digitalizado, mais luz do que o necessário penetra
pelas aberturas e produz faixas de cor ao redor da
imagem digitalizada.
Se isso ocorrer, use o protetor fornecido como
mostrado na figura.
5 Ajuste a Guia de filme
na tampa de
documentos, e feche a
tampa de documentos.
a
b
Segure a tampa de
documentos e a insira a
parte inferior da Guia de
filme na abertura inferior da
tampa de documentos. Em
seguida, b incline o topo da
Guia de filme e a insira para
dentro da tampa de
documentos até que se
encaixe no lugar até ouvir um
clique.
7
Digitalizar filme
6 Inicie o ArcSoft PhotoStudio e, em seguida,
o ScanGear.
Siga as etapas de 2 a 4 em “Digitalizar” na página 4.
7 Selecione [Negative Film (Color)] (Filme
negativo (colorido)) ou [Positive Film
(Color)] (Filme positivo (colorido)) em
[Select Source] (Selecionar origem) para
encontrar o tipo de filme correspondente
ao que está sendo digitalizando, e clique
em [Preview] (Visualizar).
8 Coloque uma marca de seleção ao lado do
número de cada quadro que deseja digitalizar.
Faça as correções na imagem conforme necessário.
9 Clique em [Scan] (Digitalizar) para começar a
digitalizar.
Não toque no scanner enquanto ele
estiver em operação.
10 Quando solicitado para fechar o ScanGear,
clique em [OK].
11 Salve a imagem digitalizada no ArcSoft
PhotoStudio e feche a janela.
• Não deixe o diafilme na guia de filme por um longo período de tempo pois o calor da
unidade pode danificar o filme.
• Para obter mais informações sobre digitalização de filme, consulte “Digitalizar filme” no
Guia de digitalização.
8
Especificações
Especificações
Tipo de scanner
Mesa
Elemento de digitalização
Cor CCD de 6 linhas
Fonte de luz
4800 x 9600 dpi
Resolução selecionável
Profundidade de
digitalização por bit
Velocidade da
digitalização *3
(foto ou documento)
25–19200 ppp (ScanGear)
Colorido
Escala de cinza
Entrada de 48 bits (16 bits para cada cor)
saída de 48 bits ou 24 bits (16 bits ou 8 bits para cada cor)
Entrada de 48 bits (16 bits para cada cor)
saída de 16 bits *2 ou 8 bits
Colorido
7,7 milissegundos/linha (2400 dpi),
14,8 milissegundos/linha (4800 dpi)
Escala de cinza,
Preto-e-branco
7,7 milissegundos/linha (2400 dpi),
14,8 milissegundos/linha (4800 dpi)
7,4–74,0 milissegundos/linha
Velocidade de digitalização*3 (Filme)
Velocidade de visualização
Aproximadamente 5 seg.
*3*4
Interface
USB 2.0 Hi-Speed
Tamanho máximo do documento
A4/Carta: 216 x 297 mm
Tipo de filme/Número de quadros
Diafilme de 35 mm (máximo de 6 quadros)/slide de
35 mm (máximo de 4 quadros)
7 botões (PDF x 4, COPY (COPIAR), PHOTO/FILM
(FOTO/FILME), E-MAIL (E-MAIL))
Botões do scanner
Temperatura
Faixa de operação
Umidade
Requisitos de alimentação
Consumo de energia
10qC a 35qC (50qF a 95qF)
10% a 90% de umidade relativa, 20% a 80% de
umidade relativa para a digitalização do filme sem
formação de condensação
Português
Resolução óptica
Lâmpada fria fluorescente de cátodo
*1
Adaptador de energia CA (100/120/230/240V)*5
Em operação: 17 watts no máximo, Em espera: 4 watts
(usando o adaptador de energia CA fornecido)
Dimensões máximas externas
Peso
Kit de acessórios opcional
259 x 474 x 83 mm
Aproximadamente 2,8 kg
Kit de acessórios CSAK-4400F
A resolução óptica é a máxima amostragem baseada no ISO 14473.
Somente para digitalização de filme.
*3
A maior velocidade no modo USB 2.0 Hi-Speed em PC Windows. O tempo de transferência não é incluído.
A velocidade de digitalização varia de acordo com os tipos de documento, as configurações da
digitalização ou as especificações do computador.
*4
O tempo do processamento da calibração não está incluído.
*5
O tipo do adaptador de CA varia de acordo com a região em que o scanner foi adquirido.
Use apenas os adaptadores de CA listados nas instruções para o usuário. (Adaptador de CA Canon:
K30279 é para o Reino Unido e K30278 é para os outros países da União Européia). Não os utilize para
outros produtos.
*1
*2
• As especificações estão sujeitas a alterações sem aviso prévio.
9
Apenas União Europeia (e AEE).
Este símbolo indica que o produto não deve ser colocado no lixo doméstico, de acordo com a
Directiva REEE (2002/96/CE) e a legislação nacional. Este produto deverá ser colocado num ponto
de recolha designado, por exemplo, num local próprio autorizado quando adquirir um produto
semelhante novo ou num local de recolha autorizado para reciclar resíduos de equipamentos
eléctricos e electrónicos (EEE). O tratamento inadequado deste tipo de resíduo poderá causar um
impacto negativo no ambiente e na saúde humana devido às substâncias potencialmente
perigosas normalmente associadas aos equipamentos eléctricos e electrónicos. Simultaneamente,
a sua cooperação no tratamento correcto deste produto contribuirá para a utilização efi caz dos
recursos naturais. Para mais informações sobre os locais onde o equipamento poderá ser
reciclado, contacte os serviços locais, a autoridade responsável pelos resíduos, o esquema REEE
aprovado ou o serviço de tratamento de lixo doméstico. Para mais informações sobre a devolução
e reciclagem de produtos REEE, visite o Web site
www.canon-europe.com/environment.
(AEE: Noruega, Islândia e Listenstaine)
Para clientes na Europa, Oriente Médio, África e Rússia apenas
Para contatar o Centro de Assistência Técnica Canon, consulte o verso do Sistema Europeu de Garantia (EWS, European Warranty
System) ou acesse
www.canon-europe.com.
A tomada deve estar instalada próxima ao equipamento e estar facilmente acessível.
Aviso
Ao utilizar este produto, observe os aspectos legais a seguir:
• A digitalização de determinados documentos, como notas promissórias bancárias (títulos bancários), títulos da dívida
pública e certidões públicas, é proibida por lei e pode acarretar responsabilidade penal e/ou civil.
• De acordo com a lei, talvez seja necessário obter autorização do proprietário dos direitos autorais ou dos direitos
legais do documento a ser digitalizado.
Caso tenha dúvida quanto à legalidade da digitalização de algum item específico, consulte primeiramente o seu
consultor jurídico.
®
®
• Adobe e Adobe RGB (1998) são marcas comerciais ou marcas registradas da Adobe Systems Incorporated nos Estados Unidos e/
ou em outros países.
•
•
•
•
®
®
Microsoft e Windows são marcas comerciais ou registradas da Microsoft Corporation nos E.U.A. e/ou em outros países.
Macintosh, Mac e o logotipo da Mac são marcas comerciais da Apple Computer, Inc., nos E.U.A. e/ou em outros países.
©ArcSoft, Inc. Todos os direitos do PhotoStudio são reservados.
Outros nomes ou produtos não mencionados acima podem ser marcas comerciais ou registradas de suas respectivas companhias.
10
Aan de Slag gids
Lees deze handleiding voordat u deze scanner gebruikt. Bewaar de handleiding nadat u deze
gelezen heeft op een veilige plaats voor toekomstig gebruik.
Inhoudsopgave
Inhoud van het pakket ................................ 1
De scannerknoppen gebruiken................... 5
De software installeren ............................... 2
Film scannen................................................. 6
De scanner opstellen ................................... 3
Specificaties.................................................. 9
Scannen ........................................................ 4
Inhoud van het pakket
Scanner en toebehoren
Scanner
USB-kabel
Netspanning
sadapter
Filmgeleider*
(voor 35 mm filmstrook/dia)
Bescherming
*Ingebouwd in de
documentklep
Documentatie
Nederlands
• Aan de Slag gids (deze handleiding)
• Aanvullende documenten
Cd-rom met CanoScan-setupprogramma
• Software
- ScanGear (scannerstuurprogramma)
- CanoScan Toolbox
- ArcSoft PhotoStudio
- Presto! PageManager (enkel voor Windows)
- ScanSoft OmniPage SE (niet compatibel met Windows 98 First Edition)
- Adobe RGB (1998) (enkel voor Windows)
• On line handleidingen
- Handleiding Scannen (voor ScanGear, CanoScan Toolbox en Problemen oplossen)
- Handleidingen voor gebundelde applicatieprogramma's
*In deze handleiding worden Windows XP-schermafdrukken gebruikt als illustratie bij de uitleg
die geldt voor alle besturingssystemen.
1
De software installeren
De software installeren
• Sluit de scanner NIET aan op een computer voordat u de software heeft geïnstalleerd.
Als u de scanner aansluit en de wizard Nieuwe hardware verschijnt, klikt u op [Cancel]
(Annuleren).
• Sluit alle programma's af, inclusief de anti-virussoftware.
• Voor Windows 2000/XP meldt u zich aan als beheerder om de software te installeren.
1 Plaats de cd-rom voor het CanoScansetupprogramma in het station.
Selecteer uw taal en woonplaats indien dit wordt gevraagd. Het
CanoScan-setupprogramma start.
• Macintosh: Dubbelklik op het pictogram [Setup] (Instelling).
Voer de beheerder-ID en het paswoord in het dialoogvenster
in.
2 Klik op [Easy Install] (Eenvoudige installatie) in het
hoofdmenu.
3 Klik op [Install] (Installeren) om de installatie te
starten.
Lees aandachtig de licentieovereenkomst en klik vervolgens op
[Yes] (Ja) om verder te gaan. Alle softwareprogramma's en on
line handleidingen worden nu geïnstalleerd op uw computer.
4 Voor gebundelde programma's volgt u de instructies
op het scherm om de installatie uit te voeren.
5 Nadat de installatie is voltooid, klikt u op [Restart]
(Opnieuw opstarten) om uw computer opnieuw op
te starten.
• Verwijder de cd-rom uit het station en bewaar deze op een veilige
plaats.
• Als er zich een probleem voordoet tijdens de installatie, zie
"Problemen oplossen" in de Handleiding Scannen.
• Als u later uw besturingssysteem upgradet naar Windows XP,
moet u de software opnieuw installeren.
2
De scanner opstellen
De scanner opstellen
De scanner ontgrendelen
1 Trek de verzegelstickers op de scanner los.
2 Verschuif de vergrendelingsknop tot het ontgrendelingsteken (
).
Ontgrendelingsteken
• Draai de scanner niet meer dan 90 graden vanaf de horizontale positie wanneer u
ontgrendelt.
• Neem de scanner met beide handen vast. Let op dat de scanner niet valt.
• Vergrendel altijd de scanner voordat u deze verplaatst of vervoert.
• Als u de scanner vergrendelt, hef dan de achterkant niet op en houd de voorkant
(scannerknoppen) naar beneden. Het is mogelijk dat u niet kunt vergrendelen.
De scanner aansluiten
1 Sluit de scanner aan op uw computer met de bijgeleverde USB-kabel.
2 Sluit de bijgeleverde netspanningsadapter aan op de scanner en steek deze in een
Nederlands
stopcontact.
• Gebruik enkel de USB-kabel en de netspanningsadapter die bij de scanner zijn geleverd.
Het gebruik van andere kabels of adapters kan de scanner beschadigen.
• Het bericht "Snel USB-apparaat op trage USB-hub aangesloten" dat verschijnt wanneer
de scanner onder Windows XP is aangesloten op de USB 1.1-poort, mag u gewoon
negeren. In deze omstandigheden werkt de scanner zonder problemen.
• De scanner heeft geen aan/uit-knop. De scanner is ingeschakeld op het moment dat u
de netspanningsadapter in een stopcontact steekt.
3
Scannen
Scannen
Hier vindt u een beschrijving van de gewone scanprocedures met behulp van het
beeldbewerkingsprogramma ArcSoft PhotoStudio en het scannerstuurprogramma ScanGear.
1 Plaats een document op de glasplaat en sluit
de documentklep.
Bovenrand
Ondersteun de documentklep met uw
hand als u deze opent tot ze stopt.
Onderrand
Uitlijningsteken
2 Start ArcSoft PhotoStudio.
Windows: Selecteer [start] - [(All) Programs] ((Alle)
Programma's) - [ArcSoft PhotoStudio 5.5] en klik op
[PhotoStudio 5.5].
Macintosh: Open de map [Applications] (Programma's)
- [PhotoStudio] en dubbelklik op het pictogram
[PhotoStudio].
3 Kies in het menu [File] (Bestand) [Select Source] (Bron selecteren) en selecteer het
scannermodel.
Windows: Selecteer niet de modelnaam die [WIA] bevat.
4 Klik op het pictogram [Acquire] (Ophalen)
om ScanGear te starten.
5 Selecteer het documenttype dat u wilt scannen in
[Select Source] (Bron selecteren) en klik op [Preview]
(Voorbeeld).
6 Stel het [Destination] (Doel) en/of het [Output Size]
(Uitvoerformaat) in.
7 Klik op [Scan] (Scannen) om het scannen te starten.
Raak de scanner tijdens het scannen niet
aan.
8 Klik op [OK] als u wordt gevraagd om ScanGear te
sluiten.
9 Sla de gescande afbeelding in ArcSoft PhotoStudio op
en sluit het venster.
• Voor meer informatie over scannen met behulp van ScanGear, gebundelde programma's en problemen oplossen, zie
de on line handleiding Handleiding Scannen. Om de Handleiding Scannen te openen, dubbelklikt u op het pictogram
Handleiding voor scannen op uw bureaublad of op
in ScanGear of de CanoScan Toolbox.
4
De scannerknoppen gebruiken
De scannerknoppen gebruiken
Met de scannerknoppen kunt u kopiëren, scannen, een e-mail verzenden en gescande afbeeldingen opslaan
in PDF-formaat met slechts één druk op de knop. Plaats uw document gewoon op de scanner en druk
vervolgens op de scannerknop met de gewenste functie. Voor meer informatie, zie de Handleiding Scannen.
P DF
C O PY
PDF-knoppen
Met de PDF-knoppen kunt u gemakkelijk PDFbestanden maken naargelang uw behoeften.
De knopnamen zijn niet gelabeld op de scanner.
Knop COLOR (KLEUR)
P HOTO/F
IL M
E - MA
IL
Knop COPY
De gescande afbeelding met een printer
afdrukken (kopiëren).
Knop PHOTO/FILM
Kleurenafbeeldingen in A4 of Letter scannen
met 300 dpi.
*
Knop BLACK & WHITE
(ZWART-WIT)
Zwart-witafbeeldingen in A4 of Letter
scannen met 300 dpi.
De gescande afbeelding openen in het
gebundelde applicatieprogramma ArcSoft
PhotoStudio.
Knop E-MAIL
*
Knop CUSTOM
(AANGEPAST)
De gescande afbeelding koppelen aan een
nieuw e-mailbericht.
De eerste keer dat u op deze knop drukt, wordt u
gevraagd om een e-mailprogramma te selecteren
om deze functie te kunnen gebruiken.
Nederlands
Afbeeldingen scannen volgens de instellingen
van de gebruiker.
Knop FINISH (VOLTOOIEN)
De taak beëindigen en de gescande
afbeelding opslaan in een PDF-bestand.
*De grootte is afhankelijk van uw systeem.
• Vooraleer u deze knoppen gebruikt, moet u controleren of alle programma's op uw computer zijn geïnstalleerd met
behulp van de optie [Easy Install] (Eenvoudige installatie) in het CanoScan-setupprogramma. Zie "De software
installeren" op pagina 2.
• Mac OS X 10.3 en 10.2.8: Vooraleer u deze knoppen gebruikt, moet u Image Capture (Beeld vastleggen) instellen (in
de map [Applications] (Programma's)) zodat de CanoScan Toolbox automatisch opent als u een scannerknop indrukt.
Start Image Capture (Beeld vastleggen) en voer dan de volgende stappen uit.
- Mac OS X 10.3: Klik op [Options] (Opties) en selecteer CanoScan Toolbox in [When a scanner button is pressed,
open:] (Als er op een scannerknop wordt gedrukt, open:).
- Mac OS X 10.2.8: Selecteer [Other] (Andere) in [When a scanner button is pressed, open:] (Als er op een scannerknop
wordt gedrukt, open:). Selecteer CanoScan Toolbox en klik op [Open].
Klik op [OK] en sluit Image Capture (Beeld vastleggen). Voor meer informatie, zie "Problemen oplossen" in de
Handleiding Scannen.
5
Film scannen
Film scannen
Deze scanner kan 35 mm films (filmstroken of dia's) scannen. Om film te scannen volgt u de onderstaande
procedure.
1 Verwijder de
bescherming van de
documentklep.
Plaats na het scannen de
bescherming terug door deze
in de gleuven in de
documentklep naar beneden
te schuiven.
Plaats altijd de bescherming terug als u geen films scant om de lichtbron in de
documentklep te beschermen.
2 Verwijder de
filmgeleider van de
documentklep.
a
b
Houd de documentklep zo
vast dat deze niet sluit, druk
dan a naar beneden en
houd het lipje aan de
linkerbovenkant van de
filmgeleider vast en b schuif
de filmgeleider naar buiten
om deze te verwijderen.
3 Open de filmhouder.
Filmhouder
Druk op de beide zijden van
de filmhouder om deze te
openen.
Kalibratiegleuf
6
Film scannen
4 Plaats de film in
de filmgeleider.
Plaats de film met de
bovenkant naar
beneden met de
kaders in omgekeerde
volgorde.
• Gebruik een haardroger voor het verwijderen van stof op de film: stof tast de
beeldkwaliteit aan. Houd de film aan de zijkanten vast om te vermijden dat er vuil of
vingerafdrukken op de film komen.
• Blokkeer de kalibratiegleuf op de filmgeleider niet tijdens het scannen van de film.
Kleuren worden niet juist gescand als de kalibratiegleuf geblokkeerd is.
• Sluit de filmgeleider voorzichtig. Druk lichtjes totdat u de geleider hoort klikken.
Gebruik van de bescherming
5 Plaats de filmgeleider op
de documentklep en
sluit de klep.
a
Nederlands
Bij het scannen van korte of gekrulde films kan er
extra licht door de gaatjes komen en hierdoor
ontstaan kleurbanden aan de zijkanten van de
gescande afbeelding.
Gebruik in dit geval de bijgeleverde bescherming
zoals aangeduid in het voorbeeld.
b
Houd de documentklep vast,
a plaats de onderste zijde
van de filmgeleider in de
onderste gleuf van de
documentklep en beweeg
dan b de bovenkant van de
filmgeleider in de richting van
de documentklep totdat u
deze hoort sluiten met een
klik.
7
Film scannen
6 Start ArcSoft PhotoStudio en vervolgens
ScanGear.
Volg stap 2 tot 4 van "Scannen" op pagina 4.
7 Selecteer [Negative Film(Color)] (Negatieve
film (kleur))of [Positive Film(Color)]
(Positieve film (kleur)) in [Select Source]
(Bron selecteren) om het filmtype aan te
duiden dat u wilt scannen en klik dan op
[Preview] (Voorbeeld).
8 Vink de nummers aan van de kader(s) die u wilt scannen.
Voer eventueel afbeeldingscorrecties uit.
9 Klik op [Scan] (Scannen) om het scannen te starten.
Raak de scanner tijdens het scannen niet
aan.
10 Klik op [OK] als u wordt gevraagd om Scangear te
sluiten.
11 Sla de gescande afbeelding in ArcSoft PhotoStudio
op en sluit het venster.
• Laat de filmstrook niet in de filmgeleider zitten voor een lange periode. De hitte van het
toestel kan de film immers beschadigen.
• Voor meer informatie over het scannen van films, zie "Film scannen" in de Handleiding
Scannen.
8
Specificaties
Specificaties
Type scanner
Flatbed
Scanelement
CCD 6-lijnen kleur
Lichtbron
4.800 x 9.600 dpi
Selecteerbare resolutie
25–19.200 dpi (ScanGear)
Kleur
Scanbitdiepte
Grijswaarden
Scansnelheid *3
(Foto of document)
7,7 msec./lijn (2.400 dpi), 14,8 msec./lijn (4.800 dpi)
Grijswaarden,
Zwart-wit
7,7 msec./lijn (2.400 dpi), 14,8 msec./lijn (4.800 dpi)
7,4–74,0 msec/lijn
Ongeveer 5 sec.
*3*4
Interface
USB 2.0 Hi-Speed
Maximale documentgrootte
Filmtype/aantal kaders
7 knoppen (PDF x 4, COPY, PHOTO/FILM, E-MAIL)
Temperatuur
10qC tot 35qC (50qF tot 95qF)
Vochtigheid
10% tot 90% relatieve luchtvochtigheid, 20% tot 80%
relatieve luchtvochtigheid bij scannen van film zonder
condensvorming
Stroomvoorziening
Energieverbruik
Maximale buitenafmetingen
Gewicht
Optionele accessoireset
A4/Letter: 216 x 297 mm
35 mm strook (max. 6 kaders)/35 mm dia (max. 4 kaders)
Scannerknoppen
Gebruiksomgeving
48 bits invoer (16 bits voor iedere kleur)
16 bits *2 of 8 bits uitvoer
Kleur
Scansnelheid *3 (Film)
Voorbeeldsnelheid
48 bits invoer (16 bits voor iedere kleur)
48 bits of 24 bits uitvoer (16 bits of 8 bits voor iedere kleur)
Netspanningsadapter (100/120/230/240V)*5
In werking: max. 17 W, Stand-by: 4 W
(Bij gebruik van bijgeleverde netspanningsadapter)
259 x 474 x 83 mm
Ongeveer 2,8 kg
Accessoireset CSAK-4400F
Nederlands
Optische resolutie
Koude fluorescerende kathodelamp
*1
Optische resolutie vertegenwoordigt de maximum sampling rate gebaseerd op ISO 14473.
Enkel voor het scannen van film.
*3
Hoogste snelheid in USB 2.0 Hi-Speed-modus op Windows-pc. Overdrachttijd is niet inbegrepen.
Scansnelheid is afhankelijk van het documenttype, de scaninstellingen en de computerspecificaties.
*4
Kalibratietijd is niet inbegrepen.
*5 Netspanningsadaptertype kan verschillen naargelang de plaats waar u de scanner heeft aangekocht.
Gebruik alleen netspanningsadapters vermeld in de gebruiksaanwijzing. (Canon-netspanningsadapter:
K30279 is voor Verenigd Koninkrijk en K30278 is voor andere EU-landen. Gebruik ze niet voor andere
producten.
*1
*2
• Specificaties kunnen zonder voorafgaande kennisgeving worden gewijzigd.
9
Alleen Europese Unie (en EER).
Dit symbool geeft aan dat dit product in overeenstemming met de AEEA-richtlijn (2002/96/EG) en
de nationale wetgeving niet mag worden afgevoerd met het huishoudelijk afval. Dit product moet
worden ingeleverd bij een aangewezen, geautoriseerd inzamelpunt, bijvoorbeeld wanneer u een
nieuw gelijksoortig product aanschaft, of bij een geautoriseerd inzamelpunt voor hergebruik van
elektrische en elektronische apparatuur (EEA). Een onjuiste afvoer van dit type afval kan leiden tot
negatieve effecten op het milieu en de volksgezondheid als gevolg van potentieel gevaarlijke
stoffen die veel voorkomen in elektrische en elektronische apparatuur (EEA). Bovendien werkt u
door een juiste afvoer van dit product mee aan het effectieve gebruik van natuurlijke
hulpbronnen. Voor meer informatie over waar u uw afgedankte apparatuur kunt inleveren voor
recycling kunt u contact opnemen met het gemeentehuis in uw woonplaats, de reinigingsdienst,
of het afvalverwerkingsbedrijf. U kunt ook het schema voor de afvoer van afgedankte elektrische
en elektronische apparatuur (AEEA) raadplegen. Ga voor meer informatie over het inzamelen en
recyclen van afgedankte elektrische en elektronische apparatuur naar
www.canon-europe.com/environment.
(EER: Noorwegen, IJsland en Liechtenstein)
Enkel voor klanten uit Europa, het Midden-Oosten, Afrika en Rusland
Indien u de klantendienst van Canon wilt contacteren, zie de achterkant van het European Warranty System (EWS)-boekje of surf naar
www.canon-europe.com.
De contactdoos dient dichtbij het toestel te worden geïnstalleerd en moet gemakkelijk toegankelijk zijn.
Waarschuwing
Bij gebruik van dit product dient u de volgende wettelijke bepalingen in acht te nemen:
• Het scannen van bepaalde documenten zoals bankbiljetten, staatsobligaties en publieke certificaten kan worden
verboden door de wet en kan resulteren in strafrechtelijke en/of burgerlijke aansprakelijkheid.
• De wet kan u verplichten toelating te vragen aan de persoon die de auteursrechten of andere wettelijke rechten
bezit van het gescande item.
Als u niet zeker bent of het scannen van een bepaald item wettelijk is toegestaan, moet u uw juridisch adviseur op
voorhand raadplegen.
®
®
• Adobe en Adobe RGB (1998) zijn handelsmerken of gedeponeerde handelsmerken van Adobe Systems Incorporated in de
Verenigde Staten en/of andere landen.
®
®
• Microsoft en Windows zijn handelsmerken of gedeponeerde handelsmerken van Microsoft Corporation in de Verenigde Staten
en/of andere landen.
• Macintosh, Mac en het Mac-logo zijn handelsmerken van Apple Computer, Inc., geregistreerd in de Verenigde Staten en andere
landen.
• ©ArcSoft, Inc. Alle rechten voorbehouden voor PhotoStudio.
• Andere namen of producten dan hierboven vermeld kunnen handelsmerken of gedeponeerde handelsmerken zijn van hun
respectieve bedrijven.
10
FCC Notice (U.S.A. Only)
For 120V, 60Hz model
Model Number : K10293
This device complies with Part 15 of the FCC Rules. Operation is subject to the following two conditions: (1)
This device may not cause harmful interference, and (2) this device must accept any interference received, including
interference that may cause undesired operation.
Note: This equipment has been tested and found to comply with the limits for a Class B digital device, pursuant to Part 15
of the FCC Rules. These limits are designed to provide reasonable protection against harmful interference in a residential
installation. This equipment generates, uses and can radiate radio frequency energy and, if not installed and used in
accordance with the instructions, may cause harmful interference to radio communications.
However, there is no guarantee that interference will not occur in a particular installation. If this equipment does cause
harmful interference to radio or television reception, which can be determined by turning the equipment off and on, the
user is encouraged to try to correct the interference by one or more of the following measures:
•
•
•
•
Reorient or relocate the receiving antenna.
Increase the separation between the equipment and receiver.
Connect the equipment into an outlet on a circuit different from that to which the receiver is connected.
Consult the dealer or an experienced radio/TV technician for help.
Use of a shielded cable is required to comply with Class B limits in Subpart B of Part 15 of the FCC Rules.
Do not make any changes or modifications to the equipment unless otherwise specified in the manual. If such changes or
modifications should be made, you could be required to stop operation of the equipment.
Canon U.S.A., Inc.
One Canon Plaza
Lake Success, NY 11042
1-516-328-5600
English
Français
Deutsch
Italiano
Español
Português
Nederlands
Quick Start Guide
Guide de démarrage rapide
Schnellstart-Referenz
Guida rapida all’installazione
Guía de inicio rápido
Guia de Início Rápido
Aan de Slag gids
QT5-0618-V03
©CANON INC. 2007
PRINTED IN CHINA
IMPRIME EN CHINE