1
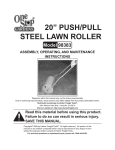
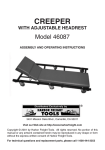
PARK BENCH
Palm Tree Design
ASSEMBLY INSTRUCTIONS
®
3491 Mission Oaks Blvd., Camarillo, CA 93011
Visit our Web site at http://www.harborfreight.com
Copyright © 2003 by Harbor Freight Tools®. All rights reserved. No portion of this manual
or any artwork contained herein may be reproduced in any shape or form without the
express written consent of Harbor Freight Tools.
For technical questions please call 1-800-444-3353
SPECIFICATIONS
Item
Construction
Finish Slats
Design
Overall Dimensions
Weight
Weight Capacity
Discription
Cast-Iron Frame w/Bronze Finish
Varnished Wooden Slats, Teak Wood
Palm Tree Pattern Bronze and Black Detailing
49-5/8" L X 33-7/8" W X19-3/8" H
79.36 Lbs.
300 Lbs.
SAVE THIS MANUAL
You will need the manual for the safety warnings and precautions, assembly
instructions, operating and maintenance procedures, parts list and diagram. Keep
your invoice with this manual. Write the invoice number on the inside of the front
cover. Keep the manual and invoice in a safe and dry place for future reference.
SAFETY WARNINGS AND PRECAUTIONS
1.
KEEP PRODUCT USAGE AREA CLEAN. Cluttered areas invite injuries. Place
product on flat, level surface such as carpet or grass. Concrete could injure people
if Bench is tipped over.
2.
KEEP CHILDREN AWAY FROM PRODUCT DURING ASSEMBLY. Two adults are
better at assembling this product. Do not allow children to use until all hardware in
this product is fully assembled and tightened. Be careful not to pinch fingers
between slats.
3.
DO NOT ATTEMPT TO ASSEMBLE THIS PRODUCT IF UNDER THE INFLUENCE OF ALCOHOL OR DRUGS. Read warning labels on prescriptions to
determine if your judgement or reflexes are impaired while taking drugs. If there is
any doubt, do not attempt to assemble this product.
4.
USE EYE PROTECTION. Wear ANSI approved safety impact goggles when
assembling this products. Goggles are available from Harbor Freight Tools.
5.
PERIODICALLY CHECK. Check Bolts and Nuts to be sure hardware has not
loosened.
6.
STAY ALERT. Watch what you are doing at all times. Use common sense. Do not
assemble this product when you are tired or distracted from the job at hand.
7.
CHECK FOR DAMAGED PARTS. Before using this product, carefully check that it
will operate properly and perform its intended function. Check for damaged parts
and any other conditions that may affect its operation. Replace or repair damaged
or worn parts immediately.
SKU 90317
PAGE 2
8.
REPLACEMENT PARTS AND ACCESSORIES. When servicing, use only identical
replacement parts. Only use accessories intended for use with this product.
Approved accessories are available from Harbor Freight Tools.
9.
THIS PRODUCT IS MANUFACTURED OF CAST IRON. Do not force any part of the
assembly and do not overtighten the bolts. Serious damage can occur. Do not stand on this
Bench. Use only for intended purpose. The Park Bench is made for adults. Children
need to be supervised. Injury could occur if Park Bench is overloaded. Use caution!
10.
RECOMMENDED AGE APPROPRIATE USE over 10 years of age unless accompanied by
an adult. Maximum weight for Bench recommended is 300 lbs.
UNPACKING
When unpacking, check to make sure all parts shown on the Parts List (page 5) are
included. If any parts are missing or broken, please call Harbor Freight Tools at the
number shown on the cover of this manual as soon as possible.
ASSEMBLY INSTRUCTIONS
We suggest you assemble the unit on a soft surface to avoid damage to the finish.
ASSEMBLY OF BENCH
1.
Assemble the five Seat Slats (#1) to the Cast Iron End Pieces-Right and Left (#2).
Attach with ten Bolts and Nut Pairs (#3). Hand tighten. See Figure 1 & 2.
Note: It may become necessary to enlarge the holes in the End Pieces (#2). Clear
the hole of paint by sliding a bolt through the hole or using a drill with a bit notched
to the hole size.
#2
#3
#3
#1 Seat Slats
Figure 2
Figure 1
SKU 90317
Page 3
2.
Attach the Seat Support Bracket (#5) to the center underside of the Seat Slats (#1) with the
Wood Screws (#6). Tighten self tapping Wood Screws. See Figure 3.
#1
#6
Wood
Screws
#5
Seat Support
Bracket
(View from Underneath Bench)
Figure 3
3.
Attach the Seat Back Assembly (#4) to the brackets on the Cast Iron Ends (#2) with hardware
Bolts (#3) (on front of Bench) and Nut (#3) (on back of Bench). Repeat on opposite end of
Bench. See Figure 4 & 5.
#4
Bracket
#3
#3
#4
#3
#3
#2
#2
Figure 4
4.
Figure 5
Tighten Nuts (#3) after assembling the Side Brackets. Tighten ALL the hardware at this time.
Test the Park Bench before using. Park Bench should sit firmly on a flat level surface.
SKU 90317
PAGE 4
PARTS LIST
PART #
DESCRIPTION
QTY
1
Seat Slats
2
Cast Iron Ends
2
3
Bolt and Nuts Pairs
14
4
Seat Back Assembly
1
5
Seat Support Bracket
1
6
Wood Screws
5
5
ASSEMBLY ILLUSTRATION
#4
#3
#5
#6
#1
#2
1.
MAINTENANCE
For better and safer performance, keep all parts of this product clean and dry at
all times.
THE MANUFACTURER AND/OR DISTRIBUTOR HAS PROVIDED THE PARTS DIAGRAM IN THIS
MANUAL AS A REFERENCE TOOL ONLY. NEITHER THE MANUFACTURER NOR DISTRIBUTOR
MAKES ANY REPRESENTATION OR WARRANTY OF ANY KIND TO THE BUYER THAT HE OR SHE IS
QUALIFIED TO MAKE ANY REPAIRS TO THE PRODUCT OR THAT HE OR SHE IS QUALIFIED TO
REPLACE ANY PARTS OF THE PRODUCT. IN FACT, THE MANUFACTURER AND/OR DISTRIBUTOR
EXPRESSLY STATES THAT ALL REPAIRS AND PARTS REPLACEMENTS SHOULD BE UNDERTAKEN
BY CERTIFIED AND LICENSED TECHNICIANS AND NOT BY THE BUYER. THE BUYER ASSUMES
ALL RISK AND LIABILITY ARISING OUT OF HIS OR HER REPAIRS TO THE ORIGINAL PRODUCT OR
REPLACEMENT PARTS THERETO, OR ARISING OUT OF HIS OR HER INSTALLATION OF REPLACEMENT PARTS THERETO.
SKU 90317
PAGE 5