1
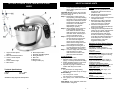
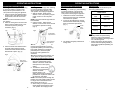
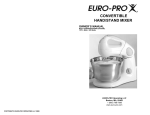
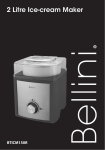
TWIN MOTOR STAND MIXER
OWNER’S MANUAL
Model EP595H
120V., 60Hz., 480 Watts
For information or assistance:
EURO-PRO Operating LLC
94 Main Mill Street, Door 16
Plattsburgh, NY 12901
Tel.: 1 (800) 798-7398
EP595H
ONE (1) YEAR LIMITED WARRANTY
EURO-PRO OPERATING LLC warrants this product to be free from defects in material
and workmanship for a period of one (1) year from the date of purchase when utilized for
normal household use.
If your appliance fails to operate properly while in use under normal household
conditions within the warranty period, return the complete appliance and accessories,
freight prepaid to EURO-PRO Operating LLC, 94 Main Mill Street, Door 16, Plattsburgh,
N.Y. 12901. If the appliance is found to be defective in material or workmanship, EUROPRO Operating LLC will repair or replace it free of charge. Proof of purchase date and
$18.95 to cover the cost of return shipping and handling must be included.*
The liability of EURO-PRO Operating LLC is limited solely to the cost of the repair or
replacement of the unit at our option. This warranty does not cover normal wear of parts
and does not apply to any unit that has been tampered with or used for commercial
purposes. This limited warranty does not cover damage caused by misuse, abuse,
negligent handling or damage due to faulty packaging or mishandling in transit.
This warranty is extended to the original purchaser of the unit and excludes all other
legal and/or conventional warranties. The responsibility of EURO-PRO Operating LLC if
any, is limited to the specific obligations expressly assumed by it under the terms of the
limited warranty. In no event is EURO-PRO Operating LLC liable for incidental or
consequential damages of any nature whatsoever. Some states do not permit the
exclusion or limitation of incidental or consequential damages, so the above may not
apply to you.
This warranty gives you specific legal rights, and you may also have other rights which
vary from state to state.
*Important: Carefully pack item to avoid damage in shipping. Be sure to include
proof of purchase date and to attach tag to item before packing with your name,
complete address and phone number with a note giving purchase information,
model number and what you believe is the problem with item. We recommend you
insure the package (as damage in shipping is not covered by your warranty). Mark
the outside of your package “ATTENTION CUSTOMER SERVICE”. We are
constantly striving to improve our products, therefore the specifications contained
herein are subject to change without notice.
-----------------------------------------------------------------------------------------------------------------------------
OWNERSHIP REGISTRATION CARD
Please fill out and mail the product registration card within ten (10) days of purchase.
The registration will enable us to contact you in the unlikely event of a product safety
notification. By returning this card you acknowledge to have read and understood the
instructions for use, and warnings set forth in the accompanying instructions.
RETURN TO EURO-PRO OPERATING LLC, 94 Main Mill Street, Door 16, Plattsburgh, N.Y. 12901
EP595H
______________________________________________________________________
Appliance model
______________________________________________________________________
Date purchased
Name of store
______________________________________________________________________
Owner’s name
______________________________________________________________________
Address
Printed in China
City
State
9
Zip Code
IMPORTANT SAFETY INSTRUCTIONS
CARE & CLEANING
Warning: To avoid injury when inserting
or removing beaters or dough hooks,
always set the speed selector to the
“Off” position and unplug the appliance.
1. Wipe the outside area of the mixer with
a damp cloth and polish with a soft, dry
cloth. NEVER immerse the mixer, plug
or power cord into water or any other
liquid.
2. Wipe any excess food particles from
the power cord.
3. To make cleaning easier, remove the
beaters/dough hooks and wash right
away after use. Wash the mixing
bowl, beaters and dough hooks in
warm, soapy water. The stainless
steel mixing bowl, beaters and dough
hooks are dishwasher safe.
Do NOT use scouring pads, harsh
detergents or abrasive cleaners to
clean the bowls, beaters or dough
hooks. Dry with a soft, clean cloth.
Storing Your Mixer
You can keep your mixer in a convenient
place on your kitchen counter ready for
use. Place the beaters and dough hooks
into the bowl. Storing the beaters or
dough hooks in a drawer with other
kitchen utensils may cause damage.
Never wind the power cord around the
motor after use as the warmth of the
motor may cause damage to the power
cord.
IMPORTANT INSTRUCTIONS
ALWAYS
NEVER
ALWAYS make sure that your hands are dry
before handling the plug or switching on the
appliance.
NEVER place your hand in the bowl while it is in
operation.
ALWAYS use the mixer on a dry, level surface.
NEVER use this appliance outdoors.
ALWAYS unplug unit from the electrical outlet
when not in use or when removing attachments
and before cleaning.
NEVER use this appliance for other than
intended use. This appliance is for household use
only.
ALWAYS remove the beaters or dough hooks
from the mixer before washing.
NEVER mix dry, thick or heavy mixture for more
than 2 minutes without turning off the mixer and
stirring the ingredients before continuing.
ALWAYS avoid contact with moving parts while
unit is in operation. Keep hands, hair, clothing as
well as other utensils away from beaters/dough
hooks during operation.
NEVER use harsh, abrasive or caustic cleansers
to clean this appliance.
When using electrical appliances, basic safety precautions should always be
followed, including the following:
12. When using extremely heavy loads1. Read all instructions for use carefully
do not use the mixer for more than 2
and look at the illustrations before you
minutes.
start using the appliance.
13. Never tilt back the mixer head while
2. To protect against risk of electrical
the unit is in operation.
shock, do not immerse power cord,
14. Do not restrain the mixer bowl while
plug or mixer in water or any other
it is rotating.
liquid.
15. Extreme caution must be used when
3. Close supervision is necessary when
moving any appliance containing hot
any appliance is used by or near
liquids.
children.
16. Do not leave appliance unattended
4. Unplug from outlet when not in use,
while in use.
before putting on or taking off parts and
17. Do not use outdoors.
before cleaning the appliance.
18. Do not let cord hang over the edge
5. Do not operate any appliance with a
of the table, counter or touch hot
damaged cord or plug, or after the
surfaces.
appliance malfunctions, has been
19. Do not place on or near a hot gas or
dropped or damaged in any manner.
electric burner, or in a heated oven.
Return the appliance to EURO-PRO
20. Do not use appliance for other than
Operating LLC for examination, repair
intended household use.
or adjustment. See warranty.
21. To avoid injury by accidentally
6. Avoid contact with moving parts at all
switching on the appliance when
times. Keep hands, hair, clothing, as
inserting the beaters or dough
well as spatulas and other utensils away
hooks, always set the switch to the
from beaters during operation to prevent
"OFF" position and unplug the
personal injury and/or damage to the
appliance before assembling or
mixer.
disassembling.
7. The use of accessory attachments
Note: An extension cord may be used if
not recommended by the appliance
you are careful in its use:
manufacturer may cause injuries.
8. Remove beaters and dough hooks
1. The electrical rating of the extension
from mixer before cleaning.
cord should be at least as great as
9. NEVER place the unit close to the
the electrical rating of the appliance.
edge of a counter or table. Make
2.
An extension cord with the power
sure that the power cord is
cord must be arranged so that it will
positioned safely so that nobody
not drape over the countertop or
trips or gets tangled in it.
tabletop where they can be pulled on
10. Never eject beaters or dough hooks
by children or tripped over
when the appliance is in operation.
accidentally.
11. Do not remove the mixing bowl from the
base of the mixer while mixer is in use.
NEVER allow children to use this appliance
unsupervised.
NEVER leave this appliance unattended while in
use.
NEVER let the power cord hang over the edge of
a table or counter, touch hot surface or become
knotted.
NEVER eject attachments with the unit operating.
This appliance has a polarized plug (one blade is wider than the other). To reduce
the risk of electric shock, this plug is intended to fit into a polarized outlet only one
way. If the plug does not fit fully into the outlet, reverse the plug. If it still does not fit,
contact a qualified electrician. Do not attempt to modify the plug in any way.
SAVE THESE INSTRUCTIONS
FOR HOUSEHOLD USE ONLY
8
1
Rev. 07/05
GETTING TO KNOW YOUR TWIN MOTOR STAND
MIXER
6. Beater Eject Button
7. Stainless Steel Mixing Bowl
8. Mixing Bowl Base
9. Main Unit
10. Beaters (x2)
11. Dough Hooks (x2)
1. High-Low Bowl Speed
Selector
2. Mixer Head Release Button
3. On/Off – Beater Speed
Selector
4. Power Indicator Light
5. Mixer Head
Technical Specifications
Voltage:
Power:
120V., 60Hz.
480 Watts
*Illustrations may vary from actual product
2
HELPFUL BAKING HINTS
Step 2: As the ingredients start to form
a ball, scrape down sides of bowl
with a plastic spatula then remove
your dough.
CAUTION: Do not use the mixer near the
edge of a counter or table top where there
is a risk of falling off.
Step 3: Depending on what recipe you
are preparing, manually kneading
the dough may be required. Place
dough onto a well floured surface
and knead until dough is smooth
and elastic. This should take
approximately 3-5 minutes
depending on quantity.
Step 4: After kneading dough, place into
a well greased, large mixing
bowl. Place the bowl in a warm,
draft-free area and cover with a
clean dish towel. Allow dough to
rest until it doubles in size.
Step 5: Plunge a fist into the centre of
the risen dough to expel excess
air. Then fold outer edges of
dough into the centre several
times. Remove dough from bowl
onto a lightly floured surface.
Step 6: Place dough into baking tins, or
cut and shape dough for making
rolls, small loaves, or buns etc…
Step 7: Cover the dough with a clean dish
towel and place in a warm,
draft-free area till it rises. Then
glaze the surface and bake.
Finishing Effects
Topping breads and buns:
1. Sprinkle loaves or buns with sesame,
poppy, or caraway seeds before baking.
2. Drizzle shredded cheese on top of loaf
5 minutes before baking is over.
3. Sprinkle icing sugar on sweet buns or
muffins after they have cooled.
Glazes:
1. Any time before or during baking
glazes can be brushed on top of dough.
Before Baking:
1. For a shiny crust – brush
top with cream or evaporated milk.
2. For a glossy crust – brush with beaten egg
whites.
After Baking: For a matt finish, brush with
melted butter or margarine.
7
Helpful Hints for a Successful
Cakes
1. Make sure all ingredients are at room
temperature and warm the bowl if
weather is cold.
2. Add flavoring and essences to the
shortening for a better flavor.
3. When creaming butter and sugar beat
until light and creamy.
4. Beat whole egg until incorporated
into batter before adding the next
when more than one is required.
5. Divide flour and liquid into two
portions and alternately add with the
liquid on low speeds.
6. Cooking times and temperatures are
meant only as a guide. Light mixtures
should spring back when lightly
touched and heavier cake mixes
should be tested using a toothpick.
Fruit cakes should be tested using a
small sharp knife. This should be
done towards the end of the
suggested cooking time.
Reasons for Poor Baking Results
Sponge cakes shrinkUnbalanced ingredients, over beating
egg whites, sudden changes in
temperature or draught when removing
from oven.
Cakes do not RiseMainly due to over beating, but can also
be caused by oven being to hot during
the first part of cooking.
Centre of Cakes SinkToo much fat, raising agent, liquid or
sugar; too little flour; under cooking or
cooking too slowly.
Cakes Run Over Edges of PansOverfilling cake pans, oven too cool, too
much sugar, too much raising agent.
Hard Outer CrustToo much flour, too little sugar, over
mixing, oven too hot.
Moist, Sticky OutsideToo much sugar, over beating, under
baking.
Coarse Crumbly Texture
Over beating, low baking temperatures.
HELPFUL BAKING HINTS
Ingredients
Butter:
Butter is made up of approximately 80%
milk fat (cream) and is churned over time
to produce butter. Butter is a stabilizer
that also adds texture and flavor. Butter
comes salted or unsalted, it is best to use
unsalted for cake batters. Clarified butter
has the milk solids and salt removed
making it ideal for pastry making as it can
be heated to higher temperatures than
regular butter.
NOTE: Margarine is a good substitute for
butter. However because it is made from
vegetable oils it may alter the end results.
There is a variety of margarines to
choose from when diets are a concern.
Yeast:
Yeast is a raising agent used in doughs.
It is a microscopic living organism that
grows rapidly in warm, moist conditions.
The yeast plant feeds on sugar and
expels carbon dioxide which expands the
gluten. Do not allow the water
temperature to exceed 104 °F when
foaming yeast, as this will kill the live
yeast. It is best to foam yeast with
temperatures between 79°F - 86 °F that
are draft free.
Substitutes
If you need to substitute ingredients in a
recipe, check the following alternatives:
1 cup self raising flour = 1 cup plain
flour and 2 tsp baking powder
1 cup plain flour and 1 tsp baking
powder = ½ cup each of plain and self
raising flour.
Sultanas = equal measure of any other
dried fruit.
Golden Syrup = equal measure of
molasses.
1 cup buttermilk = 1 cup fresh milk and
2 tsp vinegar of lemon juice.
Hints for Measuring Ingredients
A good recipe depends on correct and
careful measurement of all ingredients.
All measurements of dry ingredients
should be “leveled off” (scrape surface of
a dry measuring cup with the flat end of a
knife). Tapping the measuring cup lightly
on a kitchen counter or table before
leveling. If your dry ingredients has any
lumps, make sure to remove or break
them up prior to mixing.
6
Raising Agents:
For best results pay attention to details.
Check for lumps and crush them if using
baking soda before measuring. Ensure
that yeast is fresh, and water is at the
right temperature.
Cheese and Breadcrumbs:
Pack grated cheese and soft breadcrumbs into the cup pressing lightly to
obtain best results.
Fats and Oils:
The easiest way to measure ingredients
such as butter, margarine or shortening
is to place ½ cup of water into a
measuring cup then add margarine etc
until the water level raises to the amount
required minus the ½ cup water. Discard
water after measuring.
Helpful Hints for a Successful
Dough
Preparing the Yeast
Step 1: For the dry yeast to be
activated it needs to ferment.
To do this place warm milk,
sugar and the tepid water into
a bowl, add dry yeast and mix.
Let stand in a warm place until
mixture starts foaming, ie:
bubbles come to the surface.
This process will take
approximately 10 minutes.
WARNING: Ensure that you do not
overheat the milk or water as high
temperatures kill the yeast.
Read all the sections of this booklet and follow all the instructions carefully.
OPERATING INSTRUCTIONS
Warning: To avoid injury when inserting
or removing beaters or dough hooks,
always set the speed selector to the
“Off” position and unplug the appliance.
1. Before using your mixer for the first
time, wash the beaters, dough hooks,
and bowl in warm, sudsy water. Rinse
and dry thoroughly. Use a damp cloth
to wash the mixer base. Dry with
a soft cloth. NEVER immerse the
mixer in water or any other liquids.
2. Before assembling your mixer, make
sure that the power cord is unplugged
from the electrical outlet and that the
On/Off beater speed control is at the
“Off” position.
4. To insert the beaters: take
the two beaters, the
oval shaped beater (a) is
placed in the left socket,
of the mixer head, (outer
position). Place the beater
with the plastic scrapers (b) a
on the base into the right
socket, (inner position). (Fig. 2)
Fig. 2
b
a
Attaching the Beaters to the
Mixer
5. To insert the beaters: take
the two dough hooks,
place the dough hook with
the shorter hook at the
bottom (a) into the left
socket of the mixer head.
Then place the longer dough
hook (b) into the right socket
a
(inner position) of the mixer
head. (Fig. 3)
1. Ensure that the mixer is not
plugged in to an electrical outlet
and that the On/Off beater speed
selector is on the “Off” position.
2. Press the mixer head release
button and tilt the mixer head
upwards. (Fig. 1)
NOTE: The mixer head will lock in the
‘tilt’ position.
Fig. 1
Fig. 3
b
a
Preparing the Dough
NOTE: Ensure dough hooks are properly
in place.
Step 1: Place the dry ingredients into
the mixer’s bowl and position
onto the base locking the bowl.
Turn the speed control
switch to “LOW”. Begin to
gradually add the liquid
ingredients to the bowl while
mixer is on a low beater
speed.
NOTE: Using a spatula to scrape the
sides of the bowl while mixing is helpful.
CAUTION: Do not attempt to feed the
dough into the dough hooks with your
hands, spatula or any other utensil while
the mixer is operating.
b
6. Ensure that both the beaters or
dough hooks click firmly into
place, if required you can twist the
attachments slightly to engage
them into position prior to pushing
them into the sockets.
NOTE: Ensure that the dough hooks
are properly inserted into the correct
sockets in the correct manner or your
mixer or hooks could be damaged.
Mixer Head Release Button
3. Select the desired attachments
depending on the mixing task at
hand:
Beaters-For creaming butter and
sugar, mixing cake and muffin
mixes or whisking cream or egg
whites.
Dough Hooks-For kneading dough,
and other heavy mixes.
3
b
OPERATING INSTRUCTIONS
Using the Mixer
Warning: To avoid injury when inserting
Fitting the Bowl onto the Base
Warning: To avoid injury when inserting
or removing beaters or dough hooks,
always set the speed selector to the
“Off” position and unplug the appliance.
1. With the On/Off - beater speed
selector in the “Off” position, plug the
power cord into a 120 volt power
outlet.
NOTE: The power indicator light will now
be illuminated.
2. Use the On/Off – beater speed
selector to turn the unit on and off and
to control the speeds for mixing.
(Fig. 6)
or removing beaters or dough hooks,
always set the speed selector to the
“Off” position and unplug the appliance.
1. Press the mixer head release button,
located on the side. While the button
is depressed, ease the mixer head
back.
NOTE: The mixer head will lock in the
‘tilt’ position.
2. Place the mixing bowl onto the metal
base so that it is sitting evenly. Lock
the bowl into place by turning it
clockwise. (Fig. 4)
Lock
OPERATING INSTRUCTIONS
Power
Indicator
Unlock
Fig. 6
Removing the Beaters/Dough
Hooks
Warning: To avoid injury when inserting
Mixing Guide
To use your mixer most efficiently use
the mixing guides below.
or removing beaters or dough hooks,
always set the speed selector to the
“Off” position and unplug the appliance.
1. Hold down the mixer head release
button and ease the mixer head back
until it locks into position.
2. To remove the attachments, loosely
hold the beater shafts while pressing
down on the beater eject button.
(Fig. 7)
Fig. 7
MIXING GUIDE
Beater
Eject
Button
On/Off-Beater
Speed Selector
Fig. 4
HIGH-LOW Bowl
Speed Selector
Fig. 5
3. The beaters will gently release from
mixing head.
Selecting the Mixing Bowl Speed
Mixer Head
Release Button
4
RECOMMENDED
SPEED(S)
Folding &
Blending
“LOW” 1 & 2
Light Mixing
“LOW” 3 & 4
Creaming &
Beating
“LOW” 5 or
“HIGH” 6 - 8
Whipping &
Aerating
“HIGH” 9 & 10
Note:
• Always select the speed setting
before the mixing bowl speed to
prevent ingredients from being flicked
out of the mixing bowl.
• Always start mixing at slow speeds
and increase the speed gradually to
prevent the ingredients splashing out
of the bowl.
TIP: Start mixing at slow speeds and
increase speed gradually to prevent
ingredients splashing out of the mixing
bowl. When adding dry ingredients,
particularly flour, lower the speed
temporarily until ingredients are
combined.
TIP: When kneading yeast doughs, use
‘LOW’ speed to achieve best results.
3. Press the mixer head release button
and hold while pushing the mixer
head downwards with the selected
attachments in place. (Fig. 5)
MIXING
TASK
1. The mixing bowl automatically turns
when the On/Off beater speed
selector is turned on. Most tasks
will require the ‘LOW’ speed
setting.
2. To select the ‘HIGH’ bowl
speed turn the bowl speed
selector clockwise
towards ‘HIGH’. This
setting is best used for maximum
performance required for dishes such
as meringue, and cakes.
NOTE: The mixture passes through the
beaters more often yielding faster results.
For large volume mixtures the bowl
speed should be set at ‘LO’.
3. When mixing is complete, turn the
On/Off beater speed selector to the
“Off” position and unplug the unit.
5