1
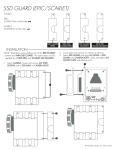
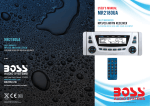
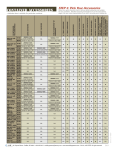
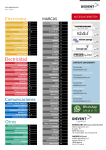
1. What's Included
3. Key Functions
1. RF Receiver
x 1pcs
3
1
4
2
MRF90
Floating, Water-Resistant
Radio Frequency Wireless Remote With White LED LIGHT
2. RF Remote Control
6
7
x 1pcs
5
8
9
3. Long Lasting 3V Lithium Battery x 1pcs
4. User Manual x 1pcs
5. Weather-Resistant Plastic Remote Holder x 2 PCS
6. Weather-Resistant Self-Tapping Screws x 4 pcs
1. Press MODE button to change mode.
) button to use the white
2. Press and hold Light (
7. Double sided Mounting Tape x 2 pcs
3. Press DISP button to view clock, and other available
LED light.
information.
8. Lanyard x 1pcs
4. Use Volume up ( ) to raise the sound volume.
5. Use Volume down ( ) to lower the sound volume.
6. Press ( ) button to seek up/select the higher channel
/track up in different modes. Or hold this button to tune
up/fast channel up/fast forward, etc in different modes.
7. Press (
) button to seek down/select the lower channel
/track down in different modes. Or hold this button to tune
down/fast channel down/fast rewind, etc in different modes.
8. Press BAND button to change different band in the
AM &FM mode(if available).
9. Press POWER( ) once to turn on or off the unit.
Compatible with MR2180UA, MR1650UA, MR1630UA
Connect the MRF90 black box receiver to the RF
remote port connector at the back of the unit securely.
Make sure the pins are aligned properly when pugging
in, and the connection is secure, use tape to secure
the connection if needed. When installing the receiver
do not put it in any metal shielding for better reception.
1. On the back of the Remote, remove the battery
Main Unit
like pictures below, gently with a coin.
2. Obtain one fully charged Cr2430. Be sure to install
the new battery the same way as the old battery.
3. Install the battery cover back into place, being
careful to align it with the rubber seal.
CR2430 Battery Specification (Coin Type Crimpsealed, Primary Lithium Battery)
Nominal Capacity
Nominal Voltage
Standard Discharge Current
Max. Discharge Current
Continuous
Pulse
Temperature Range
Weight
Dimensions
280mAh
3V
0.3mA
6mA
50mA
-10°C ~ +60°C
4.0g
3.0mm
24.5mm
Height (H)
Diameter(D)
RF Remote Port
Remove The Battery Out
2
CL
O
SE
EN
E
EN
OS
OP
RF Receiver
EN
CL
3
OP
1
OP
Floating, Water-Resistant
Radio Frequency Wireless Remote With White LED LIGHT
4. Installing/Replacing the Battery
RF Remote Port
MRF90
2. Connecting the RF Receiver
CL
OS
E
Installing/Replacing the Battery (continued)
4
5
O
SE
EN
CL
OS
E
OP
OP
CL
EN
OS
E
CL
6
OP
EN
Warning: Always
use the rubber ring
when installing the
battery cover.
7.Remote Cradle Mounting Instructions
There are 2 recommended mounting options:
1. If mounting the cradle on a wood surface, two self
tapping stainless steel screws are included. Hold
the cradle in place and proceed with the self
tapping screws.
2. If mounting on the surface of a SPA, Boat or other
fiberglass surface, we've included an adhesive
strip that is resist to most SPA chemicals,
saltwater and sunlight. Make sure the mounting
surface is clean and dry. Then remove the
adhesive proactive tape on both sides of the
adhesive strip, and apply the strip to the fiberglass
surface. You're now ready to mount the cradle.
Simply press firmly for a few seconds and it's
done. firmly for a few seconds and it's done.
Self-tapping screw
M3X12mm
5. How to pair Remotes
Each receiver can support up to 10 Remote Controls
at the same time.
Method: Press and hold the DISP button for 5 seconds.
Note: If the receiver is already paired with 10 remotes
successfully and you continue to pair new remotes, it
will automatically un-pair with the the first remotes
paired.
6. Specifications
Remote Control Power:
1 pcs CR2430 Battery
RF Range:
Up to 20 Feet
Remote Control
Dimensions (H x W x D):
86x 56x12 mm
RF Receiver Dimensions 76x 42x17 mm
(H x W x D):
Note: Specifications are typical. Individual units may
vary. Specifications are subject to change and
improvement without notice.
Reminder: This unit uses 433.92MHz and may interfere
with other RF transmissions near this frequency.