1
6720606990-0701_(Remote control).fm Page 1 Tuesday, January 30, 2007 10:07 AM
Bosch Remote Control for
6 720 606 990 (07.01) JS
GWH-635-ES/ESO/250SX/250SXO/2400E/2400EO
6720606990-0701_(Remote control).fm Page 2 Tuesday, January 30, 2007 10:07 AM
Contents
Contents
1
Declaration of conformity FCC 3
2
Remote control data
4
3
Parts supplied
4
4
4.1
4.2
4.6
4.7
Using the remote control
4
Description of the LCD
4
Remote control transceiver PCB
installation
5
Remote control activation
7
AF board
7
SU board
8
Hot water temperature adjustment
by remote control
9
"Program" button on the remote
control
9
"Priority" function
10
Error messages
11
5
5.1
5.2
5.3
Troubleshooting
Replacing batteries
Cleaning
Troubleshooting
12
12
12
12
6
Notes
15
4.3
4.3.1
4.3.2
4.4
4.5
2
6 720 606 990
6720606990-0701_(Remote control).fm Page 3 Tuesday, January 30, 2007 10:07 AM
Safety instructions
Safety instructions
1
Declaration of conformity FCC
B Read the following instructions very
carefully to ensure correct
operation.
This device meets the requirements of
FCC Directives.
B Follow safety instructions.
Caution: Any
changes or
modifications not
expressly approved
by the party
responsible for
compliance could
void the user’s
authority to operate
the equipment.
Caution: the remote
control
is
waterproof and can
also be used in the
shower
. Nevertheless,
you
should ensure it is
not immersed in
water, for instance
in the bathtub
.
6 720 606 990
Caution: The
remote control can
be used only in the
following countries:
United States of
America and
Canada.
This device complies with Part 15 of
the FCC rules. Operation is subject to
the following two conditions: (1) This
device may not cause harmful
interference, and (2) this device must
accept any interference received,
including interference that may cause
undesired operation.
3
6720606990-0701_(Remote control).fm Page 4 Tuesday, January 30, 2007 10:07 AM
Remote control data
2
Remote control data
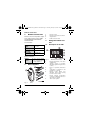
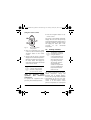
Remote control for temperature adjustment of Bosch water heaters GWH635-ES/ESO/250 SX/250SXO/
2400E/2400EO.
1
2
3
4
Remote control
Remote control transceiver PCB
Support block
PCB connection cable
4
Using the remote control
4.1
Description of the LCD
Technical Data:
Battery power
supply
Alkaline AA LR 6
2 x 1.5V
Frequency
915 MHz
Type of
protection
IP X6
User range
98 ft (30 m)
Further Indications:
Remote
control
3
Up to 6 remote controls
can be programmed for
one single appliance..
Parts supplied
Fig. 2
1
2
3
4
5
6
7
Fig. 1
4
Multifunctional LCD
Displays temperature, error codes
and functions
"Remote control in operation"
indication (signal arriving at remote
control)
Device in operation (with burner
on)
Temperature measurement unit
(possible in °C and °F)
Remote control battery level
indication (weak signal coming
from the remote control)
Priority function (temperature
cannot be modified by other user
when water is running)
"Error code" symbol
Parts
6 720 606 990
6720606990-0701_(Remote control).fm Page 5 Tuesday, January 30, 2007 10:07 AM
Using the remote control
4.2
Remote control transceiver PCB installation
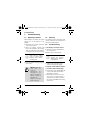
Warning: For safety reasons, disconnect the power
supply to the water
heater before performing installation.
Pre-installation preparation
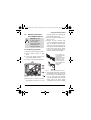
B Disconnect power supply to heater.
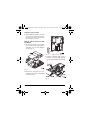
2) being careful not to damage the
foam sealant material on it.
B Remove control unit auxiliary cover
(Fig. 3, pos. 4).
B Remove the two electrical strip
connectors inside the auxiliary cover
(Fig. see diagram below) and then
loosen the 110V power supply cord
retaining nut located underneath the
heater. Once loosened, the power
cord can be pulled up through the
heater to provide sufficient slack.
B Remove plastic decals on front
panel.
Once auxiliary cover
is off, pull off the two
electrical strip
connectors from the
board. Once off, the
wiring harness can
be removed from the
case by pulling their
rubber seals
outward.
B Loosen two Philips head screws
located behind plastic decals.
B Lift front cover upward and remove.
Fig. 4
Fig. 3
B Remove the 5 screws on the front
retaining bar (see Fig. 3, pos. 1 and
6 720 606 990
Electrical strip connectors
B At the ignition electrodes, pull off the
2 yellow igniter wires that come from
the top of the control board (Fig. 3,
pos. 3). Then pull the complete
control board forward and out of the
heater, pull up the power supply
cord further if more slack is needed.
5
6720606990-0701_(Remote control).fm Page 6 Tuesday, January 30, 2007 10:07 AM
Using the remote control
B While holding the board in one hand
or resting it on a flat surface, remove
the front cover of the control board
by removing its 4 screws.
Remote control transceiver PCB
installation
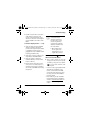
B Remove the protective cover (Fig. 5,
pos. 2) from one face of the support
and attach it to the main PCB as
shown in Fig. 6.
Fig. 6
Support correct position
B Using the supplied cable connect
between the main PCB and the
remote control PCB as shown in Fig.
7.
Fig. 5
B Remove the other protective cover
and attach the remote control PCB
as shown in Fig. 7.
Fig. 7
6
6 720 606 990
6720606990-0701_(Remote control).fm Page 7 Tuesday, January 30, 2007 10:07 AM
Using the remote control
B Replace the control unit cover with
the 4 Philips head screws (Fig. 5,
pos. 1).
B Slide control unit back into heater.
B Plug 2 yellow electrode wires from
the top of the control unit back onto
the ignition electrodes (Fig. 3, pos.
3).
i
Wire polarity does not
matter on the electrode
wires.
B Pull end of power cord to take up
excess slack and tighten retaining
nut on the bottom of the heater.
B Reinstall the two electrical strip
connectors onto the PCB. The
larger connector connects to the
lower connection on the PCB.
Reseat the rubber seals for both
connectors.
B Replace the control unit auxiliary
cover. (Fig. 3, pos. 4).
B Replace front retaining bar using 5
Philips head screws. (Fig. 3, pos 1).
4.3
i
Remote control
activation
Before
the
remote
control will work, it must
be activated using the
procedure
described
below with the operator
standing in front of the
appliance.
The remote control initialization
instructions vary based on the version
of control board installed in your
heater.
To determine the control board
version in the water heater:
B Turn power switch on the water
heater to the off position (O).
B When turning power switch to the
on position, note the first two letters
that appear on the display (should
be AF or SU).
B If the letters are AF, follow section
4.3.1. For SU, follow chapter 4.3.2.
4.3.1 AF board
B Connect power to heater.
B Move the power switch on the
appliance to the off position (0).
B On heater control panel press and
hold Program key
or
6 720 606 990
7
6720606990-0701_(Remote control).fm Page 8 Tuesday, January 30, 2007 10:07 AM
Using the remote control
while turning on the power switch (I).
Release program key when LCD
displays “188”.
LCD shows “P2”. If not, repeat
previous step.
B Select “P3” using buttons
on heater.
and
B Press and hold Program key
or
again for 1 sec.
LCD shows one number and one
rotating digit. If not, repeat previous
step.
The number represents the remote
control which is to be registered, the
first remote control will be registered
with number “0”, the second with
number “1” and so on.
The rotating digit shows that the
electronics is expecting a registration.
If the LCD fails to show a number and
rotating digit after repeated attempts,
double check the wire connections
made in section 4.2.
B Hold remote control in front of the
control panel on the heater and
press simultaneously remote control
buttons
and
until the
temperature indication is shown on
the remote control LCD.
B Switch power switch on the
appliance to the "OFF" (0) position
and then back "ON" (I).
8
B Press buttons
or
in order
to reach requested temperature.
New remote control is programmed.
4.3.2 SU board
B Connect power to heater.
B Move the main switch on the
appliance to the "OFF" (0) position.
B Press and hold
key while at the
same time turning the main switch to
“ON” position (I).
LCD shows one number and one
rotating digit. If not repeat previous
step.
The number represents the remote
control which is to be registered, the
first remote control will be registered
with number “0”, the second with
number “1” and so on.
The rotating digit shows that the
electronics is expecting a registration.
If the LCD fails to show a number and
rotating digit after repeated attempts,
double check the wire connections
made in section 4.2.
B Hold remote control in front of the
control panel on the heater and
press simultaneously remote control
buttons
or
until the
6 720 606 990
6720606990-0701_(Remote control).fm Page 9 Tuesday, January 30, 2007 10:07 AM
Using the remote control
temperature indication is shown on
the remote control LCD.
B Switch ON/OFF switch to “OFF”
position (0) and then back on (I).
B Press buttons
or
in order
to reach requested temperature.
New remote control is programmed.
4.4
Hot water temperature
adjustment by remote
control
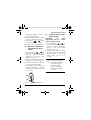
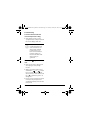
B Press the buttons
or
on
the remote control (Fig. 8, pos. 2)
until the required temperature
appears on the remote control
display (Fig. 8, pos. 1).
B When the required temperature is
displayed, turn on the hot water tap.
B The required temperature will flash
on the remote control display.
B The flashing will stop when the
required temperature is reached
(tolerance from selected set point +/
-5°F (+/- 2°C).
Fig. 8
4.5
"Program" button on the
remote control
Memorizing
the
water
temperature with the remote
control "Program" button
B Press the buttons
or
on
the remote control (Fig. 9, pos. 2), )
until the required temperature
appears on the remote control
display (Fig. 9, pos. 1).
B You will now be able to memorize
this temperature by pressing the
"Program" button on the remote
control (Fig. 9, pos. 3) for 3
seconds.
i
Note: Previously saved
temperature may show
on the display when first
pushing the program
button. Once "PR"
shows on the display,
the desired setting will
be saved.
Temperature adjustment
6 720 606 990
9
6720606990-0701_(Remote control).fm Page 10 Tuesday, January 30, 2007 10:07 AM
Using the remote control
B Press the "Program" button on the
remote control.
Fig. 9
Memorizing water
temperature
B Only one temperature per remote
control can be memorized using the
"Program" button on the remote
control.
B At this point the remote control will
display the memorized temperature .
When the hot water tap is turned on,
the water heater will supply hot
water at the temperature memorized
on the remote control.
i
Up to six addition remote
controls can be used to
memorize a temperature
for each remote control.
Using the "Program" button
(operation
with
memorized
temperature)
To operate the equipment with a
previously memorized temperature:
10
The remote control display and heater
display will now show the previously
memorized temperature. When the hot
water tap is turned on, the water heater
will supply hot water after a few
seconds,
at
the
memorized
temperature.
4.6
i
"Priority" function
Temperature cannot be
memorized or changed
using the heater's
control panel buttons or
a second remote control
when hot water is in use
(e.g. during a shower)
The "Priority" function
will automatically
activate to stop another
user from modifying the
temperature when hot
water is in use.
The remote control does not have a
default temperature setting and
therefore has no default "Priority"
function.The "priority" will be attributed
automatically by the first user who
selects or memorizes (on the remote
control or on the heater’s control
panel) a temperature for subsequent
6 720 606 990
6720606990-0701_(Remote control).fm Page 11 Tuesday, January 30, 2007 10:07 AM
Using the remote control
use (e.g. a shower).
Then, when the hot water is used (e.g.
for a shower), the heater's display and
additional remote control displays will
show the symbol "
".
The temperature may only be modified
using the same buttons that
memorized it (depending on whether
the control panel or the remote control
was used). The priority device will not
have the symbol "
".
To clear a device that is locked out with
the "
" symbol (with no hot water
running) simply:
B press and hold both the "
" and
"
" buttons on that device for 5
seconds.
The "Priority" function ends:
• 5 minutes after the last use of the
hot water (return to basic set up).
• 2
minutes
after
selecting/
memorizing the temperature if no hot
water
is
used
immediately
afterwards.
B Press and hold "
" or "
" to
select the desired temperature.
B Press and hold the "Program" button until the symbol "Pr" appears on
the remote control display.
B Use the hot water within two
minutes of acquiring "priority”.
i
4.7
"Priority" cannot be
acquired while the hot
water tap is open.
Error messages
This device has an error message
system. Any errors that the heater
generates will be indicated by an error
code that will appear on the display
(Fig. 2, pos. 1) and by a symbol
indicating a "safety block" (Fig. 2, pos.
7). The remote control will be operative
only after pressing the reset button on
the heater and clearing the error.
To identify the type of error or if the
error will not clear, consult chapter 6 of
the heater installation manual.
Acquiring "priority”
Any user can acquire "priority" for
subsequent use of hot water, as
follows:
B Move the heater's main switch to the
on position (I).
6 720 606 990
11
6720606990-0701_(Remote control).fm Page 12 Tuesday, January 30, 2007 10:07 AM
Troubleshooting
5
Troubleshooting
5.1
Replacing batteries
5.2
Cleaning
When batteries are weak, the symbol
(Fig. 2, pos. 5) will appear on the
display.
Use a damp cloth to clean parts of the
remote control. Do not use abrasive or
solvent-based detergents.
B Remove the two screws on the back
of the remote control.
5.3
B Open the battery housing and
remove the batteries, then replace
with new AA LR6 1.5V batteries,
ensuring they are inserted correctly.
1. No display on remote control
i
Verify that the rubber
seal is correctly fitted
between both plastic
housing parts.
B Close the battery housing using the
two screws.
Warning: dead batteries
must
be
replaced.
Consequently,
the
manufacturer is not
liable for any faults or
damage caused by
dead batteries.
Dispose of the dead
batteries properly.
12
Troubleshooting
B Check for weak or dead batteries
(see section 5.1).
Remote control in sleep mode.
i
If not used for a few
minutes, the remote's
display will go blank to
save batteries.
B simply press any button on the
remote to bring up the display.
2. Remote control will not activate
/ no number with rotating digit
B Ensure that you are standing directly
in front of the water heater when
attempting to activate.
B Ensure that no other device in the
area, such as a cordless phone, is
operating on a frequency similar to
the remote (915 MHz) and causing
interference.
6 720 606 990
6720606990-0701_(Remote control).fm Page 13 Tuesday, January 30, 2007 10:07 AM
Troubleshooting
B Double check all wire connections
made under section 4.2 of the
remote control manual. Pay close
attention to the wire connecting the
remote's PCB to the heater's main
PCB.
3. Remote display shows "- -" only
B Verify the water heater's ON/OFF
switch is turned to the ON (I)
position. If the water heater's display
is still blank, verify the heater is
plugged into a live 120VAC/ 60Htz
properly grounded outlet.
i
Large amounts of metal
or concrete in the
structure may have a
blocking effect on the
remote's signal. This
may alter the maximum
distance allowable from
the water heater.
B Move within direct
line of sight of the
water heater to see if
signal will reconnect.
B Verify there is proper voltage to the
water heater (120VAC/60Htz).
4. Error code and “
” symbol
will not clear from remote
B Verify the remote is within the
maximum distance from the water
heater of 98 feet.
B Error codes cannot be reset by
B Ensure that no other device in the
area, such as a cordless phone, is
operating on a frequency similar to
the remote (915 MHz) and causing
interference
using the remote. All errors must be
cleared by using the reset button
on the water heater's main
control panel
• If an error code is generated immediately after the installation of the
remote control transceiver PCB,
ensure two large electrical connectors (Fig. 4) on the main PCB are
properly seated.
• Error code may not be resettable.
Consult water heater's installation
manual or www.boschhotwater for
further troubleshooting on error
codes.
6 720 606 990
13
6720606990-0701_(Remote control).fm Page 14 Tuesday, January 30, 2007 10:07 AM
Troubleshooting
5. Remote will not memorize
desired temperature setting
B Verify that the remote control
"program" button is depressed until
the remote display reads "Pr".
i
Memorization of a selected temperature only
saves to the device on
which it was originally
programmed. To retrieve a memorized temperature setting, you
must use the device with
which it was programmed.
6. Priority "
clear
" symbol will not
B Verify no hot water is being used
when trying to clear "priority"
function.
B With no hot water running, press
and hold the “
” or “
” button
for 5 seconds on the locked out
device (remote or water heater) until
the "
" symbol (Fig. 2, Pos. 6)
disappears.
B Do not use any hot water for at least
5 minutes. The priority function
should automatically clear after this
time period.
14
6 720 606 990
6720606990-0701_(Remote control).fm Page 15 Tuesday, January 30, 2007 10:07 AM
Notes
6
Notes
6 720 606 990
15
6720606990-0701_(Remote control).fm Page 16 Tuesday, January 30, 2007 10:07 AM
BBT NORTH AMERICA
Bosch Group
Bosch Water Heating
340 Mad River Park
Waitsfield, Vermont 05673
800 642-3111
(802) 426-6924
For service, see contact information listed on the back of the water heater’s installation manual.