Transcript
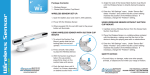
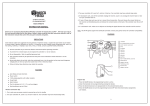
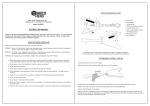
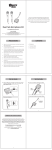
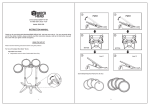
TM
Thank you for purchasing this Multi Wireless Guitar. We hope you enjoy it.
For your personal safety and for the safety of others,
please carefully read this instruction manual as well as the instruction
manuals that came with your game consoles and games.
Multi Wireless Guitar
for WiiTM
Designed for use with RockBandTM and Guitar Hero® games.
Model: DUS0273
Nintendo® and Wii are either registered trademarks or trademarks of Nintendo® of America, Inc.
This product is not sponsored,endorsed or approved by Nintendo®.
TM
1
Quick Setup Guide
PRECAUTIONS
Slide the guitar neck into the guitar body as shown below. Make
sure nothing is caught between the neck and body while
assembling.
Make sure to read the Instruction Manual of the Multi Wireless Guitar
before using the product.
If you have any health concerns, please consult with your physician prior
to using the Multi Wireless Guitar.
If at any time during game play you feel achy, numb, tingling or anything
else abnormal, please take a break from playing. Blockhead recommends
taking frequent breaks to prevent any of the above from happening.
Keep all liquids away from this product. Getting this product wet will
void your warranty.
Do not insert objects of any kind into the product as this may cause
damage or a fire hazard and void your warranty.
To detach the guitar neck from the body, press the connect
button and simultaneously pull out the neck.
Make sure small children are supervised while playing.
Keep the Multi Wireless Guitar out of environments of extreme heat and
extreme cold.
If you have any technical or functional problems with the Multi Wireless
Guitar, please contact Customer Service and do not try to modify the
PRESS
product or fix the problem yourself as this would void your warranty.
OFF
When the Multi Wireless Guitar is not in use, make sure to store it
SYNC
ON
properly for both safety and preservation of the product.
3
Wii Guitar Hero
Wii Guitar Hero
Install batteries
3
Connect
OFF
OFF
SYNC
SYNC
ON
ON
1
2
POWER
SYNC
PRESS
PRESS
Battery
Door
RESRT
POWER
(2 X AA Batteries
Not Included)
Guitar Bottom
Remove the battery cover on the bottom of the guitar and insert 2 AA
batteries. Be sure they are inserted correctly. Then, replace the cover.
ON
Press and hold the SYNC button until the four LEDs light up
simultaneously. Then release it, the four LEDs begin to flash.
IMPORTANT: Always replace the battery cover to prevent moisture, dirt,
dust or other foreign matter from entering the battery compartment.
2
SYNC
OFF
Press the SYNC button of your Wii console.
One of the four LEDs will light up to indicate the player number. The
guitar is ready to play.
Turn on
Note:
OFF
SYNC
ON
Do not connect the attached receiver when you play Guitar Hero.
For playing instruction, see the manual of Guitar Hero.
PRESS
SYNC
TM
When you want to play Rock Band , please turn off the guitar first and
follow the instructions below.
POWER
OFF
ON
Slide the power toggle switch to ON.
5
Wii Rock Band
Wii Rock Band
Install batteries
3
Connect the guitar with the receiver
OFF
OFF
SYNC
ON
SYNC
ON
1
4
POWER
OFF
(2 X AA Batteries
Not Included)
Guitar Bottom
Remove the battery cover on the bottom of the guitar and insert 2 AA
batteries. Be sure they are inserted correctly. Then, replace the cover.
IMPORTANT: Always replace the battery cover to prevent moisture, dirt,
dust or other foreign matter from entering the battery compartment.
2
SYNC
PRESS
PRESS
Battery
Door
ON
Red
indicator
Slide the power toggle switch on the bottom of the guitar to ON. Press
the SYNC button once. When the Red indicator of the receiver stops
flashing and stays on, the connection is complete.
Notes:
If connection fails, make sure your operation is right and repeat
connecting.
TM
For playing instruction, see the manual of Rock Band
When you want to play Guitar Hero, please turn off the guitar and remove
the receiver first and follow the instructions in the previous section.
Connect the receiver
Shift Fret Buttons to Solo Buttons
Insert the USB plug of the wireless receiver into the USB port of Wii™.
And press the Power button to turn on your Wii™. The Green indicator
on the receiver will light up and the Red indicator will flash slowly.
Press the Shift button to make the Fret buttons to be Solo buttons.
6
7
Button Configuration
WARRANTY AND TECHNICAL SUPPORT
Strum Home
Bar
button
Shift
LED button
D-Pad
Guitar Front
Every Blockhead branded product comes with a 90 day warranty (U.S. Only). Blockhead will
replace, repair or refund any defective products or components at no charge to you within 90
days of the purchase date. This warranty does not apply if the Blockhead branded product has
been damaged by misuse, neglect, or reasons unrelated to defective materials or assembly.
Blockhead is not responsible or liable for loss of data or loss of equipment use. You must retain
a copy of your original receipt for warranty support.
For support on Blockhead products, contact us by visiting www.blockheadgaming.com or call
us at 727-431-0650.
Fret
Buttons
Whammy
Bar
Effects
Switch
SYNC
Button
On/Off
Switch
PRESS
OFF
SYNC
ON
Start/+ Select/-
Detachable Neck
Button System
Receiver
Battery
Door
Guitar Back
For general questions, comments, information or grammar tips, email us at
[email protected].
FCC INFORMATION
This equipment has been tested and found to comply with the limits for a class B digital device,
pursuant to part 15 of the FCC rules. These limits are designed to provide reasonable protection
against harmful interference in a residential installation. This equipment generates, uses, and
can radiate radio frequency energy and, if not installed and used in accordance with the instru
-ctions, may cause harmful interference to radio communications.However, there is no guarantee
that interference will not occur in a particular installation. If this equipment does cause harmful
interference to radio or television reception, which can be determined by turning the equipment
off and on, the user is encouraged to try to correct the interference by one or more of the
following measures:
Reorient or relocate the receiving antenna.
Increase the separation between the equipment and the receiver.
Connect the equipment into an outlet on a circuit different from that to which
the receiver is connected.
Consult the dealer or an experienced radio/TV technician for help.
Red
indicator
Note: Changes or modifications not expressly approved by the party responsible for compliance
could void the user's authority to operate equipment.
Green
indicator
8
9