1
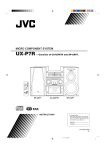
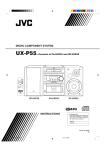
Radio / CD
Sevilla CD51
Wiesbaden CD51
Operating instructions
SVENSKA
NEDERLANDS
3
5
16 15
7
14
13
8
ESPAÑOL
1
9
ITALIANO
4
PORTUGUÊS
2
FRANÇAIS
6
12 11 10
3
ENGLISH
DEUTSCH
CONTROLS
1
2
3
4
5
6
7
8
28
button - unlatches the flip/
release panel
Volume control
Button - switches the radio and
mute function on/off
RDS button - switches RDS convenience function on/off (radio
data system).
Selects variable radio texts.
BND button (band), source selection for radio mode,
selection of FM memory levels
and the wavebands MW and LW
(Wiesbaden CD51 does not feature MW and LW)
TS, starts the Travelstore function.
Display (display field)
button - indicates the time on
the display
DIS, change display contents
MENU button - selects the menu
for basic settings
9
:
;
<
=
>
?
@
button - opens the flip/release
panel
Arrow-key block
OK button - confirms menu entries and starts the scan function
EQ button (digital equalizer) switches the equalizer on/off
AUD button (Audio) - adjusts
bass and treble, balance and
fader
LD - switches loudness function
on/off (volume adjustment to
comfortable hearing level)
Key block 1 - 6
TRAF button, switches traffic information standby on/off
CD•C button - selects between
CD, CD changer (if connected)
and AUX sources
Traffic information .................. 40
CD Mode ................................ 41
Starting CD mode ......................... 41
Selecting a track ........................... 41
Fast track selection ....................... 41
Fast search (audible) ..................... 41
Random play (MIX) ........................ 41
Scanning tracks (SCAN) ............... 42
Repeating a track (REPEAT) .......... 42
CLOCK - Time ........................ 45
Tone and volume balance ...... 46
Switching loudness on/off..... 47
Equalizer ................................ 47
Notes on adjusting the equalizer .... 47
Switching the equalizer on/off ........ 48
Setting the equalizer ...................... 48
Setting the level indicator ............... 48
Setting aid for the equalizer ........... 49
External audio sources .......... 50
Technical data ........................ 50
Guarantee .............................. 51
Installation instructions ........ 196
29
ENGLISH
FRANÇAIS
ITALIANO
NEDERLANDS
Switching to radio mode ................ 35
RDS function (AF, REG) ................ 35
Selecting the waveband/memory ... 35
Tuning into a station ....................... 36
Setting the sensitivity of the
station search mode ...................... 36
Storing stations ............................. 36
Storing stations automatically
(Travelstore) .................................. 37
Listening to preset stations ............ 37
Scanning receivable stations
(SCAN) ......................................... 37
Setting the scanning time .............. 37
Programme type (PTY) .................. 37
Optimising radio reception ............. 39
Selecting radio text display ............ 39
Setting the display ......................... 39
Starting CD changer mode ............ 43
Selecting a CD .............................. 43
Selecting a track ........................... 43
Fast track selection ....................... 43
Fast search (audible) ..................... 43
Changing the display ..................... 43
Repeating individual tracks or
whole CDs (REPEAT) .................... 43
Random play (MIX) ........................ 44
Scanning all tracks on all CDs
(SCAN) ......................................... 44
Interrupting Play (PAUSE) ............. 44
SVENSKA
Flip/release panel .................. 31
Switching on/off .................... 32
Volume adjustment ................ 33
Radio mode ............................ 35
CD changer mode .................. 43
ESPAÑOL
Road safety ................................... 30
Installation ..................................... 30
Accessories .................................. 30
International telephone
information .................................... 30
Interrupting play (PAUSE) .............. 42
Changing the display ..................... 42
Traffic announcements in
CD mode ...................................... 42
Removing a CD ............................. 42
PORTUGUÊS
Notes and Notes and
accessories ............................ 30
DEUTSCH
TABLE OF CONTENTS
NOTES AND ACCESSORIES
Thank you for deciding in favour of a
Blaupunkt product. We wish you a great
deal of pleasure with your new car radio.
Before using your car radio, please read
these instructions carefully. The Blaupunkt editors are constantly working to
make our instruction manuals as clear
and easy to understand as possible.
Should you nonetheless have any questions about how to operate your new car
radio, please contact your specialist
dealer or call the telephone hotline for
your country, the number of which is given on the back page of this manual.
Road safety
Road safety has priority. Only operate your car radio if road and traffic conditions allow. Familiarise yourself with the unit before setting off on
your journey.
You should always be able to hear
police, fire and ambulance sirens in
good time. For this reason, set the
volume of your car radio at a suitable level.
Installation
If you would like to install your car radio
yourself, please read the installation and
connection instructions at the end of the
manual.
30
Accessories
Please use only Blaupunkt-approved
accessories.
Remote controls
The most important functions can be
selected safely from the steering wheel
using the optional remote controls RC
08 and RC 10.
Amplifiers
All Blaupunkt amplifiers are suitable for
use with the radio.
CD changer
The following Blaupunkt CD changers
can be connected to the radio: CDC
A 06, CDC A 08, CDC A 072 and IDC
A 09.
The CD changers CDC A 5 and CDC
A 071 can also be connected if you use
an adapter cable (Blaupunkt no.: 7 607
889 093).
International telephone
information
Should you have any questions about
how to use the car radio or require any
further information, please call us!
The telephone information service numbers are printed on the last page of this
manual.
Removing the flip/release panel
1
➮ Press the
●
●
Attaching the flip/release panel
➮ Slide the flip/release panel from left
to right into the unit guide.
➮ Press the left side of the panel into
NEDERLANDS
ITALIANO
the unit until it slots into place.
Note:
● Do not press against the display
while attaching the flip/release panel.
If the car radio was switched on when
the flip/release panel was removed, it
comes on again automatically as last
set (radio, CD, CD changer or AUX)
when the panel is replaced.
button 1.
This unlatches the flip/release panel.
31
SVENSKA
Note:
● Do not drop the flip/release panel.
● Do not expose the flip/release panel to direct sunshine or other sources of heat.
● Keep the flip/release panel in the
case provided.
● Avoid direct skin contact with the
flip/release panel. Please clean it
when necessary with some white
spirit on a lint-free cloth.
●
ESPAÑOL
Your car radio is fitted with a flip/release
panel to guard against theft. Without this
panel, the unit is worthless to the thief.
Protect your unit from theft by taking the
flip/release panel with you every time
you leave the car. Do not leave the panel
behind in the car, even if it is out of sight.
The constructive design of the panel
makes for simple handling.
straight and then to the left out of
the unit.
After removing the flip/release panel, the unit switches itself off.
All the current settings are saved.
If there is a CD in the unit, it remains there.
ENGLISH
Theft protection
FRANÇAIS
➮ First pull the flip/release panel
PORTUGUÊS
Flip/release panel
DEUTSCH
FLIP/RELEASE PANEL
SWITCHING ON/OFF
Switching on/off
There are various ways of switching the
car radio on and off, as described below.
Switching on/off using the ignition
If the car radio is correctly connected to
the ignition and has not been switched
off using the button 3, it is switched
on/off simultaneously with the ignition.
You can also switch on your car radio
when the vehicle ignition is off.
➮ To do so, press the button 3.
Note:
To protect the vehicle battery, the
unit switches off automatically after
one hour.
●
Switching on/off using the flip/
release panel
➮ Remove the flip/release panel.
The unit switches itself off.
➮ Replace the flip/release panel once
more.
The car radio is switched on. The last
settings (radio, CD, CD changer or AUX)
are activated.
Switching on/off using the button
3
➮ To switch the unit on, press the button 3.
➮ To switch the unit off, hold the button 3 down for more than two
seconds.
The car radio is now switched off.
32
Switching on by inserting a CD
If there is no CD in the CD compartment when the car radio is switched off,
➮ press the
button 9.
This flip/release panel then opens.
➮ Without exerting any force, slide
the CD into the compartment, printed side uppermost, until you feel
some resistance.
The CD is automatically drawn into the
drive.
Do not hinder or assist the drive as it
draws the CD in.
➮ Press the flip/release panel gently
until you feel it slot into place.
The car radio switches itself on and CD
playback begins.
Volume adjustment
Mute setting
The system volume can be adjusted in
steps from 0 (off) to 66 (maximum).
This feature enables you to lower the
system volume instantaneously (mute).
➮ Press the MENU button 8.
➮ Press the or button : repeatedly until “ON VOLUME” appears on the display.
buttons : to set the
switch-on volume.
If you select the “0” setting, the volume
played before the unit was last switched
off will be reactivated.
➮ Use the
Risk of serious injury! If the
switch-on volume is set at the maximum, the volume can be very high
when you switch on your car radio.
If the volume was set on maximum
before the unit was last switched off
and the switch-on volume is set at
“0”, the volume can be very high
when you switch on your car radio.
This may damage your hearing!
➮ When you have completed setting
the volume, press either the MENU
button 8 or OK ;.
ENGLISH
➮ Press the MENU button 8.
➮ Press the or button : repeatedly until “MUTE LEVEL” appears on the display.
➮ Use the
buttons : to set the
mute level.
➮ When you have completed the setting, press either the MENU button
8 or OK ;.
Mute during telephone
operation
If your car audio system has been
equipped with a mobile telephone, it will
automatically switch to mute when you
use the phone. This will not work unless the mobile phone is connected to
the car audio system as described in
the installation instructions.
If a traffic announcement is received
while the phone is in use and traffic information priority has been activated,
you will hear the traffic announcement.
For more information, refer to the section on “Traffic information reception”.
The car audio system will be muted to
the mute level selected.
33
FRANÇAIS
You can set the volume at which you
wish the car radio to play when switched
on.
ITALIANO
Setting the switch-on volume
Activating the mute setting
The unit's mute level is adjustable.
NEDERLANDS
the volume control 2 to the left.
SVENSKA
➮ To lower the system volume, turn
➮ Briefly press button 3.
“MUTE” appears on the display.
ESPAÑOL
the volume control 2 to the right.
PORTUGUÊS
➮ To raise the system volume, turn
DEUTSCH
VOLUME ADJUSTMENT
VOLUME ADJUSTMENT
Setting the volume for the
confirmation tone
If you hold down a button for longer than
two seconds when using certain functions, e.g. storing a station on a station
button, a confirmation tone (beep)
sounds. The volume of this beep is adjustable.
➮ Press the MENU button 8.
➮ Press the or button : repeatedly until “BEEP” appears on
the display.
➮ Adjust the volume using the
and
buttons :. “0” means the beep
is off, “9” means maximum beep
volume.
➮ When you have completed the setting, press either the MENU button
8 or OK ;.
34
peatedly until “RADIO” appears on
the display.
RDS function (AF, REG)
The RDS functions AF (Alternative Frequency) and REG (Regional) extend
your radio's range of functions.
● AF: If this RDS function is activated, the unit automatically tunes into
the best receivable frequency for
the station that is currently set.
● REG: Some radio stations set
aside some of their broadcasting
time for regional programmes that
provide different regional content.
With the REG function, your car radio is prevented from switching to
alternative frequencies with a different regional content.
Note:
● REG has to be specially activated/
deactivated in the unit's menu.
button :.
;.
Switching the RDS convenience
function on/off
➮ To use the RDS functions AF and
REG, press the RDS button 4.
The RDS convenience functions are
active when RDS lights up on the display with a symbol. When the RDS convenience functions are activated, “REG
ON” or “REG OFF” appears briefly on
the display.
Selecting the waveband/
memory
This unit can receive programmes
broadcast over the FM as well as MW
and LW (AM) waveband (Wiesbaden
CD51 only receives FM). There are
three preset memory levels for the FM
range and one each for the MW and
LW ranges (only FM1, FM2 and FMT
for Wiesbaden CD51).
Six stations can be stored on each
memory level.
35
ENGLISH
FRANÇAIS
or
➮ Press the MENU button 8 or OK
ITALIANO
➮ press the BND/TS button 5 re-
➮ To switch REG on or off, press the
NEDERLANDS
If you are in CD, CD changer or AUX
mode:
peatedly until “REG” appears on
the display. “OFF” or “ON” will be
displayed alongside “REG”.
SVENSKA
Switching to radio mode
➮ press the MENU button 8.
➮ Press the or button : re-
ESPAÑOL
This unit is equipped with an RDS radio
receiver. Many of the receivable FM stations transmit a signal that not only carries the programme but also additional
information such as the station name
and programme type (PTY).
The station name appears on the display as soon as it is received.
Switching REG function on/off
To use the RDS functions AF and REG,
PORTUGUÊS
Radio mode
DEUTSCH
RADIO MODE
RADIO MODE
➮ In order to switch between memory
levels or wavebands, briefly press
the BND/TS button 5.
Tuning into a station
There are various methods available for
tuning into a station.
Automatic station search mode
➮ Press the
or
button :.
The unit tunes into the next receivable
station.
Tuning into stations manually
You can also tune into stations manually.
➮ Press either the
or
buttons :.
Note:
● You can only tune into stations
manually if the RDS function has
first been deactivated.
Browsing through broadcasting
networks (only FM)
If a radio station provides several programmes, you have the option of browsing through its so-called “broadcasting
network”.
or button : to
move to the next station on the
broadcasting network.
➮ Press the
Note:
● If you want to use this feature, the
RDS function must first be activated.
You will then only be able to switch to
stations that you have received once
already. To do so, use the Scan or Travelstore function.
36
Setting the sensitivity of the
station search mode
You can choose whether you wish to
preset only strong or also poor-reception stations.
➮ Press the MENU button 8.
➮ Press the or button : repeatedly until “SENS” appears on
the display.
➮ Press the
button :.
The display shows the currently set value for sensitivity. “SENS HI6” denotes
maximum sensitivity. “SENS LO1” is the
minimum. If “SENS LO” is selected, “lo”
appears on the display.
buttons : to set the
desired degree of sensitivity.
➮ Use the
➮ When you have completed the settings, press the MENU button 8
or the OK buttons ;.
Storing stations
Storing stations manually
➮ Select the required FM memory
level, FM1, FM2, FMT or either
waveband MW or LW (Wiesbaden
CD51 does not feature MW and
LW).
➮ Tune into the desired station.
➮ Hold down one of the preset station buttons 1 - 6 > on which you
wish to store the station for more
than two seconds.
peatedly until “SCANTIME” appears on the display.
➮ Hold down the BND / TS button 5
for more than two seconds.
The automatic station-storing procedure
begins. “TRAVEL-STORE” appears on
the display. Once the process is completed, the station stored in FMT memory location 1 is played.
Listening to preset stations
➮ Select the memory or frequency
range.
➮ Hold down the preset station button 1 - 6 > of the desired station.
Scanning receivable stations
(SCAN)
You can briefly listen in to all receivable
stations. The scanning time can be set
in the menu at between 5 and 30 seconds.
Starting SCAN
➮ Hold down the OK button ; for
more than two seconds.
The scanning process begins. “SCAN”
appears briefly on the display, followed
by the current station name or frequency, which flashes.
buttons : to set the
desired scanning time.
➮ Use the
➮ Once the setting has been completed, press the MENU button 8
or OK ;.
Note:
The set scanning time also applies
to scanning in the CD and CD
changer mode.
●
Programme type (PTY)
Besides transmitting the station name,
some FM stations also provide information on the type of programme they are
broadcasting. This information can be
received and displayed by your car radio.
For example, the programme types can
be:
CULTURE
TRAVEL
JAZZ
SPORT
NEWS
POP
ROCK
CLASSICS
You can use the PTY function to select
stations of a particular programme type.
37
ENGLISH
FRANÇAIS
Setting the scanning time
➮ Press the MENU button 8.
➮ Press the or button : re-
ITALIANO
Note:
● Stations that were previously
stored in this memory are deleted
in the process.
The scanning process is completed, the
station last scanned remains active.
NEDERLANDS
➮ Press the OK button ;.
SVENSKA
You can store the six stations with the
strongest reception in the region automatically (only FM). The stations are
stored in the FMT memory.
ESPAÑOL
Ending SCAN, continuing to listen
to a station
PORTUGUÊS
Storing stations automatically
(Travelstore)
DEUTSCH
RADIO MODE
RADIO MODE
PTY-EON
When the programme type has been
selected and the search started, the car
radio switches from the current station
to a station featuring the selected programme type.
Note:
● If no station with the selected programme type is located, a beep
sounds and “NO PTY” appears
briefly on the display. The unit
tunes into the station last received
once again.
● If the set station or another station
in the broadcasting network transmits the selected programme type
at a later time, the car radio automatically switches from the current
station - or from CD or CD changer
mode - to the station featuring the
desired programme type.
Switching PTY on/off
➮ Press the MENU button 8.
➮ Press the or button : repeatedly until “PTY ON” or “PTY
OFF” appears on the display.
or button : to
switch PTY on (ON) or off (OFF).
When PTY is activated, PTY lights up
on the display.
➮ Press the
➮ Press the MENU button 8 or OK
;.
38
Selecting programme type and
starting a search
➮ Press the
or
button :.
The current programme type appears
on the display.
➮ If you would like to select a different programme type, you can
change to another programme time
within the time the programme is
displayed by pressing the or
button :.
Or
➮ Press one of the buttons 1 - 6 >
to select the programme type
stored on that particular button.
The selected programme type will appear briefly on the display.
or button : to
start the search.
The next station corresponding to your
selected programme type will be tuned
into.
➮ Press the
Storing the programme type on the
station buttons
or button : to select
a programme type.
➮ Use the
➮ Hold down the desired station button 1 - 6 > for more than two seconds.
The programme type is now stored on
the selected station button 1 - 6 >.
repeatedly until “HICUT” appears
on the display.
or button : to select
HICUT.
“HICUT 0” denotes no treble reduction,
“HICUT 1” the greatest automatic reduction of the treble and the interference
level.
➮ Use the
➮ Press the MENU button 8 or
OK ;.
➮ In order to reactivate the display of
“radio texts”, hold down the RDS
button 4 until “NAME VAR” appears on the display.
Setting the display
In radio mode you can choose between
the continuous display of the time or the
continuous display of the station name/
frequency.
/ DIS button 7
until the desired feature appears on
the display.
➮ Hold down the
ENGLISH
ESPAÑOL
➮ Press the MENU button 8.
➮ Press the or button :
“NAME FIX” appears on the display.
PORTUGUÊS
Switching HiCut on/off
➮ Press the RDS button 4 until
FRANÇAIS
Some radio stations use the RDS signal to broadcast advertising or other information instead of their station name.
Such “radio texts” appear on the display. You can either allow or block the
display of radio text.
ITALIANO
High-frequency cut-off feature
(HICUT)
The HiCut function improves the sound
during poor radio reception (only FM).
If interference occurs, the treble is automatically reduced and thus also the
interference level.
NEDERLANDS
Selecting radio text display
SVENSKA
Optimising radio reception
DEUTSCH
RADIO MODE
39
TRAFFIC INFORMATION
Traffic information
Your car radio is equipped with an RDSEON reception system. EON stands for
Enhanced Other Network.
When a traffic announcement (TA) is
broadcast, your unit will automatically
switch, within a broadcasting network,
from a station which does not transmit
traffic information to one that does.
The unit reverts to the programme previously listened to when the traffic announcement is over.
Switching traffic information
priority on/off
➮ Press the TRAF button ?.
Priority for traffic announcements is activated when the traffic-jam symbol lights
up on the display.
Note:
You will hear a warning tone,
● if you leave the reception area of a
traffic information station to which
you are currently tuned in;
● if you leave the reception area of a
traffic information station when you
are listening to a CD and the subsequent automatic search cannot
locate a new traffic information station;
● if you retune the radio from a traffic
information station to one that does
not broadcast traffic information.
Either deactivate the priority for traffic
information or switch to a station which
broadcasts traffic information.
40
Setting the traffic
announcement volume
➮ Press the MENU button 8.
➮ Press the or button : repeatedly until “TA VOLUME” appears on the display.
or button : to set the
desired volume.
➮ Use the
➮ Once the setting is completed,
press the MENU button 8 or OK
;.
Note:
You can also adjust the volume
during a traffic announcement for
its duration by using the volume
control 2.
●
Note:
● You can also adjust the tone and
volume balance for traffic announcements. Please see the
“Tone and Volume Balance” section.
or button
: until fast track selection backwards or forwards begins.
Fast search (audible)
For a fast search backwards or forwards
buttons : pressed
until the fast search backwards or
forwards begins.
➮ keep the
Random play (MIX)
➮ Press the button 5 MIX >.
“MIX CD” appears briefly on the display,
the MIX symbol lights up. The next track
played will be randomly selected.
Stopping MIX
➮ Press the button 5 MIX > once
again.
“MIX OFF” appears briefly on the display, the MIX symbol goes out.
41
ENGLISH
FRANÇAIS
➮ hold down either the
ITALIANO
If there is no CD in the drive,
➮ Press the button 9.
The flip/release panel opens.
➮ Gently insert the CD into the CD
compartment with the printed side
uppermost until you feel some resistance.
The CD will be drawn into the drive automatically.
Do not hinder or assist the drive as it
draws the CD in.
➮ Close the panel using light pressure until you feel it latch into place.
CD playback begins.
● If there is already a CD in the drive,
➮ press the CD•C button @ repeatedly until “CD” appears on the display.
Playback begins from the point at which
it was last interrupted.
●
For fast track selection backwards or
forwards:
NEDERLANDS
Starting CD mode
Fast track selection
SVENSKA
Risk of damage to CD drive!
Single CDs with a diameter of 8 cm
and CDs which are not circular
(“shape CDs”) should not be used.
We accept no liability for any damage to the CD drive that may occur
as a result of the use of unsuitable
CDs.
row block : to select the next or
previous track.
If the or button : is pressed once,
the current track is played again from
the beginning.
ESPAÑOL
You can use this unit to play standard
CDs with a diameter of 12cm.
Selecting a track
➮ Press one of the buttons on the ar-
PORTUGUÊS
CD Mode
DEUTSCH
CD MODE
CD MODE
Scanning tracks (SCAN)
Ending Pause
You can briefly listen in to all the tracks
on a CD.
➮ Press the button 3
➮ Hold down the OK button ; for
more than two seconds. The next
track starts to play.
Note:
● The scanning time is adjustable.
Read about setting the scanning
time in the section “Setting the
scanning time” in the chapter “Radio mode”.
Stopping SCAN and continuing
playback
➮ Press the OK button ; to end
scanning.
The current track will then continue to
play.
Repeating a track (REPEAT)
➮ If you would like to repeat a track,
press button 4 RPT >.
“REPEAT TRCK” appears briefly on the
display, the RPT symbol lights up. The
track is then repeated until RPT is deactivated.
Stopping REPEAT
➮ If you would like to end repeat,
press the button 4 RPT > once
again.
“REPEAT OFF” appears briefly on the
display, the RPT symbol goes out. Normal playback is resumed.
Interrupting play (PAUSE)
➮ Press the button 3 >.
“PAUSE” appears on the display.
42
> during the
pause.
Play then resumes.
Changing the display
➮ To alter the display between track
number and time or track number
/
and playing time, press the
DIS 7 button once or several
times for more than two seconds
until the desired elements appear
on the display.
Traffic announcements in CD
mode
➮ If you want to receive traffic announcements whilst listening to a
CD, press the TRAF ? button.
Traffic announcement priority is active
when the traffic-jam symbol lights up on
the display. Please see the chapter “Traffic information”.
Removing a CD
➮ Press the button 9.
The flip/release panel opens to the front
and the CD is ejected.
➮ Carefully remove the CD and close
the flip/release panel.
Selecting a CD
➮ To change up or down to a different
CD, press the or button :
once or several times.
Selecting a track
➮ To move up/down from one track to
another on the current CD,
press the or button : once or
several times.
Fast track selection
For fast track selection backwards or
forwards:
➮ hold down either the
or button
: until fast track selection backwards or forwards begins.
number and playing time or track
number and time or track number
/ DIS
and CD number, press the
7 button once or several times for
more than two seconds until the
desired elements appear on the
display.
Repeating individual tracks or
whole CDs (REPEAT)
➮ To repeat the current track, press
the button 4 RPT > briefly.
“REPEAT TRCK” appears briefly on the
display and RPT lights up.
➮ To repeat play of the entire CD,
press the button 4 RPT > once
again.
“REPEAT DISC” appears briefly on the
display and RPT lights up.
Stopping REPEAT
➮ To stop the repeat function for the
current track or CD,
press the button 4 RPT > repeatedly until “REPEAT OFF” appears
briefly on the display and RPT
goes out.
43
ENGLISH
FRANÇAIS
edly until “CHANGER” appears on
the display.
Playback begins with the first CD the
CD changer recognises.
Changing the display
➮ To alter the display between track
ITALIANO
Starting CD changer mode
➮ Press the CD•C button @ repeat-
buttons : pressed
until the fast search backwards or
forwards begins.
➮ keep the
NEDERLANDS
For a fast search backwards or forwards
SVENSKA
Note:
● Information on handling CDs, inserting CDs and operating the CD
changer can be found in the operating instructions accompanying
your CD changer.
ESPAÑOL
Fast search (audible)
PORTUGUÊS
CD changer mode
DEUTSCH
CD CHANGER MODE
CD CHANGER MODE
Random play (MIX)
➮ To play the tracks on the current
CD in random order, press the button 5 MIX >.
“MIX CD” appears briefly on the display
and MIX lights up.
➮ To play the tracks of all the inserted
CDs in random order, press the
button 5 MIX > once again.
“MIX ALL” appears briefly on the display and MIX lights up.
Note:
● In the case of CD changers CDC
A 08 and IDC A 09, all CDs in the
changer are randomly selected. All
other changers first play all the
tracks on a CD in random selection
before moving to the next CD in
the changer.
Stopping MIX
➮ Press the button 5 MIX > until
“MIX OFF” appears briefly on the
display and MIX goes out.
Scanning all tracks on all CDs
(SCAN)
➮ To listen in briefly to all the tracks
on all inserted CDs in ascending
order, hold down the OK button ;
for more than two seconds.
“SCAN” appears on the display.
44
Stopping SCAN
➮ To stop scanning, press the OK
button ; briefly.
The track currently being scanned then
continues play.
Note:
● You can set the scanning time as
required. Please see the section
“Setting the scanning time” in the
“Radio mode” chapter.
Interrupting Play (PAUSE)
➮ Press the button 3 >.
“PAUSE” appears on the display.
Ending Pause
➮ Press the button 3
pause.
Play then resumes.
> during the
➮ To set the time manually, press the
MENU button 8.
or button : repeatedly until “CLOCKSET” appears on the display.
➮ Press the
➮ Press the
button :.
The time appears on the display. The
minutes flash and can now be set.
➮ Set the minutes using the
but-
tons :.
➮ Once the minutes have been set,
press the button :. The hours
now flash.
➮ Set the hours using the
but-
tons :.
➮ Press the MENU button 8 or OK
; once you have completed the
setting.
Selecting the 12/24-hour clock
mode
➮ Press the MENU button 8.
is switched off and the ignition is
switched on, press the MENU button 8.
“MENU” appears on the display.
or button : repeatedly until “CLK DISP OFF” or
“CLK DISP ON” appears on the
display.
➮ Press the
button : to switch
between ON and OFF.
➮ Press the
➮ Press the MENU button 8 or OK
; once you have completed the
setting.
SVENSKA
Setting the time manually
Viewing the time with the car
radio switched off and the
ignition on
➮ To view the time when the car radio
Briefly viewing the time when
the car radio is switched off
In order to view the time when the car
radio is switched off,
➮ press the button
/ DIS 7.
The time appears on the display for eight
seconds.
“MENU” appears on the display.
or button : repeatedly until “24 H MODE” or “12
H MODE” appears on the display.
➮ Press the
45
ESPAÑOL
Setting the time
; once you have completed the
setting.
PORTUGUÊS
to display the time.
ENGLISH
➮ Press the MENU button 8 or OK
FRANÇAIS
Briefly displaying the time
➮ Press the / DIS 7 button briefly
ITALIANO
➮ Press the
NEDERLANDS
buttons : to switch
between the 12 and 24-hour mode.
CLOCK - Time
DEUTSCH
CLOCK - TIME
TONE AND VOLUME BALANCE
Tone and volume balance
You can adjust the tone and volume
balance separately for every audio
source (radio, CD, CD changer, AUX
and traffic announcements).
Note:
● Adjustments to tone and volume
balance for traffic announcements
can only be made during a traffic
announcement.
Adjusting the bass
➮ Press the AUD / LD = button.
“BASS” appears on the display.
➮ Press the
or
button : to set
the bass.
➮ Press the MENU button 8 or OK
; once you have completed the
setting.
Setting the volume distribution
left/right (balance)
➮ To set the volume distribution left/
right (balance), press the AUD / LD
= button.
“BASS” appears on the display.
button : repeatedly
until “BALANCE” appears on the
display.
➮ Press the
or button : to set
the volume distribution left/right.
➮ Press the
➮ Press the MENU button 8 or OK
; once you have completed the
setting.
Setting the volume distribution
front/rear (fader)
➮ To set the volume distribution front/
Adjusting the treble
➮ Press the AUD / LD = button.
rear (fader), press the AUD / LD =
button.
“BASS” appears on the display.
“BASS” appears on the display.
➮ Press the
button : repeatedly
until “TREBLE” appears on the display.
➮ Press the
➮ Press the
or
button : to set
the treble.
➮ Press the MENU button 8 or OK
; once you have completed the
setting.
46
button : repeatedly
until “FADER” appears on the display.
or button : to set
the volume distribution front/rear.
➮ Press the
➮ Press the MENU button 8 or OK
; once you have completed the
setting.
LOUDNESS
The loudness level can be raised in
steps of one to six.
or button : repeatedly until “LOUDNESS” appears on the display.
➮ Press the
or button : to set
the desired volume increase.
➮ Press the
➮ Press the MENU button 8 or OK
; once you have completed the
setting.
We recommend you use a CD you are
familiar with when adjusting the equalizer.
Before adjusting the equalizer, set the
tone and volume balance to zero and
deactivate the loudness function. To do
this, please see the chapter “Tone and
volume balance”.
➮ Listen to the CD you have chosen.
➮ Evaluate the tone impression according to your taste.
➮ Now consult the chart “Sound impression” section of “An aid to adjusting the equalizer”.
➮ Set the equalizer values as de-
PORTUGUÊS
Setting the loudness intensity
ENGLISH
Notes on adjusting the equalizer
approx two seconds.
When loudness is activated, LD lights
up on the display.
FRANÇAIS
“MENU” appears on the display.
➮ Press the AUD / LD = button for
ITALIANO
➮ Press the MENU button 8.
This car radio is fitted with a parametric
digital equalizer. In this case, parametric means that for each of the 2 filters,
one frequency can be individually raised
or lowered (GAIN +7 to - 7).
The following filters are available:
● LOW EQ
60 - 100 Hz
● HIGH EQ
10 000 - 17 500 Hz
These filters can be set without measuring equipment. This means that the
sound quality inside the vehicle can be
greatly influenced.
NEDERLANDS
Loudness means the bass and treble
are increased to a comfortable level at
lower volume levels.
SVENSKA
Equalizer
ESPAÑOL
Switching loudness on/off
DEUTSCH
EQUALIZER
scribed under “What to do”.
47
EQUALIZER
Switching the equalizer on/off
Setting the level indicator
In order to switch on the equalizer,
The level indicator (spectrometer) on
your display briefly indicates the volume,
tone and equalizer settings with symbols on your display as you make the
corresponding settings.
When settings are not being made, the
spectrometer indicates the original level of the car radio.
You can also set the type of spectrometer on your menu.
There are two types available.
➮ hold down the EQ < button until
DEQ lights up on the display and
“EQ ON” appears briefly.
To switch off the equalizer,
➮ hold down the EQ < button until
DEQ goes out on the display and
“EQ OFF” appears briefly.
Setting the equalizer
➮ Press the EQ button <.
“LOW EQ” appears on the display.
➮ Select between “LOW EQ” and
“HIGH EQ” by pressing the
button :.
or
button :.
or
but-
ton :.
➮ To select the next filter, first press
the OK button ;, then the
button :.
or
➮ When all the settings have been
selected, press the EQ button <.
48
➮ Press the MENU button 8.
“MENU” appears on the display.
or button : repeatedly until “EQ DISPLAY” appears on the display.
➮ Press the
➮ Press the or button :.
➮ To select the frequency, press the
➮ Set the level using the
Selecting a spectrometer type
or button : to
choose between displaying
“SPECTRUM 1” and “SPECTRUM2”
or “EQ DISP OFF” set the volume
distribution left/right.
➮ Press the
➮ Press the MENU button 8 or OK
; once you have completed the
setting.
EQUALIZER
Commence settings at mid and treble section and complete them in the bass
section.
What to do
Bass reproduction too weak
Raise bass with
frequency: 60 to 100 Hz (LOW EQ),
level: +4 to +6
Muffled reproduction
Low transparency
No instrumental brilliance
Raise tweeter range with
frequency: approx. 12,600 Hz
(HIGH EQ),
level: +2 up to +4
PORTUGUÊS
ESPAÑOL
SVENSKA
NEDERLANDS
ITALIANO
FRANÇAIS
Sound impression/problem
ENGLISH
DEUTSCH
Setting aid for the equalizer
49
EXTERNAL AUDIO SOURCES
TECHNICAL DATA
External audio sources
Technical data
In place of the CD changer it is also
possible to connect other external audio sources to the line output. These
sources can include a portable CD player, MiniDisc player or MP3 player.
If there is no CD changer connected to
your unit, two external audio sources
can be hooked up.
The AUX output has to be switched on
in the install menu.
To connect up an external audio source,
you will need an adapter cable, obtainable from any authorised Blaupunkt
dealer.
Amplifier
Switching the AUX input on/off
➮ Press the MENU button 8.
“MENU” appears on the display.
or button : repeatedly until “AUX-IN-1 OFF” or
“AUX-IN-1 ON” appears on the display.
➮ Press the
Output power:
4 x 25 watts sine
in accordance
with DIN 45 324 at
14.4V,
4 x 45 watts max.
power
Tuner
Frequency ranges:
FM :
87.5 - 108 MHz
MW :
531 - 1 602 kHz
LW :
153 - 279 kHz
(Wiesbaden CD51 does not feature
MW and LW)
FM transmission range:
35 - 16 000 Hz
CD
➮ Press the
Transmission range:
20 - 20 000 Hz
➮ Press the MENU button 8 or OK
Pre-amp output
or button : to
switch AUX on or off.
; once you have completed the
setting.
Note:
When the AUX input is switched on, it
can be selected using the CD•C button
@.
4 channels:
3V
Input sensitivity:
AUX 1 input
: 2 V / 6 kΩ
Subject to changes!
50
GUARANTEE
DEUTSCH
Guarantee
PORTUGUÊS
ESPAÑOL
SVENSKA
NEDERLANDS
ITALIANO
FRANÇAIS
ENGLISH
The scope of the guarantee complies
with the legal provisions applicable in
the country in which the unit was bought.
Should your car radio prove to be defective, please contact your dealer, presenting proof of purchase.
If the legal guarantee period in your
country is less than 12 months, Blaupunkt grants a 12-month manufacturer's
guarantee. Not covered by such guarantee are damage caused by wear and
tear, improper use or commercial use.
In order to claim the Blaupunkt manufacturer's guarantee, please send in the
defective unit along with proof of purchase to the central Blaupunkt aftersales department in your country. You
can find out which is the nearest address to you by calling the telephone
hotline printed on the back of this manual. Blaupunkt reserves the right to repair or replace the defective unit at its
discretion.
51