1
30 Litre Operation Manual 2007.qxp
12/07/2007
2:59 PM
Page 1
Microwave Oven
Operation Manual
Model BMO300X
READ these instructions carefully before installing and operating the oven. Store them in a
safe place for further reference. IMPORTANT: Retain your “Proof of Purchase”. Read the
warranty information on page 2 of this manual.
30 Litre Operation Manual 2007.qxp
12/07/2007
3:00 PM
Page 2
WARRANTIES
REMEMBER TO RETAIN YOUR “PROOF OF PURCHASE” TO VALIDATE ALL WARRANTY CLAIMS.
BLANCO COOKING PRODUCT
WARRANTY
STATEMENT OF STANDARD
WARRANTY CONDITIONS
1. Subject to the "Statement of Standard
Warranty Conditions" this product is
covered by the following Warranty.
1. The Warranty only applies provided that
the appliance has been used in accordance
with the manufacturer's instructions and
provided that the appliance has not been
damaged by an accident, misuse, neglect
or abuse of any person other than the
manufacturer or BLANCO/Major Electrical
Appliances ("MEA") or from faulty
installation, mis-adjustment or tampering
by unauthorised persons.
TWO (2) YEARS WARRANTY from date
of purchase, covering all parts and labour.
2. The appliance is warranted under normal
single family domestic installation and
use, as set out in the instruction manual,
against manufacturing defects for the
Warranty periods shown above.
3. Should service be required under this
Warranty, the purchaser should contact
an approved BLANCO Service Provider
during their normal business hours. The
product is a plug in item and therefore
the purchaser is responsible for taking
the product to the repairer.
4. At no time does BLANCO/MEA have
liability for any freight or transportation
costs or for any damage during transit or
for any consequence of failure of this
appliance outside of the normal service
area, unless such limitation of liability is
prohibited by statute.
5. This Warranty excludes replacement of
parts required due to normal wear and
tear including light globes.
6. This Warranty only applies, provided the
appliance has been used in accordance
with the manufacturer's instructions and
provided an accident, misuse, neglect or
abuse has not damaged the appliance.
7. None of the above Warranties claim to
exclude, restrict or modify either the
application or the exercise of a right
conferred by any applicable Statute.
8. Please complete the details below, which
should be retained for future reference
along with your proof of purchase:
Date of Purchase:.…………………………....
Model No:.…………………………………….
Serial No:. …..….……………………………..
2. When a service inspection reveals the
alleged fault or faults are caused by
incorrect operation, contrary to the
instruction manual, and otherwise the
appliance is in good order and working
condition, the purchaser shall be liable
for a service fee charged by BLANCO/MEA
or one of its' Service Providers.
3. If the appliance is used in Commercial
Applications or for Rental purposes, a
separate warranty of Twelve (12) months
covering all parts with Three (3) months
on the labour will apply.
4. Subject to the provisions of any applicable
statute this Warranty applies to the original
retail purchaser only and is not transferable.
5. Subject to the provisions of any applicable
statute, at no time does BLANCO/MEA
have liability for freight, transport or travel
costs outside normal service areas.
6. None of the above Warranties purport to
exclude, restrict or modify either the
application or the exercise of a right
conferred by any applicable statute.
7. Subject to any Warranties implied by
statute, at no time will BLANCO/MEA or
its' Service Providers be liable for any
economic loss consequent upon the
failure of the appliance.
8. This Warranty is only valid for major
appliances imported and distributed by
BLANCO/MEA, purchased and used in
Australia.
30 Litre Operation Manual 2007.qxp
12/07/2007
3:00 PM
Page 3
CONTENTS
Precautions to Avoid Possible Exposure to Excessive Microwave Energy ........................................................3
Specifications ................................................................................................................................................3
Before You Call for Service ............................................................................................................................4
Installation......................................................................................................................................................4
Earthing Instructions ......................................................................................................................................4
Radio Interference..........................................................................................................................................5
Important Safety Instructions ..........................................................................................................................5
Microwave Cooking Principles ........................................................................................................................6
Microwave Safe Containers............................................................................................................................6
Part Names ..................................................................................................................................................6
Control Panel ................................................................................................................................................7
Operating Instructions ....................................................................................................................................8
Setting the Clock ..........................................................................................................................................8
Setting the Minute Timer ................................................................................................................................9
Setting Cooking Times with Power Levels ......................................................................................................9
Pre-set Function ............................................................................................................................................9
Express Cooking ........................................................................................................................................10
Jet Defrost ..................................................................................................................................................10
Weight Defrost ............................................................................................................................................10
Program Cooking ........................................................................................................................................10
Child and Safety Lock..................................................................................................................................11
To Stop the Oven while in Operation ............................................................................................................11
Cleaning and Care ......................................................................................................................................11
PRECAUTIONS TO AVOID POSSIBLE EXPOSURE TO EXCESSIVE MICROWAVE ENERGY
(a)
Do not attempt to operate this oven with the door open. Open-door operation can result in harmful
exposure to microwave energy. It is important not to break or tamper with the safety interlocks.
(b)
Do not place any object between the oven front face and the door or allow dirt/grime or residue from
cleaning products to accumulate on sealing surfaces.
(c)
Do not operate the oven if it is damaged. It is particularly important that the oven door closes
properly and that there is no damage to the:
(d)
The oven should not be repaired by anyone except by a MEA qualified Service Agent (refer to page 12).
1. Door (bent) 2. Hinges and latches (broken or loosened) 3. Door seals and sealing surfaces.
SPECIFICATIONS
Power Consumption:
240V~50Hz, 1400W
Rated microwave power output:
1000W
Operation Frequency:
2450MHz
Outside Dimensions:
305mm (H) × 525mm (W) × 443 mm (D)
Oven Cavity Dimensions:
219mm (H) × 350mm (W) × 384 mm (D)
Oven Capacity:
30Litres
Cooking Uniformity:
Turntable System {Ø314mm}
Net Weight:
Approx.17.9kg
*Specifications subject to change without notice.
3
30 Litre Operation Manual 2007.qxp
12/07/2007
3:00 PM
Page 4
BEFORE YOU CALL FOR SERVICE
If the oven fails to operate:
a)
Check to ensure that the microwave oven is plugged in securely. If it is not, switch off the power, remove
the plug from the outlet, wait 10 seconds and plug it in again securely.
b) Check for a blown circuit fuse or a tripped main circuit breaker. If these seem to be operating properly,
test the outlet with another appliance.
c) Check to ensure that the control panel is programmed correctly and the timer is set.
d) Check to ensure that the door is securely closed engaging the door safety lock system. Otherwise, the
microwave energy will not flow into the oven.
IF NONE OF THE ABOVE RECTIFY THE SITUATION, THEN CONTACT AN MEA QUALIFIED SERVICE AGENT
(REFER TO PAGE 12). DO NOT TRY TO ADJUST OR REPAIR THE OVEN YOURSELF.
INSTALLATION
1. Make sure that all the packing materials are removed from the inside of the door.
2. WARNING: Check the oven for any damage, such as misaligned or bent door, damaged door seals and
sealing surface, broken or loose door hinges and latches and dents inside the cavity or on the door. If there
is any damage, do not operate the oven and contact an MEA Qualified Service Agent (refer to page 12).
3. This microwave oven must be placed on a flat, stable surface to hold its weight and the heaviest food likely
to be cooked in the oven.
4. Do not place the oven where heat, moisture or high humidity are generated, or near combustible materials.
5. For correct operation, the oven must have sufficient airflow. In an open freestanding situation, allow 20mm
of space from any overhead obstruction and 10mm from a back wall and 5mm from any side walls. If
more than one side of the appliance is closed in, then installation is as per a "built-in" installation requiring
adequate venting. The specification requirements for "built-in" installations are detailed in the Blanco
Specification Book, and require the purchase of a trim kit and vented cabinetry design.
6. Do not operate the oven without glass tray, roller support, and shaft in their proper positions.
7. Make sure that the power supply cord is undamaged and does not run under the oven or over any hot or
sharp surface.
8. The power socket must be readily accessible so that it can be easily unplugged in an emergency.
9. Do not use the oven outdoors.
EARTHING INSTRUCTIONS
This appliance must be earthed. The microwave oven is equipped with a cord which has an earth wire and an
earth plug. It must be plugged into a wall receptacle that is properly installed and earthed. In the event of an
electrical short circuit, earthing reduces the risk of electric shock by providing an escape wire for the electric
current. It is recommended that a separate circuit, serving only the oven, be provided. Using a high voltage is
dangerous and may result in a fire or other accident causing damage to the oven.
WARNING: Improper use of the earthing plug can increase the risk of electric shock.
Notes: 1. If you have any questions about the earthing or electrical instructions, consult an MEA Qualified
Service Agent (refer to page 12).
2. Neither the manufacturer nor the distributor can accept any liability for damage to the oven or
personal injury resulting from failure to observe the electrical connection procedures.
THE WIRES IN THIS MAINS CABLE ARE COLOURED IN ACCORDANCE WITH THE
FOLLOWING CODE:
Green and Yellow = EARTH
Blue = NEUTRAL
Brown = LIVE
4
30 Litre Operation Manual 2007.qxp
12/07/2007
3:00 PM
Page 5
RADIO INTERFERENCE
1. Operation of the microwave oven can cause interference with your radio, TV or similar electrical equipment.
2. When there is interference, it may be reduced or eliminated by taking the following measures:
a) Clean the door and sealing surface of the microwave oven.
b) Reposition the receiving antenna on the radio or television.
c) Relocate the microwave oven with respect to the receiver.
d) Move the microwave oven away from the receiver.
e) Plug the microwave oven into a different outlet so that microwave oven and receiver are on
different branch circuits.
IMPORTANT SAFETY INSTRUCTIONS
When using this oven, basic safety precautions should be followed. Abiding by these will reduce the risk of
burns, electric shock, fire, injury to persons and exposure to excessive microwave energy:
1. Read all instructions before using the appliance.
2. Use the appliance only for its intended use as described in this manual. Do not use corrosive chemicals or
vapours in the appliance. This type of oven is specifically designed to heat, cook, defrost or dry food. It is
not designed for industrial or laboratory use.
3. Do not operate the oven when empty.
4. Do not operate the appliance if it has a broken cord or plug, if it is not working properly or if it has been
damaged or dropped. If the supply cord is broken, it must be replaced by MEA or one of their Service
Agents in order to avoid a hazard.
5. WARNING: Only allow children to use the oven without supervision when adequate instructions have been
given so that the child is able to use the oven in a safe way and understands the hazards of improper use.
6. To reduce the risk of fire in the oven cavity:
a. When heating food in a plastic or paper container, keep an eye on the oven due to the possibility of ignition.
b. Remove wire twist-ties from paper or plastic bags before placing bag in oven.
c. If smoke is observed, switch off or unplug the appliance and keep the door closed in order to stifle any flames.
d. Do not use the oven cavity for storage purposes. Do not leave paper products, cooking utensils or
food in the oven cavity when not in use.
7. WARNING: Liquid or other food must not be heated in sealed containers since they are likely to explode.
8. Heating of beverages can result in delayed eruptive boiling, therefore please take care handling the container.
9. Do not fry food in the oven. Hot oil can damage oven parts and utensils and may result in skin burns.
10. Eggs in their shell and whole hard-boiled eggs should not be heated in the microwave oven since they may
explode even after microwave heating has ended.
11. The appliance is not intended for use by young children or infirm persons unless they have been
adequately supervised by a responsible person to ensure that they can use the appliance safely.
12. Young children should be supervised to ensure that they do not play with the appliance.
13. If the supply cord is damaged, it must be replaced by the manufacturer or its service agent or a similarly
qualified person in order to avoid a hazard.
14. Pierce foods with heavy skins such as potatoes, whole squash, apples and chestnuts before cooking.
15. The contents of feeding bottles and baby jars should be stirred or shaken. The temperature should then be
checked before serving in order to avoid burns.
16. Cooking containers may become hot due to the heat transferred from the hot food. Potholders may be
needed to handle the container.
17. Containers should be checked to ensure that they are suitable for use in the microwave oven. Container
Test: Place the empty container in the oven, microwave at high power for 60 seconds. A container which
becomes very hot should not be used.
18. WARNING: It is hazardous for anyone other than an MEA Qualified Service Agent to carry out any service or
repair operation involving the removal of any cover that gives protection against exposure to microwave energy.
19. WARNING: If the door or door seals are damaged, the oven must not be operated until it has been repaired
by an MEA Qualified Service Agent.
20. The oven should be cleaned regularly and any food deposits removed. Failure to maintain the oven in a clean
condition could lean to deterioration of the surface that could adversely affect the life of the appliance and
possibly result in a hazardous situation.
5
30 Litre Operation Manual 2007.qxp
12/07/2007
3:00 PM
Page 6
MICROWAVE COOKING PRINCIPLES
1. Arrange food carefully. Place thickest areas towards outside of dish.
2. Watch cooking time. Cook for the minimum amount of time indicated and increase cooking time if
necessary. Food which has been severely overcooked can smoke or ignite.
3. Cover foods while cooking to prevent spattering and to help foods cook evenly.
4. Turn foods over once during microwaving to speed up cooking. Large items such as roasts must be turned
over at least once.
5. Rearrange foods such as meatballs halfway through cooking. Place those on the bottom of the dish at the
top and those in the centre of the dish to the outside.
MICROWAVE SAFE CONTAINERS
1. The ideal material of a microwave container is transparent. This allows energy to pass through the container
and to heat the food.
2. Microwave oven energy can not penetrate metal, so metal utensils or dishes with metallic trim should not
be used.
3. Do not use recycled paper products eg. paper towels, when microwave cooking, as they may contain
small metal fragments which may cause sparks and/or fires.
4. Round/oval dishes rather than square/oblong ones are recommend, as food in corners tends to overcook.
5. Narrow strips of aluminum foil may be used to prevent overcooking of exposed areas. Be careful not to use
too much foil and keep a distance of 1 inch (2.54cm) between foil and cavity.
The list below is a general guide to help you select the correct microwave safe products.
COOKWARE
MICROWAVE
COOKING
GRILL
COOKING
COMBINATION
COOKING
Yes
Yes
Yes
Heat-Resistant Glass
Non Heat-Resistant Glass
No
No
No
Heat-Resistant Ceramics
Yes
Yes
Yes
Microwave-Safe Plastic Dish
Yes
No
No
Kitchen Paper
Yes
No
No
Metal Tray
No
Yes
No
Metal Rack
No
Yes
No
Aluminum Foil & Foil Containers
No
Yes
No
NOTE: Containers made from Plyethylene, melamine and phenol become hot in the microwave and are therefore unsuitable.
6
3
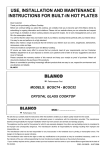
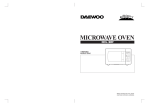
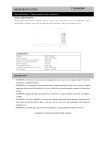
PART NAMES
1 Door Safety Lock System
6 Glass Tray
2 Oven Window
3 Oven Air Vent
7
2
5
4
4 Shaft
1
5 Roller Ring
6
7 Control Panel
30 Litre Operation Manual 2007.qxp
12/07/2007
3:00 PM
Page 7
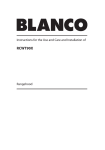
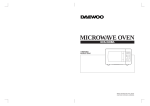
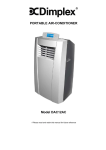
CONTROL PANEL
DISPLAY
Clock cooking time, power and feature
indicators are displayed.
NUMBER PADS (0-9)
Touch to set times or weights.
WEIGHT DEFROST
Use to defrost foods eg. frozen meat,
poultry and seafood by weight. The
defrosting time and power level are
automatically set once the food category
and the weight are programmed.
JET DEFROST
Touch to set defrosting time; the oven
automatically divides the defrosting time
into periods of alternating defrost and
stand times by cycling on and off.
POWER
Use to set the cooking power level. To
check the power level during timed
cooking, touch the POWER pad.
PRE-SET
Use to set the oven to start-up at a later
time. The pre-set indicator will flash when
the oven is in the PRE-SET state. The
clock must be accurate (set to correct
time of day) before the pre-set function
can be programmed.
CLOCK
Use to set the time of day (12-hr) or
recall the time of day. The time of day will
be displayed at all times except when the
oven is operating. In the event of a
power failure or if the oven is unplugged,
the clock will have to be reset.
CANCEL
Touch to cancel the selected power
level, cook or defrost times that were
previously programmed.
NB. The time of day clock cannot be
cancelled.
7
30 Litre Operation Manual 2007.qxp
12/07/2007
3:00 PM
Page 8
FEATURES
CLOCK
WEIGHT DEFROST
CHILD LOCK
COOKING MODE
JET DEFROST
1 STAGE COOKING
2 STAGE COOKING
SPECIAL FEATURES
PROGRAM COOKING
The microwave oven has the ability to be programmed to do several consecutive functions, eg. defrost
food, then cook at various power levels for set time periods.
JET/WEIGHT DEFROST
Use to defrost foods by weight or time. Defrosting of meat, poultry and seafood can be pre-set.
CHILD LOCK
Use to prevent unsupervised operation of the oven by small children. The CHILD LOCK indicator light will
be lit on the display and the oven can not be operated while the CHILD LOCK is set.
OPERATING INSTRUCTIONS
BEEP DURING OVEN SETTINGS
Each time a pad is touched, a beep will sound to acknowledge the touch.
SETTING THE CLOCK
1. Touch CLOCK pad.
2. Touch CANCEL pad.
3. Use the number pads to enter the correct time. You must touch at least three numbers to set the clock(one
for hour and two for minutes).
4. Touch CLOCK pad again.
NOTE: This is a 12-hour clock. When the oven was plugged in, "1:01" should have appeared on the display. To
reset the time of day, repeat the steps outlined above. You can check the clock time while cooking is in
progress by touching the CLOCK pad.
8
30 Litre Operation Manual 2007.qxp
12/07/2007
3:00 PM
Page 9
SETTING THE MINUTE TIMER
1. Touch TIME pad.
2. Enter the amount of time you wish to set the timer for by touching the number pads. Digit time is in minutes
and seconds and set left to right. Set one digit (eg. press 5 for 5 seconds) or up to four digits (2405 for 24
minutes, 5 seconds).
3. Touch POWER pad.
4. Touch number pad 0 (TIMER).
5. Touch START pad.
NOTE: Touch TIME and then touch CANCEL to cancel TIME during timing process.
SETTING COOKING TIMES WITH POWER LEVELS
A. One-Stage Cooking
1. Touch TIME pad.
2. Use the number pad to set a cooking time. You can set a cooking time from one second to 99 minutes
and 99 seconds. If you are setting a time greater than one minute, you must enter numbers for both
minutes and seconds.
FOR EXAMPLE: To set 20 minutes, enter 2, 0, 0, 0.
3. If you want to set a power level other than 100% power, touch POWER, then use the number pads to enter
the power level. You can set the power level from 1 to 9 (see scale below).
4. Touch START to start cooking.
USE THESE SINGLE DIGITS TO REPRESENT OVEN POWER LEVELS
Number pad
9
8
7
6
5
4
3
2
1
0
% of Power
90%
80%
70%
60%
50%
40%
30%
20%
10%
TIMER
B. Two-Stage Cooking
Some recipes require different stages of cooking at different temperatures.
1. SET STAGE 1: Follow steps 1-3 in "One-stage Cooking". DO NOT TOUCH START PAD.
2. SET STAGE 2: Touch MEMORY pad, touch TIME then use the number pad to enter the STAGE 2 cooking
time. Touch POWER then use the number pad to enter the STAGE 2 power level. (Most 2 stage recipes
use lower power for second stage).
3. Touch START pad.
NOTE: The respective lights will come on to indicate which stage the oven is operating in. After total time has
elapsed, 3 beeps sound. After a cooking or defrosting program has completed, the oven will automatically
continue to sound three beeps every two minutes until the door is opened or the CANCEL pad is touched.
PRE-SET FUNCTION
Suppose you want to set the oven to start-up at 2 o'clock.
1. Touch PRE-SET pad.
2. Touch 2, 0, 0 on number pad.
3. Set the cooking time(s) with power levels for one or two stage cooking (refer above).
4. Touch START pad.
5. Touch CANCEL to cancel the pre-set function.
NOTE: Be sure the clock is set at the correct time of day before programming the PRE-SET function.
9
30 Litre Operation Manual 2007.qxp
12/07/2007
3:00 PM
Page 10
EXPRESS COOKING
Use this feature to program the oven for 4 popular microwave timings.
With each touch of the EXPRESS pad you can program the oven for:
15 seconds .................... TOUCH EXPRESS PAD ONCE
30 seconds .................... TOUCH EXPRESS PAD TWICE
1 minute ........................ TOUCH EXPRESS PAD 3 TIMES
2 minutes ...................... TOUCH EXPRESS PAD 4 TIMES
The oven will operate at HIGH power (100% power output) for EXPRESS cooking program.
Suppose you want to set the oven to cook for 1 minute at 100% by using the feature:
1. Touch the EXPRESS pad 3 times then "1:00" will appear in the display.
2. Touch START pad.
JET DEFROST
1. Touch JET DEFROST pad.
2. Enter desired defrosting time by touching digits on the number pad. Digital timer sets minutes and seconds
from left to right so a single digit can be set (eg. press 5 for 5 seconds) or up to 4 digits (2405 for 24
minutes 5 seconds).
3. Touch START pad.
WEIGHT DEFROST
EXAMPLE: Suppose you want to defrost 600g seafood.
1. Touch WEIGHT DEFROST pad 3 times. "d 3" will appear in the display.
2. Touch number pads 6.0.0. to represent weight in grams.
3. Touch START pad.
NOTE: The maximum allowable weight for each category is shown below.
CATEGORY
MAXIMUM WEIGHT
DISPLAY
Meat
2300g
d1
Poultry
4000g
d2
Seafood
900g
d3
For foods exceeding these maximum weights, use the JET DEFROST program. If you try to program weight in
excess of the maximum recommended above, the oven will not operate properly.
PROGRAM COOKING
The oven has the ability to be programmed to do several consecutive functions.
Suppose you want set the following cooking program:
1. JET DEFROST;
2. 1st stage: Cook for 5 minutes at 100%;
3. 2nd stage: Cook for 10 minutes at 50%.
10
30 Litre Operation Manual 2007.qxp
12/07/2007
3:00 PM
Page 11
1. Touch CANCEL pad.
2. Touch JET DEFROST pad and enter the desired defrosting time by touching digits on the number pad.
3. Input time (5 minutes) and power level (100%) cooking program.
Touch TIME pad and enter 5, 0, 0 using the number pad.
4. Touch MEMORY pad.
5. Input time (10 minutes) and power level (50%) cooking program.
Touch TIME pad and enter 1, 0, 0, 0 using the number pad.
6. Touch POWER pad and enter 5 (50%) using number pad.
7. Touch START pad.
NOTE: JET DEFROST and WEIGHT DEFROST can only be selected before the cooking stage in a program.
They can not be selected between or after stage 1 or stage 2.
CHILD AND SAFETY LOCK
The child and safety lock prevents unsupervised operation of the oven by small children. To set this feature
press and hold number pads 5 and 7 for 1 sec, a beep sounds and LOCK indicator lights. To cancel, press
and hold number pads 5 and 7 for 1 sec, a beep sounds and the LOCK indicator disappears from the display.
TO STOP THE OVEN WHILE IN OPERATION
Open the door.
You can restart the oven by closing the door and touching START pad.
NOTE: Oven stops operating when door is opened.
CLEANING AND CARE
1. Turn off the oven and remove the power plug from the wall socket before cleaning.
2. Keep the inside of the oven clean. When food splatters or spilled liquids adhere to oven walls, wipe with a
damp cloth. Mild detergent may be used if the oven gets very dirty. Avoid the use of spray and other harsh
cleaners as they may stain, streak or dull the door surface.
3. The outside surfaces should be cleaned with a damp cloth. To prevent damage to the operating parts
inside the oven, water should not be allowed to seep into the ventilation openings.
4. Wipe the door and window on both sides, the door seals and adjacent parts frequently with a damp cloth
to remove any spills or spatters. Do not use abrasive cleaner.
5. Do not allow the control panel to become wet. Clean with a soft, damp cloth. When cleaning the control
panel, leave oven door open to prevent oven from accidentally turning on.
6. If steam accumulates inside or around the outside of the oven door, wipe with a soft cloth. This may occur
when the microwave oven is operating in high humidity conditions. This is normal.
7. It is occasionally necessary to remove the glass tray for cleaning. Wash the tray in warm soapy water or in
the dishwasher.
8. The roller ring and oven floor should be cleaned regularly to avoid excessive noise. Simply wipe the bottom
surface of the oven with mild detergent. The roller ring may be washed in mild soapy water or in the dishwasher. When removing the roller ring from cavity floor for cleaning, be sure to replace in the proper position.
9. Remove odours from your oven by combining a cup of water with the juice and skin of one lemon in a
deep microwaveable bowl. Microwave for 5 minutes. Wipe thoroughly and dry with a soft cloth.
10. When it becomes necessary to replace the oven light, please consult an MEA Qualified Service Agent to
have it replaced.
11. Take care when leaving the oven door open. Ensure it is not subjected to strain of any kind eg. children
hanging from the handle or door frame.
11
30 Litre Operation Manual 2007.qxp
12/07/2007
3:00 PM
Page 12
BLANCO Technical, Service & Spare Parts Assistance
NEW SOUTH WALES
Service and Spare Parts
All General Whitegoods Service
Telephone: 02 8788 8666
Facsimile: 02 9756 1091
AUSTRALIAN CAPITAL
TERRITORY
Service and Spare Parts
Detlevs Appliance & Electrical Care
Telephone: 02 6260 1033
Facsimile: 02 6260 1035
QUEENSLAND
Service and Spare Parts
Endeavour Appliances
Telephone: 07 3872 7444
Facsimile: 07 3852 2465
Platinum Appliance Service
Telephone: 07 3862 1154
Facsimile: 07 3862 1114
Roshad (Gold Coast)
Telephone: 07 5535 7044
Fascimile: 07 5535 7407
SOUTH AUSTRALIA
Service and Spare Parts
Prestige Appliance Repair Centre
Telephone: 08 8352 2022
Facsimile: 08 8353 3044
VICTORIA
Service and Spare Parts
Advantage Appliances
Telephone: 03 9874 4222
Facsimile: 03 9874 6917
WESTERN AUSTRALIA
Service and Spare Parts
Metropolitan Appliance Repairs
Telephone: 08 9330 1724
Facsimile: 08 9317 1296
TASMANIA
Electrical Equipment Service
(Launceston)
Telephone: 03 6339 3873
Facsimile: 03 6339 4588
Baldocks Appliances Service (Hobart)
Telephone: 03 6234 5995
Fascimile: 03 6234 8134
BLANCO Offices & Showrooms
New South Wales
Head Office, Sales & Marketing
Hagemeyer Building
104 Vanessa Street
Kingsgrove NSW 2208
Telephone: (02) 9503 2828
Facsimile: (02) 9503 2810
Showroom
40 Ebley Street
Bondi Junction NSW 2022
Telephone: (02) 9386 1190
Facsimile: (02) 9386 1671
Victoria
State Office & Showroom
Hagemeyer Building
35 Centre Road
Scoresby VIC 3179
Telephone: (03) 8756 7888
Facsimile: (03) 8756 7907
Queensland
State Office and Showroom*
148 Robinson Road East
Geebung, QLD 4034
Telephone: 07 3259 2555
Facsimile: 07 3265 6933
South Australia & NT
Agent & Sales Office
SC Lighting & Electrical Supplies
47 North Terrace
Hackney SA 5069
Telephone: (08) 8362 4599
Facsimile: (08) 8362 4591
Tasmania
Mark Pearce Agencies
23 Tranmere Road
Howrah TAS 7018
Tel/Fax:
(03) 6247 9215
Western Australia
State Office
1 Alvan Street
SUBIACO WA 6008
Telephone: 08 9382 1611
Facsimile: 08 9382 1622
BLANCO SALES & CUSTOMER SERVICE CENTRE: 1300 739 033
Web site: www.meaappliances.com.au
ABN 28 001 375 686
BLANCO is proudly distributed in Australia by Major Electrical Appliances (MEA). MEA continues to make a concerted effort to produce the most ‘up-todate’ andcomprehensive literature, however this document must not be regarded as an infallible guide to the current specifications, as products are
constantly changing to ensure the market has access to the best of appliance excellence.