1
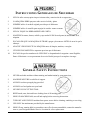
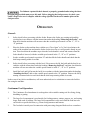
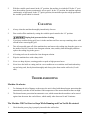
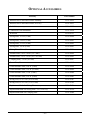
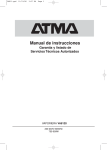
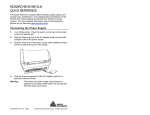
Owner/OperatOr
Manual
The Choice of Experience
MOdels
CC34
C32
B32
FOOd prOCessOrs
Noticia importaNte
este manual contiene importantes instrucciones
de seguridad que deben ser seguidas el pie de la
letra cuando utilice esta maquina.
importaNt Notice
this manual contains important Safety
instructions which must be strictly
followed when using this equipment.
BK46708 (September 2007)
Before Using This eqUipmenT
Berkel’s Food processors are designed to process fruits, vegetables and other
food products safely and efficiently. However, unless the operator is properly
trained and supervised, there is the possibility of a serious injury. it is the responsibility of the owner to ensure that this food processor is used properly
and safely, strictly following the instructions contained in this manual and any
requirements of local law.
No one should use or service this food processor without proper training and
supervision. all operators should be thoroughly familiar with the procedures
contained in this manual. even so, Berkel cannot anticipate every circumstance or environment in which its food processors will be used. You, the
owner and/or operator, must remain alert to the hazards posed by the function
of a food processor—particularly the sharp, cutting tools. No one under 18
years of age should operate this equipment. if you are uncertain about a particular task, ask your supervisor.
this manual contains a number of safe practices in the General Safety instruction Section. additional warnings are placed throughout this manual. WARNINGS RELATED TO YOUR PERSONAL SAFETY ARE INDICATED
BY:
if any warning label, wall chart or manual becomes misplaced, damaged or
illegible, please contact your nearest distributor or Berkel directly, for a free
replacement.
remember, however, THIS MANUAL OR THE WARNING LABELS
DO NOT REPLACE THE NEED TO BE ALERT AND TO USE YOUR
COMMON SENSE WHEN USING THIS FOOD PROCESSOR.
–2–
TaBle of ConTenTs
Before Using this equipment .......................................2
instrucciones Generales de Seguridad ...........................4
General Safety instructions ............................................4
equipment Description ..................................................5
intended Uses and characteristics .................................7
Unpacking and installation ............................................7
operation........................................................................8
cleaning .......................................................................11
troubleshooting ...........................................................11
Specifications ...............................................................12
optional accessories....................................................15
Warranty .......................................................................16
The Berkel Company • World’s Leading Manufacturer of Slicers and Food Processing Equipment
Berkel COMpany
4406 technology Drive · South Bend, indiana 46628-9770
574/232-8222 · Fax 888/888-2838
(800) 348-0251
Form No. omcc34-0907N
printed
in USa
BerkelPart
company
part No. 3175-00944
Printed in USA Berkel
Company No. 3175-00944
–3–
insTrUCCiones generales de segUridad
1.
NUNca utlice esta mçquina sin previa instrucciùn y autorizaciùn de su supervisor.
2.
La mÁQUiNa DeBe apoyarse sobre un nivel solido y plano.
3.
Siempre utilice el enchufe original proveido por el fabricante.
4.
Siempre utilice el utensillo para empujar la comida - nunca su mano.
5.
NUNCA TOQUE LA HERRAMIENTA DE CORTO.
6.
maNteNGa manos, brazos, cabello y ropa suelta LeJoS de toda parte en movimiento de la
máquina.
7.
eN caSo De QUe La mÁQUiNa Se traBe, apague y desconecte aNteS de sacar lo que la
obstruye.
8.
apaGUe Y DeScoNecte La mÁQUiNa antes de limpiar, sanitizar, o arreglar.
9.
UtiLiZe UNicameNte los repuestos provistos por el fabricante.
10.
eN caSo de que los membretes de ‘peLiGro’ se desprendan de la mçquina o sean illegibles,
llame al fabricante o a su representante de service Berkel para que lo reemplace sin cargo.
general safeTy insTrUCTions
1.
NeVer touch this machine without training and authorization by your supervisor.
2.
MACHINE MUST BE on solid level support.
3.
aLWaYS use three pronged plug provided.
4.
aLWaYS use food pusher not your hand.
5.
NEVER TOUCH CUTTING TOOL.
6.
Keep hands, arms, hair and loose clothing clear of all moving parts.
7.
SHOULD MACHINE JAM, turn off and unplug before removing obstruction.
8.
tUrN oFF aND UNpLUG machine from power source before cleaning, sanitizing or servicing.
9.
USe oNLY the attachments provided by the manufacturer.
10.
SHOULD any warning label on a machine come off or become unreadable, contact the manufacturer or your Designated Berkel Service Location for a free replacement.
–4–
eqUipmenT desCripTion
Feed Tube
Feeder Handle
Large Feed
Compartment
Shaft
Variable Speed
Control
Machine Outlet
Handle
Pusher
Standard Slicer
Scraper Handle
Crimping Slicer
Lid
Fine Cut Slicer
Julienne Cutter
Scraper Ring
Dicing Grid
Knife
Grater/Shredder
Bowl
Fine Grater
Ejector Plate
–5–
Machine
Base
Always Use Ejector Plate
Dismantling Lid
Assemble Sealing Ring Into Lid
When Dicing - Sharp Edge Up
Assembling Lid
Dismantling Scraper
Dismantling Feeder Unit
Assembling Bowl
Assembling Feeder Unit
Assembling Scraper
Wall Racks
Assembling Knife
–6–
inTended Uses and CharaCTerisTiCs
Intended Uses
the models cc34, c32 and B32 Food processors are designed for the following applications:
•
Slices, dices, shreds and/or grates fruits, vegetables, dry bread, cheese and nuts.
•
Chops and grinds meat, fish, fruits, vegetables and nuts.
•
Blends/mixes sauces, aromatic butter, mayonnaise, soups, dressings, thickenings, desserts, etc.
the following types of items are Not suitable for processing in the models cc34, c32 and B32:
•
Non-food items.
•
Frozen foods
•
Bone in products
Special Features/Characteristics
•
two or four speeds (auto select on cc34) for perfect processing results during cutting & chopping.
•
Low profile, compact design for easy product loading.
•
pulse function and scraper save time during cutting.
•
Dual interlocks for operator protection.
•
carrying handles for ease of transport.
•
Two-handed filling for maximum throughput.
•
automatic start/stop functions on feeder.
UnpaCking and insTallaTion
NOTE immediately after unpacking, check the unit for shipping damage. if the unit is found to be damaged, save everything! Notify the carrier within 5 days of delivery.
1.
place the machine on a sturdy bench or table 26 – 35 inches high.
2.
Connect the machine to a main electric supply with specification in accordance with the details on
the data plate on the back of the machine base.
3.
mount the wall rack, if available, for the cutting tools and the ejector plate on a wall close to the
machine.
–7–
To eliminate a potential shock hazard, a properly grounded outlet using the threepronged plug provided must power this unit. Before plugging the food processor in, check your
outlet voltage to be sure it complies with the voltage specified on the serial number plate on the
food processor.
operaTion
General:
1.
Safety check before processing with the feeder. remove the feeder, any cutting tools and the
ejector plate in accordance with the instructions under the heading “Removing the Feeder”, and
then check that the machine will not start when the variable speed control is in the “i”, “ii” or
“p” positions.
2.
place the feeder on the machine base with the text “close open” at 5 o’clock in relation to the
outlet of the machine base and turn the feeder clockwise as far as it will go and is firmly in position. then check that the machine stops when the feeder handle is raised and restarts when the
feeder handle is lowered, with the variable speed control in the “i”, “ii” or “p” positions.
3.
Set the variable speed control to position “ii” and then lift the feeder handle and check that the
shaft stops rotating within 4 seconds.
4.
Safety check before processing with the bowl. First remove the lid, the knife and the bowl in accordance with the instructions under the heading “Removing the Bowl”, and then check that the
machine will not start when the variable speed control is in the “i”, “ii” or “p” positions.
5.
install the bowl and lid (but not the knife) in accordance with the instructions under the heading
“Installing the Bowl” and set the variable speed control to the “ii” position. remove the lid by
turning it counterclockwise and check that the shaft stops rotating within 4 seconds.
in the event of any fault or malfunction, call in an authorized service technician to correct the fault before using the machine.
Continuous Feed Operation:
1.
the continuous Feed attachment is used together with a suitable cutting tool for slicing, dicing,
shredding or grating.
2.
the large feed compartment is used mainly for feeding potatoes, onions, peppers, etc. and cutting
larger foods such as cabbage. the large feed compartment is also used when the food has to be
cut/sliced in a specific direction, e.g. when slicing tomatoes and lemons.
3.
the feed tube is mainly used in connection with processing elongated foods such as cucumbers.
–8–
Choice of Cutting Tools When Processing With the Feeder:
1.
Slicer: Slices soft and firm foods. Dices in combination with the Dicing Grid.
2.
crimping Slicer: For ripple slicing.
3.
Julienne cutter: For julienne potatoes, cucumber, etc. 3/16 x 3/16 in. (4.5 x 4.5 mm) for shredding of white cabbage.
4.
Dicing Grid: Dices in combination with the standard slicer.
5.
Grater/Shredder: Grates carrots, white cabbage, nuts, cheese, dry bread, etc.
6.
Fine Grater: Finely grates raw potatoes, hard/dry cheese, etc.
Installing the Feeder:
1.
place the ejector plate on the shaft and turn/press down the ejector plate onto its coupling.
2.
During dicing, place the dicing grid with the sharp edge of the knives upward, so that the recess
in the side of the dicing grid fits into the guide grove on the machine base.
3.
then place the standard slicer so that it drops down onto its coupling.
4.
During slicing, shredding and grating, place only the chosen cutting tool on the shaft and rotate
the cutting tool so that it drops onto its coupling.
5.
place the feeder on the machine base so that the text “close open” is at 5 o’clock in relation to
the outlet of the machine base and turn the feeder clockwise as far as it will go and it is firmly in
position.
Removing the Feeder:
1.
turn the feeder counterclockwise as far as it will go, then lift off the feeder.
2.
turn the cutting tool clockwise and lift it off.
3.
Lift off the dicing grid (if applicable).
4.
Lift off the ejector plate.
Bowl Processing:
1.
the bowl is used for chopping and grinding or for blending/mixing, etc.
–9–
Amount, Size and Processing Times of Foods, When Processing With the Bowl:
1.
the amount and size of the pieces which can be processed at one time, and the length of time the
processing takes, depend on the consistency of the foods and on the result desired.
2.
For even and consistent results with firm foods such as meat and cheese, it should first be separated into pieces approximately equal in size and not bigger than 1x1x1 in. (3x3x3 cm).
3.
the maximum amounts which should be processed at one time:
meat: 2 lb. Fish: 2 lb. aromatic butter: 2 lb. mayonnaise 2 pints. parsley 1.8 pints.
Installing the Bowl:
1.
place the bowl on the machine base so that the locating plate of the bowl is inserted into the
recess on the top of the machine base.
2.
place the knife on the shaft and rotate the knife while pressing it down so that it drops completely onto its coupling.
3.
Fit the sealing ring into the groove on the inside of the lid.
4.
Grip the center of the scraper ring and place the lid on the scraper ring.
5.
place the scraper handle on top of the lid and press together the scraper ring and the scraper
handle, while at the same time turning the scraper handle counterclockwise as far as it will go so
the three parts are joined.
6.
place the lid on the bowl so that the text “close open” is at 5 o’clock in relation to the outlet of
the machine base.
7.
turn the lid clockwise as far as it will go.
Removing the Bowl:
1.
turn the lid counterclockwise as far as it will go and lift away the lid/scraper.
2.
to disassemble the scraper from the lid, press the scraper ring and the scraper handle together,
while rotating the scraper handle clockwise as far as it will go and separate the three parts.
3.
rotate the knife clockwise as far as it will go, remove the knife and lift off the bowl. if the contents of the bowl are liquid, it should be emptied before the knife is removed.
Using the Variable Speed Control:
1.
During dicing and slicing of fragile foods such as tomatoes, peppers, etc., it is recommended that
the variable speed control is set in the “i” position to give extra slow/gentle processing and the
best results.
– 10 –
2.
With the variable speed control in the “o” position, the machine is switched off. in the “i” position, the machine operates continuously at low speed. in the “ii” position, the machine operates
continuously at high speed. in the “p” (pulse) position, the machine operates at high speed until
the variable speed control is released.
Cleaning
1.
always clean the machine thoroughly immediately after use.
2.
First switch off the machine by setting the variable speed control to the “o” position.
Unplug food processor before cleaning.
3.
if you have used the dicing grid, leave it in the machine and force out any remaining cubes with
a brush before removing the grid.
4.
take all removable parts off of the machine base and remove the sealing ring from the groove on
the inside of the lid, clean in a hot detergent solution, rinse, and dry them thoroughly and then
replace the sealing ring in the groove.
5.
all cutting tools can be washed in a hot detergent solution.
6.
Wipe the machine base with a damp cloth.
7.
Never use sharp objects, scouring powder or pads or high pressure hoses.
8.
Never leave the knife or cutting tools in a wet condition or on a stainless steel bench when they
are not being used, but dry them thoroughly and always place them on the wall rack (if available).
TroUBleshooTing
Machine Overheats:
1.
To eliminate the risk of damage to the motor, the unit is fitted with thermal motor protection that
automatically switches off the machine if the temperature of the motor should become too high.
2.
the thermal motor protection has automatic reset, which means that the machine can be started
again when the motor has cooled down, which usually takes between 10 and 30 minutes.
The Machine Will Not Start or Stops While Running and Can Not Be Re-started:
1.
check that the power plug is properly inserted in the wall socket.
– 11 –
2.
check the circuit breaker in the electrical panel to see if it has tripped.
3.
check that the feeder is correctly installed and that the feeder handle has been lowered. check
that the bowl and lid are correctly installed.
4.
Wait for up to 30 minutes and then try to start the machine again. call in a service technician for
further action.
Low Capacity or Poor Processing Results When Using the Feeder:
1.
Select the right cutting tool or combination of cutting tools.
2.
always use the ejector plate.
3.
check that the knives and slicing discs are sharp and without any defects.
4.
press the food down loosely.
Low Capacity or Poor Processing Results When Using the Bowl:
1.
Separate the foods into smaller, evenly-sized pieces, maximum 1x1x1 in. (3x3x3 cm).
2.
process for a shorter or longer period of time.
3.
process a smaller amount each time.
4.
Always have the scraper fitted and use as required.
The Cutting Tool Cannot Be Removed When Using the Feeder:
1.
always use the ejector plate.
2.
carefully remove the cutting tool by turning it clockwise.
speCifiCaTions
Type of Processing:
1.
Slices, dices, shreds, and/or grates fruit, vegetables, dry bread, cheese, nuts and mushrooms.
2.
Chops and grinds meat, fish, fruit, vegetables and nuts.
3.
mixes/blends sauces, aromatic butter, mayonnaise, soups, dressing, thickenings, desserts, etc.
– 12 –
Users:
1.
restaurants, dietary kitchens, day care centers, retirement homes, catering establishments, etc.
2.
preparing from 10 to 80 portions a day.
Capacity and Volume:
1.
processes up to 4 lbs. per minute with the feeder depending on the type of cutting tool and product.
2.
Volume of the feeder: 1 quart.
3.
Diameter of the feed tube: 2 inches.
4.
Gross volume of bowl: 3 quarts.
5.
Net volume of bowl with free-flowing liquid: 1.5 quarts.
Machine Base:
1.
Motor: 1000 W. 120 V, Single phase, 60 Hz.
2.
thermal motor protection.
3.
transmission: maintenance free toothed belt.
4.
operator protection: two interlock switches.
5.
Degree of protection: ip34.
6.
power supply socket: Grounded, single phase, 10 a. protective device for circuit must be per
National electrical code (NFpa No. 70 current edition).
7.
Sound level: 76 dBa during cutting and 82 dBa during chopping.
Controls and Speeds:
1.
Four speeds for perfect processing results in connection with cutting and chopping.
2.
Automatic speed setting (AUTO-SPEED) that senses whether the feeder or the bowl is fitted.
During cutting with the feeder the machine operates at 550 rpm in the “i” position and 850 rpm
in the “ii” position. During chopping with the bowl; 1,450 rpm in position "i" and 2,500 rpm in
position "ii". the pulse function operates at 850 rpm with the feeder and at 2,500 rpm with the
bowl, in "p" position.
– 13 –
Cutting Tools and Chopping Knife:
1.
the diameter of the cutting tools is 7.25 in.
2.
the diameter of the chopping knife is 6.70 in.
Materials:
1.
the machine base is made of aluminium.
2.
the continuous feed attachment:
3.
•
Housing: Polycarbonate
•
ejector plate: acetal
•
cutting tool discs: robust acetal, polysulphone, polyutherane or aluminium
•
cutting tool blades: Stainless Steel
the bowl cutter/mixer attachment:
•
Bowl: Stainless Steel
•
Knife hub: acetal
•
Knife blades: Stainless Steel
•
Lid: polycarbonate
•
Scraper: polysulfone.
Net Weights:
1.
machine base: 20.0 lbs.
2.
Vegetable preparation attachment complete but excluding cutting tools: 2.2 lbs.
3.
cutting tools: approx. 0.9 lb average.
4.
Fast chopping attachment complete but excluding knife: 3.0 lbs.
– 14 –
opTional aCCessories
Accessory
Part Number
Stainless Steel cutter/mixer Bowl assembly
cc34-24122
Stainless Steel cutter/mixer Bowl (bowl only)
cc34-24151
Knife Unit (knife only)
cc34-24153
continuous Feed attachment
cc34-24120
Wall rack
cc34-01071
Slicing plate, 1/32 in. (1 mm)
cc34-84050
Slicing plate, 5/64 in. (2 mm)
cc34-84051
Slicing plate, 5/32 in. (4 mm)
cc34-84052
Slicing plate, 1/4 in. (6 mm)
cc34-84053
Slicing plate, 3/8 in. (10 mm)
cc34-83304
Julienne plate, 5/64 x 5/64 in. (2 x 2 mm)
cc34-84054
Julienne plate, 3/16 x 3/16 in. (4.5 x 4.5 mm)
cc34-84055
crimping plate, 3/16 in. (4.5 mm)
cc34-84057
Grater plate, Fine
cc34-84062
Grater/Shredder plate, 5/64 in. (2 mm)
cc34-84058
Grater/Shredder plate, 3/16 in. (4.5 mm)
cc34-84059
Grater/Shredder plate, 1/4 in. (6 mm)
cc34-84060
Grater/Shredder plate, 5/16 in. (8 mm)
cc34-84061
Dicing Grid, 3/8 x 3/8 in. (10 x 10 mm)
cc34-83267
Dicing Grid, 5/8 x 5/8 in. (15 x 15 mm)
cc34-83269
replacement Blade for Slicing plates - except 3/8" (10 mm)
cc34-37420
replacement Blade for Slicing plate - 3/8" (10 mm only)
cc34-36530
replacement Blade for crimping plate
cc34-36880
– 15 –
The Choice of Experience
WarranTy
effective: February 14, 2002
Berkel company (“Berkel”) warrants to the Buyer of new equipment that said equipment, when installed
in accordance with our instructions and subjected to normal use, is free from defects in material or workmanship for a period of one (1) year from the date of sale.1, 2
BERKEL SPECIFICALLY DISCLAIMS ANY IMPLIED WARRANTY OF MERCHANTABILITY
OR EXPRESS OR IMPLIED WARRANTY OF FITNESS FOR A PARTICULAR PURPOSE.
Berkel’s obligation and liability under this warranty is expressly limited to repairing or replacing equipment that proves to be defective in material or workmanship within the applicable warranty period.
Berkel or a Designated Berkel Service Location will perform all repairs pursuant to this warranty.
Berkel expressly excludes responsibility for incidental or consequential damages to buyer or any third
party, including, without limitation, damages arising from personal injuries, lost profits, loss of business
opportunity, loss of property, economic losses, or statutory or exemplary damages, whether in negligence, warranty, strict liability or otherwise.
this warranty does not apply to: periodic maintenance of equipment including but not limited to lubrication, replacement of worn blades, knives, stones, knobs, accessories, and miscellaneous expendable
supply items, and other adjustments required due to installation set-up or normal wear.
These warranties are given only to the first purchaser from a Berkel Authorized Channel of Distribution.
No warranty is given to subsequent transferees.
the foregoing warranty provisions are a complete and exclusive statement of the warranty between the
buyer and seller. Berkel neither assumes nor authorizes any persons to assume any other obligation or
liability connection with said equipment. this warranty supersedes any and all prior warranties to the
subject hereof.
1
model 180 slicers carry a 90-day warranty.
2
three year replacement guarantee for polymer parts used on the X series slicers.
BK46708 (September 2007)
– 16 –