1
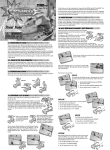
C
K
COURAGE FOR YOUR HEAD
A
R
TT
A
L
F
T
EE
ENGLISH
PLEASE READ CAREFULLY
HELMET USE
This helmet is intended only for pedal cyclists, skateboarders, rollerskaters, or in-line
skating. It is not designed for motor vehicle use or other sports. This helmet is certified
to EN 1078.
LIMITED IMPACT PROTECTION
Helmets reduce or prevent many injuries. But, impact forces, even in a common low
speed accident, can result in serious injury or death. Energy absorbing materials used
in helmets crush on impact. Sometimes, the blow can crush the material completely.
When this happens some of the force is transferred to the head. If the force is great
enough it can cause injury or death. Because every accident is different, it’s impossible
to predict when this might happen. Any helmet subjected to a severe impact should be
discarded and destroyed.
HELMETS CAN’T PREVENT ALL HEAD INJURIES
Some head injuries are not caused by impacts at all, but by other forces. You can
scramble an egg just by shaking it. You don’t have to break the shell to destroy the contents. Helmets cannot prevent this type of injury.
HELMETS CAN’T PROTECT WHAT THEY DON’T COVER
The helmet will not protect the neck or any area of the head it doesn’t cover. Always
wear a helmet low in the front to protect the forehead. Make sure the helmet fits snugly
and the straps are adjusted to hold the helmet firmly in place when tightly fastened.
YOU SHOULD
ALWAYS:
YOU SHOULD
NEVER:
1
1
Wear your helmet low in the front
to protect the forehead.
2 Fasten your buckle and tighten your
chin strap.
3 Check your adjustments every time
you wear your helmet.
4 Inspect your helmet regularly for
signs of wear or damage.
5 Replace your helmet immediately if
it shows any visible signs of
wear or damage. Helmets have a
limited life span of use.
6 Replace your helmet after an accident, even if no damage is visible.
7 Clean your helmet with mild soap
and water only.
8 Store your helmet in a cool dry
place.
9 Wear a helmet whenever you ride.
10 Wear a helmet designed for what
you’re doing.
11 Ride safely.
Wear a helmet that’s been in an accident,
even if no damage is visible.
2 Loan your helmet to anyone.
3 Wear someone else’s helmet.
4 Wear your helmet with the buckle
unfastened.
5 Wear your helmet tipped back to
expose your forehead.
6 Wear anything under your helmet.
7 Wear this helmet while operating a
motor vehicle.
8 Make any attachments other than
those recommended in this manual.
9 Clean your helmet with chemical
cleaners.
10 Store your helmet in hot and damp
places.
11 Take unnecessary risks just
because you’re wearing a helmet.
12 Modify or remove any original
component parts of the helmet
other than as recommended by the
manufacturer.
PARENTS:
A helmet is NOT a toy. DO NOT allow your children to use while climbing or in
other play activities, where a risk of strangulation exists.
This helmet can only protect you if it fits well. Be sure to try on different sizes
and choose the size which feels secure and comfortable on your head.
FOLLOW THESE FIVE SIMPLE STEPS TO LEARN HOW TO PROPERLY FIT AND
WEAR YOUR HELMET. YOU WILL NEED A MIRROR
STEP 1: WEAR IT IN THE PROPER POSITION
Always wear a helmet low in the front to protect the forehead. See Figure 1 for the proper way to wear a helmet.
IN-CORRECT
CORRECT
FIGURE 1
IMPORTANT: All fitting adjustments MUST be made with
the helmet in the proper position. Failure to do so will
result in a poor fit. This will allow the helmet to move out
of position or come off in an accident.
STEP 2: ADJUSTING THE STRAPS
The front and rear straps should join at a point slightly
below and in front of (but not covering) the ears. See
Figure 2.
FIGURE 2
STEP 3: ADJUSTING THE CHIN STRAP
Always wear the helmet with the chin strap buckle fastened and the strap pulled
tight. Make sure the strap is well back against the throat, NOT on the point of
the chin. Straps worn on the point of the chin increase the chance of the helmet
coming off in an accident. Position the buckle away from your jawbone. Figures
3 and 4 show how to fasten and release the buckle and Figure 5 shows proper
placement of the chin strap.
FIGURE 3
FIGURE 4
FIGURE 5
WARNING!
Make sure the loose end of the strap passes through
the rubber “O” ring. If it does not, the strap may slide
loose and the helmet can come off accidentally.
(See figure 6)
FIGURE 6
1
ENGLISH
FITTING THE HELMET TO YOUR HEAD
ENGLISH
STEP 4: GETTING THE CORRECT FIT
The helmet fits correctly when it is held firmly but comfortably in place by the
interior fit pads. Adjustments are made by varying the thickness of the interior
pads and by varying the position and tension of the straps.
The front fit pad should lightly touch your forehead. If it does not, replace it
with the thicker pad provided. If it still does not, try a smaller size helmet.
When correctly adjusted, you should feel a slight pressure at the back of your
head, and the front pad will push firmly, but comfortably against your forehead.
STEP 5: CHECKING THE FIT AND ADJUSTMENTS
Before using the helmet, make sure it fits correctly, the straps are
correctly adjusted, and the chin strap is tight enough. Put the helmet on
in the correct position. Fasten the chin strap and pull it tight. Stand in
front of the mirror.
A. Check the Fit
Grab the helmet with both hands and twist it to the left and to
the right. If the helmet fits right, the skin on the forehead will
move as the helmet moves. If it does not, the helmet is too
loose. Return to Step 4.
B. Check the Straps
Grab the helmet with both hands and try to remove it by rolling the helmet
forward and backward as far as you can. Make a serious effort. This is
important. If you can roll it off the head completely in either direction, roll it
forward so far that it blocks vision, or roll it backward far enough to expose
the forehead, it doesn’t fit right. Repeat Steps 2 and 3 until helmet move
ment is minimal.
WARNING!
If you cannot adjust the helmet to fit properly according to Step 5,
DO NOT USE THIS HELMET. Replace it with a different size or model.
Once you are satisfied that the helmet fits correctly and that all straps
are properly adjusted and tightened, take a short test ride. Pay attention
to overall comfort and helmet stability while riding. Make any minor
adjustments to the fit pads and straps to improve comfort or stability.
CLEANING
Helmets are made of materials that can be damaged by many commonly
available cleaners. Petroleum based solvents or cleaners are especially
dangerous. They can damage a helmet so that its protective capabilities are
significantly reduced. Many times this damage is not visible. For best results,
clean the helmet using a soft cloth or sponge, warm water and mild soap.
STORAGE
After each use allow the helmet to air dry and then store in a cool, dry
place. Excessive heat can damage the helmet. In direct sunlight, dark gear
bags and automobile trunks can get hot enough to cause heat damage.
Damaged helmets will appear to have uneven or bubbly surfaces.
WARNING! DO NOT use heat damaged helmets.
SAFETY
1 Enjoy bicycling. Ride safely. You are responsible for
your own safety.
2 Always wear your helmet, even on a short ride. Many accidents
happen close to home.
3 Watch carefully for drivers turning left in front of you. Drivers often
report that they never saw the bicycle or the rider.
4 Wear brightly colored clothing.
5 Obey all traffic laws.
6 Don’t ride at night without proper lighting and reflectors. Watch for
parked cars. Doors often open without warning.
7 Pretend you’re invisible. Don’t assume that automobile
drivers can see you.
ENGLISH
TAKE A TEST RIDE