1
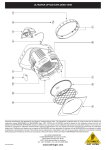
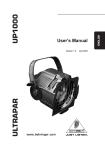
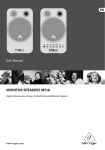
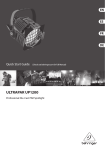
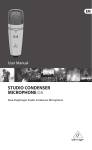
User Manual
ULTRAPAR UP1200
Professional Die-Cast PAR Spotlight
2
ULTRAPAR UP1200 User Manual
Table of Contents
Important Safety Instructions...............................3
Legal Disclaimer......................................................3
Limited Warranty....................................................3
1. Introduction........................................................4
1.1 Before you begin......................................................4
1.1.1 Online registration............................................5
1.2 Mains connection....................................................5
2. Lamp....................................................................5
2.1 Disassembling the lamp
casing/installing a lamp................................................5
3. Lenses..................................................................5
3.1 Dismounting the lens ............................................6
3.2 Mounting the lens...................................................6
4. Color frame.........................................................6
5. Cleaning the reflector........................................6
6. Suspended installation.....................................6
7. Specifications......................................................6
3
ULTRAPAR UP1200 User Manual
Important Safety
Instructions
Terminals marked with this
symbol carry electrical
current of sufficient
magnitude to constitute risk of electric
shock. Use only high-quality professional
speaker cables with ¼" TS or twistlocking plugs pre-installed. All other
installation or modification should be
performed only by qualified personnel.
This symbol, wherever it
appears, alerts you to the
presence of uninsulated
dangerous voltage inside the enclosure voltage that may be sufficient to
constitute a risk of shock.
This symbol, wherever it
appears, alerts you to
important operating and
maintenance instructions in the
accompanying literature. Please read
the manual.
Caution
To reduce the risk of electric
shock, do not remove the
top cover (or the rear section). No user
serviceable parts inside. Refer servicing
to qualified personnel.
Caution
To reduce the risk of fire or
electric shock, do not expose
this appliance to rain and moisture.
The apparatus shall not be exposed to
dripping or splashing liquids and no
objects filled with liquids, such as vases,
shall be placed on the apparatus.
Caution
These service instructions
are for use by qualified
service personnel only. To reduce the
risk of electric shock do not perform any
servicing other than that contained in the
operation instructions. Repairs have to be
performed by qualified service personnel.
1. Read these instructions.
2. Keep these instructions.
3. Heed all warnings.
4. Follow all instructions.
5. Do not use this apparatus near water.
6. Clean only with dry cloth.
7. Do not block any ventilation
openings. Install in accordance with the
manufacturer’s instructions.
8. Do not install near any heat sources
such as radiators, heat registers, stoves,
or other apparatus (including amplifiers)
that produce heat.
9. Do not defeat the safety purpose
of the polarized or grounding-type plug.
A polarized plug has two blades with
one wider than the other. A groundingtype plug has two blades and a third
grounding prong. The wide blade or the
third prong are provided for your safety.
If the provided plug does not fit into
your outlet, consult an electrician for
replacement of the obsolete outlet.
10. Protect the power cord from being
walked on or pinched particularly at
plugs, convenience receptacles, and the
point where they exit from the apparatus.
11. Use only attachments/accessories
specified by the manufacturer.
12. Use only with
the cart, stand,
tripod, bracket,
or table specified by
the manufacturer,
or sold with the
apparatus. When a cart is used, use caution
when moving the cart/apparatus
combination to avoid injury from tip-over.
13. Unplug this apparatus during
lightning storms or when unused for long
periods of time.
14. Refer all servicing to qualified
service personnel. Servicing is required
when the apparatus has been damaged
in any way, such as power supply cord or
plug is damaged, liquid has been spilled
or objects have fallen into the apparatus,
the apparatus has been exposed to rain
or moisture, does not operate normally,
or has been dropped.
15. The apparatus shall be connected to
a MAINS socket outlet with a protective
earthing connection.
16. Where the MAINS
plug or an appliance
coupler is used as the
disconnect device,
the disconnect device shall
remain readily operable.
LEGAL DISCLAIMER
TECHNICAL SPECIFICATIONS AND
APPEARANCES ARE SUBJECT TO CHANGE
WITHOUT NOTICE AND ACCURACY
IS NOT GUARANTEED. BEHRINGER,
KLARK TEKNIK, MIDAS, BUGERA,
AND TURBOSOUND ARE PART OF THE
MUSIC GROUP (MUSIC-GROUP.COM).
ALL TRADEMARKS ARE THE PROPERTY
OF THEIR RESPECTIVE OWNERS.
MUSIC GROUP ACCEPTS NO LIABILITY
FOR ANY LOSS WHICH MAY BE
SUFFERED BY ANY PERSON WHO RELIES
EITHER WHOLLY OR IN PART UPON
ANY DESCRIPTION, PHOTOGRAPH
OR STATEMENT CONTAINED HEREIN.
COLORS AND SPECIFICATIONS MAY
VARY FROM ACTUAL PRODUCT.
MUSIC GROUP PRODUCTS ARE SOLD
THROUGH AUTHORIZED FULLFILLERS
AND RESELLERS ONLY. FULLFILLERS
AND RESELLERS ARE NOT AGENTS OF
MUSIC GROUP AND HAVE ABSOLUTELY
NO AUTHORITY TO BIND MUSIC GROUP BY
ANY EXPRESS OR IMPLIED UNDERTAKING
OR REPRESENTATION. THIS MANUAL IS
COPYRIGHTED. NO PART OF THIS MANUAL
MAY BE REPRODUCED OR TRANSMITTED
IN ANY FORM OR BY ANY MEANS,
ELECTRONIC OR MECHANICAL, INCLUDING
PHOTOCOPYING AND RECORDING OF
ANY KIND, FOR ANY PURPOSE, WITHOUT
THE EXPRESS WRITTEN PERMISSION OF
MUSIC GROUP IP LTD.
ALL RIGHTS RESERVED.
© 2013 MUSIC Group IP Ltd.
Trident Chambers, Wickhams Cay,
P.O. Box 146, Road Town, Tortola,
British Virgin Islands
LIMITED WARRANTY
For the applicable warranty terms
and conditions and additional
information regarding MUSIC
Group’s Limited Warranty, please
see complete details online at
www.music-group.com/warranty.
4
ULTRAPAR UP1200 User Manual
(4)
(5)
(3)
(6)
(2)
(14)
(15)
(1)
(9)
(13)
(12)
(10)
(8)
(11)
ULTRAPAR UP1200 Exploded View
1. Introduction
Congratulations! With the BEHRINGER ULTRAPAR UP1200 you
purchased a fi rst-class PAR spot-light mounted in a compact,
extremely robust and durable casing and featuring a comprehensive
range of accessories.
1.1 Before you begin
Your ULTRAPAR was carefully packed in the factory and the
packaging is designed to protect the unit from rough handling.
Nevertheless, we recommend that you carefully examine the
packaging and its contents for any signs of physical damage,
which may have occurred during transit.
◊ If the unit is damaged, please do not return it to BEHRINGER,
but notify your dealer and the shipping company
immediately, otherwise claims for damage or replacement
may not be granted. Shipping claims must be made by
the consignee.
5
ULTRAPAR UP1200 User Manual
1.1.1 Online registration
•
Please register your new BEHRINGER equipment right after your
purchase by visiting http://behringer.com and read the terms and
conditions of our warranty carefully.
Disconnect the spotlight from the mains power supply,
and unscrew the thumb screw on the rear of the
lamp casing (3) (G 9.5 socket)
•
Carefully pull out the lamp casing (3) from the rear part
of the spotlight
•
Carefully take the lamp out of its carton, by holding it
at its socket
Should your BEHRINGER product malfunction, it is our intention
to have it repaired as quickly as possible. To arrange for warranty
service, please contact the BEHRINGER retailer from whom the
equipment was purchased. Should your BEHRINGER dealer not
be located in your vicinity, you may directly contact one of our
subsidiaries. Corresponding contact information is included in
the original equipment packaging (Global Contact Information/
European Contact Information). Should your country not be listed,
please contact the distributor nearest you. A list of distributors can be
found in the support area of our website (http://behringer.com).
◊ Never touch the glass bulb of the lamp, as this can reduce
the lamp’s service life considerably. If you touch the glass
bulb during installation, wipe it clean with a lint-free cloth
damped with ethyl alcohol (spirit).
•
Depending on socket type, use the corresponding
temperature-resistant rubber adapter provided
•
Press the lamp socket (and the rubber adapter) into the holder
inside the lamp casing (3) until the lamp is safely mounted
in place. The entire bottom side of the lamp socket must be in
contact with the casing
1.2 Mains connection
•
Prior to the initial operation of the spotlight UP1200, a mains plug
must be attached to the power cord. Please use a commercially
available shockproof plug with a minimum power rating of 2.5 A
(220/240 V). The wires of the connecting cable are clearly marked
according to their function.
Remount the casing and connect it to the grounding cable (2)
coming from the spotlight. Fasten the thumb screw until the
casing is safely mounted in place
•
Avoid touching the reflector with bare hands. Oily finger
marks can bake onto the glass surface and substantially
lower optical quality
The spotlight can be operated from a power supply of max. 120 V/5 A
or 240 V/2.5 A AC. The mains frequency should be 50/60 Hz.
3. Lenses
◊ Please note that your ULTRAPAR spotlight must be grounded
Your ULTRAPAR spotlight is delivered with four glass lenses.
Registering your purchase and equipment with us helps us process
your repair claims more quickly and efficiently.
Thank you for your cooperation!
properly. For your own safety, you should not remove or
defeat the ground connection of the spotlight or power cord.
◊ Make sure that the spotlight will be installed by qualified
personnel only.
2. Lamp
The halogen lamp needed for using the UP1200 is not included
with the shipment. To start using your ULTRAPAR spotlight, use the
BEHRINGER 575H (575 Watts at 110 V/230 V) or any other compatible
lamp with the G9.5 socket. Make sure that the lamp you use is
compatible with local voltage.
◊ If the lamp is operated with a voltage surpassing its nominal
operating voltage, it can be damaged/destroyed or its
service life reduced considerably.
2.1 Disassembling the lamp casing/
installing a lamp
Lamps that have been damaged, must be replaced immediately!
Please proceed as follows to replace the lamp:
◊ The lamp gets very hot during operation of the spotlight,
so let it cool down sufficiently before you attempt to
dismount it!
◊ Never use your ULTRAPAR without the protective mesh in
combination with the color frame because it prevents direct
contact with the hot lamp surface. It also prevents pieces of
broken glass from uncontrollably dispersing in the event of
the lens being broken.
The shape of each lens determines the light beam produced by the
spotlight (Fig. 3.1). Also, use the turnable lens ring to optimally
adjust the direction of the light beam.
NameQuality
Properties
Narrow-spot lens
Transparent glass
Round beam (15°)
Spot lens
Grain screen glass
Round, slightly diffuse
beam (19°)
Medium flood lens
Glass with few facets
Oblong beam (21° x 34°)
Wide medium
flood lens
Glass with many facets
Oblong beam (30° x 51°)
Fig. 3.1: ULTRAPAR lenses and their features
◊ Defective lenses (scratches, cracks, etc.) must be
replaced immediately.
6
ULTRAPAR UP1200 User Manual
3.1 Dismounting the lens
◊ Never use your ULTRAPAR without the protective mesh in
combination with the colorframe because it prevents direct
contact with the hot lamp surface. It also prevents pieces of
broken glass from uncontrollably dispersing in the event of
the lens being broken.
◊ The lens gets very hot during operation of the spotlight,
•
so let it cool down sufficiently before you attempt to
dismount it!
Disconnect the spotlight from the mains and wait until it has
cooled down
•
Place the spotlight on a flat and stable surface. Never mount or
dismount the lens, while the spotlight is fi xed to a truss or stand
•
5. Cleaning the reflector
•
Disconnect the spotlight from the mains and remove the
lamp casing as described in chapter 2.1
Remove the protective mesh (8) : press its two spring shackles,
then pull out the mesh
•
Remove the color frame (11) (chapter 4), the protective mesh and
lens (10) (chapter 3.1), so that the refl ector is easily accessible
•
Directly in front of the lens, you will fi nd a movable metal
clamp (4) attached to the lens ring (5) . Turn the lens ring,
until the metal clamp is located on the top side of the spotlight
(directly below the locking bracket (13)
•
Cleaning the reflector: Use oil-free compressed air or a soft,
lint-free cotton cloth. Tenacious stains can be removed by
adding some mild soap water, however, don’t forget to remove
all soap water remnants as well
•
Tilt the front side of the spotlight forward by at least 45°
•
Remount the spotlight (see chapters 2.1 and 3.2)
•
Push the movable metal clamp upward to dismount and pull out
the lens (10)
◊ Never clean the reflector with commercial window cleaners,
3.2 Mounting the lens
•
Tilt the spotlight forward and turn the lens ring (5), until the
movable metal clamp (4) is located on the top side of the
spotlight (directly below the locking bracket (13)
•
Insert the lens with its rounded side towards the rear.
The lower edge of the lens must be located behind the
projecting elements (6) of the lens ring
•
Press the upper edge of the lens slightly towards the rear,
until it locks in behind the metal clamp (4)
•
Installation of the protective mesh (8) : Press the two spring
shackles of the protective mesh and place it directly in front
of the lens ring (5) . There are two slots in the die-cast casing
of your ULTRAPAR for the “feet” of the protective mesh.
The two spring shackles must be located directly below
the locking bracket (13)
4. Color frame
The color frame (11) is used to hold color filters. Please observe the
following instructions to install the color frame:
• Detach the locking bracket (13) on the top side of the spotlight,
by pushing it to the side. Then, open the bracket and tilt it
towards the rear
•
Insert the color frame into the frame holders (9) and (12),
i.e. the outer guiding rail (with stops on three sides) on the
front side of the ULTRAPAR
•
Push the locking bracket (13) to the side and move it down
until it locks in
◊ Only use color filters with appropriate
temperature resistance!
as the chemical substances contained in these agents can
damage the reflector insert!
◊ Don’t use paper towels or other material with a rough
surface to wipe the refl ector clean, so as to avoid scratches
damaging the reflector surface.
◊ Avoid touching the reflector with bare hands. Oily finger
marks can bake onto the glass surface and substantially
lower optical quality.
6. Suspended installation
Use the mounting bracket (1) to attach your spotlight to a stand
or truss. Always use M12 steel screws to fasten the spotlight.
Your UP1200 must be secured with an additional safety steel cable .
Use the steel cable fixed to the spotlight casing (eyelet (15) ).
Once the spotlight has been adjusted, it must be secured in place
with the locking screw (14) .
7. Specifications
Power 575 W max. (120 V / 240 V)
Max. room temperature Ta = 45°C
Max. temperature of exterior surfaces
Tmax = 175°C
Physical/Weight
Dimensions (Height x Diameter)
approx. 11 3/4 x 9 1/4"
approx. 300 x 237 mm
Weight approx. 10.8 lbs / 4.9 kg
BEHRINGER is constantly striving to maintain the highest professional standards. As a result of
these efforts, modifi cations may be made from time to time to existing products without further
notice. Specifi cations and appearance may differ from those listed or shown.
7
ULTRAPAR UP1200 User Manual
We Hear You