1
ENGLISH
User Manual
EUROLIVE
VP1220/VP1220F/
VP1520/VP2520/
VP1800S
Professional 800/1000/2000-Watt
PA Speaker with 12"/15" Woofer
and 1.75" Titanium-Diaphragm
Compression Driver
Thank you
Table of Contents
Thank you for purchasing one of our EUROLIVE VP series
Thank you...................................................................... 1
Important Safety Instructions.................................... 2
1. Before You Get Started............................................ 3
2. Connections ............................................................. 4
3. Optimal Operation.................................................. 4
4. Additional Considerations..................................... 5
5. Application Examples............................................. 6
6. Specifications........................................................... 7
Legal Disclaimer........................................................... 8
Warranty........................................................................ 9
loudspeakers. These loudspeakers offer powerful, pristine sound
reinforcement in a lightweight, portable package. Furthermore,
they can act as pieces to an expandable sound system, with both
¼" TS and professional locking-style inputs and outputs, pole
mounting sockets and recessed handles. Heavy duty low-frequency
drivers deliver thumping bass and powerful midrange clarity while
high-frequency compression drivers cut through the mix with
smooth, shimmering treble. The VP1800S subwoofer matches
perfectly with the full range counterparts to create an absolutely
massive sound. We’re certain these versatile loudspeakers will bring
you years of faithful sound reinforcement and ensure that your
music is heard the way it should be!
This manual is available in English, German, French,
Spanish, Italian, Russian, Polish, Dutch, Finnish, Swedish,
Danish, Portugese, Greek, Japanese and Chinese. There may
also be more current versions of this document. Download them
by going to the appropriate product page at:
www.behringer.com
A50-A4K30-08001
EUROLIVE VP1220/VP1220F/VP1520/VP2520/VP1800S User Manual
ENGLISH
2
Important Safety Instructions
!!
Caution
* {1}.
{2}.
{3}.
{4}.
{5}.
{6}.
{7}.
!!
{8}.
Caution
To reduce the risk of electric shock, do not remove the top
cover (or the rear section). No user serviceable parts inside;
refer servicing to qualified personnel.
Warning
To reduce the risk of fire or electric shock, do not expose this
appliance to rain and moisture. The apparatus shall not be
exposed to dripping or splashing and no objects filled with
liquids, such as vases, shall be placed on the apparatus.
* Caution
{9}.
[10].
[11].
This symbol, wherever it appears, alerts you to the presence
of uninsulated dangerous voltage inside the enclosure—
voltage that may be sufficient to constitute a risk of shock.
!!
Caution
This symbol, wherever it appears, alerts you to important
operating and maintenance instructions in the
accompanying literature. Please read the manual.
[12].
Read these instructions.
Keep these instructions.
Heed all warnings.
Follow all instructions.
Do not use this device near water.
Clean only with a dry cloth.
Be sure to mount your speakers on a solid, stable and level base or stand.
Vibrating floors do not provide reliable support for speaker enclosures
or stacks.
Do not install near any heat sources such as radiators, heat registers, stoves,
or other apparatus (including amplifiers) that produce heat.
Only use attachments/accessories specified by the manufacturer.
Use only with the cart, stand, tripod, bracket, or
table specified by the manufacturer, or sold with the
device. When a cart is used, use caution when moving
the cart/device combination to avoid injury from
stumbling over it.
Refer all servicing to qualified service personnel.
Servicing is required when the unit has been damaged in any way, liquid has
been spilled or objects have fallen into the device, the unit has been exposed
to rain or moisture, does not operate normally, or has been dropped.
Do not block any ventilation openings. Install in accordance with the
manufacturer’s instructions.
1. Before You Get Started
1.1 Shipment
Your VP series loudspeaker was carefully packed at the assembly plant to assure secure transport. Should the condition of
the cardboard box suggest that damage may have taken place,
please inspect the unit immediately and look for physical indications of damage.
◊ Damaged equipment should NEVER be sent directly to us.
Please inform the dealer from whom you acquired the unit
immediately as well as the transportation company from
which you took delivery. Otherwise, all claims for replacement/repair may be rendered invalid.
◊ Please always use the original packaging to avoid damage
due to storage or shipping.
◊ Never let unsupervised children play with the loudspeaker
or with its packaging.
◊ Please dispose of all packaging materials in an environmentally friendly fashion.
1.2 Online registration
Please do remember to register your new BEHRINGER
equipment right after your purchase by visiting
http://www.behringer.com (alternatively www.behringer.de) and
kindly read the terms and conditions of our warranty carefully.
Should your BEHRINGER product malfunction, our goal is to
have it repaired as quickly as possible. To arrange for warranty
service, please contact the retailer from whom the equipment
was purchased. Should your BEHRINGER dealer not be located
in your vicinity, you may directly contact one of our subsidiaries.
Corresponding contact information is included in the original
equipment packaging (Global Contact Information/European
Contact Information). Should your country not be listed, please
contact the distributor nearest you. A list of distributors can be
found in the support area of our website (www.behringer.com/
support). Registering your purchase and equipment with us
helps usprocess your repair claims quicker and more efficiently.
Thank you for your cooperation!
1.3 Basic operation
3
Using the VP series loudspeakers is easy and intuitive. Simply
follow these steps to achieve the best possible sound:
1. Plug the line-level outputs from a sound source such as a
mixer or stereo system into a power amp of appropriate size
(see 4.2 Power amp rating). Make sure the sound source and
amplifier are turned off.
2. Using ¼" TS or professional locking-style speaker cables,
plug the power amp output into the ¼" or locking-style input
on the back of the speaker. DO NOT use instrument cables
(i.e., guitar cords) for this connection!
3. If using a pair of VP loudspeakers, run the amp in stereo
operation. If using just one loudspeaker, mono operation is
preferable.
4. If using four or more loudspeakers, there are a few ways to
make the connections. The first is to use two power amps, one
for each pair of loudspeakers. Another is to connect the first
pair of loudspeakers in normal stereo operation, then use
the output jacks on the back of the loudspeakers to link the
second pair of loudspeakers. This way each channel on the
power amp is driving two loudspeakers. Make sure that the
wattage and ohm rating are appropriate for this situation.
Caution – Never connect multiple power amps to one loudspeaker. Doing so could cause the very fabric of reality to
unravel, sending the entire universe into oblivion. Worse yet,
it could destroy your amplifiers and your loudspeaker.
5. If using the VP1800S subwoofer, it is important to run the
source signal into a crossover before the power amp(s). This
will allow you to direct only the low frequencies to the subwoofer, and the rest of the sound spectrum to the full-range
loudspeakers.
6. Turn the sound source on (mixer, stereo, etc.).
7. Make sure the volume/gain control on the power amp is
turned all the way down, and then turn the power on.
8. Activate the sound source, whether it is playing music from
a CD player or speaking into a microphone, and adjust the
levels. Gradually raise the power amp volume level to desirable level. If distortion occurs, turn the power amp volume
down. Should the problem persist, make sure distortion is
not occurring at the sound source. If you reach the desired
volume level by barely turning up the power amp level/gain,
turn the sound source output down to allow the power amp
to push the speakers more.
9. Rock ‘n Roll!
ENGLISH
EUROLIVE VP1220/VP1220F/VP1520/VP2520/VP1800S User Manual
EUROLIVE VP1220/VP1220F/VP1520/VP2520/VP1800S User Manual
ENGLISH
4
2. Connections
Fig. 2.1 Connector panel
Fig. 2.3 ¼" TS loudspeaker connector
[1]
The VP series features two locking professional loudspeaker [1] connectors that are wired in parallel. You can
connect one of the connectors to the output on your power
amp and tap into the signal from the amp on the second
connector, in order, for example, to feed this signal into an
additional loudspeaker. The pin designation of the loudspeaker connector is pins 1+ and 1-. Pins 2+ and 2- are not
connected.
◊ When several loudspeakers are wired in
T
parallel the overall impedance ZT to be
handled by the power amp can be calculated, as shown below, from the individual impedance values
of the connected speakers:
For the VP series, here are typical connection scenarios:
Two 8 Ohm speakers in parallel = 4 Ohms
Four 8 Ohm speakers in parallel = 2 Ohms
Two 4 Ohm speakers in parallel = 2 Ohms
Four 4 Ohm speakers in parallel = 1 Ohm
◊ Your amplifier may be damaged if the actual impedance
drops below its input impedance. Please make sure that
the calculated total impedance ZT is not smaller than the
minimum impedance specified for your amplifier.
3. Optimal Operation
Fig. 2.2 Professional loudspeaker connector
◊ ATTENTION: Never connect the output signals of different
power amps to both parallel inputs at the same time. This
may permanently damage your equipment.
[2] The VP series includes two parallel ¼" TS loudspeaker [2]
inputs. You can connect one of the connectors to the output
on your power amp and tap into the signal from the amp
on the second connector, in order, for example, to feed this
signal into an additional loudspeaker.
We have developed the VP series for use in a wide range of
possible applications. Of course, the sound of your loudspeakers depends on the acoustic characteristics of the room/space
in which they are being used. The following chapters of this
manual will give you information about getting the most out of
your EUROLIVE loudspeakers.
3.1 Loudspeaker placement
Here are some tips to get optimal sound and performance from
your loudspeaker(s):
Elevate the loudspeaker at or above head level. High frequencies
are the segment of the audio spectrum responsible for clarity
and speech intelligibility. They can get muffled by the front row
of the audience, so we recommend positioning your loudspeakers
so the high-frequency drivers are slightly above the height of the
audience. The more you can get everyone in direct earshot, the
better. Imagine the loudspeaker is a giant flashlight, and you
want to illuminate everyone in the room.
5
Avoid placing full-range loudspeakers in a corner or right next
to a wall. This enhances the low frequencies and can cause the
sound to get muddy. Subwoofers may be placed almost anywhere
since low frequencies are not highly directional.
Make sure that the loudspeakers are not in a place where they
could be knocked over by dancing audience members, overly
eccentric stage performers, sudden earthquakes, etc.
Some rooms, such as gymnasiums and auditoriums, create a
large amount of natural reverb, making it difficult to maintain
intelligible sound. Laying carpet or rugs on the ground and
curtains across windows or brick walls will help dampen the
reflections and improve the overall sound.
4. Additional Considerations
3.2 How to prevent feedback
Selecting the right amp can turn out to be rather difficult.
Therefore, stick to the following rule of thumb: the power rating
of your amp should be roughly twice the loudspeaker load capacity. A loudspeaker rated at 200 Watts continuous performance
can easily be powered by an amp rated at 400 Watts output
power. An optimal addition to your speaker system would be the
BEHRINGER EUROPOWER EP2000 power amp, for example.
Always place the “front of house” speakers ahead of the microphones (from the audience’s perspective), and never behind. Use
professional floor monitors or an in-ear monitoring system to
allow the stage performers to hear.
3.3 How to avoid feedback when
working with record players
(DJ applications)
In applications with record players, bass feedback can occur.
Bass feedback occurs when low frequencies get back to the
pickup and are reproduced on the loudspeakers. The most
common causes for this are: speakers located too closely to
the record player, a room with a wooden floor, or presence of a
podium or a platform. In such cases, it is best to move the
loudspeakers away from the record player and remove them
from the stage, so that they are located on firm ground. Another
option is to use raised stands, which prevent the loudspeakers
from having a direct contact with the ground.
3.4 Loudspeaker protection by using a
low-cut filter
Try to prevent damage to your loudspeakers caused by extreme
oscillation of the low-frequency driver due to subsonic noise
and extremely deep frequencies. Use an equalizer to cut off
those frequencies that fall below your loudspeakers’ frequency
range, or use a low-cut/high-pass filter. Most equalizers and
sound-improvement systems offer a low-cut function, like the
BEHRINGER ULTRAGRAPH DIGITAL DEQ1024, for example.
Using a low-cut filter in your signal path is particularly recommended if you use record players or CD players as your signal
source. CD players often produce extremely deep frequencies,
which can lead to extreme excursions of the low-frequency driver.
4.1 Length and diameter of
loudspeaker cables
Loudspeaker cables whose diameter is too small can considerably limit the power amp performance. The longer the cable,
the more pronounced the problem. As a result, musicians
often simply “turn up” the amp, which can lead to loudspeaker
damage. Therefore, don’t use cables longer than 15 m (45 ft.).
For most applications, this will not be necessary. Cable diameter
should be at least 14 - 12 gauge.
4.2 Power amp rating
4.3 Fuses
We do not recommend the use of fuses with loudspeaker applications. Damage to loudspeakers can be the result of high peak
signals and high output power. However, fuses can only offer
protection from one of these two factors, and never from both.
Additionally, fuse resistances are sometimes nonlinear, leading
to distortion and unpredictable overdriving.
4.4 Protecting your equipment
• Always try to find the optimal signal level. Avoid overdriving
your amp.
• Keep in mind the physical limitations of your PA system.
• Use a limiter to restrict the output signal level. Place the
limiter between the mixing console and the power amp. For
this purpose, our proven AUTOCOM PRO-XL MDX1600,
COMPOSER PRO-XL MDX2600 and MULTICOM PRO-XL
MDX4600 compressors offer an outstanding solution. All
models can be used as a limiter: the audio signal doesn’t
overdrive any more, and unpleasant “peaks” are effectively
avoided.
◊ Our ULTRADRIVE PRO DCX2496 and SUPER-X CX3400/
CX2310 crossovers are particularly well-suited for
protecting your equipment: for each output, they have independent limiters.
ENGLISH
EUROLIVE VP1220/VP1220F/VP1520/VP2520/VP1800S User Manual
EUROLIVE VP1220/VP1220F/VP1520/VP2520/VP1800S User Manual
ENGLISH
6
5. Application Examples
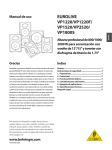
5.1 Full-range stereo operation
This example applies to the VP1220, VP1220F, VP1520, and
VP2520.
In this example, the main output signal of a mixing console is
connected to a power amplifier. Both the outputs and inputs are
stereo. A full-range VP series loudspeaker is connected to each of
the amplifier outputs, and these loudspeakers reproduce the
entire frequency range.
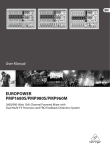
5.2 Full-range stereo operation with
floor monitors
This example applies to the VP1220, VP1220F, VP1520, and
VP2520
This example is a variation of the example above, with the
addition of several VP1220F floor monitors. Two separate
monitor outputs from the mixing console are connected to the
inputs of a stereo power amplifier. A VP1220F is connected to
each amplifier output, and a second VP1220F is connected to the
parallel outputs of the first set of VP1220F monitors.
XENYX 1202FX
XENYX 2442FX
EUROPOWER
EP2000
L
EUROLIVE
VP1520
R
EUROPOWER EP2000
AUX 1
SEND
AUX 2
SEND
EUROPOWER EP2000
Fig. 5.1 Full-range stereo operation
EUROLIVE VP1220
EUROLIVE VP1220F
Fig. 5.2 Full-range stereo operation with floor monitors
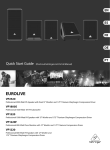
5.3 Two-way stereo operation with a
crossover, full-range loudspeakers and
subwoofers
This example applies to the VP1800S in combination with the
full-range loudspeakers (VP1220, VP1520, and VP2520).
Using an external active crossover, the main output signal of a
mixing console is split into two signals. One signal covers the
lower frequency range and the other signal covers the mid and
high frequency range. The recommended crossover frequency is
150 Hz. Then, the mid-high frequency signal is connected to a
stereo power amplifier. A VP series loudspeaker is connected to
each of the amplifier outputs. The low-frequency signal is
connected to an additional power amplifier, which powers two
VP1800S subwoofers.
XENYX 1202FX
SUPER-X PRO CX2310
EUROPOWER EP2000
EUROLIVE VP1220
EUROLIVE VP1800S
Fig. 5.3 Two-way stereo operation with subwoofers
7
6. Specifications
SYSTEM DATA
Continuous Power (IEC 60268-5)
VP1220
VP1220F
VP1520
VP2520
VP1800S
200 W
200 W
250 W
500 W
400 W
Peak Power
VP1220
VP1220F
VP1520
VP2520
VP1800S 800 W
800 W
1000 W
2000 W
1600 W
Type
VP1220
VP1220F
VP1520
VP2520
VP1800S
2-way full-range loudspeaker
2-way full-range loudspeaker
2-way full-range loudspeaker
2 ½-way full-range loudspeaker
Subwoofer
Frequency Response
VP1220
VP1220F
VP1520
VP2520
VP1800S
55 Hz - 22 kHz
55 Hz - 22 kHz
50 Hz - 22 kHz
40 Hz – 22 kHz
40 Hz – 200 Hz
Impedance
VP1220
VP1220F
VP1520
VP2520
VP1800S
8 Ohms
8 Ohms
8 Ohms
4 Ohms
8 Ohms
Sound Pressure Level (SPL)
VP1220
VP1220F
VP1520
VP2520
VP1800S
93 dB (Full space, 1 W @ 1 m)
93 dB (Full space, 1 W @ 1 m)
94 dB (Full space, 1 W @ 1 m)
96 dB (Full space, 1 W @ 1 m)
100 dB (Half space, 1 W @ 1 m)
Dispersion
VP1220
VP1220F
VP1520
VP2520
VP1800S
80° x 50°
80° x 50°
80° x 50°
80° x 50°
N/A
ENGLISH
EUROLIVE VP1220/VP1220F/VP1520/VP2520/VP1800S User Manual
EUROLIVE VP1220/VP1220F/VP1520/VP2520/VP1800S User Manual
ENGLISH
8
Crossover Frequency
VP1220
VP1220F
VP1520
VP2520
VP1800S
Rigging Fittings
VP1220
VP1220F
VP1520
VP2520
VP1800S
2.5 kHz
2.5 kHz
2.5 kHz
2.2 kHz
LP 150 Hz
ergonomically shaped handle;
integral tripod/stand adapter
ergonomically shaped handle
ergonomically shaped handle;
integral tripod/stand adapter
ergonomically shaped handle
ergonomically shaped handle;
35 mm pole socket
COMPONENTS
HF Driver
VP1220
VP1220F
VP1520
VP2520
VP1800S
LF Driver
VP1220
VP1220F
VP1520
VP2520
VP1800S
Depth
VP1220
VP1220F
VP1520
VP2520
VP1800S
16.9 in / 430 mm
22.6 in / 575 mm
18.3 in / 465 mm
20.1 in / 510 mm
24.2 in / 615 mm
Weight
VP1220
VP1220F
VP1520
VP2520
VP1800S
39.5 lb / 17.9 kg
35.7 lb / 16.2 kg
49.8 lb / 22.6 kg
87.7 lb / 39.8 kg
91.3 lb / 41.4 kg
BEHRINGER is constantly striving to maintain the highest professional standards. As a result of these
efforts, modifications may be made from time to time to existing productswithout prior notice.
Specifications and appearance may differ from those listed or illustrated.
1.75 in titanium-diaphragm
compression driver
1.75 in titanium-diaphragm
compression driver
1.75 in titanium-diaphragm
compression driver
1.75 in titanium-diaphragm
compression driver
N/A
Legal Disclaimer
Technical specifications and appearance are subject to change without
notice. The information contained herein is correct at the time of printing.
BEHRINGER, accepts no liability for any loss which may be suffered by any
person who relies either wholly or in part upon any description, photograph or
statement contained herein. Colors and specifications may vary slightly from
product. Our products are sold through authorized dealers only. Distributors
and dealers are not agents of BEHRINGER, and have absolutely no authority
12 in / 307 mm
12 in / 307 mm
15 in / 385 mm
2 x 15 in / 385 mm
18 in / 460 mm
to bind BEHRINGER, by any express or implied undertaking or representation.
No part of this manual may be reproduced or transmitted in any form or by any
means, electronic or mechanical, including photocopying and recording of any
kind, for any purpose, without the express written permission of BEHRINGER
International GmbH.
ALL RIGHTS RESERVED. © 2008 BEHRINGER, International GmbH,
DIMENSIONS/WEIGHT
Hanns-Martin-Schleyer-Str. 36-38, 47877 Willich, Germany.
Width
VP1220
VP1220F
VP1520
VP2520
VP1800S
Tel. +49 2154 9206 0, Fax +49 2154 9206 4903
14.6 in / 370 mm
17.3 in / 440 mm
17.9 in / 455 mm
18.7 in / 475 mm
20.9 in / 530 mm
Height
VP1220
VP1220F
VP1520
VP2520
VP1800S
23.6 in / 600 mm
16.9 in / 430 mm
27.0 in / 685 mm
41.9 in / 1065 mm
25.6 in / 650 mm
9
Warranty
§ 1 Other warranty rights and national law
[2]. If the product needs to be modified or adapted in order to comply with appli-
[1]. This warranty does not exclude or limit the buyer’s statutory rights
cable technical or safety standards on a national or local level, in any coun-
provided by national law, in particular, any such rights against the seller
try which is not the country for which the product was originally developed
that arise from a legally effective purchase contract.
and manufactured, this modification/adaptation shall not be considered a
[2]. The warranty regulations mentioned herein are applicable unless they
defect in materials or workmanship. The warranty does not cover any such
constitute an infringement of national warranty law.
modification/adaptation, irrespective of whether it was carried out properly
or not. Under the terms of this warranty, BEHRINGER shall not be held
responsible for any cost resulting from such a modification/adaptation.
§ 2 Online registration
Please do remember to register your new BEHRINGER equipment right after
[3]. Free inspections and maintenance/repair work are expressly excluded from
your purchase by visiting http://www.behringer.com and kindly read the terms
this warranty, in particular, if caused by improper handling of the product
and conditions of our warranty carefully. Registering your purchase and equip-
by the user. This also applies to defects caused by normal wear and tear, in
ment with us helps us process your repair claims quicker and more efficiently.
particular, of faders, crossfaders, potentiometers, keys/buttons, tubes, guitar
Thank you for your cooperation!
strings, illuminants and similar parts.
[4]. Damage/defects caused by the following conditions are not covered by this
warranty:
§ 3 Warranty
[1]. BEHRINGER (BEHRINGER International GmbH including all
• improper handling, neglect or failure to operate the unit in compliance
BEHRINGER subsidiaries, except BEHRINGER Japan) warrants the
with the instructions given in BEHRINGER user or service manuals;
mechanical and electronic components of this product to be free of defects
• connection or operation of the unit in any way that does not comply with
in material and workmanship for a period of one (1) year* from the original
the technical or safety regulations applicable in the country where the
date of purchase, in accordance with the warranty regulations described
product is used;
below. If the product shows any defects within the specified warranty
• damage/defects caused by force majeure or any other condition that is
period that are not excluded from this warranty as described under § 5,
BEHRINGER shall, at its discretion, either replace or repair the product
beyond the control of BEHRINGER.
[5]. Any repair or opening of the unit carried out by unauthorized personnel
(user included) will void the warranty.
using suitable new or reconditioned parts. In the case that other parts are
used which constitute an improvement, BEHRINGER may, at its discretion,
[6]. If an inspection of the product by BEHRINGER shows that the defect in
question is not covered by the warranty, the inspection costs are payable by
charge the customer for the additional cost of these parts.
the customer.
[2]. If the warranty claim proves to be justified, the product will be returned to
the user freight prepaid.
[7]. Products which do not meet the terms of this warranty will be repaired exclusively at the buyer’s expense. BEHRINGER will inform the buyer of any
[3]. Warranty claims other than those indicated above are expressly excluded.
such circumstance. If the buyer fails to submit a written repair order within
§ 4 Return authorization number
6 weeks after notification, BEHRINGER will return the unit C.O.D. with
[1]. To obtain warranty service, the buyer (or his authorized dealer) must
a separate invoice for freight and packing. Such costs will also be invoiced
call BEHRINGER during normal business hours BEFORE returning the
separately when the buyer has sent in a written repair order.
product. All inquiries must be accompanied by a description of the problem.
BEHRINGER will then issue a return authorization number.
§ 6 Warranty transferability
[2]. Subsequently, the product must be returned in its original shipping carton,
This warranty is extended exclusively to the original buyer (customer of retail
together with the return authorization number to the address indicated by
dealer) and is not transferable to anyone who may subsequently purchase this
BEHRINGER.
product. No other person (retail dealer, etc.) shall be entitled to give any war-
[3]. Shipments without freight prepaid will not be accepted.
ranty promise on behalf of BEHRINGER.
§ 5 Warranty regulations
§ 7 Claim for damage
[1]. Warranty services will be furnished only if the product is accompanied by a
Failure of BEHRINGER to provide proper warranty service shall not entitle
copy of the original retail dealer’s invoice. Any product deemed eligible for
the buyer to claim (consequential) damages. In no event shall the liability of
repair or replacement under the terms of this warranty will be repaired or
BEHRINGER exceed the invoiced value of the product.
replaced.
*
Customers in the European Union please contact BEHRINGER Germany Support for further details.
ENGLISH
EUROLIVE VP1220/VP1220F/VP1520/VP2520/VP1800S User Manual
ENGLISH
This manual is available in English, German, French,
Spanish, Italian, Russian, Polish, Dutch, Finnish, Swedish,
Danish, Portugese, Greek, Japanese and Chinese. There may
also be more current versions of this document. Download them
by going to the appropriate product page at:
www.behringer.com