1
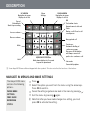
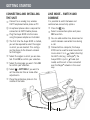
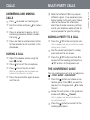
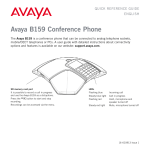
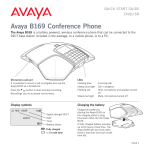
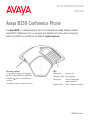
QUICK REFERENCE GUIDE ENGLISH Avaya B159 Conference Phone The Avaya B159 is a conference phone that can be connected to analog telephone sockets, mobile/DECT telephones or PCs. A user guide with detailed instructions about connectivity options and features is available on our website: support.avaya.com. SD memory card port It is possible to record a call in progress and use the Avaya B159 as a dictaphone. Press the button to start and stop recording. Recordings can be accessed via the menu. LEDs Flashing blue Incoming call Steady blue light Call in progress Flashing red Hold, microphone and speaker turned off Steady red light Mute, microphone turned off 16-603913 Issue 2 DESCRIPTION UP ARROW Navigation in menus Display of call list Menu Settings DOWN ARROW Navigation in menus Display of call list OK Yes/confirm choice Cancel No/end/back Start/ stop recording Answer/connect calls and Flash During a call: Press to call a new person Increase volume Decrease volume Hang up/end call Conference Automatic dialling of conference groups One press of this button will always connect all parties to a conference call Mute Hold Alphanumerical buttons Hold down a button for 2 seconds to open the phonebook Line mode Connectivity options Some Avaya B179 have a different keypad with other symbols. This does not affect the functions of the buttons. NAVIGATE IN MENUS AND MAKE SETTINGS The Avaya B159 menu contains the following options: Press . Select the option you want from the menu using the arrow keys. PHONE BOOK Cancel the setting or go back one level in the menu by pressing SETTINGS CONF GUIDE RECORDING STATUS Press OK to confirm. Quit the menu by pressing again. Note that after you have made changes to a setting, you must press OK to activate the setting. . BESKRIVELSE GETTING STARTED • TILKOBLING • LINJEVELGEREN CONNECTING AND INSTALLING THE UNIT Connect to an analog line, wireless LINE MODE – SWITCH AND COMBINE An optional phone cable is required for Press the key. Select a connection option and press DECT telephone/mobile phone or PC. connection to DECT/mobile phones. Plug the Avaya B159 into the mains using the power adapter as illustrated. The first time the Avaya B159 is started, you will be required to select the region in which you are located. This configures the phone to the telecom network for that region. Select the region in which you are located. Click OK to confirm your selection. Select the language you want. Click OK to confirm your selection. Select > SETTINGS if you want to set the date and time or make other adjustments. Place the conference phone in the middle of the table. It is possible to switch between and combine two connectivity options. OK to confirm. You can add another line, disconnect or switch between connected lines during a call. Connected to a computer, the Avaya B159 can be used to record sound and music when it is in mode (stand-by). For VoIP calls (e.g. via Skype®), the Avaya B159 is put in mode (call mode) and the call is then connected over the Skype® network in the usual way. MULTI-PARTY CALLS ANSWERING AND MAKING CALLS Press to answer an incoming call. Dial the number and press to make a Note that different PBXs may require different signals. If you experience problems making multi-party calls: Please refer to the manual for information about how to make necessary settings and to your telephone administrator or service provider for specific settings. call. Press an arrow key to open a call list containing previously dialled numbers. Call using . Press and hold an alphanumeric button for two seconds to call a contact in the phonebook. DURING A CALL Adjust the speaker volume using the keys Press Press and ADDING A PARTY TO A CALL Press the (F) button during the call. Calls in progress are put on hold and a second dialling tone is heard. Dial the second participant’s number, press and wait for an answer. . to turn off the microphone. to put the call on hold. Both the microphone and the speaker are turned off and the call is on hold. Press the same button again to reconnect the call. Press the (F) button and then 3 to connect all the meeting participants or (F) to return to the previous call. THE CONFERENCE GUIDE You can create groups of up to six people via > CONF. GUIDE > ADD GROUP. Press the button and choose a conference group. Press OK if you want to see who is in the group and to make the call. Follow the instructions in the guide and answer with OK or (Cancel). Calls in progress are put on hold when the next participant calls. Press the button to connect all the meeting participants. 110209-61-001 Rev 2A CALLS