1
OWNERS MANUAL
by AUDIOVOX
MVDV4A
PORTABLE DVD PLAYER
128-6364A
A. SAFETY PRECAUTIONS
A CAUTION
RISK OF ELECTRIC SHOCK
DO NOT OPEN
# ——
cer”
- The lightning flash with arrowhead symbol within an equilateral
triangle is intended to alert the userto the presence of uninsulated "
dangerous voltage" within the product's enclosure that may be of
sufficient magnitude to constitute a risk of electric shock to persons.
« The exclamation point within an equilateral triangle is
intended to alert the user to the presence of important
operating and maintenance (servicing)instructions
in the literature accompanying the product.
WARNING: To reduce the risk of fire or electric shock, do not expose this appliance
CAUTION:
CAUTION:
WARNING:
to rain or moisture. Dangerous high voltages are present inside the
enclosure. Do not open the cabinet.
To prevent electric shock, match wide blade plug to wide slot, fully insert.
The unit employs a laser system. To ensure the proper use of the unit, read
this manual carefully and keep it for future reference. If the unit requires
servicing, contact the seller or our service center- see "troubleshooting". To
prevent direct exposure to the laser radiation, do not open the cabinet. In
visible laser radiation when the cabinet is opened or the interlocks are
defeated. Do not stare into the laser beams.
Use of any controls, adjustments, or procedures other than those specified
herein may result in hazardous radiation exposure.
Not for use where video monitor is visible to driver to avoid risk of serious injury
or possible violation of state laws.
°81°$
B. IMPORTANT SAFETY INSTRUCTIONS
(1)Read Instructions - All the safety and operating instructions should be read
before the product is operated.
(2)Retain Instructions - The safety and operating instructions should be retained
for future reference.
(3)Heed Warnings - All warnings on the product and in the operating
Instructions should be adhered to .
(4)Follow Instructions - All operating and use instructions should be followed
(5)Cleaning - unplug this product from the wall outlet before cleaning. Do not
use liquid cleaners or aerosol cleaners. Use a damp cloth for cleaning.
(6)Attachments - Do not use attachments not recommended by the product
manufacturer as they may cause hazards.
(7) Water and moisture - Do not use this product near water - for example, near
a bath tub, wash bowl, kitchen sink, or laundry tub; in a wet basement; or
near a swimming pool; and the like.
(8)Accessories - Do not place this product on an unstable cart, stand, tripod,
bracket, or table. The product may fall, causing serious injury to a child or
adult, and serious damage to the product. Use only with a cart, stand, tripod,
bracket, or table recommended by the manufacturer, or sold with the product.
Any mounting of the product should follow the manufacturer's instructions,
and should use a mounting accessory recommended by the manufacturer.
(9)A product and cart combination should be moved with care. Quick stops,
excessive force and uneven surfaces may cause the product and cart
combination to overturn.
(10)Power Sources - This product should be operated only from the type of
power source indicated on the rear panel. If you are not sure of the type
of power supply to your home consult your product dealer or local power
company. For products intended to operate from battery power, or other
sources, refer to the operating instructions.
(11)Grounding or Polarization - This product may be equipped with a polarized
alternating-current line plug(a plug having one blade wider than the other).
This plug will fit into the power outlet only one way. This is a safety feature. If
you are unable to insert the plug fully into the outlet, try reversing the plug. If
the plug should still fail to fit, contact your electrician to replace your obsolete
outlet. Do not defeat the safety purpose of the polarized plug.
(12)Power- Cord Protection - Power-supply cords should be routed so that they
are not likely to be walked on or pinched by items placed upon or against
them, paying particular attention to cords at plugs, convenience receptacles,
and the point where they exit from the product.
8/78
B. IMPORTANT SAFETY INSTRUCTIONS
(13)Lightning - For added protection for this product during a lightning storm, or
when it is left unattended and unused for long periods of time, unplug it
from the wall outlet and disconnect the antenna or cable system. This will
prevent damage to the product due to lightning and power-line surges.
(14)Power Lines - An outside antenna system should not be located in the
vicinity of overhead power lines or other electric light or power circuits, or
where it can fall into such power lines or circuits. When installing an outside
antenna system, extreme care should be taken to keep from touching such
power lines or circuits as contact with them might be fatal.
(15)Overloading - Do not overload wall outlets, extension cords, or integral
convenience receptacles as this can result in a risk of fire or electric shock.
(16)Object and Liquid Entry - Never push objects of any kind into this product
through result in a fire or electric shock. Never spill liquid of any kind on the
product.
(17)Servicing - Do not attempt to service this product yourself as opening or
removing qualified service personnel.
(18)Damages Requiring Service - Unplug this product from the wall outlet and
refer servicing to qualified service personnel under the following conditions.
a) When the power- supply cord or plug is damaged.
b) If liquid has been spilled , or objects have fallen into the product.
c) If the product has been exposed to rain or water.
d) If the product does not operate normally by following the operating
Instructions. Adjust only those controls that are covered by the operating
Instructions as an improper adjustment of other controls may result in
damage and will often require extensive work by a qualified technician to
restore the product to its normal operation.
e) If the product has been dropped or damaged in any way.
f) When the product exhibits a distinct change in performance - this
Indicates a need for service.
(19)Replacement parts - When replacement parts are required, be sure the
service technician has used replacement parts specified by the
manufacturer or have the same characteristics as the original part.
Unauthorized substitutions may result in fire, electric shock or other
hazards.
(20)Safety Check - Upon completion of any service or repair to this product, ask
the service technician to perform safety checks to determine that the
product is in proper operating condition.
(21)Heat - The product should be situated away from heat sources such as
radiators, heat registers, stoves or other products(including amplifiers)that
produce heat.
983°
TABLE OF CONTENTS
mo >
TIO MmMmMmMmOO
J.
. SAFETY PRECAUTIONS® = © #2 °z °z 1
. IMPORTANT SAFETY
INSTRUCTIONS? 2 9 29 2x0 002023
FEATURES = =202020202020 200x004
ABOUT MANUAL? ="="=x="x0=0200xf6.
PLAYABLE DISCS? =*="="x9x0x0x0x05
TERMS FOR DISCS°#°#°#°x°#0x° #08
. BEFORE OPERATION ° °°° 3° x 775
PRECAUTIONS FOR DISCS °#°#°#°5 /
PREPARATIONS BEFORE
OPERATION" ="=0=0x0x0 00000
+ CHECK ACCESSORIES = ° = ° # В =
> USE REMOTE CONTROL* ="="2=8
5 FRONT PANEAL*=0=9=05020202000)
+ DISPLAY. ="==0x0x0x0x0x 0x0 ()
* REAR PANEL" ="="=0x0x020 2 Me 1)
+ NAMES AND LAYOUT OF REMOTE
CONTROLS #%#0%20202020202002 11
> CONNECTIONS x9x204050207202 0%)
BASIC OPERATIONS *="="x"=x0=x8
> SYSTEM SETTING *="="="=x="8
» PLAY DISCS° #° #0 #0 #0 #0 5 0 + 0 040»
v PAUSE zz) AR m 0 HOT pe
> OSD°x°#° 595050505950 505 04P +
“+ DVD MENU PLAY *= *="="="=0=2910
> AUDIO/ VIDEO IN%* *=*=9=9252"10
K. FUNCTION SETTING * =0=9 502x020 0220)
MENU SETTING == 020% 020% 020% 05 70
L. PLAY DISCS IN
VARIOUS WAY S°#°0#0#0520520520 82020295
» AUDIO MODE ***=%=0292040202029225
+ MUTE? x= =0x00:0 0400402000 0476
+ FAST PLAYS ="=0x0x04040 4004006
a SLOV PLAY? ="=0=x=0x0x0x000 а ОБ
© REPEAT PLAY? 2030305050520 £0
+» SELECT SUBTITLES®29222°292°28
+ ANGLES SELECT? = ° #23 9 929 9278
a ZOOM PLAYS="=0=0x0x0 0.000.970
M. PLAY MP3 DISCS 2992020202020 4020200
N. OTHERS *="="=0=0x05020200 2000030)
> TROUBLE SHOOTING*="="="="30
+ TECHNICAL SPECIFICATIONS =°=31
O. INSTALLATION® © 29 29 2 0 520 0 52 0 5 0390 op
INSTALLATION GUIDE 92929202002
C. FEATURES
1. OUTSTANDING
SOUND QUALITY
Dolby Laboratories features high quality
audio which can be played in DVD or CD
disc at home.
2. HIGH DEFINITION
The unit adopts MPEG? coding format and
brings the horizontal resolution over
500 lines.
3. UNIQUE FUNCTIONS
Multi-angle and multi-language.
Parental lock makes it easy to control the
content of discs.
4. SCREEN
4x3 screen and wide screen (16:9) are
available.
5. COMPATIBILITY
The unit can play DVD, CD and MP3
discs.
6. ZOOM
It can enlarge pictures twice or three or four
times as large.
It can also shrink pictures 1/2, 1/3, or 1/4 as
big.
7. MULTI-FUNCTIONS
Fast forward, fast reverse, slow play, frame
(step) play, repeat play .
8. CONTENT DISPLAY
Colored fluorescent display and English
OSD, make the disc content clearer.
9. VIDEO OUTPUT
Standard video output mode and easy
system change.
This product incorporates copyright protection technology that is protected by method claims
of certain U.S. patents and other intellectual property rights owned by Macrovision
Corporation and other rights owners. Use of this copyright protection technology must be
authorized by Macrovision Corporation, and is intended for home and other limited viewing
uses only unless otherwise authorized by Macrovision Corporation. Reverse engineering or
disassembly is prohibited.
°g4°g
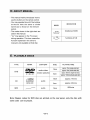
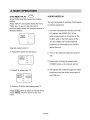
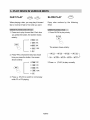
D. ABOUT MANUAL
= This manual mainly introduces how to
use the buttons on the remote control.
© You may operate the unit if the buttons
on the unit have the same or similar MARK INDICATION
names as to those on the remote
control.
> The marks shown in the right chart are functions of DVD
DVD
used in the manual. CO
5 (A) may appear on the TV screen
during operation. This icon means the
function explained in the owner's
manual is not available on that disc.
functions of CD
(s
E. PLAYABLE DISCS
TYPE MARK CONTENT SIZE PLAYING TIME
12cm approx. 2hrs (single-side disc)
audio+video approx. 4nrs (double-side disc)
аа
DVD
~ | (motion pictures) approx. 80mins (single-side disc)
VIDEO acm —
approx. 160mins(double-side disc)
COMPACT 12cm approx. /4mins
CD 0 16) (Е audio
BEAR scm approx. 20mins
MP3 PC audio 12cm 600mins
Note: Region codes for DVD disc are printed on the rear panel, only the disc with
same code can be played.
°ghog
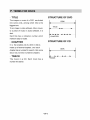
FF. TERMS FOR DISCS
> TITLE
The images or music of a DVD are divided
into some units, among which title is the
biggest one.
To an image in video software, title is movie;
to a piece of music in audio software, it is
disk.
Each title has a indication number which
makes it easy to locate.
>» CHAPTER
It is the smallest unit of a DVD. A title Is
made up of several chapters, and each
chapter has a number for search. But some
discs may not have numbered chapters.
> TRACK
The music in a CD. Each track has a
number for search.
°s6°S
STRUCTURE OF DVD
DISK
af
TITLE
Ч 2 в
<> > «> «> «>
CHAPTER
STRUCTURE OF CD
DISK
onl
G. BEFORE OPERATION
WHEN DRIVING
Keep the volume level low enough to be
aware of road and traffic conditions.
WHEN CAR WASHING
* Do not expose the product to water or
excessive moisture. This could cause
electrical shorts, fire or other damage.
WHEN PARKED
* Parking In direct sunlight can produce very
high temperatures inside your vehicle.
# Give the interior a chance to cool down
before starting playback.
ETES
Put the unit where ventilation is good
enough to prevent overheatina.
“Never put the unit in direct sunlight or near
heat sources.
> Put the unit horizontally, never put any
heavy object on the unit.
“ To protect the laser, do not put the unit
where there is most dust. If there is dust
on the laser, use a cleaning disc to clean It.
© Refer to the operation instructions of
the cleaning disc you bought.
CONDENSATION
Water will appear on the pickup lens in
the following cases:
> The unit is suddenly moved a cold place to
a warm place.
> The unit is put in a room with a heater, or
in the cold air from a air-conditioner.
Use of the unit in a humid place. In these
cases, the unit can not work. Unload the
disc and leave the unit on for about
one hour to evaporate the water.
LEARNING
Use soft cloth with a little neutral
—delement to wipe the cabinet, panel and
controls. Never use abrasive paper,
polishing powder or solvent like alcohol
and gasoline.
H. PRECAUTIONS FOR DISC
HANDLING DISC
° То keep the disc clean, do not touch
the play sides of the disc.
Do not attach paper or tape to the disc.
© Keep the disc away from direct sunlight
or heat sources.
> Store the disc in a disc case after
playback.
CLEANING DISC
„ Before playback, wipe the disc outwards
from the center with clean cloth.
* Do not use any type of solvent such as
thinner, benzine, commercially available
cleaners or antistatic spray.
ес /°5
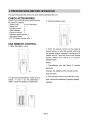
|. PREPARATIONS BEFORE OPERATION
This part introduces the work to be done before operating the unit.
CHECK ACCESSORIES
Check if you have all the accessories after
the carton is opened.
= Audio cords 2(L+R channels)
Ls
SE
SE
Video cord
Remote control 1
AAA batteries 2
= Owner's manual 1
« External remote sensor 1
= Mounting fittings 1
DC 12V power source cord 1
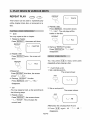
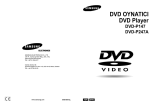
USE REMOTE CONTROL
1. Open the battery cover.
{Е "UND
g P|
2. Insert two AAA batteries, make sure to
match "+" and "-" on the batteries to
marks inside the battery compartment.
pm ===
о O
A В /|
‘ , |
Li
+
o О
No — A}
3. Close the battery cover.
y |
O о
X ml
~
Sof
O Ch |
u E
4. Point the remote control at the external
remote sensor or point the remote control at
the display window, operate in the range of 5
meters and 30 from the front of the remote
sensor. Make sure there is no barrier
between them.
Notes:
1. The batteries can last about 6 months
generally.
Change the batteries If the remote control
does not work.
2. If the remote control is not used for a long
time, remove the batteries to prevent battery
leakage.
°£8°§
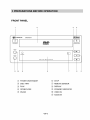
|. PREPARATIONS BEFORE OPERATION
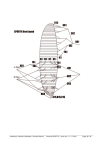
FRONT PANEL
y o
4 MSN AUDIOYOX mMVDVDA я hz
Lo] EL
ON/STANDBY DVD OPEN/CLOSE
VIDEO
OO! ©
STANDBY
ALICHD Il
es
© ovD-CD-MP3 PLAYER es
\_ À
11 10 9 8 7 6 5
(1) POWER ON/STANDBY 6) STOP
(2) DISC TRAY 7) REMOTE SENSOR
(3) PLAY DISPLAY
(4) OPEN/CLOSE (9 STANDBY INDICATOR
(5) PAUSE VIDEO IN
(D AUDIO IN
°ggeg
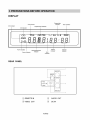
|. PREPARATIONS BEFORE OPERATION
DISPLAY
Repeat play
Title indicator indicator FBC indicator
DVD indicator Chaptertrack indicator
CD indicator
CD
a e
[> | Um a y Ll Г
N
PLAY indicator Title/chapter/track Fer Second
Pause indicator PNC | Hout et necator
indicator
REAR PANEL
VIDEO QUT |
REMOTE AA
LION
Sra
2 | * АСС oa =,
1| + 12\ 1.54 | + += | Г 3
3| + GND d ()
\
AUDIO QUT
4
(1) REMOTE IN (3) AUDIO OUT
@ VIDEO OUT @ DCIN
°§10°§
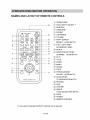
I.PREPARATIONS BEFORE OPERATION
NAMES AND LAYOUT OF REMOTE CONTROLS
No —
on on > QD
J
10
11
12
13
CH=
NN REMOTE CONTROL AC:-168 Af
26
/ \
4 A DVD: -MV/TV o
OD 2
SUBTITLE LANGUAGE TVWAV MUTE
OD ос -
REPEAT OSD — SYSTEM 23
22
SEDO
EE o MODE RETURN
OO) ® 20
pI COLOR +. __
PB.C/SLOW PAUSE Fo)
= 17
SETUP 16
15
O > x
x
HF > ZOOM
O) e 14
(1) OPEN/CLOSE
@ DVD & MV/TV SELECT *
@ SUBTITLE
(2) LANGUAGE
(5) REPEAT
(6) A-B REPEAT
(7) VOLUME
FR/FF SEARCH
BRIGHT-, +(FOR MV/TV)
(© P.B.C. (LEFT SIDE)
SLOW(RIGHT SIDE)
SETUP
1) DIRECTION BUTTONS
CHANNEL-, +(FOR MV/TV)
(2 PLAY
(9 TITLE
ZOOM
(3 MENU
(9 PAUSE
(7 STOP
PREVIOUS/NEXT
COLOR-, +(FOR MV/TV)
AUDIO MODE
TV DISPLAY(FOR MV/TV)
RETURN
2) OSD
22 SYSTEM
@ ANGLE
TV/AV SELECT(FOR MV/TV)
29 MUTE
29 POWER
@ REMOTE CONTROL
* |f you want to operate the MV/TV, optional unit is required.
°§11°§
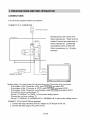
|. PREPARATIONS BEFORE OPERATION
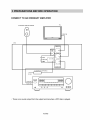
CONNECTIONS
Turn off all the equipment before connections.
CONNECT TO A TV/IMONITOR
O
O
EXTERNAL REMOTE SENSOR
Manufactured under license from
Dolby Laboratories. Dolby and the
double-D symbol are trademarks of
Dolby Laboratories. Confidential
DVD PLAYER
Unpublished works. ©1992-1997
Dolby Laboratories, Inc. All rights
2 | + АСС reserved.
1 | =12V 1.54 | ;
3 e GND
TY/MONITOR
VIDEO IN
AC ADAPTOR
| |
PRIMARY AC INPUT AUDIO BL
[== — ESE)
System setting: You have to set the unit according to the TV/monitor to be connected.
» If the system of the TV/monitor is PAL, push SYSTEM and select PAL.
= |f the system of the TV/monitor is NTSC, push [SYSTEM] and select NTSC.
+ If the system of the TV/monitor is multi-system, push SYSTEM | and select MULTI.
= Connect the unit to a wide-screen TV.
Set the "TV DISPLAY" to "WIDE " in the function setting column.
+ Connect the unit to an ordinary TV.
Set the "TV DISPLAY" to "NORMAL/PS" or "NORMAL/LB" in the function setting column.
CONNECT TO AC ADAPTOR(not supplied)
1. Connect the output terminal of the AC adaptor to DC IN jack of this unit.
2. Connect the other plug to AC power source.
°§12°§
|. PREPARATIONS BEFORE OPERATION
CONNECT TO AN ORDINARY AMPLIFIER
EXTERNAL REMOTE SENSOR ТУ
O VIDEO IN
г — ==
DVD
VIDEO OUT:
FF
e
2| e ACC |
123 Ц
|
|
| «12 1.5А | = = = | HH
|
|
|
e GND
AC ADAPTOR (OPTIONAL)
(TO AC)
] || en
AUDIOIN R Cr | СТО
( ) ГС
© O 00 me № © ©
La Le
> There is no sound output from the output terminal when a DTS disc is played.
°§13°§
|. PREPARATIONS BEFORE OPERATION
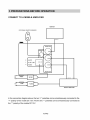
CONNECT TO A MOBILE AMPLIFIER
MONITOR
EXTERNAL REMOTE SENSOR
O |
VIDEO IN
VIDEO OUT
>
2 | * АСС
1 |e12V1.5A 123 5
J | * GND ) e
R
| AUDIOOUT
ALEC IN R L
+ o e
12V FUSE FILTER [> |
+ O—
12V FUSE FILTER
-0 си
VEHICLE AMPLIFIER
In the connection diagram above, the two "+" polarities can be simultaneously connected to the
"+" polarity of the mobile DC 12V. And the two "-" polarities can be simultaneously connected to
the "-" polarity of the mobile DC 12V.
°§14°§
J. BASIC OPERATIONS
°~ SYSTEM SETTING CC”
The unit can recognize color system of the disc automatically and
transmit the corresponding signal.
°sif your TV can only receive PAL system, select the standard of the
unit PAL. The unit will keep PAL output in spite of which
signal format is used by the disc being played.
°sif your TV can only receive NTSC system, select the standard of
the unit NTSC.
°sif your TV is multi - system, we advise you to select MULTI to get
clearer images.
PLAY DISCS ~~ <>
1.Load a disc and press » (PLAY) to play the disc.
2.5top playback.
Press °°.
3.Kemove the disc and switch off the unit.
°SYou have to press this "°"
DVD discs.
“ button twice to stop the playback of
°$15°$
J. BASIC OPERATIONS
PAUSE DVD, o&- CD
Press [11 —
” WHEN PLAYING MOVIES
If the movies of a DVD is played,
press II | to make playback pause.
The unit enters step play status. Each time
vou press| 11 , the picture advances one
frame.
“WHEN PLAYING MUSIC CD
Press| II | to make playback pause.
Press» (PLAY)to resume playback.
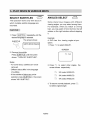
OSD o
me
The On-Screen Display (OSD) contains
many playback features.To see the Display,
press the[OSD|button on the remote while a
disc is playing. The Display appears across
the top of the screen.Each feature Is
llustrated with an icon. Use the « or » buttons
on the remote to move through the different
icons in the Display.
When an icon is highlighted, use the Y or 4
butons on the remote to scroll through the
choices displayed in the text box under the
ICONS.
Remember, you can only access the Display
when you're plaving a disc. Also, the Display
features are only available if the disc was
created with that particular feature (i.e., if
you select the Subtitle icon, you wont be
able to change the subtitle language unless
the author of the disc created the disc with
subtitles).
The invalid symbol " )" appears on the
screen when you press a button that doesn't
have any function. If one of the icons Is
"grayed out " that Display feature isn't
available for the disc you're playing. To make
the Display disappear from the screen, press
OSD on the remote.
WHEN PLAYING DVD
DVD discs have the following playback
features: Title, Chapter, Audio, Subtitle, Angle
and Repeat.
DVD-VIDEO 0:01:24
£ ‘itle Chapter Audio Subtitle Angle Repeat
(52) >
£ "TITLE 01/°1°1 CHAPTER °1°1 /°i°]
>” Select a Title
Some discs contain more than one title. For
example, there might be four movies on one
disc (each movie might be considered a title).
Each title is divided into chapters. To select a
title:
1. While the disc is playing, press OSD| on
the remote to bring up the Display.
2. If the Title icon on the Display isn't
highlighted, use the « or » buttons to
highlight it.
3. Press the 4 or y buttons to go to the next
or previous title.
Note: Some discs only have one title.
>” Select a Chapter
Because DVD discs use digital technology, a
title can be divided into individual chapters
(similar to tracks on a CD). You can skip to a
specific chapter by using the Chapter feature
in the Display.
1. While the disc is playing, press |OSD| on
the remote to bring up the Display.
°§16°§
J. BASIC OPERATIONS
2. Press the « or » buttons to highlight the
Chapter icon.
3. Press the A or ¥ buttons to go to the next
or previous chapter.
Notes: The chapter feature won't work if the
disc isn't formatted with separate chapters.
You can also advance to the next chapter by
pressing »»| on the remote and go to the
preceding chapter by pressing |-4« on the
remote.
>” Changing the Audio Language
If the disc was created with different
language tracks (recorded in different
languages), you can use the Display to
temporarily change the DVD players Audio
Language setting.
1. While the disc is playing, press JOSD| on
the remote to bring up the Display.
2. Press the «or » buttons to highlight the
Audio icon. The current audio language
appears in the text box below the row of
icons.
3. Press the A or Y buttons to scroll through
the audio languages that are available on
the disc until the audio language you want
to use appears in the text box. Audio will
be played in that language.
4. lo make the Display disappear, press the
OSD) button on the remote.
Note: The language feature only works if the
disc was created with multiple audio tracks.
When you choose an audio language from
the Display, you only override the audio
language setting in the DVD player's main
menu temporarily.
The audio language can also the changed
through the DVD player menu.
°~ Selecting the Subtitle Language
If the disc was created with subtitles, you
can use the Display to change the Subtitle
language.
1. When the disc is playing, press |OSD| on
the remote to bring up the Display.
2. Press the « or » buttons to highlight the
Subtitle icon.
3. Press the 4 or Y buttons to scroll through
the subtitle languages that are available
on the disc until the subtitle language you
want to use appears in the text box. The
subtitles will be shown in that language.
4. To make the Display disappear, press the
OSD| button on the remote.
Notes:Changing the subtitle language with
the Display will only affect the disc currently
being played. When the disc is removed or
the player is turned off, the subtitle language
will revert to the language setting specified
through the DVD player main menu.
The subtitle language can also be changed
through the DVD player menu.
>” Changing the Camera Angle
Some discs contain multiple angles of a
particular scene or sequence. If the disc only
has one angle, this feature won't work, When
multiple angles are available, to change the
camera angle:
1. When a disc is playing, press OSDlon the
remote to bring up the Display.
2. The Angle icon will display the number of
angles available. For example, if there are
3different angles, the icon will read 1 of 3,
This means angle 1 is currently being
played.
3. Press the A or ¥ buttons to scroll through
the angle choices. The angle number
displayed in the text window 1s
automatically shown.
4. To make the Display disappear, press the
OSD button on the remote.
>” Using the Repeat Feature
The default mode for the Repeat feature 15
off. There are three Repeat options:
°§17°§
J. BASIC OPERATIONS
°§ All-repeats the disc that is playing
°s litle-repeats the title that Is playing
°s Chapter-repeats the chapter that is playing
To Use Repeat:
1. While a disc is playing, press OSD on
the remote to bring up the Display.
2. Highlight the Repeat icon.
3. Press the à or Y buttons to scroll through
the Repeat options until the Repeat option
you want is displayed in the text box.
4. The selected repeat option will loop
repeatedly until you turn Repeat off.
How to Cancel Repeat:
There are three ways to cancel Repeat:
°§ Press STOP twice.
°§ Go to Repeat icon in the Display and
select Off.
°§ Eject the disc.
WHEN PLAYING CD
CD discs have the following playback
features: Track, L/R, Audio (not available)
and Repeat.
CD
E'rack L/R Audio Repeat
(52)
>” Select a Specific Track
1. While the disc Is playing, press JOSD| on
the remote to bring up the Display.
2. Highlight the Track icon.
3. Press the 4 or Y buttons to scroll through
the track numbers.
>” Changing the Audio Channel Output
If you are playing a Stereo CD, you can
change the channel output from the player.
1. Press (OSD| on the remote to bring up
the Display.
2. Highlight the L/R icon on the Display.
3. The audio channel choices appear in the
text box. Press the 4 or Y buttons to
scroll through the choices: LEFT MONO,
RIGHT MONO , MIXED MONO or STEREO.
choice is displayed becomes the
active choice.
°” Using the Repeat Feature
The default mode for the Repeat feature 15
off. There are two Repeat options for CDs:
°§ All-repeats the disc that is playing
°§ Track-repeats the track that is playing
To Use Repeat:
1. While a disc is playing, press /OSD on the
remote to bring up the Display.
2. Highlight the Repeat icon.
3. Press the à or Y buttons to scroll through
the Repeat options until the Repeat option
you want is displayed in the text box.
4. The selected repeat option will loop
repeatedly until you turn Repeat off.
°§18°§
J. BASIC OPERATIONS
DVD
DVD MENU PLAY C >
some DVDs have title menus and chapter
menus.
Press »(PLAY), the screen shows the menu.
Press >| Or -4< to skip the next or
previous page, select with number buttons or
direction buttons.
FERN
sea
Example: select track 13.
1. Press »»| to enter the next menu.
/
ROOT 12. 444m „A
MENU 13.—— .
da mueran
3 45, wives )
2. Press ¥ to select track 13.
я
ROOT 72 ERE
MENU 13. | EA
A ees
16, lina
> A
3. Press » (PLAY)to start playing track 13.
Press | TITLE once to return to the title menu.
Press MENU | once to return to the root
menu.
AUDIO/VIDEO IN
The unit can supply an auxiliary (AUX) signal
to external equipment.
1. Connect the equipment and the unit with
A/V cables, the AUDIO OUT of the
external equipment is connected to the
AUDIO jack on the front panel of the
unit, the VIDEO OUT of the external
equipment is connected to the VIDEO
jack of the unit.
2. Turn on the external equipment and the
unit.
3. Select input function by pressing the
POWER button on the remote control.
4. The signals are routed through the Video
output jack and the Audio output jack of
the DVD unit.
°§19°§
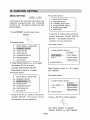
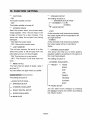
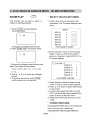
K. FUNCTION SETTING
MENU SETTING
The screen shows:
DVD CD
2 C7 os AUDIO SETUP PAGE — À
According to the recorded information and > SPEAKER SETUP
external equipment,set the following » CHANNEL EQUALIZER
functions for the player to obtain the best » DOLBY DIGITAL SETUP
playing status. » SUPER EQUALIZER
= MAIN PAGE
J
1.Press| SETUP | to set the main menu.
SETUP
“ Press the ¥ button and >» (PLAY) to
confirm and enter "DOLBY DIGITAL
SETUP ". The screen shows the
submenu for your selection.
The screen shows:
( ~ The screen shows:
SETUP MENU -- MAIN PAGE
» (GENERAL SETUP É `
P AUDIO SETUP — DOLBY DIGITAL SETUP —
» VIDEO SETUP STEREO
> PASSWORD SETUP DUAL MONO | >> | LEFT MONO
» PREFERENCES D.R.C. RIGHT MONO
a EXIT SETUP y MIXED MONO
2. Press direction buttons ( » , 4) to select > AUDIO SETUP
and press » (PLAY) to confirm.
Example: Select AUDIO SETUP"
* Press direction button Y to select.
The screen shows:
4 x
SETUP MENU -- MAIN PAGE
> Press » (PLAY) to confirm and enter
"AUDIO SETUP". The screen shows
the submenu for you selection.
x
Press direction button » £ Y to select
"LEFT MONO”
The screen shows:
/
``.
» GENERAL SETUP
» AUDIO SETUP — DOLBY DIGITAL SETUP --
» VIDEO SETUP STEREO
> PASSWORD SETUP DUAL MONO >>
» PREFERENCES D.R.C. RIGHT MONO
EXIT SETUP MIXED MONO
% / P AUDIO SETUP
> Press » (PLAY) to confirm selection.
pe
set DUAL MONO" in "DOLBY
DIGITAL SETUP" to LEFT MONO.
°§20°§
K. FUNCTION SETTING
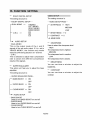
3.Exit from menus.
Press direction buttons and » (PLAY) to
select the relevant exit column.
+ Press the direction buttons A °& to exit
from "DUAL MONO".
+ Press the direction button y to select
"AUDIO SETUP", press > (PLAY) to exit 2. NORMAL/LB
from the current column and return to the
"AUDIO SETUP PAGE".
“Press A, Y to select "MAIN PAGE", then
press » (PLAY) to return to the main menu.
GENERAL SETUP
The setting structure is as follows:
This is selected when the unit is connected
to a normal TV. Wide-screen images are
shown on the screen, with black belt on the
top and bottom.
--GENERAL SETUP PAGE-- 3. WIDE
— IV DISPLAY >> NORMAL/PS
This is selected when the unit Is
connected to a wide-screen TV.
NORMAL/LB
WIDE
— TV TYPE >> PAL
MULTI
NTSC
— CAPTIONS >> ON
OFF
— SCREEN SAVER >> ON > TV TYPE
OFF You may select according to the color system
— LAST MEMORY >> Er of the TV to be connected.
— MENU STYLE >> TYPE © Select "MULTI" for a multi-system
TYPE 2 TV.
— MAIN PAGE > Select "NTSC" for an NTSC TV.
> Select PAL fora PAL TY.
9> TV DISPLAY
1. NORMAL/PS
This is selected when the unit is connected
toa normal TV.
Wide-screen images are shown on the
screen, but with some parts cut
automatically.
°§21°§
K. FUNCTION SETTING
9°” CAPTIONS
° ОМ
The hidden subtitle is shown.
“OFF
The hidden subtitle is turned off.
©” SCREEN SAVER
Start the screen saver, the screen saver
image appears when the unit stops or the
image is frozen for a few minutes. This
saver can keep the screen from being
damaged.
“ ON: Start the screen saver.
“ OFF: Remove the screen saver.
9”. LAST MEMORY
The unit can memory the point of a disc
where the power is off and play from the
point when you turn on the unit again.
© ON: This function is on and works.
* OFF: This function is off and does not
work.
°° МЕМО STYLE
The menu has two types of styles ( type 1
and type 2 ).
You can select one type which you prefer.
AUDIO SETUP
The setting structure is:
- - AUDIO SETUP PAGE - -
— SPEAKER SETUP
— CHANNEL EQUALIZER
— DOLBY DIGITAL SETUP
— SUPER EQUALIZER
—> MAIN PAGE
°” SPEAKER SETUP
The setting structure 15:
-- SPEAKER SETUP PAGE --
DOWNMIX >> LT/RT
| STEREO
AUDIO SETUP
© LIRT
A disc recorded multi channel soundtrack,
the output signal will be incorported to left
and right channel.
STEREO
A disc recorded multi channel soundtrack,
the output signal will be incorported to
stereo.
° CHANNEL EQUALIZER
This option will help you to select graphic
equalizer patterns according to the genre of
the music being played.
The setting structure is:
- - CHANNEL EQUALIZER- -
— PRESET >> NONE
ROCK
POP
LIVE
DANCE
TECHNO
CLASSIC
SOFT
—” AUDIO SETUP
You can select music category by pressing
the direction buttons and confirm by pressing
the | PLAY | button.
°§22°§
K. FUNCTION SETTING
°” DOLBY DIGITAL SETUP
The setting structure is:
--DOLBY DIGITAL SETUP - -
—DUAL MONO >> STEREO
LEFT MONO
RIGHT MONO
MIXED MONO
— D.R.C >> dE
— AUDIO SETUP
* DUAL MONO
This is the output mode of the L and R
signals of the set audio output. If it is set to
"MIXED MONO", the function only works
when the DVD being played is 5.1-channel.
* D.R.C
This is selected to adjust linear compression
rate to obtain the different compression
results of the signals.
°- SUPER EQUALIZER
This option will help you to adjust the bass
equalizer.
The setting structure is:
- - SUPER EQUALIZER PAGE- -
— BASS BOOST >> ON
OFF
— SUPER BASS >> ON
OFF
— CLEAR BOOST >> ON
OFF
— AUDIO SETUP
BASS BOOST
Uses to turn BASS BOOST on and off.
* SUPER BASS
Uses to turn SUPER BASS on and off.
+ CLEAR BOOST
Uses to turn CLEAR BOOST on and off.
VIDEO SETUP
The setting structure is:
- - VIDEO SETUP PAGE- -
— SHARPNESS >> HIGH
MEDIUM
LOW
— BRIGHTNESS >> 0
— CONTRAST >>0
—» MAIN PAGE
©” SHARPNESS
Uses to select the sharpness level.
“> HIGH
The sharpness level is highest.
> MEDIUM
The sharpness level is medium.
* LOW
The sharpness level is lowest.
9° BRIGHTNESS
You can use the 4 or Y button to adjust the
brightness.
©” CONTRAST
You can use the A or Y button to adjust the
contrast.
°§23°§
K. FUNCTION SETTING
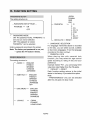
PASSWORD SETUP
The setting structure is
ñ >
- -PASSWORD SETUP PAGE - -
PW MODE >> ON
OFF
KL >,
> PASSWORD MODE
>. ÓN: The password works, "PARENTAL" is
dim and can not be selected.
OFF: The password is locked,
"PARENTAL" can be selected.
Enter a password according to the screen.
Note: The factory set password is: »», »»
++ (press the »»| button 5 times).
PREFERENCES
The setting structure is :
— AUDIO >> ENGLISH
FRENCH
SPANISH
CHINESE
JAPANESE
— SUBTITLE >> ENGLISH
FRENCH
SPANISH
CHINESE
JAPANESE
OFF
— DISC MENU >> ENGLISH
CHINESE
FRENCH
SPANISH
JAPANESE
— LOCALE >> CHINA
FRANCE
HONG KONG
JAPAN
TAIWAN
GBR
USA
— PARENTAL >> 1.6
2.
3. PG
4. PG 13
5. PGR
6. R
7. NC-17
8. ADULT
— DEFAULTS >> RESET
° LANGUAGE SELECTION
If a language mentioned above is recorded
on the disc, you can select sounds, subtitles
or disc menu languages. If not, the language
recorded on the disc Is shown.
° PARENTAL LOCK
When playing disc with parental lock
function, you may select an age control
grade according to rating of disc and your
preference.
Example: Select "PG" , you cannot play DVD
video disc rated higher than the PG grade.
97. DEFAULT >> RESET
Each function setting returns to the initial
status in the factory If you select this option.
Note:
* "PREFERENCES" only can be selected
after the unit goes into stop mode.
°§24°§
L. PLAY DISCS IN VARIOUS WAYS
AUDIO MODE (DVD, CD,
“ You may select a needed language from a
multi-language DVD .
“ You may select the right channel or left
channel or stereo from a multi-channel CD.
WHEN PLAYING DVD
* Press LANGUAGE, the screen shows
orderly:
fr \
AUDIO 1/2:AC-3 5.1CH
N
AUDIO 2/2:AC-3 5.1CH
a A
Different discs differ in languages.
* Press MODE |, the screen shows
orderly:
| MONO LEFT |
| MONO RIGHT,
MIXED MONO)
| STEREO |
WHEN PLAYING CD
MODE
В | MONO LEFT |
-
Ly
_
MODE
+ [MONO RIGHT |
Ó | MIXED MONO |
@ | STEREO |
You may select one mode.
Notes:
> Different discs differ in languages.
MUTE DVD) C CD,
When playing a disc, this function can remove
the sound.
1. REMOVE SOUND
Press| MUTE , the screen shows "MUTE".
MUTE
a 3 MUTE
2. RESUME SOUND
Press [MUTE | again, the screen shows
"MUTE OFF".
°§25°§
L. PLAY DISCS IN VARIOUS WAYS
FAST PLAY (DVD, CCD,
When playing a disc, you may play it forward
fast or reverse it fast to find what you want.
WHEN PLAYING DVD OR CD
1. Press »» to play forward fast. Each time
you press the button, the screen shows
orderly:
—— cie] 2X
CAP] 4X
c сер] 8х
N 6 [>>] 16X
Co
2. Press «<q to reverse the disc fast. Each
time you press the button, the screen
shows orderly:
SLOW PLAY ¿o
Enjoy slow motions by the following
steps.
WHEN PLAYING DVD
1. Press SLOW to play slowly.
SLOW
>
NA
No Le
—
Tr
The screen shows orderly:
— > 1/2 — 1/4 — 1/8 — > 1/16 —
— ¿ci 2X
Cda 4X
(<<) ce] 8X
ne 6 [<<] 16X
OX
с) |
3. Press » (PLAY) to switch to normal play
while FF or FR playing.
—|> <— «116 —411/8— 1/4 «— 1/2 «-
2.Press » (PLAY) to play normally.
°§26°§
L. PLAY DISCS IN VARIOUS WAYS
REPEAT PLAY (DVD) CCD,
This function can be used to repeatedly play
a title, chapter, track, disc, or some part on a
disc.
PLAYING À DISC REPEATEDLY
” DVD
You may repeat a title or chapter.
1. Repeat a chapter.
Press |REPEAT |, the screen will show
REPEAT @ A
UI CHAPTER
= \_ y
2. Repeat a title
Press REPEAT | twice, the screen will
show
REPEAT a a
CO) TIME
y N
`В» N и
3.Repeat all.
Press | REPEAT | third time, the screen
shows “ > ALL.
4. Remove "REPEAT" function.
Press |REPEAT | until" “> ALL"
disappears.
* GB
+ YOU May repeat a track, a disc according to
the following steps.
1. Repeat a track.
Press | REPEAT |, the screen shows
"© TRACK". The unit plays the
current track.
REPEAT a в
по TRACK
x A
Bic \ J
2. Repeat a disc.
Press | REPEAT |, the screen shows
" UC) ALL". The unit plays all the
tracks on the disc.
REPEAT a >
СО АН.
В No J
3. Remove "REPEAT" function.
Press REPEAT till " T > ALL"
disappears.
REPEAT SOME PARTS
You may press | A-B to enjoy some parts
repeatedly when playing a disc.
9” PLAY DVD or CD.
1. Set a starting point A.
The screen shows:
A-B ; A
a с UA
KM
i Lo J
2. Set an end point B.
The screen shows:
A-B у x
ND) O AB
E
> \_ /
Afterwards, the unit plays from À to B.
3. Press |A-B
disappears.
°§217°§
again till
7) AB
L. PLAY DISCS IN VARIOUS WAYS
SELECT SUBTITLES <>
This operation works only with discs on
which multiple subtitle language are
recorded.
PLAY DVD
1. Press SUBTITLE | repeatedly until the
desired language Is selected.
The screen shows:
SUBTITLE > s
( ) SUBTITLEO1/O0S: ENGLISH
— `` A
2. Remove the subtitle.
Press | SUBTITLE until the screen
shows "TURN OFF SUBTITLES".
Notes:
* For some discs, subtitles can not be
removed.
© Different discs differ in the language
of subtitles.
° If the subtitles of discs can not be
selected, press [SUBTITLE |, the screen
shows "NO SUBTITLE".
ANGLES SELECT <>”,
Some discs have images with different
viewing angles, you may select among them.
For example, when you watch a running
train, you may watch it from the front, the left
window or the right window without stopping
it.
Example:
A DVD has four viewing angles at your
option.
1. Press | to select ANGLE1.
SCREEN
ä _ A
—1 1/4
Ma À
2. Press | to select other angles, the
screen shows respectively:
2/4 (select ANGLEZ2)
3/4 (select ANGLES)
4/4 (select ANGLEA4)
3. To resume normal playback, press
to select original angle.
820%
L. PLAY DISCS IN VARIOUS WAYS M. MP3 OPERATION
ZOOM PLAY a
This function can be used to watch a
motion or motionless picture.
1. Press ZOOM | during playback,
the screen shows:
ñ AM
Q 2X
À
The picture is enlarged twice the size.
2. Press ZOOM | again, the screen shows:
4 AM
Q 3X
A
The picture is enlarged three times the size.
Note: The unithas six zoom steps:
A 2X,Q 3X,X 4XA 1/2, Q 1/3, and
Q 1/4.
3. Push «4, à , Y, » to move the enlarged
picture.
4. To resume the picture, push ZOOM
until the picture is in normal size.
> SELECT TRACKS WITH MENU
1, Insert a disc, the unit will search disc
information. The TV screen displays main
menu.
и >
MENU
MP3-01 1 Po
MP3-02
MP3-03
MP3-04
MP3-05
[
MP3-06
PLAY MODE: FOLDER
©) Oh + & Го
N
2.Press direction key y to select song
folder. Press » (PLAY) to confirm
selection. Example: Select MP3-02, the
TV screen displays.
( À
(| UP DIR 1
WAVE-11 1
WAVE-12 2
WAVE-13 3
WAVE-14 4
WAVE-15 5
PLAY MODE: FOLDER
и
3. Press direction buttons to select a song.
Press » (PLAY) button to start playback.
4. Press A or Y button to select other tracks
In stop mode.
5. In stop mode, select the folder icon (UP
DIR 1) on the left side, then press » (PLAY)
button to return to the main menu.
6. Press »-» Orla «to play previous or next
songs.
> OTHER FUNCTIONS
During playback MP3 discs, the unit features
mute, volume control, repeat play
(FOLDER,REP-ONE,FOLDER REPEAT).
°s29°$
N. OTHERS
TROUBLE SHOOTING Disc can not be played
If you experience the following problems > 1here is no disc in the unit |
while using the unit, this troubleshooting > Fut the disc on the disc tray properly with
guide can help you. the label side up.
“ Clean the disc.
No sound * Moisture has condensed in the unit.
> Check if the unit is connected securely. Remove the disc and leave the unit on for
> Make sure you operate the TV/monitor or about one hour. |
amplifier correctly. “ DVD may be wrong region.
° Маке sure the amplifier is set to receive |
DVD signal output. The unit doesn't operate normally
“Disconnect the power plug and insert it
No | image into the wall outlet again.
> Check if the unit is connected securely.
° Маке sure you operate the TV/monitor Remote control does not work
| correctly. “Remove barriers between the remote
> Make sure you set the color system
control and the unit.
correctly.
“ Point the remote control at the remote
Bad sound quality control sensor of the unit.
© Make sure the audio output mode is set “Replace the batteries with new ones.
correctly.
7 Make sure the audio connection between
the unit and amplifier is right.
°§30°§
N. OTHERS
TECHNICAL SPECIFICATIONS
Laser wavelength 650nm
Video system NTSC/PAL /MULTI
Frequency response 30Hz ~ 20KHz°:2dB
signal/noise ratio °, 85dB
Audio distortion + noise
о, - 70dB (1KHz)
Channel separation
o, 85dB ( 1KHz)
Dynamic range
>, 80dB ( 1KHz)
Audio out
(analog audio)
Output
+0
output level: 2 . Y
Load impedance: 10K |
Video out
output level: 1% 0.2V
Load impedance: 75 |
Power supply DC12V, 1.5A
Environment temperature 5.35%
Power consumption °20W
Dimensions
200° i 260° i 78mm
Weight
Approx. 2Kgs
This manual is only for your reference, any change to the design and specifications will not be
advised.
°§31°§
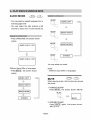
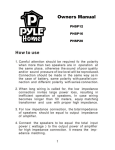
O. INSTALLATION
INSTALLATION GUIDE
MVDVD4
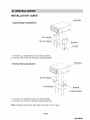
“Impending installation аи PR
Flat washer
Spring washer Ea
N
\
|
\ —
—
é
00
28
0
О
A
D
SCrews
yo TE
5
1. FiX the L bracket to the unit with screws.
2. Fix the unit to the car through mounting holes.
© Horizontal placement TT DNA
!
1. FiX the- L bracket to the unit with screws.
2. Fix the unit to the car through mounting holes.
Note: Please remove the disc when the unit 1s not in use.
°§32°§
128-6364A