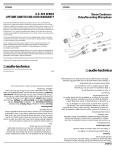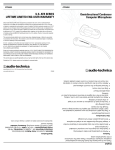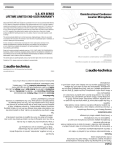
1
ATR1500
ATR1500
U.S. ATR SERIES
LIFETIME LIMITED END-USER WARRANTY
Cardioid Dynamic
Vocal/Instrument Microphone
Select Audio-Technica ATR series microphones purchased in the U.S.A. from an authorized AudioTechnica (A.T.U.S.) dealer are warranted for the lifetime of the original purchaser by A.T.U.S. to be free
of defects in materials and workmanship. In event of a defect, End-User’s exclusive remedy is at A.T.U.S.’
election, the cost of repair, refund of the purchase price in the form of credit or cash, or replacement of
the product. A.T.U.S. reserves the right to replace any product with one of equal value. The product must
be delivered to A.T.U.S., prepaid to the address below, together with the sales slip or other proof
of original purchase and $8.00 for handling and return to a U.S. address. Check or money order required;
no cash or stamps.
This warranty excludes defects due to normal wear, abuse, shipping damage, or failure to use product
in accordance with instructions. This warranty is void in the event of unauthorized repair or modification,
or removal or defacing of the product labeling.
A.T.U.S.’ warranty is to the End User only. Except for A.T.U.S.’ said express warranty, A.T.U.S.
MAKES NO WARRANTIES, EXPRESS OR IMPLIED, WITH RESPECT TO THE PRODUCTS.
A.T.U.S. SPECIFICALLY MAKES NO WARRANTY OF MERCHANTABILITY OR FITNESS
FOR A PARTICULAR PURPOSE.
Except to the extent precluded by applicable state law, A.T.U.S. IS NOT LIABLE FOR CONSEQUENTIAL,
INCIDENTAL, DIRECT OR SPECIAL DAMAGES ARISING, DIRECTLY OR INDIRECTLY, IN RESPECT OF
SUCH PRODUCTS OR USE OR FAILURE THEREOF, WHETHER BASED ON BREACH OF WARRANTY,
NEGLIGENCE, STRICT LIABILITY, TORT OR OTHERWISE.
This warranty gives you specific legal rights, and you may have other rights which vary from state to state.
Outside the U.S.A., please contact your local dealer for warranty details.
Audio-Technica U.S., Inc., 1221 Commerce Drive, Stow, Ohio 44224
www.audio-technica.comP52491
• Screw the clamp onto the top of a mic stand. Slide the mic
into the clamp so that it fits snugly.
Using Stand Clamp
•Slide microphone switch into the ON position.
Slide to OFF position to turn microphone off.
•Turn on mixer, amplifier or recording device.
Turning On
• Plug the other end of the cable into an XLR-type mic jack
on your mixer, amplifier or recording device.
• Plug the cable’s female XLR connector into the microphone.
Connecting Microphone
User Instructions
Specifications and product details are subject to change without notice.
Element: Dynamic; Polar Pattern: Cardioid;
Frequency Response: 60 – 15,000 Hz; Sensitivity: -57 dB;
Impedance: 500 ohms; Weight: 284 g (10 oz) without cable;
Cable: Detachable, replaceable 5 m (16.5') cable (XLR to XLR);
Accessories Included: Adjustable stand clamp;
soft protective pouch
Specifications
When using the microphone for vocals, sing or speak across
the mic windscreen rather than directly into the mic to reduce
popping caused by sudden breath blasts. To prevent feedback,
hold or position the mic fairly close to the sound source, i.e.
mouth; but refrain from overcrowding the mic.The mic should
always be located behind or aimed away from the loudspeaker to
minimize pickup of loudspeaker’s sound.
• Rugged metal construction for long-lasting performance
Tips
Features
• Enhanced warmth when used up close
• Conveniently located on/off switch
• Focused pickup helps prevent feedback
• Ideal for on-stage vocal/instrument use
Thank you for purchasing this Audio-Technica cardioid dynamic
vocal/instrument microphone. Please read the instructions
in this manual before using.
English
Français
Merci d’avoir acheté ce microphone dynamique cardioïde voix/
instruments Audio-Technica. Lisez les instructions du présent
manuel avant de l’utiliser.
Caractéristiques :
Conseils :
• Idéal pour les enregistrements vocaux ou instrumentaux sur scène
Lors de l’utilisation du microphone pour la voix, chantez ou parlez à travers
la bonnette antivent du microphone plutôt que directement dans le micro
afin de réduire les plosives provoquées par les expirations soudaines. Pour
réduire le risque d’effet Larsen, tenez ou placez le micro suffisamment près
de la source sonore (c’est-à-dire la bouche), mais sans le recouvrir. Le micro
doit toujours se trouver derrière ou éloigné du haut-parleur afin de limiter la
directivité du son du haut-parleur.
• Capture directionnelle pour limiter le risque d’effet Larsen
• Construction métallique robuste garantissant des performances de
longue durée
• Interrupteur marche/arrêt ergonomique
• Son encore plus chaleureux dans les prises de près
Instructions d’utilisation :
Branchement du microphone :
• Branchez le connecteur XLR femelle du câble dans le microphone.
• Branchez l’autre extrémité du câble dans le jack micro de type XLR de
votre mélangeur, amplificateur ou appareil d’enregistrement.
Mise sous tension :
Caractéristiques :
Élément : dynamique ; Directivité : cardioïde ; Réponse en fréquence :
60 à 15 000 Hz ; Sensibilité : -57 dB ; Impédance : 500 ohms ; Poids :
284 g sans le câble ; Câble : câble détachable et remplaçable de 5 m (16,5
pi) (XLR - XLR) ; Accessoire inclus : pince pour pied réglable ; étui de
protection souple
Les caractéristiques des produits sont susceptibles d’être modifiées sans préavis.
• Allumez le mélangeur, l’amplificateur ou l’appareil d’enregistrement.
• Poussez l’interrupteur du microphone en position ON. Poussez en
position OFF pour éteindre le microphone.
Utilisation de la pince :
• Vissez la pince sur la partie supérieure d’un pied de microphone. Glissez
le micro dans la pince pour bien le positionner.
Español
Gracias por adquirir este micrófono dinámico cardioide para voz/
instrumento de Audio-Technica. Lea las instrucciones de este
manual antes de utilizar el micrófono.
Características:
Sugerencias:
• Ideal para voces e instrumentos en el escenario
• Mayor calidez cuando se usa de cerca
Cuando emplee el micrófono para uso vocal, cante o hable a través del
protector antiviento del micrófono en lugar de hacerlo directamente al
micro para reducir el "popping" provocado por la respiración. Para evitar la
retroalimentación, mantenga o coloque el micrófono bastante cerca de
la fuente de sonido (es decir, la boca), pero no sobrecargue el micro. El
micrófono debe estar ubicado siempre detrás o en dirección opuesta al
altavoz para minimizar la captación del sonido del mismo.
Instrucciones de usuario:
Especificaciones:
Conexión del micrófono:
• Enchufe el otro extremo del cable en un conector para micro tipo XLR de
su mezclador, amplificador o dispositivo de grabación.
Elemento: dinámico; Patrón polar: cardioide; Respuesta de frecuencia:
60-15 000 Hz; Sensibilidad: -57 dB; Impedancia: 500 ohmios; Peso: 284 g
(10 oz) sin cable; Cable: cable de 5 m (16,5') desconectable y sustituible
(XLR a XLR); Accesorios incluidos: abrazadera para pedestal ajustable;
estuche protector
Encendido:
Las especificaciones y los detalles del producto están sujetos a cambios sin previo aviso.
• Captación focalizada que ayuda a prevenir la retroalimentación
• Construcción robusta de metal para un rendimiento duradero
• Interruptor de encendido/apagado convenientemente situado
• Enchufe el conector XLR hembra del cable en el micrófono.
• Encienda el mezclador, el amplificador o el dispositivo de grabación.
• Coloque el interruptor del micrófono en la posición de encendido (ON).
Para apagar el micrófono, colóquelo en la posición de apagado (OFF).
Uso de la abrazadera para pedestal:
• Enrosque la abrazadera a la parte superior de un pedestal para micro.
Introduzca el micro en la abrazadera hasta que quede perfectamente
ajustado.