1
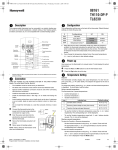
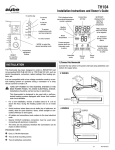
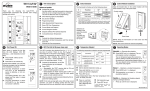
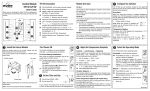
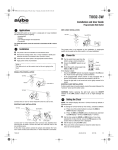
AFTER
BEFORE
MODEL TH110A-DP-P
B
240 VAC
SUMMARY
u
B
B
60 HZ
OPTIONS SELECTION
B
At the back of the thermostat, there are 3 selection switches to set at
your preferences.
Temperature in °C or °F, time in 12 or 24 hours and Early Start function.
u
TO SET TIME AND DAY
Press on DAY, HOUR and MIN buttons to adjust time and day.
u
TO RECORD THE
(COMFORT) SETPOINT TEMPERATURE
Select chosen setpoint temperature by using
or
button. Press on
button (app. 3 seconds) until icon appears on display.
WARNING: Special CO/ALR solderless connectors must be used when
connecting with aluminum conductors.
u
TO RECORD THE
(ECONOMY) SETPOINT TEMPERATURE
Select chosen setpoint temperature by using
or
button.
Press on button (app. 3 seconds) until icon appears on display .
Power-up
u
TO RECORD THE
NOTE: All cables and connections must conform to the local electrical code.
Set the On/Off switch to On.
When power is applied for the first time, the
display must show the time 00:00, the room
temperature and the Manual mode icon (
).
Other information might show up on the display if
installation is defective or does not comply with the
instructions.
(VACATION) SETPOINT TEMPERATURE
To program the Vacation temperature, select the desired degree using the
buttons and press on the
and
buttons simultaneously
until the
icon is displayed (app. 3 seconds).
u
OPERATING MODES
To select an operating mode, use MODE button.
AUTO:
Runs the program.
or
shows temperature setting
and can override temporarily your programming up to the
next program.
MAN:
Maintains the selected temperature.
the temperature setting.
or
NOTE: The On/Off switch set to Off will place the
thermostat in sleep mode. Ideal for summertime.
changes
OPERATING MODES
The TH110A-DP-P has two (2) operating modes.
MANUAL (
)
This mode allows you to maintain a constant temperature in the room.
1- To activate this mode, press on Mode button to display the
2- Set the desired temperature using the
pre-programmed
or
or
settings.
(To select the
setting, press on
and
AUTOMATIC (
icon.
buttons or select the
simultaneously.)
)
This mode executes your own programming.
To activate this mode, press on Mode button to display the
icon.
The
or
icon indicates which temperature setting is used. Also, the icon
of the program number will be shown.
Memory back-up
In the event of a power failure, an internal circuit will maintain the programming
and the time. But only the time could have to be set if power failure is more than
2 hours.
Early Start function
The thermostat is providing a built-in function enabling it to calculate the
optimum time to start the heating system to achieve the desired temperature
setting at the programmed time. This function could start the heating system as
early as 6 hours prior to the programmed time. To enable this function, set the
switch E.S. to “ON” at the back of the thermostat.
PROGRAMMING
INSTALLATION
NOTE: The "Problems and Solutions" section at the end of this user's guide will
help you to correct your problems during the installation.
This thermostat has been designed to operate with any installation
which has a RESISTIVE load not exceeding 4000 W (16.67 A) @ 240 VAC
such as electric baseboards, radiant ceilings and floors, electric con
vectors, etc. It is not compatible with a low voltage controller used by
a central heating system.
Programming the time and day
1- Set the time using the Hour and Min buttons.
2- Set the day using the Day button.
Programming the Comfort, Economy and Vacation settings
The Comfort
, Economy
and Vacation
settings respectively represent
the temperatures that you wish to have during the day
, at night or while you
are away at work
, or while you are away for an extended period
.
Electricians or experienced technicians should install the thermostat.
This thermostat is designed to be used with a self-protected heating
system equipped with thermal cut off and circuit breaker.
PARTS INCLUDED
- One (1) TH110A-DP-P (240 VAC) thermostat
- Two (2) 6-32 screws
- Four (4) solderless connectors (for copper wire)
TURN OFF POWER OF THE HEATING SYSTEM AT THE MAIN POWER
PANEL TO AVOID ELECTRICAL SHOCK. Keep air vents of the thermostat clean
and free from obstructions.
920-110-003-00-1-A 1/2
To program your settings
To modify the Saturday and Sunday schedules:
a) To program the Comfort temperature, select the desired degree using the
buttons and press the
button until the
icon is displayed
(app. 3 seconds).
6- Press on Day button until SA or SU is displayed.
b) To program the Economy temperature, select the desired degree using the
buttons and press the
button until the
icon is displayed
(app. 3 seconds).
c) To program the Vacation temperature, select the desired degree using the
buttons and press on the
and
buttons simultaneously
until the
icon is displayed (app. 3 seconds).
d) Press the Mode button to exit this function and return to the normal
operating mode.
Schedule programming
The TH110A-DP-P allows 4 setting changes for each day of the week. There are
no pre-set programs.The programs are tailored to perfectly adapt to your life
style. The principle is very simple. For each day, enter the time at which you wake
up (P1), the time you leave for work (P2), the time you arrive back home (P3) and
the time you go to bed (P4).
Mode
Program
Wake-up time
2
Leaving time
3
Return time
4
Bed time
) and Hour and Min
8- Press on PGM button to select Prog. 2 (
erase it.
) and then Clear button to
9- Press on PGM button to select Prog. 3 (
erase it.
) and then Clear button to
10- Press on PGM button to select Prog. 4 (
buttons to enter 11:00 PM.
) and then Hour and Min
11- Press on Mode button to exit this function.
Temporary or permanent temperature bypass
This operation allows you to temporarily modify the room temperature while you
are in the Automatic mode. Simply press on
or
button to select the desired
temperature, or the
or
button to select the Comfort or Econo settings you
have programmed.This temperature will be maintained until the beginning of the
next programmed schedule.
You can also switch to the Vacation setting for a prolonged absence by pressing
on
and
at the same time.The display will show
icon. In that case,
the derogation is permanent. To return to the normal operating mode, press on
Mode button.
Time
1
7- Press on PGM button to select Prog. 1 (
buttons to enter 7:30 AM.
If you wish to immediately return to the programmed settings, press on Mode
button twice.
For savings to be obtained, you must lower the temperature for a period of 2 to 3
times the delay required to bring the temperature back to your comfort level.
CHARACTERISTICS
• Model:
TH110A-DP-P (240 VAC)
Example : If your system takes one hour to go from your saving temperature level
to your comfort temperature Ievel, it is useless to lower the temperature for a
period less than 2 to 3 hours.
• Supply:
240 VAC, 50/60 Hz
• Load:
16.67 A maximum (resistive only)
• Power:
4000 watts (NI) @ 240 VAC
a) To program your schedule
• Approvals:
CSA / UL
1- Press on PGM button to access the programming mode.
• Display range:
0 to 60 °C (32 to 140 °F)
2- Press on Day button to select the day to be programmed. You can select
all days of the week by pressing on Day button for 3 seconds.
• Setting range:
5 to 30 °C (40 to 85 °F)
• Comfort default setting:
20 °C (68 °F)
3- Press on PGM button to select program 1, 2, 3 or 4.
• Econo default setting:
18 °C (64 °F)
4- Press on Hour and Min buttons to program the time.
• Vacation default setting:
10 °C (50 °F)
5- When you have completed your programming, press on Mode button
to exit this function.
• Storage:
-20 to 50 °C (-4 to 120 °F)
b) To erase a program :
Select the program using PGM and Day buttons, and press on Clear
button. The time field displays --:-- when the program is inactive.
WARRANTY
c) Example 1 : Comfort period from 7:00 AM to 10:30 PM
Economy period from 10:30 PM to 7:00 AM
Identical schedule for all days of the week.
This product is warranted against material defects and workmanship in normal
use for a period of one year, from the date of the original purchase from
authorized dealers. During this period, AUBE technologies inc. will repair or
replace the product with a new or of equivalent quality at AUBE'S option, without
charge, any product proven defective in normal use.
1- Press on PGM button to access the programming mode.
2- Press on Day button 3 seconds to select every day of the week.
3- Press on Hour button to enter 7:00 AM, Prog. 1 (
4- Press on PGM button again to select Prog. 2 (
Hour and Min buttons to enter 10:30 PM.
Warranty does not cover transportation costs. Nor does it cover a product
subjected to misuse or accidental damage. This warranty does not cover the cost
of installation, removal or reinstallation.
).
), and press on
This limited warranty is in lieu of all other warranties, obligations or liabilities
expressed or implied by the company. In no event shall AUBE technologies inc.
be liable for consequential or incidental damages resulting from installation of this
product. Some states or provinces do not allow limitations on how long an implied
warranty lasts, or the exclusion or limitation of incidental or consequential
damages, so the above exclusions or limitations may not apply to you. This
warranty gives you specific legal rights and you may also have other rights which
vary from state to state.
5- Press on Mode button to exit this function.
d) Example 2 : Comfort period: Monday to Friday from 6:15 AM to
8:15 AM and from 5:00 PM to 10:00 PM.
Saturday & Sunday from 7:30 AM to 11:00 PM.
Schedule/Day
MON.
TUES.
WED.
THU.
FRI.
SAT.
SUN.
PROG. 1
6:15 AM 6:15 AM 6:15 AM 6:15 AM 6:15 AM 7:30 AM 7:30 AM
PROG. 2
8:15 AM 8:15 AM 8:15 AM 8:15 AM 8:15 AM
---
---
PROG. 3
5 PM
5 PM
5 PM
5 PM
5 PM
---
---
PROG. 4
10 PM
10 PM
10 PM
10 PM
10 PM
11 PM
11 PM
NOTE:
AUBE TECHNOLOGIES INC. ONE (1) YEAR LIMITED WARRANTY
It is faster to program the same schedule for every day and then
modify the exception days.
The defective product and the original sale receipt must be returned to the
original dealer or shipped pre-paid, insured and addressed to:
Aube technologies inc., 705 Montrichard, Iberville (Quebec),
Canada, J2X 5K8
www.aubetech.com
[email protected]
If you have any questions concerning the installation or programming of this
product, please call our technical assistance at (450) 358-4600 for the Montreal
area or 1-800-831-AUBE for outside area, Monday to Friday between
8:30 AM and 5:00 PM Eastern time.
1- Press on PGM button to access the programming mode.
2- Press on Day button 3 seconds to select every day of the week.
3- Press on Hour and Min buttons to enter 6:15 AM, Prog. 1 (
4- Press on PGM button to select Prog. 2 (
enter 8:15 AM.
).
) and Hour and Min buttons to
5- Repeat step 4 to enter Prog. 3 (5:00 PM) and Prog. 4 (10:00 PM).
NOTE: When making modifications, make sure you are in the right
program.
05/07/02
920-110-003-00-1-A
2/2
PROBLEMS AND SOLUTIONS
PROBLEMS
CAUSES
SOL
No display
• Circuit breaker is open
• Power failure
• The thermostat switch is
in Off position
• Check 240 VAC presence
at the thermostat
• Put the switch
in On position
The thermostat is loosing
the time but not the programming
• Power failure more than
2 hours
Room temperature shown is wrong
• A draft is nearby the thermostat
• Eliminate the draft
Programs do not change as you want
• Incorrect programming hours
• Wrong programming mode selected
• Check actual time
in AM & PM as well
as program times
(AM is not displayed)
• Make sure operating mode
is set to AUTO
PROBLÈMES ET SOLUTIONS
PROBLÈMES
CAUSES
SOLUTIONS
Pas d'affichage
• Disjoncteur ouvert
• Panne de courant
• L’interrupteur du thermostat
est en position Off
• Vérifiez la présence
du 240 Vca au thermostat
• Placez l’interrupteur en
position On
Le thermostat perd l'heure
mais pas la programmation
• Panne de courant de longue
durée (plus de 2 heures)
Affichage de la température ambiante
incorrect
• Courant d'air à proximité
• Éliminez les courants d'air
Système de chauffage toujours
en marche
• Mauvaise installation
• Vérifiez l'installation
Le thermostat affiche du chauffage mais le
sytème de chauffage
ne chauffe pas
• Mauvaise installation
• Vérifiez l'installation
• Vérifiez la présence du
240 Vca au système de chauffage
Les programmes ne changent pas comme
vous le souhaitez
• Heures de programmation
incorrectes
• Mauvais mode d'opération
sélectionné
• Vérifiez les heures actuelles
de programmation
(attention au format AM
et PM, AM n'est pas affiché)
• Assurez-vous que vous avez
choisi le mode d'opération
AUTO
UTIONS
PROBLEMAS Y SOLUCIONES
PROBLEMAS
CAUSAS
SOLUCIONES
La pantalla no marca
• Disyuntor abierto
• Corte de corriente eléctrica
• El interruptor se encuentra en Off
El termostato pierde la hora pero
no la programación
• Pérdida de corriente de larga duración
(más de 2 horas)
Marca la temperatura ambiente incorrecta
• Corriente de aire a proximidad
• Elimine la corriente de aire
Sistema de calefacción siempre en marcha
• Mala instalación
• Verifique la instalación
El termostato marca la calefacción pero el
sistema de calefacción no calienta
• Mala instalación
• Verifique la instalación
• Verifique la presencia del
240 Vca en el sistema de calefacción
Los programas no cambian como usted
desea
• Horas de programación incorrectas
• Selección de un modo de operación erróneo
• Verifique las horas de programación
actuales (cuidado con el ciclo
AM y PM, AM no aparece
en pantalla)
• Asegúrese de haber elegido
el modo de operación AUTO
11/06/01
• Verifique la presencia de 240 Vca
del termostato
• Colóquo en On
25/06/02
920-110-003-00-1-A
3/3