1
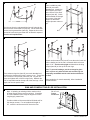
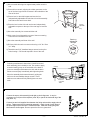
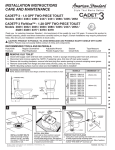
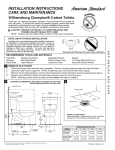
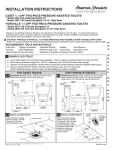
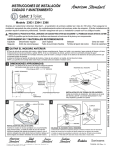
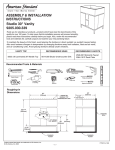
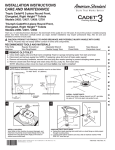
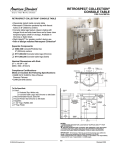
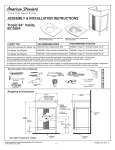
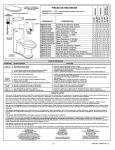
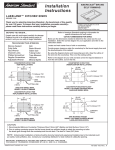
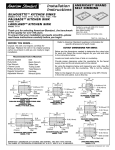
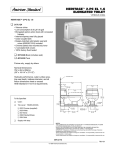
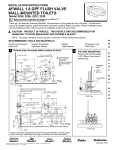
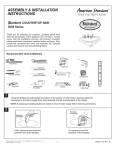
ASSEMBLY & INSTALLATION
INSTRUCTIONS
RETROSPECT® CONSOLE TABLE
7812.002
7812.295
Thank you for selecting our products...products which have been the benchmarks of fine quality for over 100 years.
To help insure that the installation process will proceed smoothly, please read these instructions carefully before you
begin. Also, review the recommended tools and materials list; carefully unpack and examine your new plumbing fixture.
Recommended Tools & Materials
0282.008
8711.000.002
8711.000.295
RETROSPECT® CONSOLE PEDESTAL TOP
CONSOLE TABLE LEGS (Chrome)
CONSOLE TABLE LEGS (Satin)
Adjustable Wrench
13-3/4"
(349mm)
FINISHED WALL
Channel Locks
3 Holes
1-3/8" (35mm) Dia.
8"
(203mm)
3-3/8"
(86mm)
9"
(229mm)
15"
(381mm)
Plumbers' Putty or
Caulking
Level
19-3/4"
(502mm)
1-3/4" DIA.
STD. DRAIN
OUTLET
Phillips Screwdriver
Regular Screwdriver
Tape
Measure
27"
(686mm)
FINISHED
WALL
8-1/8" TO
BOTTOM OF
DRAIN OUTLET
(206mm)
7-1/4"
(184mm)
Putty Knife
3/8" (10mm) DIA.
SINK ANCHOR
SCREW HOLES
ON 13-3/4" (349mm)
CENTERS
Pipe Wrench
8"
(203mm)
SUPPLIES
AS REQ'D
1-1/4 O.D.
WASTE
*
24"
(610mm)
36"
(914mm)
1-1/4" O.D.
TAILPIECE
*
22"
(559mm)
11"
(279mm)
Hacksaw
7-1/2"
(191mm)
FINISHED
FLOOR
22"
(559mm)
Drill
Product names listed herein are trademarks of American Standard Inc.
© American Standard Inc. 2003
- 1 -
7 3 0 7 5 7 - 1 0 0 R EV. B
1
2
#3
Place a middle leg tube
(Item #4) over each
threaded rod. Identify the
shelf support pins at the
inner corners of the Shelf
Support (Item #5). Guide
each threaded rod through
the corners of the shelf
support so that these
support pins are nearer to
you.
#2
#1
Run the two front leg sub-assemblies (Item #1) through the
two front holes of the towel bar (Item #2). Do the same with
the two rear leg assemblies (Item #3). Adjust the hex nut at
the end of each rear leg such that 5/8" of thread is exposed.
Turn the unit upside down.
3
#5
#4
4
#8
#7
#6
#5
Thread one decorative foot (Item #7) onto the end of each rod
until the leading end of the rod is recessed with the foot to a
depth of 1/4". Set the unit upright and thread one leveling
trumpet (Item #8) on the top of the rear legs.
Note: To prevent breakage, put the rectangular glass
shelf in place only after the sink and console legs are
Place a bottom leg tube (Item #5) over each threaded rod
completely assembled and the sink has been bolted to
such that the closed end of each is nearer to you. Thread one the wall.
hex nut from the kit (Item #6) onto each rod. Lay the unit
down and tighten each of the four legs firmly. Maintain the
Upon completion of console assembly, follow installation
5/8" of exposed thread at the top end of the rear legs. Once
procedure below.
again, set the unit upside down.
SINK AND CONSOLE TABLE LEG INSTALLATION
1
Note: If replacing an existing sink be certain to shut
off water supply before removing old sink. If installing
in a new bathroom follow rough-in diagram to locate
rough supply, waste lines.
C/L of 2 x 8
Support
and Bracket
30-3/4"
Provide suitable reinforcement behind finished wall for
sink hanger screws. For an installed sink height of
36", center the reinforcement 29" above the floor.
Finished
Floor
- 2 -
7 3 0 7 5 7 - 1 0 0 R EV. B
2
1) Move console table legs into approximate position near the
wall.
2) Place sink on console, aligning the rubber grommets on the
top of the front legs with the recesses in the underside of the
front of the sink.
3) Place a level on the shelf support and use the four
independently adjustable console feet to level the assembly
both side-to-side and front-to-back.
4) Place the level on the sink and use the two independently
adjustable trumpets on the tops of the rear legs to level the
sink.
Feet are
adjustable
5) Move the assembly into contact with the wall.
6) With a pencil, mark through the center of the two mounting
holes found on the back of the sink.
Rear Leg
Adjustment
Bumper
7) Move the assembly well clear of the wall.
8) Drill two pilot holes at the center marks using a 1/4" bit. Bore
in 1" deep.
9) Thread the two 5/16" headless hanger screws into the pilot
holes leaving 1-7/8" thread exposed in front of the wall.
3
Following manufacturer's instructions, install faucet and
drain assembly (not included) in sink. Be certain to apply
a bead of sealing putty on the underside of the drain to
ensure a watertight seal between the sink and the drain.
Remove excess putty immediately after tightening drain.
Move the assembly back toward the wall, guiding the
sink over the two headless hanger screws. Place
washers over studs and firmly hand-tighten nuts onto
each.
Lavatory
Hanger Screw,
Washer & Nut
Front Leg
Grommet
of Console
Table
4
4
Connect the trap to drain assembly hand tight to check alignment. It may be
necessary to cut off part of the tailpiece (area "B") or part of the horizontal leg of the
trap (area "C").
Connect hot and cold supplies lines between the fitting valve and the supply shut-off
valves. Tighten trap joints for watertight assembly. Apply a bead of caulk around
the back edge of the sink where it contacts the wall. Insert the rectangular glass
shelf onto the shelf support. Remove protective film from glass shelf.
- 3 -
C
B
7 3 0 7 5 7 - 1 0 0 R EV. B
8711 CONSOLE TABLE LEGS COMPONENTS LIST
Note: "XXX" represents color or trim finish options. Specify when ordering.
ITEM #
A
B
C
D
E
F
G
PART NO.
738728-XXX0A
738729-XXX0A
738730-0070A
738744-XXX0A
738743-XXX0A
738879-0070A
738739-0070A
PACKED QTY.
DESCRIPTION
1
Towel Bar
1
Shelf Support
1
Glass Shelf
1
Front Leg Assembly
1
Rear Leg Assembly
2
Front Leg Grommet Kit
4
Hex Nut Kit #238
F
G
For chrome, replace "XXX" with 002 when ordering.
For satin, replace "XXX" with 295 when ordering.
E
D
A
C
B
CONSOLE CARE INSTRUCTIONS: Rinse the product clean with clear water. Dry with a soft cotton flannel cloth.
DO NOT: Clean with soaps, acid, polish, abrasives, harsh cleaners, or a cloth with coarse surface.
AMERICAN STANDARD ONE-YEAR LIMITED WARRANTY
If inspection of this American Standard plumbing product, within one year after its initial purchase, confirms that it is defective in materials or workmanship, American Standard
will repair or, at its option, exchange the product for a similar model.
This warranty does not apply to local building code compliance. Since local building codes vary considerably, the purchaser of this product should check with a local building
or plumbing contractor to insure local code compliance before installation.
This warranty shall be void if the product has been moved from its initial place of installation; if it has been subjected to faulty maintenance, abuse, misuse, accident or other
damage; if it was not installed in accordance with American Standard's instructions; or if it has been modified in a manner inconsistent with the product as shipped by American
Standard.
American Standard's option to repair or exchange the product under this warranty does not cover any labor or other costs of removal or installation, nor shall American
Standard be responsible for any other incidental or consequential damages attributable to a product defect or to the repair or exchange of a defective product, all of
which are expressly excluded from this warranty. (Some states or provinces do not allow the exclusion or limitation of implied warranties, so this exclusion may not apply to
you.)
This warranty gives you specific legal rights. You may have other statutory rights that vary from state to state or from province to province, in which case this warranty does not
affect such statutory rights.
For service under this warranty, it is suggested that a claim be made through the contractor or dealer from or through whom the product was purchased, or that a service request
(including a description of the product model and of the defect) be sent to the following address:
In the United States:
American Standard Inc.
P.O. Box 6820
Piscataway, New Jersey 08855
Attention: Director of Consumer Affairs
For residents of the United States, warranty
information may also be obtained by calling
the following toll free number: (800) 442-1902
www.AmericanStandard-US.com
In Canada:
American Standard
2480 Stanfield Rd.
Mississauga, Ontario
Canada L4Y 1S2
Toll Free: (800) 387-0369
www.AmericanStandard.ca
- 4 -
In Mexico:
Customer Service Manager
Ideal Standard, S.A. de C.V.
Via Morelos #330
Col. Santa Clara
Ecatepec 55540 Edo. Mexico
www.AmericanStandard.com.mx
7 3 0 7 5 7 - 1 0 0 R EV. B