1
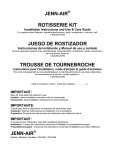
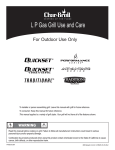
Installation Instructions
CORIAN® SOLID SURFACE
BATH AND SHOWER WALLS
Corner
Alcove
TOWN SQUARE MODELS:
Bath Tub
Certified to comply with ANSI Z124.1;
Z-124-2; Z-124.3. Observe all local
plumbing and building codes.
4834.SWTS, 3636.SWTS, 3838.CWTS, 6042.BWTS
OTHER MODELS:
3232.LSW, 3636.LSW, 4242.LSW, 4834.LSW, 6034.LSW
3636.LCW, 3838.LCW, 4242.LCW, 6060.LCW
6030.LBW, 6032.LBW, 7236.LBW
Thank you for selecting American-Standard...the benchmark of fine quality
for over 100 years. To ensure that your installation proceeds smoothly--please
read these instructions carefully before you begin.
752770-100 Rev. B
BEFORE YOU BEGIN....
Unpack your new shower walls and inspect them carefully for damage. Verify that the walls are the correct size for your
installation. Save the shipping carton to use as a template. Refer to American Standard roughing-in information for
specific dimensions for each model.
TOOLS & MATERIALS REQUIRED....
TOOLS:
• Carbide Drill & Hole
Saw or Sabre Saw
• Tape Measure
• Caulking Gun
• Razor (Utility) Knife
• Grease Pencil
NOTE
•
•
•
•
Masking Tape
Hot-Melt Glue Gun (optional)
Level
Denatured Alcohol
Solvent
MATERIALS:
• 4 Tubes Clear Silicone Caulking For Shower
or 5 Tubes Clear Silicone Caulking For Bath
• Hot Melt Glue and/or props and/or braces
Take extra care in handling the front surfaces of the walls. Use only non-abrasive cloths to avoid scratching.
HOTLINE FOR HELP
FOR TOLL FREE INFORMATION AND ANSWERS TO YOUR QUESTIONS, CALL:
1 (800) 442-1902, in Canada call 1 (800) 387-0369.
Weekdays 8:00 a.m. to 4:00 p.m. Eastern time.
1
WALL SURFACE PREPARATION:
Corian® solid surface shower walls can be installed on water-proof drywall, plaster, Wonderboard®, or marine-grade
plywood. Regular drywall is not recommended.
1. Remove any loose pieces of wall surface and repair to make a flat, plumb and square surface.
2. Clean the surface with denatured alcohol to insure good panel bonding.
3. Prime or water seal raw plaster, wallboard or spackling prior to installation.
C American Standard Inc. 2004
CORIAN® is a registered trademark of the DuPont Corporation.
1
752770-100 Rev. B
2
INSTALLATION PROCEDURES:
IMPORTANT The shower base or bath must be in place before
the shower walls can be installed. Make sure that these
fixtures are installed correctly and are level. Please cover the
fixtures with plastic or cardboard to prevent damage during
installation. Allow 1/8" gap per width of panel for expansion.
This applies especially to applications where both vertical
sides are restricted, such as between end walls. Also, allow
1/16" to 1/8" space at the bottom between the panels and
the bath or shower base.
CARDBOARD
TEMPLATE
FRONT EDGE
OF TEMPLATE
FRONT EDGE
OF PANEL
(PANEL SHOWN
ON BACKSIDE)
HOLE LOCATIONS FOR FIXTURES:
TN
OR
F
1. Turn off hot and cold supplies remove existing handles,
escutcheons and shower head & arm.
2. Cut a template from the shipping carton the width & length of
the side panel, mark the template "front". See Fig. 1.
BOTTOM EDGE
OF PANEL
3. Draw a vertical line from the top corner of the bath or
shower base using a level to 1" below the ceiling.
See Fig. 2 & 3.
FIG.1
4. Measure the centers of the shower head pipe
and faucet valve stem(s) as referenced from the
top of the mounting surface shim (made from
narrow wooden strips or plastic) and the vertical
line made in step no. 3.
5. Transfer these hole locations to the cardboard
template and cut holes in the template large
enough to fit over the faucet valve stem(s) and
the shower pipe.
6. Place the template on the wall and align the front
edge with the pencil line scribed from step no. 3.
Check for accuracy of the holes. If a hole is off,
place masking tape over the incorrect hole and
spot the new, correct center. Mark the front of
the template (side facing you) for later
identification.
PENCIL
LINE
1/16" TO
1/8" SHIM
7. Place the side wall on the floor with the grooves
facing toward the floor and place front of the
template on top (facing down). See Fig. 1 Make
sure the front of the template is lined up with the
front edge of the panel, and the bottom corresponds to the top of the
shower base. Line up the front and bottom edges and mark the hole
centers on the shower wall with a grease pencil.
BATH
1/16" TO
1/8" SHIM
SHOWER BASE
FIG.2
8. Drill holes in the panel. Using a carbide hole saw, drill holes of sufficient
size to allow for clearance of stems and valves, and to allow for future
servicing of these components. Make sure that the holes can be covered
by the escutcheon. Drill holes from the backside of the panel to avoid
chipping the front surface.
9. After drilling the holes, dry fit the panel against the wall and check for
accuracy lining-up the edges of the panel with the traced line from step
no. 3.
IMPORTANT: USE ROUTER, SPADE BITS, TWIST DRILLS OR
HOLE SAWS ONLY. DO NOT USE AUGER BITS.
FRONT
PENCIL
LINE
1/16" TO
1/8" SHIM
FIG.3
752770-100 Rev. B
2
C
American Standard Inc. 2004
3
PANEL INSTALLATION:
1.
Apply a 1/4" bead of silicone to each side of
corner(s). Place corner pieces into corners and
secure with props and/or braces and/or hot melt
glue. Shim corner pieces 1/16" to 1/8" up from tub
or shower base. Let dry. See Figs. 4 & 5.
2.
Dry-fit the back panel to the back wall, centering the
panel between the two corner pieces. You should have
the same gap between the corner and the panel on
both sides. See Fig. 6.
HOT MELT GLUE
OPTIONAL
1/4" SILICONE
BEAD
Remember to shim the panel up from fixture. With
the panel in place, trace a line across the top edge to
serve as a guide for alignment and silicone application.
Repeat this process for remaining wall(s).
3.
FIG.4
WATERPROOF
DRYWALL
GLUING PANELS TO WALL:
Bond one panel at a time. Apply silicone onto the
premarked wall to within 1/2" of the pencil lines.
Apply a 1/4" bead of silicone sealant 3/8" from edge
of the backside of the panel. Install the back panel and
secure in place with props and/or braces and/or hot
melt glue. Wipe excess sealant with a damp cloth.
Repeat this procedure until all panels are installed.
See Fig. 6.
1/4" SILICONE
BEAD
CORNER
PIECE
FIG.5
TRACE LINE
HERE
BACK PANEL
GAP
FIG.6
C
American Standard Inc. 2004
3
752770-100 Rev. B
4
SPLIT BACK-PANEL INSTRUCTIONS (for Back walls that are 48" to 72" wide)
These back-panels are split horizontally in the center of the grooves to hide the seams. The bottom panel should be installed
first, and the top panel will "slide" over the tongue of the bottom panel to make a seamless appearance.
1.
After corner pieces are set and dried, dry-fit the bottom panel to the back wall, centering the panel between the two
corner pieces. You should have the same gap between the corner piece and the panel on both sides. See Fig. 6.
(Remember to shim the panel up from the shower base or bath tub.) With the bottom half panel in place, trace a line
across the tongue to serve as a guide for alignment and adhesive application.
2.
Apply silicone onto the premarked wall to within 1/2" of the
pencil lines. Apply a 1/4" bead of silicone sealant on the edge
of the backside of the panel. Install the bottom half of the back
panel and secure in place with props and/or braces and/or
hot melt glue. Wipe excess sealant with a damp cloth.
3.
After the bottom half of the panel is set and dried, the top
panel can be installed. Dry fit the top half of the panel and
check for alignment with pre-drawn lines, corner pieces, and
bottom panel half. Apply silicone onto the pre-marked top half
wall to within 1/2" of the pencil lines.
Apply a 1/4" bead of silicone sealant in the groove of the top
panel as shown in Fig. 7 on the following page. Apply a 1/4"
bead of silicone sealant 3/8" from the edge of the sides of the
panel. Install the top half of the back panel and secure in place
with props and/or braces. Wipe excess sealant with a damp
cloth. See Figs. 7 & 8 below.
SUGGESTED BRACE
3/4" PLYWOOD
4" x 4"
BACK PANEL
BRACING EXAMPLE
(BRACING NOT SUPPLIED)
SEE ALTERNATE
METHOD ALSO
ALTERNATE BRACING METHOD:
Pull panel away from the wall at the top and apply a dab of hot melt glue to subsurface at each panel corner.
Immediately press entire panel into position. Hold panel in place for 10 to 15 seconds.
TOP
PANEL
TO TOP
OF PANEL
APPLY
SEALANT
HERE
BOTTOM
PANEL
1/4" PANEL
THICKNESS
FIG.7
752770-100 Rev. B
FIG.8
4
C
American Standard Inc. 2004
5
FINISHING:
After the adhesive is set, remove the shim and caulk the exposed seams with silicone sealant. Exposed seams must be
caulked with a clear or matching silicone sealant. The freshened caulked lines can be smoothed and excess sealant
removed by running a clean, damp cloth along the seams.
Apply trim (if any) and accesories (soap dish, etc.) with clear or matching silicone sealants and prop into place until the
sealant sets.
6
MAINTENANCE:
Clean up of silicone sealants or mastics, should follow manufacturer's recommendation. For daily care and cleaning,
refer to the American Standard maintenance label provided with the Corian® solid product shower walls. Always
provide adequate ventilation while working.
AMERICAN STANDARD TEN-YEAR LIMITED WARRANTY
CORIAN® PROODUCT
If, within ten years after its initial purchase, inspection of the
Corian portion of this American Standard
product, confirms that it is defective in materials or workmanship, American Standard will repair or, at its option,
exchange the product for a similar model or refund the purchase price.
This warranty applies only to the original purchaser and installation of these products. All labor and
transportation costs or charges incidental to warranty service are to be borne by the original consumerpurchaser.
This limited warranty does not apply to local building code compliance. Since local building codes vary
considerably, the purchaser of this product should check with a local building or plumbing contractor to insure
local code compliance before installation.
This warranty shall be void if the product has been fabricated or modified in a manner inconsistent with the
product as shipped by American-Standard; moved from its initial place of installation; if it has been subjected to
faulty maintenance, abuse, misuse, accident or other damages; or if it was not installed in accordance with
American Standard's instructions.
American Standard's option to repair or exchange the product under this warranty does not cover any labor or
other costs of removal or installation, nor shall American Standard be responsible for any other incidental
or consequential damages attributable to a product defect or to the repair or exchange of a defective
product, all of which are expressly excluded from this warranty. (Some states or provinces do not allow the
exclusion or limitation of implied warranties, so this exclusion may not apply to you.)
This warranty gives you specific legal rights. You may have other statutory rights that vary from state to
state of from province to province, in which case this warranty does not affect such statutory rights.
In the United States:
American Standard Inc.,
P.O. Box 6820
Piscataway, New Jersey 08855
Attention: Director of Consumer Affairs
In Canada:
American-Standard,
2480 Stanfield Road
Mississauga, Ontario
Canada L4Y 1S2
For residents of the United States,
warranty information may also be
obtained by calling the following
toll free number: (800) 442-1902
Toll Free: (800) 387-0369
www.americanstandard-us.com
752770-100 Rev. B
www.americanstandard-ca.com
In Mexico:
Customer Service Manager
Ideal Standard, S.A. de C.V.
Via Morelos #330
Col. Santa Clara
Ecatepec 55540 Edo. Mexico