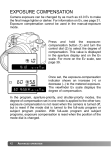
1
ACTIONCAM
Owner’s Guide
Trademarks
ACTIONCAM, FotoTune and FotoFlavor are trademarks of AgfaGevaert, NV.
Adobe is a trademark of Adobe Systems Inc., registered in the US.
Adobe Photoshop and Adobe Acrobat are trademarks of Adobe
Systems Inc.
Apple and Macintosh are registered trademarks of Apple Computer
Inc., registered in the US and other countries.
IBM is a registered trademarks of International Business Machines
Corporation.
Ulead, Ulead PhotoImpact and Ulead ImagePals are trademarks of
Ulead Systems Inc.
Microsoft, MS, MS-DOS, Windows and Windows 95 are either
registered trademarks or trademarks of Microsoft Corporation.
Adaptec, AHA, AVA and EZ-SCSI are trademarks of Adaptec, Inc.
which may be registered in some jurisdictions.
Color It! is a trademark of Microfrontier, Inc.
Other product or company names are trademarks or registered
trademarks of their respective holders.
Copyright © 1996
Agfa-Gevaert N.V.
Septestraat 27
B-2640 Mortsel
All rights reserved.
All software and hardware described in this document are subject to
change without any notice.
Safety regulations
IMPORTANT SAFETY INSTRUCTIONS
When using this digital camera and/or its accessories, basic safety
precautions should always be followed, including:
■ Read and understand all instructions.
■ Supervise closely when any digital camera or accessory is
used by or near children. Do not leave units unattended while
in use, or within the reach of children.
■ Do not connect power sources other than those specified in
the manual.
■ Do not operate the digital camera and or accessories if
dropped, damaged, or with a damaged cord, until examined
by an authorised Agfa Dealer.
■ To avoid electic shocks, do not immerse flash and/or
accessories in water or other liquids.
■ To reduce the risk of electric shocks, do not disassemble the
digital camera and/or accessories. Take them to an authorised
Agfa Dealer whenever service or repair is required. Incorrect
reassembly can cause electric shocks the next time the unit is
used.
SAVE THESE INSTRUCTIONS
CAUTION
Danger of explosion if battery is incorrectly installed.
Replace only with the same, or equivalent type, battery recommended
by AGFA.
Dispose of used batteries according to the instructions on the battery.
CE Marking (Declaration of
Conformity)
We declare under sole responsibility that the Camera and options to
which this declaration relates is in conformity with the below
specifications.
This declaration is valid for the area European Union (EU) only.
Product Type:
Digital Camera
Product Name:
ActionCam
Options:
Flash 5400HS, Objectiv AF24-85, AC Power
Adaptor AC-M515
EMC:
EN 55022 (Class B) / 1987
(Limits and method for measurement of radio
distubence characteristics of informatiotechnology
equipment (ITE)
EN 61000-3-2 (Limits for harmonic current
emissions)
EN 61000-3-2 (Limits vor voltage fluctuations)
EN 55082-1 / 1992
(Electromagnetic compability - Generic immunity
standard Part 1: Residential, commercial and light
industry)
IEC 801-2 / 1991 (Electrostatic discharge
requirement)
IEC 801-3 / 1984 (Radiated electromagnetic field
requirement)
IEC 801-4 / 1994 (Electrical fast transient / burst
requirement)
Safety:
EN 60950 / 1992 and Amendment 1 / 1993
(Safety of information technology equipment,
including electrical business equipment)
EC Directives
EMC:
Safety:
89 / 336 / EEC and 93 / 68 EEC art. 5
73 / 23 / EEC and 93 / 68 EEC art. 13
This equipment has been tested and found to comply with the limits
for a Class B digital device, pursuant to Part 15 of the FCC rules.
These limits are designed to provide reasonable protection against
harmful interference in a residential installation. This equipment
generates, uses and can radiate radio frequency energy and, if not
installed and used in accordance with the instruction, may cause
harmful interference to radio communications. However, there is no
guarantee that interference will not occur in a particular installation.
If this equipment does cause harmful interference to radio or
television reception, which can be determined by turning the
equipment off and on, the user is encouraged to try to correct the
interference by one or more of the following measures:
■
Reorient or relocate the receiving antenna.
■
Increase the distance between the equipment and the receiver.
Connect the equipment into an outlet on a circuit different from
that to which the receiver is connected.
■
■
Consult the dealer or an experienced radio/TV technician for help.
This digital apparatus does not exceed the Class B limits for radio
noise emissions from digital apparatus as set out in the Interferencecausing equipment standard entitled “Digital Apparatus”, ICES-003 of
the Department of Communications.
Preface
Thank you for purchasing the AGFA ACTIONCAM Digital Camera.
Please take the time to read through this owner's guide, for it contains
information that is important for the proper and safe use and care of
your camera. Enjoy!
The AGFA ACTIONCAM is a compact digital camera with the
following features:
• The ACTIONCAM digital camera uses three CCD imaging arrays and
a unique signal processing technique that allow it to photograph
extremely high resolution images, up to 1.75 million pixels per image.
• The design of the ACTIONCAM digital camera is based on the
Minolta MAXUM400si SUPER (VS) or the DYNAX 500 (Europe), and
uses the same high performance autofocus and exposure systems. The
ACTIONCAM can also use lenses, flashes, and other accessories
designed for use with MAXUM 400si SUPER (DYNAX 500).
• The ACTIONCAM digital camera is equipped with a SCSI-2
interface, and can be connected directly to your MACINTOSH, IBM PC,
or IBM PC compatible personal computer.
• The ACTIONCAM digital camera is packaged with the ACTIONCAM
SA driver, and the Adobe Photoshop™ plug-in software for MAC and
ActionCam Twain interface for PC that allow you to display your
images on your personal computer.
July 1996
Agfa-Gevaert N.V.
Septestraat 27
B-2640 Mortsel
Introduction
Welcome
For proper and Safe use
STANDARD SYMBOLS
Various symbols are used throughout this owner's guide, and the
product itself, for the proper and safe use of this product and to
prevent personal injury, injury to others, and property damage. An
explanation of the symbols follows. Read and understand each
caution thoroughly before reading the main text of this owner's guide.
Disregarding this warning may result in injury or death.
WARNING
Disregarding this caution may result in injury or
property damage.
CAUTION
EXAMPLES
The outer triangle is for warning. The symbol inside
illustrates what is being warned against. The example at
left means beware of electric shock.
The circle with a diagonal slash is for prohibition (don’t
do). The symbol inside illustrates what act is prohibited.
The example at left means do not disassemble.
The black circle indicates something you must do. The
circle inside illustrates how it should be done. The
example at left means you must hold the plug when
removing it from the outlet.
for proper and save use
Safety cautions for use of the
ACTIONCAM digital camera
Do not touch the flashtube during operation - it may
become hot when the flash fires.
Do not look directly at the sun through the lens
WARNING
or viewfinder.
Do not subject the camera to direct sunlight. Fire
may occur if the sunlight focuses at one point.
Do not fire the flash near the eyes of people or animals,
especially infants and young children. Maintain a distance
of one meter (three feet ) or greater.
If the camera is dropped or subjected to an impact in
which the interior is exposed, immediately remove
the batteries and discontinue use.
Do not disassemble. Call an AGFA dealer when
repairs are required.
CAUTION
Electric shock may occur if a high voltage circuit
inside the camera is touched.
Don’t walk while looking through the lens or viewfinder,
you may trip and fall causing injury.
Introduction
Read and follow all warnings supplied with the batteries.
Batteries may explode due to improper use.
Do not install batteries upside down (± reversed).
Do not use batteries with visible damage.
CAUTION
Do not subject batteries to fire or high
temperatures.
Do not attempt to recharge, short, or disassemble.
Carefully observe the following warnings when using this product
near young children or persons who may have a difficulty percieving
the potential danger associated with these products.
Use caution. Always keep out of reach when not in use.
If caution is not used, the following accidents, and others,
may occur:
■ Flash
WARNING
fired near the eye.
■ Fingers
■ Strap
caught in a running motor.
wound around the neck.
YOUNG CHILDREN MAY SWALLOW SMALL OBJECTS
Keep small accessories, or things that could be swallowed,
away from young children.
CAUTION
Contact a doctor immediately if an object is swallowed.
YOUNG CHILDREN MAY SWALLOW BATTERIES
Keep batteries away from young children.
BATTERY
CAUTION
SAFETY CAUTIONS FOR USE OF THE AC POWER ADAPTER ACM515
WARNING
Use only the indicated voltage.
Do not place a container of water or other liquid on the
product. If water or other liquid gets inside the product, it
may cause a short resulting in fire or electric shock.
Immediately unplug, discontinue use, and contact an
AGFA dealer.
Keep plug clean of dust and dirt. Insert plug
completely into the electrical outlet.
Do not use extension cords, or multiple cord
adapters. Insert plug directly into wall outlet.
Do not misuse the power cord. Damage to the cord may
result in fire or electric shock.
Do not perform any of the following acts to the cord:
• Scratch • Modify • Cut cord or replace plug
• Twist
• Bend
• Place a heavy object on
• Pull
• Heat
Do not place unit in a dusty or humid area.
WARNING
If there is smoke, a strange smell, or any other unusual
conditions, immediately unplug unit, discontinue use, and
contact an AGFA dealer.
CAUTION
Grasp the plug when removing the cord from an
outlet. Pulling the cord may damage it resulting in
fire or electric shock.
Never pull the plug if your hands
are wet, or if you are standing in
water.
Do not attempt to disassemble this product; it contains
high-voltage circuits. For repairs, contact an AGFA
dealer.
Disconnect the AC adapter when
it is not in use.
SAFETY CAUTIONS FOR THE LITHIUM ION BATTERY
1 Use only the battery charger specified for this unit.
2 Never heat the battery or expose it to fire. Do not disassemble or
modify the battery. Do not intentionally or unintentionally short
circuit the battery terminals.
3 Do not leave the battery in hot places, such as inside a car, or in
direct sunlight. Exposure to temperatures over 60°C (140°F) may cause
damage.
4 Do not drop the battery or subject it to mechanical shocks.
5 Use the battery only in the specified apparatus.
1 Do not put the battery in a microwave oven or clothes dryer.
2 Stop using, or charging, battery if there is smoke, a strange
smell, or any change of color or shape.
If the battery leaks liquid, or there is a strange smell, keep battery away
from heat or open flame.
If liquid from inside the battery gets into the eyes, flush with water and
consult a physician immediately.
HANDLING CAUTIONS FOR THE ACTIONCAM
BATTERY CAUTIONS
• When photographing in cold weather, we recommend that you
keep
the camera and spare batteries inside your coat to keep them warm
when you are not shooting. Cold batteries will regain some of their
charge when they warm up.
• The low battery symbol may appear even with a fresh battery
depending on the storage conditions. To restore camera power, repeat
turning the camera on and off.
ENVIRONMENTAL REQUIREMENTS
• This digital camera is designed for use from 0° to 50°C (-4° to
122°F).
• Never leave the digital camera where it may be subjected to
extreme temperatures such as the glove compartment of a car.
• At colder temperatures, the data panel response time will be slow;
at higher temperatures, the display will temporarily darken, but will
restore when the temperature normalizes.
• Never subject the digital camera to extreme humidity.
• To prevent condensation from forming, place the digital camera in
a sealed plastic bag when bringing it from the cold exterior to a warm
building. Allow it to come to room temperature before removing it
from the bag.
HANDLING CARE
• This digital camera is not waterproof, dustproof, or sand proof.
Take care when using at the beach or near water - costly or
irreparable damage to the camera may occur.
• Do not touch the lithium-ion battery contacts on the digital camera.
The lithium-ion battery contacts can be seen when the lithium-ion
battery case is removed.
HANDLING INSTRUCTIONS FOR THE NP500H LITHIUM ION BATTERY
PROHIBITIONS FOR HANDLING OF LITHIUM ION BATTERIES
• Never heat the battery or expose it to fire.
• Do not disassemble or modify the battery.
• Do not leave the battery in hot places, such as inside a car or in
direct sunlight. Temperatures over 60° C (140° F) may cause damage.
• Do not allow necklaces, chains, or other metal items to come in
contact with the battery’s + and - terminals, as this could lead to
excessive heat, fire, or explosion of the battery.
• Do not allow the battery to come in contact with water. Never use
a wet battery.
• Do not drop the battery, or subject it to mechanical shocks.
• Do not directly solder the battery.
CHARGING
• Use only the battery charger specified.
• Be sure that the battery terminals are correctly aligned before
recharging.
• Perform the charging within the temperature range of 0°C to +
45°C (0°F to 113°F).
DISCHARGING
• Do not use the battery in devices not designed for its use.
• Avoid discharging the battery below 2.5V. Never discharge the
battery below 1.0V.
• Perform discharging within a temperature range of 0°C to 60°C.
STORAGE
• For long term storage, discharge the battery before storing.
• Store in a cool and dry place. In particular, avoid leaving the
battery in high temperature areas.
HANDLING CAUTIONS FOR THE CONVERTER AC-M515
ENVIRONMENTAL REQUIREMENTS
• This AC converter is designed for use from 0° to 40°C (32° to
104°F).
• Do not leave the AC converter where it may be subjected to
extreme temperatures, such as the glove compartment of a car.
• Do not subject the AC converter to extreme humidity.
• To prevent condensation from forming, place the AC converter in a
sealed plastic bag when bringing it from the cold exterior to a warm
building. Allow it to come to room temperature before removing it
from the bag.
HANDLING CARE
• The AC converter is not waterproof, dustproof, or sand proof; take
care when using at the beach or near water - costly or irreparable
damage to the camera may occur.
Before you begin
Before you begin, check the packing list . If some of the parts are
missing, contact the nearest AGFA dealer.
• Digital Camera ACTIONCAM body
• Minolta zoomlens
• AC power adapter AC-M515
• DC power cord
• Lithium ion battery NP-500H
• Lithium battery 2CR5
• AGFA ACTIONCAM DIGITAL FILM Card (PC Card)
• Holding Strap HS-700
• SCSI Cable
• Digital Camera ACTIONCAM CD
• Adobe Photoshop LE 3.0 CD package
• License Agreement document
• Quick Start Card MAC and PC
• Digital Camera ACTIONCAM Owner's Guide
• Digital Camera ACTIONCAM Software Guide
• Digital Camera ACTIONCAM Application Guide
• Fototune Cam manual + IT8 ColorTarget
• Warranty & Registration card
for MAC version only :
• CUMULUS Desktop CD package
for PC version only :
• ULEAD PhotoImpact CD package
• ADAPTEC AVA 1502P SCSI Host Adapter
Quick operation
1. Insert lithium battery into camera body
Insert one 6-volt 2CR5 lithium battery into the chamber as indicated
by the + and - marks on the inside of the battery cover.
2. Install lithium ion battery into digital back
Press the battery case release button and slide the battery case out.
Insert the NP-500H lithium ion battery as illustrated on the inside of
the battery case. Slide the battery case back into the camera until it
clicks.
3. Attach Lens
Align the red mounting index on the lens with the one on the camera.
Gently insert the lens into the mount and turn the lens clockwise until
it clicks into the locked position.
4. Insert AGFA ACTIONCAM Digital Film.
Open the slot/SCSI connector cover. Insert the PC card, as shown,
until the card stops.
5. Turn on power
Slide the main switch to ON. Wait until the frame counter displays
the number of remaining frames in the data panel.
6. Set Full-Auto mode
Press the program reset button to set the camera to fully automatic
mode.
7. Focus on subject
Align the subject within the focus frame and press the shutter-release
button partway down to activate the autofocus. The focus lock
indicator will glow when the subject is in focus.
8. Take the picture
Check that the standby lamp in the viewfinder is illuminated. Gently
press the shutter-release button all the way down to take the picture,
the way you want it.
Names of parts -Camera body
Built-in Flash
Self-timer button
Shutter-release button
White balance window
Control dial
Main switch
Mode button
Manual fillflash button
Exposurecompensation button
Lens contacts
Lens-release button
Mirror
Slot/SCSI connector cover
Focus mode button
PC terminal
Inside the slot/SCSI connector cover
Access lamp
PC card slot
Ejector lever
SCSI connector
WB/ASM mode switch
Accessory shoe
Finder
Flash node button
Program reset button
Data panel
Holding strap eyelet
Remote-control terminal
Aperture button
Battery case
Battery case release button
Bottom of the camera (after the Battery case has removed out)
Power input terminal
Clock battery chamber
Battery chamber
Tripod socket
Holding strap eyelet
Names of parts -Data panel
Shutter speed / SCSI ID number display
Wireless flash indicator
Red-eye reduction indicator
Exposure compensation indicator
White balance indicators
Self timer indicator
Aperture display
Exposure mode indicators
Manual focus indicator
Battery condition indicators
Frame counter
Terminater power indicator
SCSI mode indicator
Names of parts -Viewfinder Display
Focus frame
Viewfinder frame
Flash signal
Focus signal
Standby lamp
Chapter 1
Basic operation
Attaching the Holding Strap
You will have a better grip on the ACTIONCAM Digital Camera, if you
attach the HS-700 Holding Strap to the camera.
Chapter 1
Basic operation
1.
Pass one end of the Holding Strap through the
lower strap eyelet in the ACTIONCAM and attach
as shown.
2.
Pass the other end of the Holding Strap through
the upper strap eyelet and attach as the same way
shown at the left.
Unpacking the camera
Inserting Batteries
The digital camera uses a 2CR5 lithium battery and an NP-500H
rechargeable lithium ion battery. The 6-volt 2CR5 lithium battery
powers all camera operations. The NP-500H rechargeable lithium ion
battery supplies power for recording and copying digital images.
• Please read all warnings in the Safety Cautions section of this
manual, as well as those supplied by the battery manufacturer.
1. Push the cover release in the direction of the arrow to open the
battery chamber cover.
2. Insert the 2CR5 6 volt battery into the chamber as indicated by
the + and - marks inside the battery cover. Close the cover
until it clicks and locks closed.
3. While pressing the battery case release button, slide the battery
case out.
4. Insert the NP-500H lithium ion battery into the battery case as
shown.
5. Slide the battery case back into the camera until it clicks.
Use the AC Power Adapter AC-M515 when the battery charge is low,
an AC source is readily available, or images are being copied to the
Macintosh.
1. While pressing the battery case release button, slide the battery
case out.
2. Connect the adapter DC cord to the AC power adapter.
3. Plug the other side of adapter cord into the power input
terminal in the digital camera as shown.
4. Plug the AC power adapter into an AC outlet.
Chapter 1
Basic operation
Inserting batteries
Battery Condition Indicators
This camera is equipped with an automatic battery power indicator.
Each time the main switch is turned ON, symbols will appear in the
data panel to indicate the power status of the batteries.
This symbol indicates the condition of the 2CR 5lithium battery.
This symbol indicates the condition of the NP-500H lithium ion
battery.
Full battery symbol - power is sufficient for all digital camera
operations.
Low battery symbol - power is sufficient for all digital camera
operations, but is getting low.
Blinking low battery symbol appears with other displays.
2CR5 - Power is extremely low. Replacing with a new battery is
recommended.
NP-500H - Power is extremely low. One of the following operations
is recommended.
1. Replace NP-500H with a new battery.
2. Charge the NP-500H battery.
3. Use the AC power adapter instead of the battery.
Blinking low battery symbol appears alone.
2CR5 - Replace 2CR5 with a new battery immediately.
NP-500H - One of the following operations is necessary.
1. Replace NP-500H with a new battery.
2. Charge the NP-500H battery.
3. Use the AC power adapter instead of the battery.
If no data appears in the data panel, replace the battery or check that
it is inserted correctly.
The 2CR5 lithium battery supplies power for camera function (autofocus, auto-exposure, etc.). The NP-500H rechargeable lithium ion
battery supplies the power for recording and playback of digital
images taken by ACTIONCAM.
When the power of one battery is extremely low (blinking low battery symbol
appears alone in the data panel), the ACTIONCAM will not function even if
the other battery has a full charge.
Chapter 1
Basic operation
Battery Condition Indicator
Attaching and Removing the Lens
Attaching the Lens
1. Remove the camera body cap and rear lens cap as shown.
2. Align the red mounting index on the lens with the one on the
camera.
3. Gently insert the lens into the mount and turn it clockwise until
it clicks into the locked position.
Removing the Lens
1. Press and hold the lens-release button, then turn the lens
counter clockwise until it stops.
2. Gently remove the lens from the mount. Replace caps, or
immediately attach another lens.
Caution
•
Do not force the lens if it does not turn smoothly.
•
Do not touch the inside of the camera, especially the lens contacts
or the mirror.
Handling the Camera / Holding the Camera
Hold the camera grip firmly with your right hand while supporting the
camera or lens with your left hand. Make sure that your fingers are
not blocking any of the camera’s features; they should fit securely
around the grip. To hold the camera steady, always keep your elbows
at your side and your feet shoulder-width apart for support. Always
keep the camera strap around your neck or wrist in the event you
accidentally drop the camera.
How to press the shutter-release
The shutter-release button has three positions. Press the shutter
release button partway down to activate the camera’s autofocus and
autoexposure systems. Gently press the shutter-release button all the
way down to take the picture (never with a quick jab).
Chapter 1
Basic operation
Handling the Camera
Inserting the PC Card
This camera uses an AGFA PCMCIA card as it’s recording device. The
standard accessory card has already been initialized for use in this
camera and can be used immediately. On the card you can store 113
images (130 MB)
1. Slide the main switch to lock.
PERFORM THIS OPERATION BEFORE INSERTING THE PC CARD
2. Open the slot/SCSI connector cover.
3. Insert the PC card as shown, push the card in until it stops.
4. Close the slot/SCSI connector cover and slide the main switch to
ON.
Initial loading starts when the main switch is turned on. The card is
scanned and the recording head moves to the first available space on
the PC card. While loading, the frame counter will cycle as shown.
When loading is complete, the standby display will appear showing
the number of frames remaining.
To display the maximum capacity of the PC card
While pressing the mode button, press the self timer button.
Chapter 1
Basic operation
•
The maximum capacity of the card will appear at the top center of
the data panel.
•
When the buttons are released, the card capacity will no longer be
displayed.
Inserting the PC Card
Taking Pictures in Fully-Automatic Mode
Fully-Automatic mode is the camera’s standard operating mode, and
is suited for virtually any situation. When you press the programreset button, all the camera’s functions are set to fully automatic
operation.
1. Slide the main switch to ON.
2. Press the program reset button to set the camera to program
mode.
3. Grip both sides of the built-in flash and gently lift.
The flash will fire automatically when necessary.
4. If using a zoom lens (e.g. Minolta AF 28-80 mm), rotate the
zooming ring on the lens to frame the subject as desired.
5. Align the subject within the focus frame [ ] and press the
shutter release button partway down to activate autofocus and
autoexposure systems.
6. The standby lamp in the viewfinder will glow when the digital
back is ready to take the picture.
7. Press the shutter release button all the way down to take the
picture.
Chapter 1
Basic operation
Fully-Automatic Mode
Removing the PC Card
When the card is full, “0” will be displayed in the data panel and the
shutter will lock. Remove the full PC card and replace with a new PC
card.
1. Slide the main switch to lock.
PERFORM THIS OPERATION BEFORE REMOVING THE PC CARD, OR
DATA MAY BE LOST
Wait until the data display disappears.
2. Open the slot/connector cover and pres the ejector lever.
The PC card will slide out.
3.
Insert a new PC card.
When removing a card which is only half full, follow steps 1 and
2.
If a new card is not available, set the camera to SCSI mode and
transfer the images on the card to the computer. Then delete the
image(s) on the card.
If the computer is not nearby, and a new card is not available, the last
image can be overwritten.
CAUTION
Overriding will delete the last image. Then the image can
not be recovered.
1. Press and hold the mode button and the self timer button.
"0" will blink in the frame counter.
2. Turn the control dial one click.
The blinking "0" will change to a blinking "1".
If you want to discontinue this operation, turn the control dial
until the blinking "0" reappears in the viewfinder.
3. Release the mode and self timer buttons.
The "1" will stop blinking, indicating the digital back is ready to
overwrite the last image.
Only the last image can be overwritten. If you want to repeat the
overwrite, repeat steps 1-3.
Chapter 1
Basic operation
Removing the PC Card
Chapter 2
Focus Details
Focus Signals
The focus signals appear at the base of the viewfinder when the
shutter is pressed partway down.
The color of the focus signal indicates the focus situation.
Focus Signal
Chapter 2
Focus Details
Glows Green:
Focus is confirmed and locked.
Glows Orange:
Continuous autofocus; focus is confirmed.
Glows Red:
Focus is not possible (shutter locked). Your
subject is too close or is one of the special
focusing situations described on the next page.
Focus Signals
Special Focusing Situations
In special focusing situations, it may be difficult or impossible for the
camera to focus accurately — you may have to use focus lock or
manual focus.
If two subjects at different distances overlap in the focus frame.
If a subject composed of alternating light and dark lines completely
fills the focus frame.
If the subject within the focus frame is very bright, or low contrast.
Focus Lock
Focus lock should be used when you want to take a picture with your
subject outside the focus frame [ ] or in situations where autofocus is
difficult to confirm.
1. Center your subject in the focus frame [ ] and press the shutter
release button partway down.
The focus lock indicator will glow when the focus is locked.
2. Continue to hold the shutter release button partway down
while you recompose your picture as desired.
3. Press the shutter release button all the way down to take the
picture.
Focus lock cannot be used with moving subjects.
Alternate Focus Lock Methods:
Chapter 2
Focus Details
•
If using a manual zoom lens with a focus hold button, lock focus
by pressing the focus hold button.
•
If using an AF Zoom xi or AF Power Zoom lens, lock focus by
pulling the lens control ring towards you.
Focus Lock
Manual Focus
In situations where the autofocus system is not suitable and focus lock
is not possible, you may focus the lens manually. The autofocus
system will continue to monitor focus and will indicate when the
subject within the focus frame [ ] is in focus.
1. Press the focus-mode button so that the manual focus indicator
"M. focus" appears in the data display.
2. Turn the lens focusing ring until the image in the viewfinder
appears clear and sharp.
When using an xi-series, or power zoom lens, pull the control ring
toward you and then rotate it in either direction to focus.
Autofocus Illuminator
If the flash is raised and the camera detects that the scene is too dark
to focus accurately, the flash will automatically fire a few short bursts
before and after the lens focuses (AF Illuminator). This provides the
light necessary for the camera to detect and focus on your subject.
The range of the AF illuminator flash is approximately 1 to 5m
(3.3-16 ft.).
The AF illuminator flash may not fire when the focal length you
are using is 300mm or more, or when the AF Macro ZOOM 3X1X is used.
TO TURN THE AF ILLUMINATOR OFF:
Press and hold the red-eye reduction button while you turn the
camera on.
"OFF AL ” appears in the data panel.
To turn the AF Illuminator again, repeat the procedure so that
“ON AL ” appears in the data panel.
Chapter 2
Focus Details
Autofocus Illumination
Chapter 3
Advanced Operation
Setting the White Balance
This digital camera has automatic white balance. Beautiful images
can be taken under any light source. However, manual white balance
is necessary when the light source illuminating the white balance
window is different than the light source illuminating the subject.
For example, if the camera is in a room illuminated by a fluorescent
lamp, and the subject is outside illuminated by direct sunlight,
manually set the white balance to the daylight mode.
This camera has five white balance modes.
Auto white balance
The camera measures the color temperature of the light
environment by an external sensor.
Daylight - used when the subject is illuminated by daylight.
Tungsten - used when the subject is illuminated by tungsten
(incandescent) light.
Fluorescent - used when the subject is illuminated by fluorescent
light. Use this symbol for household and office environments.
Flash - used when the subject is illuminated by flash, it is necessary
to set this mode manually when using a PC mounted or nondedicated flash.
Chapter 3
Advanced Operation
Setting the White Balance
To set the white balance manually :
1. Turn the WB/ASM mode switch to white balance (WB).
2. While pressing the mode button, turn the control dial until the
desired indicator blinks in the data panel.
The blinking WB mode is selected when you release
the mode button (the other WB indicators will
disappear).
to
Pressing the program reset button returns the camera
the auto white balance mode.
When using the built-in, or a dedicated flash, the
white balance is automatically set to flash mode.
Exposure Mode
This camera has four different exposure modes: Aperture-priority,
Shutter-priority, Manual, and Program. The exposure modes allow
you to tailor the degree of camera control needed to capture the
desired image. For information on P mode, refer to “Taking Pictures
in Program Mode”.
A Mode
S Mode
M Mode
Manually select aperture
Manually select shutter speed
Manually select aperture and shutter speed
SELECTING THE EXPOSURE MODE.
1. Set the command switch to ASM.
2. While pressing the mode button, turn the control dial until the
desired indicator blinks in the data panel.
The blinking exposure mode is selected when you release the mode
button.
When you press the program reset button, the camera is returned
to Fully-Automatic operation.
Chapter 3
Advanced Operation
Exposure Mode
A MODE: APERTURE PRIORITY
In A mode, you select the aperture and the camera automatically sets
the shutter speed required for proper exposure.
1. Set the command switch to ASM.
2. While pressing the mode button, turn the control dial until 'A '
blinks in the data panel.
The aperture priority mode is selected when you release the
mode button.
3. Turn the control dial to select the aperture.
If 2000 or 2 blinks in the data panel, the required setting is beyond
the camera’s shutter speed range. Turn the control dial until the
blinking stops. (See “Trouble Shooting”)
S MODE: Shutter Priority
In S mode, you select the shutter speed and the camera automatically
sets the aperture required for proper exposure.
1. Set the command switch to ASM.
2. While pressing the mode button, turn the control dial until 'S'
blinks in the data panel.
The shutter priority mode is selected when you release the mode
button.
3. Turn the control dial to select the shutter speed.
If the aperture display blinks in the data panel, the required setting
is outside the aperture range of the lens. Turn the control dial
until the blinking stops. (See “Trouble Shooting” beginning on
page 51 for more exposure warnings.)
The number 60, or 125, displayed in the data panel stands for
1/60 or 1/125 of a second.
See page 41 for information on flash exposure in S mode.
Chapter 3
Advanced Operation
Shutter Priority
M MODE: Manual Exposure
In M mode, you have full control of the exposure. You select both the
shutter speed and the aperture. The data panel will tell you if the
exposure you have selected is over, under, or the same as the metered
exposure.
1. Set the command switch to ASM.
2. While pressing the mode button, turn the control dial until 'M'
blinks in the data panel.
The manual mode is selected when you release the mode button.
3. Turn the control dial to select the shutter speed.
4. While pressing the aperture button, turn the control dial to
select the aperture.
Exposure Compensation
This feature lets you compensate the exposure ±3 stops, in 1/2 stop
increments. Exposure compensation is used when the camera’s
metering system cannot correctly determine the precise exposure.
1. While pressing the exposure-compensation button, turn the
control dial until the compensation value you want appears in
the data panel.
2. Release the exposure-compensation button to enter the selected
value.
or
will remain in the data panel display as a
reminder that exposure compensation is set.
To cancel exposure compensation, perform the above procedure
and select "0.0".
Chapter 3
Advanced Operation
Exposure Compensation
Self-Timer
The self-timer will delay release of the shutter for approximately ten
seconds after you press the shutter release button, giving you time to
get into the picture.
1. Press the self timer button. Self-timer indicator will appear on
the data panel. Pressing the self-timer button again will cancel
the self timer.
2. Compose the picture and press the shutter release button all the
way down to start the self timer.
The self-timer lamp on the front of the camera will blink until the
shutter releases.
Self-timer mode will automatically cancel after the exposure.
To cancel the self timer before the shutter releases, slide the main
switch to lock.
Remote Release Terminal
To avoid blurry pictures, use of the optional Remote Cord RC-1000S
(or L) is recommended.
Using Remote Cord
1. Remove the remote control terminal cover.
2. Insert the remote cord’s plug into the terminal.
To Attach the Remote Terminal Cover after use
1. Align the prongs on the remote terminal cover with the remote
terminal.
2. Carefully press the cover until it attaches.
Do not force the cover at an angle, the prongs may break.
Chapter 3
Advanced Operation
Remote Release Terminal
Chapter 4
Flash Details
Using the Built-in Flash
The built-in flash provides coverage for lens focal lengths as short as
28mm. The flash output is controlled automatically by the camera’s TTL
(through the lens) flash metering system.
Grip both sides of the built-in flash and gently lift. After you have
finished using the flash, push it back down.
FLASH SIGNALS
No Display
Built-in flash is up or accessory flash is on and
charging.
glowing
Flash is charged and will fire when the shutter-release is
pressed.
blinking
(After picture is taken, blinks rapidly) Flash output was sufficient to
provide correct exposure.
If doesn’t blink after the picture is taken, flash output was not
sufficient. Make sure your subject is within the flash range (see next
page), and release the shutter after flash is charged.
Chapter 4
Flash Details
Using the Build-in Flash
BUILT-IN Flash Precautions
FLASH RANGE
The range of the built-in flash depends on the aperture selected. Make
sure your subject is within the working range of the flash, specified in the
table below.
Aperture
Flash Range
F 6.7
1.0 - 5.0 m (3.3 - 16.5 ft.)
F8
1.0 - 4.2 m (3.3 - 13.8 ft.)
F 9.5
1.0 - 3.5 m (3.3 - 11.5 ft.)
F 11
1.0 - 3.1 m (3.3 - 10.2 ft.)
F 16
1.0 - 2.1 m (3.3 - 6.9 ft.)
If you want to take flash photographs closer than 1m (3.3 ft.), we
recommend that you use Minolta’s Close-Up Diffuser CD-1000. Otherwise
lens shadowing may occur in the bottom of your picture. This accessory
provides softer lighting for more pleasing close-up photographs.
CAUTION: LENS SHADOWING MAY OCCUR
Lens shadowing may occur at the bottom of your pictures when using the
built-in flash with certain Minolta AF lenses. To reduce the chance of lens
shadowing, never use a lens wider than 28mm, never use a lens hood, and
do not photograph closer than 1m (3.3 ft.). The following lenses may
cause shadowing at the wider focal lengths:
AF Zoom 28 - 70mm f/2.8
AF Zoom 28 - 85mm f/3.5-4.5
AF Zoom 28 - 135mm f/4-4.5
AF Zoom 28 - 200mm xi
f/.5-5.6
Built-in flash should not be used with the following lenses:
AF 300mm f/2.8 APO
AF 600mm f/4 APO
Using Flash in P, A, S and M Mode
When the built-in flash is up, or an attached accessory flash is on, it
will automatically fire in low-light or back-lit situations. The camera
will select the most appropriate shutter speed and aperture.
TO FIRE THE FLASH MANUALLY
In P mode, you can manually fire the built-in or accessory flash.
Press and hold the manual fill-flash button while you take the picture.
USING FLASH IN A,S,M MODES
When the built-in flash is up, or an attached accessory flash is on, it
will fire each time you take a picture. When the built-in flash is
down, or an attached accessory flash is off, it will not fire.
A MODE FLASH: You can select any aperture from f/6.7-f/22, and the
camera will automatically set the shutter speed.
S MODE FLASH: Operation in the S mode is the same as P mode. The
camera will automatically set the aperture and the shutter speed.
M MODE FLASH: You can select any aperture from f/6.7-f/22, and
any shutter speed between 1/90 and 1/2 second.
Chapter 4
Flash Details
Using Flash in P.A.S and M Modes
Red-Eye Reduction
When photographing people or animals at night or in low light
situations, the effect called ‘Red-Eye’ may occur due to the flash
reflecting off the inside of the subject’s eyes. To reduce this effect and
to produce more natural looking pictures, use the red-eye reduction
mode with the built-in flash.
1. Press the flash mode button so that the red-eye indicator
appears in the data panel.
2. Warn your subject that the flash will fire a few short flash
bursts just before the picture is taken.
To cancel red-eye reduction, press the flash mode button again so
that
no longer appears in the data panel.
Wireless/Remote Off Camera Flash
NORMAL FLASH
Wireless / Remote Off-Camera Flash Control is available with the
Minolta accessory flashes: 5400HS, 5400xi, or the 3500xi. Wireless /
Remote flash allows you to experiment with creative lighting
techniques using off-camera accessory flashes without a tangle of
accessory cords and connectors.
In Wireless / Remote flash mode, the off camera flash is triggered by a
coded signal from the camera’s built in flash when you press the
shutter release button. Another signal stops it once the camera’s TTL
flash meter detects that the proper exposure has been received. You
can also obtain a 2:1 lighting ratio automatically. When selected, the
off camera flash provides 2/3 of the full exposure and the built-in
flash provides the remaining 1/3.
WIRELESS /REMOTE FLASH
WIRELESS /REMOTE RATIO FLASH
SETTING WIRELESS / REMOTE FLASH MODE
1. Attach the accessory flash (5400HS, 5400xi, or 3500xi) to the
camera and turn both the flash and the camera on.
2. Press the flash mode button, "WL" will appear in the data
panel. The flash is now set for wireless / remote flash operation.
3. Remove the accessory flash, and raise the camera’s built-in
flash. The accessory flash is now ready to be positioned.
Chapter 4
Flash Details
Using Flash in Wireless Mode
Taking Picture in Wireless/Remote Flash Mode
1. Position your camera and 3500xi flash unit using the
information on this page. If you are using a flash unit other
than the 3500xi off camera, refer to the instruction manual for
that flash.
Camera Range
(See table below)
3500xi Range
(See table below)
Maximum Operating Range
5m (16.4 ft.)
Aperture
Camera-Subject Distance 3500 xi- Subject Distance
F 6.7
1.7 - 5.0 m / 5.6 -16.4 ft. 1.2 - 5.0 m / 4.0 - 16.4 ft.
F8
1.4 - 5.0 m / 4.6 - 16.4 ft. 1.0 - 5.0 m / 3.3 - 16.4 ft.
F 9.5
1.2 - 5.0 m / 4.0 - 16.4 m 0.8 - 5.0 m / 2.6 - 16.4 ft.
F 11
1.0 - 5.0 m / 3.3 - 16.4 ft. 0.7 - 4.6 m / 2.3 -15.2 ft.
F 13
1.0 - 5.0 m / 3.3 -16.4 ft. 0.6 - 3.9 m / 2.0 - 12.8 ft.
F 16
1.0 - 5.0 m / 3.3 - 16.4 ft. 0.5 - 3.2 m / 1.6 - 10.5 ft.
2. Wait for both flashes to charge.
The accessory flash’s AF illuminator will blink when the flash is
fully charged.
3. Press the flash mode button to test fire the accessory flash, and
wait again for both flashes to charge.
4. Press the shutter release all the way down to take the picture.
WIRELESS / REMOTE RATIO CONTROL
In wireless / remote mode, when ratio control is selected, the output of
the off camera flash and the built-in flash combine to provide a 2:1
light ratio.
To use ratio control, press and hold the manual fill flash button, then
press the shutter-release button all the way down to take the picture.
CANCELING WIRELESS / REMOTE FLASH
1. Reattach the accessory flash to the camera.
2. Press the red-eye reduction ( flash mode button) so that "WL"
disappears from the data panel.
To cancel wireless/remote flash mode on the 3500xi separately
from the camera, first turn the flash off. Then, press the ON/OFF
button to turn the flash on and hold the button until the wireless
lamp turns off.
To cancel wireless/remote flash mode on other flash units, refer to
your flash owner’s manual.
Chapter 4
Flash Details
P.C. Terminal
The digital camera’s threaded PC terminal accepts PC type sync. cords
from non-dedicated flash units, or flash units that do not have a hot
shoe connector. When you connect a sync. cord to the PC terminal,
set the shutter speed to 1/90 sec. or slower. Manually set the white
balance to the flash mode.
Certain Studio Flash Systems operate on a Negative Polarity triggering
system (See below).
It is possible that when using a system of this nature in conjunction
with the ACTIONCAM the flash may not fire.
It is therefore recommended that before using a Studio Flash system of
this nature you contact an AGFA Dealer for advice.
Positive Polarity
Negative Polarity
• The trigger voltage of some flash units may be too high for the
digital camera to fire the flash. If this is true of your flash, contact an
authorized AGFA Dealer.
Appendix 1
About the PC Card
This digital camera uses a PC card (PCMCIA card) as it’s recording
medium.
PCMCIA is the abbreviation for Personal Computer Memory Card
International Association, and is categorized into three types. The
three types are Type I, Type II, and Type III. The AGFA ACTIONCAM
Digital Film is a Type III card. It has been included as a standard
accessory.
The Agfa ActionCam Digital Film card is initialized and preformatted
when you buy it. If you have some problems with the card, it can be
reinitialized. This is also a faster way to empty a full card.
The card is also available as an option with your AGFA dealer.
Although some PC cards could be working with the ActionCam, there
can be some incompatabilities.
The ACTIONCAM card is optimised for 16-bit operation to speed up
the data transfer.
The AGFA warranty is invalid when using other cards than the AGFA
ACTIONCAM Digital Film. If you buy the AGFA ACTIONCAM Digital
Film, you have a one year warranty on the card.
Troubleshooting
About the Lithium Ion Battery
This digital camera uses a lithium ion battery as the power source for
the digital back. Lithium Ion batteries have the following advantages:
• Compact-Lightweight-High Energy Density
Lithium ion batteries have approximately 30% less volume, and
are 35% lighter in weight than standard nickel cadmium batteries
with the same discharge capacity.
• No Memory Effect
Lithium ion batteries can be recharged at any time, without the
need for refresh discharge circuitry, and without fear of shortened
usage time due to repeated shallow discharge cycles.
• Extremely Safe
By not using lithium metal or lithium alloys, Lithium Ion batteries
have attained a high level of safety. Even the U.S. Department of
Transportation’s Dangerous Materials Division has declared
Lithium Ion Batteries exempt from dangerous materials
regulations.
• You can shoot approximately 100 pictures with the battery.
CAUTION
Please read “SAFETY CAUTIONS FOR THE LITHIUM ION BATTERY”
and “HANDLING INSTRUCTIONS FOR THE NP-500H LITHIUM ION
BATTERY” in this manual for proper and safe use.
The Lithium Ion battery, like nickel cadmium batteries, is
rechargeable. The packaged battery is half charged for shipping.
When the capacity of the battery is low, it will blink in the data panel.
When this display occurs, remove and recharge the battery.
HOW TO RECHARGE THE LITHIUM ION BATTERY
1. Attach the NP-500H lithium ion battery to the AC-M515 AC
adapter/charger as shown.
If the adapter cord is connected to the AC power adapter,
disconnect it.
2. Plug the AC adapter/charger into a wall socket.
Power and charge lamp will glow.
It takes approximately two hours to obtain a full charge. Charge
time depends on the temperature and battery condition.
If the battery is left on the charger for more than four hours, the
prevent circuitry in the battery will turn the charger off.
Appendix
About Lithium Ion Battery
Accessory Information
This camera was designed to work specifically with lenses, flash units
and other accessories manufactured and distributed by Minolta. Using
incompatible accessories with this camera may result in unsatisfactory
performance, or damage to the camera and accessories.
LENSES (see also the Application Manual)
•
•
•
•
All Minolta AF lenses can be used with this camera.
Manual focus lenses (MD or MC) cannot be attached to this camera.
See page 41 for lens shadowing when using the built-in flash.
Some AF lenses are not suitable for use with this digital camera
Contact an authorized AGFA dealer for details.
FLASHES
• All Minolta i, xi, and HS-Series flash units can be used with this
camera.
• When used with the ACTIONCAM, the guide number of a flash will
be 2.8 times its value at ISO 100.
• See the flash instruction manual for the flash range.
• High Speed Sync (HSS) is not available with the ACTIONCAM.
• To use an AF-Series flash unit, Flash shoe adapter FS-1100 must
be attached to the camera. When the flash is on, the flash will fire
each time you take a picture. At no time will the flash’s AF
illuminator activate.
OTHER ACCESSORIES
The following accessories cannot be used with this camera:
• Angle Finder
• Magnifier
• Control Grip CG-1100
• Data Receiver DR-1000
Accessory Information
Exposure Warnings
Mode
P
Display
Cause
Action
Light level is beyond
the range of the
available shutter
speeds and apertures
In bright light, attach a neutral
density (ND) filter or reduce the
overall brightness of your
surroundings. In low light, select M
mode and use a hand-held meter or
increase the brightness of your
surroundings (i.e., use flash).
Required shutter
speed is beyond the
range of the camera
Select a larger/smaller aperture until
the display stops blinking
Required aperture is
beyond the range of
the lens
Select a faster/slower shutter speed
until the display stops blinking.
A
S
Appendix
Exposure Warnings
Troubleshooting
Refer to these pages to determine the cause of a problem you are
experiencing with your camera. If the information does not cover the
problem which you are experiencing or the condition continues,
contact your nearest AGFA dealer.
No display appears when the camera is switched on
• Batteries are exhausted.
If the camera battery is exhausted, install a new battery. If the
lithium ion battery is exhausted, remove and recharge, or use the
AC power adapter.
Help and number of one or two figures appear in the data panel
• Camera operation malfunction.
Remove and reinstall the battery in the camera body. If normal
camera operation does not resume, contact cn AGFA dealer.
When contacting, tell the Service representative the
number that appears in the data panel.
Auto focus does not work when shutter-release button is pressed
partway down
• Situation is unsuitable for autofocus.
Use focus lock or manual focus.
• Camera is set to the manual focus mode.
Set to the auto focus mode by pressing the focus mode button.
• Subject is too close.
Check the minimum focus distance for your lens.
Shutter cannot be released
• Camera has not been set to the standby mode.
Check that the standby lamp in the viewfinder is lit before pressing
the shutter release.
• Focus cannot be confirmed.
Use focus lock, or manual focus.
• PC card has not been inserted yet.
Insert the AGFA ACTIONCAM Digital Film into the card slot
according to the instructions on page 10.
• Camera is attached to a microscope or telescope
Contact an AGFA dealer for information.
The Initial Load does not start after sliding the main switch to ON
• The PC card is not fully inserted into the card slot.
Remove card, then re-insert until it stops.
Flash fires when the shutter-release is pressed partway down
• The AF illuminator is on.
This is a normal camera operation.
Flash picture is too dark
• Subject is beyond the flash range.
Make sure the subject is within the flash range.
• Flash is not charged.
Wait until appears in the viewfinder.
Er appears in the data panel
• Card access error
Set the main switch to lock, remove the card and reinsert. If this
display appears again, the card is defective or is not compatible.
Contact your AGFA dealer.
Camera operation interferes with the television or radio
• Camera is too close to the television or radio
Move back the camera from the television or radio.
Clock Battery Replacement
The clock inside the digital camera uses a 3V lithium battery (CR2025)
to maintain memory while the digital camera battery 2CR5 is being
changed. If this battery is exhausted, the clock settings in this digital
camera will be lost when the camera battery is removed.
Replace the clock battery as follows;
If the date under the each images is incorrect after changing the
camera lithium battery 2CR5, the clock battery may need to be
replaced. See the “SETTING THE CLOCK IN THE ACTIONCAM”
section in the Software Instruction Manual.
1. Remove the screw from the clock battery cover using a small
Philips screwdriver.
2. Remove old battery.
3. Insert the new battery (+ side up). Replace the clock battery
cover and retaining the screw.
After clock battery replacement, follow the instructions under
“SETTING THE CLOCK IN THE ACTIONCAM” section in the Software
Guide to reset the clock inside the digital camera.
Care and Storage
CLEANING
If the camera or lens barrel is dirty, wipe it gently with a soft,
clean, dry cloth.
If the camera or lens comes in contact with sand, gently blow
away loose particles - wiping may scratch the surface.
To clean the lens surface, first brush away any dust or sand then, if
necessary, moisten a lens tissue with lens cleaning fluid and gently
wipe the lens in a circular motion, starting from the center.
Never place lens fluid directly on the lens.
Never touch the interior of the camera, especially the shutter and
mirror.
Doing so may impair their alignment and movement. Dust on the
mirror will not affect the picture quality.
Never use compressed air to clean the camera’s interior, it may
cause damage to sensitive interior parts.
Never use organic solvents to clean the camera.
Never touch the lens surface with your fingers.
STORAGE
When storing your camera for extended periods, please follow these
guidelines:
Always attach the protective caps.
Store in a cool, dry, and well-ventilated area away from dust and
chemicals such as moth balls. For very long periods, place the
camera in an airtight container with a silica gel drying agent.
Periodically release the camera’s shutter to keep it operating
properly.
Before using after prolonged storage, always check the camera’s
operation to make sure it is functioning properly.
BEFORE IMPORTANT EVENTS
Always check camera operation carefully, or take test photographs.
QUESTIONS AND SERVICE
If you have questions about your camera, contact your local
camera dealer or write to the AGFA distributor in your area.
Technical Details (ACTIONCAM)
Image Sensor
Sensing System
Recording Format
Recording Media
Number of Frames
Autofocus
AF Illuminator
Sensitivity
Shutter
Built-in Flash
Viewfinder
White Balance
Interface
Batteries
Dimensions
Weight
1/2' CCD, Number of pixels : Total 410K
(380K Effective)
3 CCD (G1, G2, R/B), Dual-Green System
DOS Format, 8 bit Digital recording
PC Card (AGFA ACTIONCAM Digital Film)
113 Frames
Minolta’s through-the-lens (TTL) phasedetection system with CCD line sensor
Built-in-flash type, automatically activated
in low-light/low-contrast conditions
ISO 800 or equivalent
Electronically-controlled, vertical-traverse,
focal-plane
shutter, Range : 1/2000 to 1/2 seconds,
Flash sync : 1/90 sec. or slower, Wireless/
remote flash sync : 1/45 sec.
Guide number : 12, Coverage for 28mm
focal length. Recycling time : approx. 2 sec.,
Red-eye reduction pre-flash available
Optical relay finder, Field of view : 90%,
Magn.: 1.04X (with 50mm lens at infinity)
Auto white balance with outer metering,
Manual setting available
SCSI-II interface, PCMCIA Type III slot, PCterminal, Remote-control terminal
One 6V 2CR5 lithium battery pack, one 7.2V
NP- 500H Rechargeable lithium ion battery
and one 3V CR2025 lithium battery.
AC power adapter AC- M515 is available.
161(W) x 128(D) x 145(H) mm or 0.63
inch(W) x 0.50 inch (D) x 0.57 inch (H)
1.1 kg (without batteries, PC Card, lens)
Technical Details (AC-M515)
Input voltage
Output voltage
Dimensions
Weight
AC100-240V 50/60 Hz
DC 6.5V 2A (using for AC adapter)
DC 8.4V 1.4A (using for lithium ion battery
charger)
71.5(W) x 95.1(D) x 44.5(H) mm or
2.81(W) x 3.74 (D) x 1.75 inch(H)
300g
Appendix 2
The AVA™1502P SCSI HOST ADAPTER
The ActionCam PC version bundles the AVA™1502P SCSI host
Adapter from ADAPTEC. The AVA™1502 P is a 16 bit Plug and Play
ISA to SCSI host adapter for DOS and Windows systems. This board is
choosen because of his easy installation capabilities (plug-and-play)
and his external DB25 connection. The external connector can be
directly connected to the ActionCam SCSI cable. The SCSI board
supports asynchronous data transfer up to 2Mbytes/sec. which is
sufficient for the Actioncam camera. Another advantage is that only
one external SCSI device is supported so that no SCSI ID conflicts can
occur.
Hardware installation
Follow these steps to install the AVA-1502P SCSI adapter in your
system.
• Turn off your computer system and unplug it from its power source.
1. Remove the cover of your computer.
2. Locate an unused 16 bit ISA expansion slot.
3. Remove the corresponding slot cover from the back of your
computer chassis. Keep the screw that held the cover on place.
4. Carefully remove the host adapter from its package.
5. Align the host adapter with the ISA bus and press it into the
slot.
6. Attach the host adapter bracket to the computer chassis, using
the screw from the expansion slot cover you have removed in
step 3.
7. Attach the 25-pin side of the SCSI cable to the connector on the
host adapter.
8. Attach the other side of the SCSI cable (high density SCSI-2) to
the ActionCam camera connector.
9. Replace the computer chassis cover, following the instructions
in your computer's documentation.
10. Reconnect the power connector to the computer.
11. Restart your computer system.
Windows 95 automatically detects the host adapter and installs the
necessary software for it. (insert the Win95 CD in your CD Rom reader if
the installer asks for it !)
For Windows 3.xx you have to install the Adaptec EZ-SCSI Lite software
which is available on the ActionCam CD.
Agfa recommends the installation and use of the Adaptec AVA 1502P
boards even if another SCSI card is already installed. This to avoid
SCSI conflicts and system crashes due to connecting and
disconnecting the ActionCam camera. Another disadvantage of other
SCSI cards is the wide variety of SCSI connectors and therefore the
need of SCSI convertor plugs.
In case of installing another Adaptec SCSI board in your system refer to the
vendors documentation for detailed information.