1
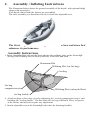
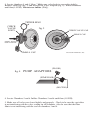
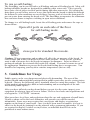
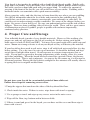
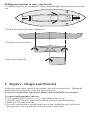
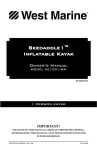
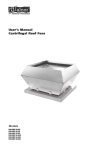
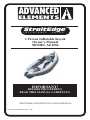
ADVANCED
ELEMENTS
StraitEdge
TM
I N F L A T A B L E
K A Y A K
1 Person Inflatable Kayak
Owner's Manual
MODEL AE1006
IMPORTANT!
BEFORE PROCEEDING
READ THIS MANUAL CAREFULLY
Save these instructions for future reference
ADVANCED ELEMENTS, INC. 2005
OWNER'S INFORMATION PACKET
StraitEdge
TM
I N F L A T A B L E
K A Y A K
1 Person Inflatable Kayak
Owner's Manual
MODEL AE1006
CONTENTS
1. CAUTION - SAFETY WARNING
2. ASSEMBLY / INFLATING INSTRUCTIONS
3. GUIDELINES FOR USAGE
4. PROPER CARE AND STORAGE
5. REPAIRS
6. FREQUENTLY ASKED QUESTIONS (FAQ)
For additional info please call us or visit our website at:
www.advancedelements.com
Send us an email at:
[email protected]
1. CAUTION - SAFETY WARNING
Users of this product agree by their use to accept the inherent risks involved in
this paddlesports activity and agree to follow all instructions, cautions, and
warnings carefully before using this Kayak.
(PLEASE READ CAUTION STATEMENT CAREFULLY)
CAUTION
SAFETY WARNING
PADDLESPORTS CAN BE VERY DANGEROUS AND PHYSICALLY
DEMANDING. THE USER OF THIS PRODUCTSHOULD UNDERSTAND
THAT PARTICIPATION IN PADDLESPORTS MAY INVOLVE SERIOUS
INJURY ORDEATH. OBSERVE THE FOLLOWING SAFETY STANDARDS
WHENEVER USING THIS PRODUCT.
· GET PADDLESPORTS INSTRUCTIONS SPECIFIC TO THIS TYPE OF CRAFT.
· OBTAIN CERTIFIED FIRST AID TRAINING AND CARRY FIRST AID AND
RESCUE/SAFETY EQUIPMENT.
· ALWAYS WEAR A NATIONALLY APPROVED PERSONAL FLOTATION DEVICE.
· ALWAYS WEAR A HELMET WHERE APPROPRIATE.
· DRESS APPROPRIATELY FOR WEATHER CONDITIONS; COLD WATER AND/OR COLD
WEATHER CAN RESULT IN HYPOTHERMIA.CHECK YOUR EQUIPMENT PRIOR TO
EACH
USE FOR SIGNS OF WEAR OR FAILURE.
· NEVER PADDLE ALONE.
· DO NOT PADDLE IN FLOOD CONDITIONS.
· BE AWARE OF APPROPRIATE RIVER WATER LEVELS, TIDAL CHANGES, DANGEROUS
CURRENTS, WEATHER CHANGES, AND STRONG OFF SHORE WINDS.
· SCOUT UNFAMILIAR WATER; PORTAGE WHERE APPROPRIATE.
· DO NOT EXCEED YOUR PADDLING ABILITY; BE HONEST WITH YOURSELF.
· CONSULT YOUR PHYSICIAN PRIOR TO BEGINNING YOUR PADDLESPORTS TRAINING.
· YOU MUST NOT USE ALCOHOL OR MIND ALTERING DRUGS PRIOR TO USING THIS
PRODUCT.
· FOLLOW THE MANUFACTURER'S RECOMMENDATIONS FOR THE USE OF THIS
PRODUCT.
· IF ADDITIONAL OUTFITTING IS REQUIRED, USE MANUFACTURER'S APPROVED
MATERIALS ONLY; DO NOT IMPAIR ENTRY OR EXIT ACCESS.
· READ OWNER'S INFORMATION PACKET PRIOR TO USING THIS PRODUCT.
THE USER OF THIS PRODUCT ACKNOWLEDGES BOTH AN UNDERSTANDING AND AN
ASSUMPTION OF THE RISK INVOLVED IN PADDLESPORTS.
ADVANCED ELEMENTS INC.
TOLL FREE 866-262-9076
Please read this entire manual for additional safety information. Please pay
close attention to items marked Important, Caution, Warning, Never, and
Always.
2.
Assembly / Inflating Instructions
The illustration below shows the general assembly of the kayak, with optional thigh
straps (sold separately)..
Your kayak comes from the factory pre-assembled.
The only assembly you should need to do is attach the adjustable seat.
The StraitEdge Kayak has a rigid frame in the bow and stern that
enhances its performance.
Assembly Instructions
1. Insert aluminum Bow rib and the Stern rib into the webbing slots on the StraitedgE
air bags and webbing slots on the kayak floor, at the bow and stern..
Aluminum Rib
Webbing Slot (on Air bag)
Air bag
Air bag
compression strap
Webbing Slot (on kayak floor)
air bag buckle
2. Attach air bags to the outer cover by tightening the “air bag compression straps” and
buckling the “air bag buckle”. Do this while the air bag is deflated. These are preset
at the factory and may not require any adjustment.
3. Attach adjustable seat to the StraitedgE side tubes by fastening buckles.
To begin inflating your kayak, you will need a Bellows Foot Pump (FAQ) or a Double
Action Hand Pump (FAQ) and your Valve Adaptor (FAQ). The Valve Adaptor can be
located in the seat pocket with the repair kit. Never use compressors, CO2 or
compressed air as they may damage you kayak.
Diagram of kayak valves
5
3
4
1
2
6
Inflating Instructions
Important: Before inflating, check to be sure that the kayak is completely assembled.
Inflate your kayak in the following order. Failure to follow these instructions may
cause damage to your kayak. Do not over inflate
1.Locate chamber 1. Unscrew butterfly cap and check that plunger valve is closed (fig.
1). Attach valve adaptor (fig. 2). Inflate Chamber 1 until firm to the touch (2.5 PSI).
OPERATING THE “PLUNGER” VALVES
2 1
PUMP
HOSE
1. PUSH STEM INWARD
2. TWIST STEM 90 DEGREES
3. THEN RELEASE
fig.1
STEM UP
(VALVE CLOSED)
INFLATE
In this position: Air can be pumped
in, but air will not escape when the
pump nozzle is removed. NOTE:
12volt pumps may not generate
enough pressure to bypass the
spring loaded plunger.
2 1
fig.2
STEM DOWN
(VALVE LOCKED OPEN)
DEFLATE
In this position: Air can be
released from the chamber. You
can also inflate in this position but
air will flow out when the pump
nozzle is removed.
SCREW ADAPTER
CLOCKWISE INTO
VALVE
2. Proceed to chamber 2. Inflate chamber 2 until StraitEdge tube is firm to
touch(2.5 PSI). Close butterfly caps on chambers 1 and 2 tightly.
3. Locate chambers 3 and 4 “floor.” Make sure valve body is screwed in tightly.
Remove small cap (fig. 3) and insert Floor Valve Adaptor (fig. 4). Inflate chambers
until firm(1.0 PSI). Do not over inflate (FAQ).
TETHER RING
CHECK
VALVE
BODY
fig. 3
CHECK VALVE CAP
SMALL CAP
INSERT “BOSTON
PUMP ADAPTOR”
SMALL CAP
fig. 4
ADVANCED ELEMENTS, INC.
PUMP ADAPTORS
(FLOOR)
(PUMP HOSE)
(BOSTON)
4. Locate Chambers 5 and 6. Inflate Chambers 5 and 6 until firm (1.0 PSI).
5. Make sure all valves are closed tightly and properly. Check to be sure the cap tether
is not interfering with the valve seating on all chambers. Also be sure that the floor
fabric is not interfering with the seal on chambers 3 and 4.
To use as self-bailing:
The StraitEdge can be used as both a self-bailing and non self-bailing kayak. Most selfbailing inflatable kayaks are designed for paddling white water only. They typically
have quite a bit of rocker to allow quick turning and other maneuvers. By opening the
drain ports you will allow water or waves that spills into the kayak to drain out through
the bottom. In calm conditions or on cold days you may wish to close the drain ports to
prevent water from entering the kayak at all. The StraitEdge incorporates the aluminum
bow and stern frame to improve tracking in open water conditions.
To change to a self-bailing kayak, locate the self-bailing ports and remove the caps as
shown below.
Open all 4 ports on each side of the floor
for self-bailing mode.
close ports for standard floor mode.
Caution: Water temperature and weather will affect the air pressure of the kayak. In
cold weather and water your kayak will lose some pressure. If this occurs, you may
want to add a bit more air to the kayak to improve performance. In hot weather or
prolonged sunlight, the air inside the kayak will expand. You must let some air out of
the appropriate chambers to prevent the kayak from failing due to overpressure. You
should avoid exposing your kayak to extreme temperatures (hot or cold).
3. Guidelines for Usage
Paddle sports can be very dangerous and physically demanding. The user of this
product should understand that participation in paddle sports may involve serious injury
or death. Observe the following safety standards whenever using this product. The user
of this product acknowledges both an understanding and an assumption of the risk
involved in paddle sports.
After you have inflated your kayak and before you put it in the water, inspect your
equipment for obvious signs of wear or failure. Review local rules and regulations and
read again the “CAUTION” statement.
Most areas have local laws and regulations about the use and equipment of small boats.
Usually a phone call to the local authorities will provide you with the needed
information. Some areas may require that you register and display a registration
number on the front of your kayak. Once you have been issued a number, it is best to
affix it to the kayak by printing it on the material with a permanent ink marker. If you
are required to display a sticker or vinyl letters, an inflatable boat ID kit can be
purchased at most marine stores.
Your kayak is designed to be paddled with a double bladed kayak paddle. Paddle with
short and even strokes. Keep the blade close to the kayak and the paddle almost vertical.
Pull with your lower hand and push with your upper hand. To reduce the amount of
swaying at the front of the kayak, ease off on the force of your stroke. Paddling with a
backward stroke can sometimes offer quick maneuverability.
Always practice safety and take the time to learn about the area where you are paddling.
Get official information about the local tides and currents before paddling there. Be
careful that you do not over estimate your strength, your endurance or your skill. Be
careful never to under estimate weather conditions. Be aware of the dangers before you
begin. Be aware of your skill level. Be sure you understand and accept the risk of these
dangers. There are many paddling clubs all over the world. These can be a great source
of information on places to paddle, people to paddle with and most importantly,
continued safety practices.
4. Proper Care and Storage
Your inflatable kayak is made of very durable materials. However, like anything else,
proper use and care will increase the life of your kayak. Before storing your kayak,
make sure it is both CLEAN and DRY. You may clean your kayak with a mild soap and
water. Never use strong solvents to clean your kayak as they will destroy the material.
If your kayak has been used in salt water, rinse it off with fresh water and allow it to dry
before storing. Use a dry towel to wipe up all moisture. It should be deflated and kept
out of direct sunlight when stored. Avoid exposure to extreme temperatures (hot or
cold). If your boat is exposed to freezing temperatures while storing, allow it to warm
up before unfolding. When the kayak has been stored for a period of time, the fin may
appear to be bent. This is only temporary. As soon as the fin warms up, it will return to
its natural position. Placing the fin in direct sunlight for five minutes will usually allow it
to spring back to its original molded form.
Do not store your kayak for an extended period of time while wet.
Follow these steps for removing excess water.
1 Unzip the zippers that run down the sides of the kayak and the floor .
2. Check inside for water. If there is water, wipe down with towel or sponge .
3. Use a sponge or towel and wipe up any excess water in the outer cover.
4. Wipe off the floor, top, bottom and in between folds.
5. If there is sand and gravel in the kayak, you can hose out the cover and then wipe it
down with a towel.
Folding instructions to store your kayak:
1. Completely deflate all air chambers (FAQ) and thoroughly dry kayak and remove the
seat.
2. Fold in half, down the center, lengthwise.
3. Fold into 3 equal sections.
4. Place into duffel bag.
5. Repairs / Design and Material
All kayaks come with a repair kit that includes glue and several patches. This should
remain with the kayak in the event that you may need it.
If service is required for your kayak, please call 866-262-9076 for assistance.
To repair small punctures and cuts:
1.Cut a rounded patch at least ¼” or ½” larger than the hole or cut.
2. Clean the area where the patch will be placed with water and/or mild soap.
3. Make sure all surfaces are dry.
4. In a well ventilated area, spread a thin layer of glue on both the patch and on the
damaged area. Let it sit for three to five minutes or until tacky.
To repair pinholes:
1.Inflate the PVC tube. Locate the pinhole by sponging soapy water over the tube until
you see air bubbles. Mark the location of the pinhole.
2. Deflate the tube and dry the affected area. Apply a drop of glue to the pinhole
3. Allow glue to dry completely.
4. Do not inflate the kayak for at least twelve hours.
6. Frequently Asked Questions
Below is a list of commonly asked questions about the Advanced Frame Inflatable Kayak. Please contact us if
you have other questions that we can help you with.
Q. Where is the valve adaptor? The valve adaptor (fig. 2) is located in a pouch in the back of the seat. The
repair kit can be found with it.
Q. What is the warranty on the kayak? The kayak carries a one year material and manufacturing warranty. If
within one year there is a manufacturing defect or material defect, we will repair or replace the affected part.
Q. The kayak seems to steer in one direction even when I stop paddling, what do I do? This could be from a
couple of different things. To avoid the kayak going in circles, first make sure it is set up properly. If the floor
is not centered correctly it could have a tendency to move in one direction. If you are pushing hard on your
strokes, it will make the front of the kayak move back and forth a little. By easing up on the stroke and
sometimes using a smaller bladed paddle, you can reduce the amount of sway in the kayak. When pulling your
kayak out of storage, the fin sometimes has a tendency to be bent to one side. To correct this, just leave it in a
warm area or in the sun for an hour and the fin will move back into its normal position.
Q. When do I stop pumping so I do not over inflate? The kayak should be inflated so that the cover is filled
out. There shouldn't be any wrinkles. The pump will also let you know when to stop. It will begin to give
resistance letting you know the kayak is inflated. For the floor chamber you should inflate it until it is firm to
the touch.
Q. I got most of the air out, how do I get the rest? Most Bellow Foot Pumps and Double Action Hand Pumps
can be reversed for deflating. For the main chambers, screw in valve adaptor and attach pump. Pump until all
the air is removed. Do the same for the twist valves.
Q. When inflating Chamber 1 and 2, I stop pumping and remove the valve adaptor but all the air just comes
back out. What do I do? The way the valve is designed is for it to remain closed while inflating. The plunger
needs to be in the up position. The reason for this is that while pumping air into the valve, it pushes the
plunger open letting air flow through. When the pumping stops, the plunger closes again keeping air from
coming back out. The only time the valve should be locked in the open position is when deflating the kayak.
Q. How can I tell if the Valve is open? One simple way is to pump air into the valve and when you stop, if the
air comes back out then it is open. To lock it in the open position, push down on the plunger and give it a
quarter turn. Push down again and twist back to pop it back up into the closed position. To tell if the valve is
closed, pump air into it. If air does not come back out when you stop inflating, then you know it is closed.
Q. How long does it take to set up? On average it takes about seven minutes when inflating with a foot pump.
It will take longer the first time as you should try to get familiar with the components and assembly described
in the owner's manual.
Q. What kind of pump should I use? We recommend a bellows foot pump or a double action hand pump. An
electric pump can be used to initially begin inflation of the kayak however it does not supply enough pressure
to inflate the kayak completely. You will still have to finish inflating the kayak with a foot or hand pump.
Q. What other accessories do you recommend? These are a few other accessories that we suggest if you don't
already have them.
a. A good quality paddling PFD (lifejacket) designed for kayaking
b. A 4-part take down paddle (so that it will fit in your kayak duffel bag).
c. Safety whistle and strobe light. Always play it safe.
d. A paddling jacket is a nice thing to have on cold wet days.
e. An external frame pack for packing your kayak into a back country lake.
f. A spray skirt will keep you and the inside of the kayak warm and dry.
LIMITED WARRANTY
Advanced Elements, Inc. warrants this product to be free from defects in material or workmanship for a
period of one year from the date of purchase. Products that prove to be defective under conditions of normal
and proper use during the warranty period because of defective workmanship or faulty material will be
replaced or repaired without charge. For warranty service, contact Advanced Elements, Inc.
Advanced Elements, Inc shall inspect all warranty claims and in the event of a defect, repair or replace the
defective part or entire item, at its option. The purchaser must, before return of a defective product, obtain
from Advanced Elements, Inc, a return authorization number and return center address. Please write or call
as listed below. Once an authorization number is obtained, the purchaser must ship the product, POSTAGE
PREPAID, to Advanced Elements, Inc for repair. Do not ship to P.O. Box address as it may be sent back.
This warranty does NOT cover:
Products used for rental, for hire or in professionally guided tours and other uses not considered normal
recreational purposes; and punctures, cuts and abrasions sustained in normal use; and items involved in
accidents; and items damaged in white water mishaps, and other unreasonable uses or improper storage.
Advanced Elements, Inc shall within (30) days from receipt of an authorized return from purchaser, perform
its responsibilities in conformance with this warranty.
THERE ARE NO WARRANTIES WHICH EXTEND BEYOND THE DESCRIPTION OF THE FACE
HEREOF. ADVANCED ELEMENTS SHALL NOT BE HELD LIABLE FOR INCIDENTAL AND
CONSEQUENTIAL DAMAGES.
THIS WARRANTY IS INCLUSIVE IN LIEU OF ALL OTHER WARRANTIES.
This warranty gives you specific legal rights, and you may also have other rights that vary from state to state.
Advanced Elements, Inc.
P.O. Box 5128, Concord, CA 94524
Toll Free - 866-262-9076 - email [email protected] - www.advancedelements.com
(cut along line)
ADVANCED ELEMENTS WARRANTY REGISTRATION
(PLEASE TYPE OR PRINT CLEARLY)
Please complete and mail card to Advanced Elements within 10 days. It will register your product.
Mail to: Advanced Elements, Inc.
P.O. Box 5128, Concord, CA 94524
Attn: warranty department.
Owner's Name_____________________________________________
Address:__________________________________________Apt._____
City_____________________________ State_______ Zip__________
Model_____________ HULL(12 characters)# ______________
Purchase Date_______________
Store Name _________________________________________
Store Address_____________________________________________
City _____________________________State ______Zip _______
Thank you for responding to the following….
1. How did you first learn of this product?
_____ Dealer
_____ Friend
_____ Magazine
_____ TV
_____ Catalog
_____ Other
2. What most influenced your decision to purchase this product?
_____ Price
______ Features
______ Style
_____ Quality
______ Other
_____Radio
IMPORTANT!
BEFORE PROCEEDING
READ THIS MANUAL CAREFULLY
Save these instructions for future reference
If you would like a catalog of
our latest products please visit
our website at
www.advancedelements.com
or call Toll Free 866-262-9076
WARRANTY REGISTRATION CARD
PLEASE COMPLETE
THE OTHER SIDE OF
THIS CARD AND RETURN TO:
Mail to: Advanced Elements, Inc.
P.O. Box 5128, Concord, CA 94524
Attn: warranty department.