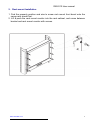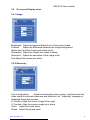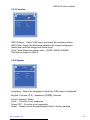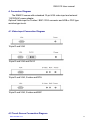
1
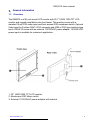
RM 6210 9U 20” Rack Mount LCD Monitor User’s Manual Rev 1.0 RM 6210 User manual Packing List The complete RM 6210 package consist of: Rack mount 20.1” 1600 x 1200 TFT LCD display x 1 6' VGA cable (male to male) x 1 Auto switch power adapter x1 User manual x1 AC Power cord x1 Check to make sure that the unit was not damaged in shipping. If you encounter a problem, contact your dealer. Please read this manual thoroughly, and follow the installation and operation procedures carefully to prevent any damage to the product, and/or any of the devices that connect to it. www.acnodes.com 2 RM 6210 User manual Safety Instructions 1. Please read these safety instructions carefully. 2. Please keep this User’s Manual for later reference. 3. Please disconnect this equipment from AC outlet before cleaning. Don’t use liquid or sprayed detergent for cleaning. Use moisture sheet or clothe for cleaning. 4. For pluggable equipment, the socked-outlet shall be installed near the equipment and shall be easily accessible. 5. Please keep this equipment from humidity. 6. Lay this equipment on a reliable surface when install. A drop or fall could cause injury. 7. Do not leave this equipment in an environment unconditioned, storage temperature above 600 C, it may damage the equipment. 8. The opening on the enclosure is for air convection hence the equipment from overheating. DO NOT COVER THE OPENING. 9. Make sure the voltage of the power source connect the equipment to the power outlet. 10. Please keep the power cord such a way that people can not step on it. Do not place anything over power cord. The power cord must rate for the voltage and current marked on the product’s electrical ratings label. The voltage and current rating of the cord should be greater than the voltage and the current rating marked on the product. 11. All cautions and warning on the equipment should be noted. 12. If the equipment is not in use for long time, disconnect the equipment from mains to avoid being damaged by transient over-voltage. 13. Never pour any liquid into ventilation openings; this could cause fire or electrical shock. 14. Never open the equipment. For safety reason, qualified service personnel should only open the equipment. 15. If one of the following situations arises, get the equipment checked by service personnel. The Power Cord or plug is damaged. Liquid has penetrated into the equipment. The equipment has been exposed to moisture. The equipment has not worked well or you can not get it work according to User’s Manual. The equipment has dropped and damaged. If the equipment has obvious signs or breakage. www.acnodes.com 3 RM 6210 User manual Index of Contents Packing List ............................................................................................................... 2 Safety Instructions ..................................................................................................... 3 Index of Contents ...................................................................................................... 4 1. General Information ............................................................................................ 5 1.1 Overview .................................................................................................. 5 1.2 Product Specification ............................................................................... 6 2. Rack Mount Installation ...................................................................................... 7 3. OSD Menu .......................................................................................................... 8 3.1 OSD Menu Membrane Switch ................................................................ 8 3.2 On Screen Display Menu ......................................................................... 9 3.2.1 Image ........................................................................................ 9 3.2.2 Geometry ................................................................................... 9 3.2.3 Function ................................................................................... 10 3.2.4 System ..................................................................................... 10 4. Connecttion Diagram ........................................................................................ 11 4.1 Video Connection Diagram .................................................................... 11 4.2 Touch Screen Connection Diagram....................................................... 12 5. Touch Screen Specification .............................................................................. 12 6. DC Input power Supply (option)........................................................................ 13 7. Trouble shooting ............................................................................................. 14 www.acnodes.com 4 RM 6210 User manual 1. 1.1 General Information Overview The RM6210 is a 9U rack mount LCD monitor with 20.1” 1600X 1200 TFT LCD monitor and rugged metal black color front bezel. This monitor comes with a standard 15-pin VGA video input and front access OSD membrane switch. Optional Video-input for S-video / BNC / RCA connector and USB or PS/2 type resistive-type touch. RM 6210 comes with an external 110/220VAC power adapter, 12/24/48 VDC power input is available for customer’s application. 1. 20” 1600X1200 TFT LCD monitor 2. Membrane OSD Menu switch 3. External 110/220VAC power adapter with bracket www.acnodes.com 5 RM 6210 User manual 1.2 Product Specification Model name RM 6210 Dimension 480 x 67 x 400.5mm/18.9 x 2.6" x 15.75inches Net Weight Display Size Panel Type Resolution Capabilities Viewing Angle (CR>10) 12 Kg / 26.5 lbs 19 inches Active Matrix TFT LCD Maximum Resolution up to 1600 x 1200 Contrast Ratio Brightness Tr Response Time (ms) Supported Colors Display Area (mm) VGA Signal Input Sync. Type Resolution 800:1 White 300 cd/m² (Center 1 point Typ) 1 ms Cables Plug & Play DDC Power Source Power Consumption Temperature Humidity Shock Vibration Chassis Construction Certification www.acnodes.com Right-Left view 160°(Typ) Up-Down View 160°(Typ) 16.7M Colors (6-bit with FRC) 406 x 306 Analog RGB, 0.7Vp-p Separate H/V, Composite, SOG 640 x 350, 70 Hz 720 x 400, 70 Hz 640 x 480, 60/ 72/ 75 Hz 800 x 600, 60/ 70/ 72/ 75 Hz 1024 x 768, 60/ 70/ 72/ 75 Hz 1152 x 864, 60/ 70/ 75 Hz 1280 x 1024, 60/ 70/ 75 Hz 1600 x 1200, 60 Hz 1 x 6’ D-sub VGA male to male Cable EDID 1.3 Auto-sensing 100 to 240VAC, 50 / 60Hz Max. 40 Watt, Standby 5 Watt Operate 0 ~ 50°C / 32 ~ 122°F Storage -20 ~ 60°C / -4 ~ 140°F 10% ~ 90% RH 10G acceleration (11ms duration) 5~500Hz 1G RMS random vibration Heavy duty steel materials CE / FCC, ROHs Compliance 6 RM 6210 User manual 2. Rack mount Installation 1. Find the property position and size to screw rack mount front bezel onto the server rack mount first. 2. Lift & push the rack mount monitor into the rack cabinet, and screw between bracket and rack mount monitor with screws. www.acnodes.com 7 RM 6210 User manual 3. OSD Menu 3.1 OSD Menu Membrane Switch www.acnodes.com 8 RM 6210 User manual 3.2 On screen Display menu 3.2.1 Image Brightness: Adjust background black level of the screen image Contrast: Adjust the difference between the image background (black level) and the foreground (white level) Sharpness: Adjust the image from weak to sharp Saturation: Adjust the saturation of the image color Hue: Adjust the screen hue value 3.2.2 Geometry Auto Configuration: Adjust automatically sizes, centers, and fine tunes the video signal to eliminate waviness and distortion .An “ Adjusting” message is displayed during the process. H. Position: Align the screen image left or right V. Position: Align the screen image up or down Clock : Adjust the clock value Phase: Adjust the phase value www.acnodes.com 9 RM 6210 User manual 3.2.3 Function OSD Position: Adjust OSD menu horizontal and vertical position OSD Zoom: Adjust the difference between the image background (black level) and the foreground (white level). Color Temp: Select the screen color - 5500K, 6500K & 9500K. The factory default is 6500 K. 3.2.4 System Language: Select the language in which the OSD menu is displayed English, Chinese (中文), Japanese (日本語), German, French, Spanish, Italian. Time: Function is not supported Power OFF: Function is not supported Reset: Recall returns the adjustments back to factory settings. www.acnodes.com 10 RM 6210 User manual 4. Connecton Diagram The RM6210 comes with a standard 15-pin VGA video input and external 110/220VAC power adapter. Optional Video-input for S-video / BNC / RCA connector and USB or PS/2 type resistive-type touch. 4.1 Video-input Connection Diagram 15-pin D-sub VGA 15-pin D-sub VGA and DVI-D 15-pin D-sub VGA, S-video and RCA 15-pin D-sub VGA, S-video and BNC 4.2 Touch Screen Connection Diagram www.acnodes.com 11 RM 6210 User manual 15-pin D-sub VGA and USB-type touch screen 15-pin D-sub VGA and Serial-type touch screen 5. Touch Screen Specification Touch screen type Resistive-type Interface USB or PS/2 Optical 82%±5% transmittance Surface hardness ≥3H (JIS K5400) Operating system Windows 98 / 2000 / ME / XP / NT / CE, DOS, Linux Remarks ■ USB touch screen package includes an extra 6ft USB cable, quick reference guideline and CD disc ■ Serial touch screen package includes an extra 6ft serial cable, quick reference guideline and CD disc ■ For detailed information, please refer to the attached CD disc ■ As the touch screen unit is not made of toughened glass, please handle it carefully. www.acnodes.com 12 RM 6210 User manual 6. DC Input Power Supply (Option) www.acnodes.com 13 RM 6210 User manual 7. Trouble shooting 1. How do I adjust the resolution? To change monitor resolution, click Start -> Control Panel -> Display. Select Setting tab to adjust the monitor resolution in Desktop Area. The available resolutions, "640 x 480", "800 x 600", "1024 x 768", "1152 x 864", "1280 x 1024", are deter- mined by the display card in your computer. 2. Is interference signal appeared on LCD normal when shutting down the computer ? In rare cases, interference may appear on the monitor. This may be caused by signal rate of VGA card and is considered normal. The image quality can be improved by adjusting the phase or pixel rate automatically or manually. 3. The membrane button power light is not ON Press the power On / Off on LCD membrane button to check if the monitor is in the ON mode. Check the power cord is properly connected to the LCD keyboard drawer and power outlet. 4. Screen image is not centered or sized properly Press the button for two seconds to automatically adjust the image. Adjust the H-position and V-position settings via On-screen menu. www.acnodes.com 14