1
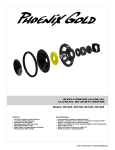
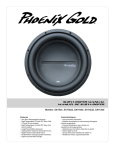
Coaxial loudSpeaker Manual
Manuel de Coaxial
Models: Ti5CX, Ti6CX, Ti65CX, Ti57CX, Ti69CX
Features
• Performance Design - Developed and CAE/CAD optimized by Phoenix Gold from the ground up to set new standards in performance
• Injection Molded Aluminum Plated Polypropylene Cone - Injection molded to be very light and rigid for excellent signal tracking
• Butyl Rubber Surround - Advanced butyl rubber surround is more rugged than foam, resists moisture and UV, and is extremely well damped
• Flat Linear Roll Spider (on select models) - Reduces distortion and provides maximum voice coil centering
• Interwoven Tinsel Leads - Tinsel leads woven directly into the spider provide added strength and reliability
• Rigid Powder Coated Steel Frame - Designed for precise motor alignment
• Optimized Magnet/Motor Structure - For high efficiency and clarity of sound reproduction
© 2010 Phoenix Gold • www.phoenixgold.com
Coaxial Speaker Owner’s Manual
BASIC INSTALLATION Selecting the placement of your new Ti Coaxial
speakers could be as easy as using the existing factory locations or may
require you to create a new location. Speaker placement in the door, dash,
or rear deck is the most common. See your local Phoenix Gold Dealer for
additional location and mounting assistance.
SPEAKER INSTALLATION WITHOUT GRILL
DOORS /REAR DECK
1. Many vehicles already have factory locations (Figure 1) to house the “DROP
IN” feature of the Ti Coaxial speakers. If no existing locations are available
or are not used, check the desired location for adequate cutout area and
any depth obstructions. Make sure to allow sufficient clearance for window
tracks, structural braces, trunk lid springs, etc.
2. Assuming enough area and depth is available, use the provided template
and trace the speaker cutout and mounting holes onto the surface of the
mounting location.
3. If the mounting surface is not structurally strong enough to accommodate
screws, (i.e. plastic, cardboard) use the pro vided speed clips which will act
as a nut for the supplied screws.
4. Always provide water protection, if not supplied in the vehicle. We suggest
using a rain shield or equivalent. If in doubt, please contact your
Phoenix Gold Dealer.
Phoenix Gold has provided a foam mounting gasket. When installing your
new component speakers in a factory location make sure to use the foam
mounting gasket as shown in figure 1. For reverse mounted speakers place the
foam gasket in front of the speaker. This will ensure an air tight seal for your Ti
speakers.
For more custom applications, or cases where the factory grill will not be used,
a high excursion protective grill has been provided. When installing your new
component speakers with the provided Ti grill use figure 2. Make sure to use
the rubber gasket to get an air tight seal.
Figure 1
Mounting the speaker in a factory location.
Figure 2
Mounting the speaker in a custom application.
SPECIFICATIONS: Due to continual product improvement, all specifications subject to change without notice.
T/S Parameters
Ti5CX
Ti57CX
Ti6CX
Ti65CX
Ti69CX
RMS Power Handling (watts)
60W
75W
75W
75W
90W
Peak Power Handling (watts)
120W
150W
150W
150W
180W
4
4
4
4
4
Cut Out Dimension (mm) / in.
(118) 4.5
(129 x 183) 7.2 x 5
(131) 4.9
(145) 5.6
(154 x 222) 8.6 x 6.1
Mounting Depth (mm) / in.
(61) 2.4
(65) 2.6
(65) 2.55
(73) 2.9
(83) 3.3
Impedance (ohms)
© 2010 Phoenix Gold • www.phoenixgold.com Coaxial Speaker Owner’s Manual
Pour Les Modele: Ti5CX, Ti6CX, Ti65CX, Ti57CX, Ti69CX
INSTALLATION DE BASE
La sélection de l’emplacement de vos nouveaux haut-parleurs coaxiaux Ti
peut être aussi facile que l’utilisation des emplacements de fabrication
ou peut nécessiter la création d’un nouvel emplacement. L’emplacement le
plus courant est dans les portes, le tableau de bord ou à l’arrière du pont.
Consultez votre concessionnaire Phoenix Gold pour un emplacement de
montage supplémentaire et de l’assistance.
INSTALLATION DES HAUT-PARLEURS PORTES / PLAGE
ARRIÈRE
1.De nombreux véhicules ont déjà des emplacements d’usine (Figure 1)
pour la fonctionnalité “DROP IN” de la ligne coaxial Ti. Si aucun des
emplacements existants n’est disponible ou s’ils ne sont pas utilisés,
vérifier l’emplacement désiré pour la découpe adéquate et des obstacles en
profondeur. Assurez-vous de laisser suffisamment de dégagement pour les
pistes de la fenêtre, les ferrures structurales, l’amortisseur arrière, etc
2.En supposant qu’il y a suffisamment de surface et de profondeur, utiliser
le modèle fourni et retracer la découpe du haut-parleur et les trous de
montage sur la surface de l’emplacement de montage
3.Si la surface de montage n’a pas une structure suffisamment solide pour
accueillir les vis, (par ex. plastique, carton) utiliser les clips rapides fournis
qui serviront d’écrous pour les vis fournies
4.Toujours assurer la protection pour l’eau, si elle n’est pas fournie dans
le véhicule. Nous vous suggérons d’utiliser une housse de pluie ou
l’équivalent. En cas de doute, veuillez contacter votre revendeur Phoenix
Gold.
Figure 1
INSTALLATION DU HAUT PARLEUR SANS GRILLES
Phoenix Gold a fourni un joint statique de montage en mousse. Lors de
l’installation de vos nouveaux haut-parleurs coaxiaux dans une usine,
assurez-vous d’utiliser les joints statiques de montage en mousse comme le
montre la figure 1. Pour les haut-parleurs montés à l’envers, placez le joint en
mousse en face du haut-parleur. Ceci assurera un joint étanche à l’air pour
vos haut-parleurs Ti.
INSTALLATION DU HAUT PARLEUR AVEC GRILLES
Pour plus d’applications sur mesure, ou des cas où la grille d’usine n’est pas
utilisée, une grille de protection de haute déviation a été fournie. Assurezvous d’utiliser le joint en caoutchouc afin d’obtenir un joint étanche à l’air.
Lors de l’installation de vos nouveaux haut-parleurs coaxiaux avec la grille Ti
fournie, utilisez la figure 2.
NB :Les spécifications sont sujettes à changer sans préavis en raison de
l’amélioration continuelle du produit.
Figure 2
© 2010 Phoenix Gold • www.phoenixgold.com Phoenix Gold
A Division of AAMP of America™
13190 56th Court
Clearwater, Florida 33760
P: 888-228-5560
[email protected]
www.phoenixgold.com
© 2010 AAMP of Florida, Inc
Designed and Engineered in the USA
LIMITED WARRANTY
Phoenix Gold warrants this product to be free of defects in materials and workmanship for a period of one (1) year from the original date of purchase. This warranty is
not transferable and applies only to the original purchaser from an authorized Phoenix Gold dealer in the United States of America only. Should service be necessary
under this warranty for any reason due to manufacturing defect or malfunction, Phoenix Gold will (at its discretion), repair or replace the defective product with new
or remanufactured product at no charge. Damage caused by the following is not covered under warranty: accident, misuse, abuse, product modification or neglect,
failure to follow installation instructions, unauthorized repair attempts, misrepresentations by the seller. This warranty does not cover incidental or consequential
damages and does not cover the cost of removing or reinstalling the unit(s). Cosmetic damage due to accident or normal wear and tear is not covered under warranty.
INTERNATIONAL WARRANTIES:
Products purchased outside the United States of America are covered only by that country’s Authorized Phoenix Gold reseller and not by Phoenix Gold. Consumers
needing service or warranty information for these products must contact that country’s reseller for information.