1
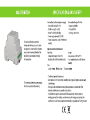
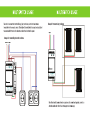
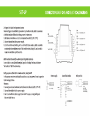
ISTABAI
MULTISWITCH
SETUP GUIDE
MULTISWITCH
This device offers the control of 6
independent devices, electrical chains
or equipment. It has two built- in power
relays and four controlled outlets. The
multiswitch communicates through
the base station.
The device is sold without power supply,
but it can be purchased separately.
CONNECTION LOCATIONS AND ELECTRICAL DIAGRAMS
P4
Vout = Vs - 0.3 [V] (Imax = 14)
P3
Vout = Vs - 0.3 [V] (Imax = 14)
P2
Vout = Vs - 0.3 [V] (Imax = 14)
P1
Vout = Vs - 0.3 [V] (Imax = 14)
Power supply Controlled outlets Relay outlets
Vs T
(a+ | -
(a1 - |
- 51-52
max = 1 [A]
— Vadiba
GND Vs = 12 - 24 [V] |
|] GND |
MULTISWITCH USAGE
The device is meant for electrical floor, light, ventilator, valve circuit and other
household device remote control. The body of the multiswitch is meant to be attached
to a standard DIN track in the fuse box or electrical distribution panel.
Example for controlling electrical sockets
+12-24V DC 230V AC
+ - LN
PI P2 P3 P4
- + - + - + - + -
200000000
MULTISWITCH USAGE
Example for controlling radiators
+24V DC
+ -
2009000
+ [sil sa]
PI P2 P3 P4
- + - + - 4
200009000
dep Il
NS AAA à
The situations in the mentioned examples can be combined together, as well as
added to with other electrical devices you wish to manage.
SET-UP
Setting up the Istabai heating control system.
Before setting up the multiswitch, you must set up the base station, which can be done
at istabai.com/start. When that’s done, proceed to these steps:
1. Add the desired devices or electrical currents to the outlets (S1, S2, P1-P4).
2. Connect the multiswitch to a power supply.
3. At the front of the multiswitch, you'll see its identification number, which can also be
seen in registration window at each of the device's outlets. Using this, indicate which
room is connected to any of the outlets.
Additional installments (to an already existing Istabai system)
In your Istabai account (istabai.com/app), open the “settings” section, and choose
“add a device”. Fulfill the above steps.
Setting up the multiswitch for remote control, using the API
In this case you must have the Istabai base station set up, but you won't need to open the
Istabai web application.
Necessary:
1. Connect your desired devices or electrical currents to the outlets (S1, S2, P1-P4)
2. Connect the mulstiswitch to a power supply
3. Get in touch with the Istabai support team for API access, receiving the key, and
documentation for use.
SPECIFICATIONS AND SAFETY
Connection location and power supply Communication specification
- 4 controlled outlets (P1-P4) - Frequency: 868 MHz
- 2 built-in relays (S1 un S2) - Protocol: IST-RF
- Socket for effective shielding - Coverage: indoor 30m
- Power supply options (DC 12-24V)
- Power consumption: up to 0.9 W (without
outlets)
Impact of external environment
Operating Storage
- Temperature range: 0° C to 40° C - Temperatures: -30° C to 70° C
- Humidity: 5% to 95% relative humidity - Max. humidity: less than 95% relative
, humidity
Size
- Length: 90 mm - Width: 53 mm - Thickness: 65 mm
- The device is meant for indoor use.
- Keep the device dry. Precipitation, humidity, and all types of liquids or moisture may
cause damage.
- Do not place the device in hot areas. High temperatures can shorten the life of
electronic devices and warp or melt certain plastics.
- Itis forbidden to open the outside shell of the base station. This may result in
harming your health and safety, and the warranty will no longer be standing. The
shell does not contain any components that would be replaceable or fixed by the user.
CE X
ISTABAI.COM/SUPPORT