1
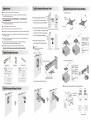
To Install The Projector On The Projector Wall Mount
@ Connect the power cable and other cables to the
projector.
Connect the
> power cable
and other cables
to the projector.
To Adjust The Vertical Tilt
Adjustment
direction
Adjustment buttons
To Adjust The Horizontal Roll
Adjustment buttons Adjustment direction
To Adjust The Horizontal Rotation
О)
Adjustment buttons
Adjustment direction
To Adjust The Forward/Backward Slide
Adjustment direction
To Put On The Decorative Cover
Product Information:
Net weight: 3.3kg | Rated capacity: 15kg
Adjustable angle: Longitudinal inclination. Level angle. Yaw angle + 5* (3 directions)
Adjustable range: From the installation plate center horizontal distance 360mm — 665mm
SN
M U L TI B R A C K ET S
M Projector Mount Short Throw
Deluxe 300-700
@ Be sure to read this manual thoroughly and to do the installation work safely.
Keep this manual available for future reference.
@ Sufficient expertise is required for installing this projector wall mount.
@ Do not use the projector wall mount for purposes other than for which it is
designed.
Important Safety
& Be sure to read this manual thoroughly to do the installation work.
9) Only qualified service personnel (two or more) should carry out installation or dismounting of the
projector from the projector wall mount.
А Use with products heavier than the maximum weights(Weight Capacity : <15kg) indicated may resultin
instability causing possible ijury.
€ Forsafety reasons, check the strength of the wall before installation. If the wall is not strong enough,
reinforce it sufficiently before installation.
Do not make alterations to the projector wall mount.
Do not install the projector wall mount on a wall subject to vibration or impact.
To avoid fire, do not install the projector with the projector wall mount in a humid or excessively dusty place.
06°
Use the supplied accessories only. Use of accessories other than those supplied may result in damage to
the projector wall mount.
When dismounting the projector from the projector wall mount, be sure to unplug the AC power cord and
other connecting cables beforehand.
2
€) Do not hit or hang any heavy objects on the projector wall mount. If the projector wall mount is
damaged, stop use and contact a qualified service person immediately.
{0 Please install this apparatus only on the horizontal surface instead of the slanting one.
* Manufacturer is not liable for any damages or injury caused by mishandling or improper installation.
Checking The Supplied Accessories
Setting plate (1)
Wall plate (1) Extend arms (4)
Napa gration [warty Noam gration [auant
A | 0” |screw (M6X55)| 5 © | Q9” |screw(M5X25)| 4
B| mus | {0mm Anchorbolt| 5 HI © MS nuts 4
G Allen key 1 | © spacer(8.0) 4
D| ©» Screw (M3X10)| 4 J es” |MeConnectingscrews 4
E ©? |Screw(M4X10)| 4 K DP | Screw (M5X10)| 4
F| ÓP |Screw(M5X12)| 4
To Set The Projector Wall Mount On The Wall
>55mm
ee
, , 210~11mm__| B
® Concrete wall mounting thickness must be Y Ll
aminimum 100mm. Anchor bolt and serew 4 |
(M6 x 55) are needed to be used for installation. | Ши;
® Dry-wall mounting thickness must be a minimum
Concrete wall mounting Use anchor bolt
70mm. Only serew(M6 x 55) is needed to be used
for installation. If the wall is not strong enough, >on
reinforce it sufficiently before installation. 5
e Please contact manufacturer if you have + |
|
Not use anchor bolt
any questions about mounting surface issue.
A CAUTION:
' Make sure both mounting holes are on
center line ofthe stud.
Dry-wall mounting
Wooden Stud Center Line |
Loose the screws and remove
the projector mounting plate
Extra screws and anchor bolt are backup!
To Install The Projector On The Projector Wall Mount
a.Use the extend arms:
Projector
mounting plate
Extend arms
b. Do not use the extend arms :
D, Es F
or
Connecting
screws J
Screw from
Parts List
Do Notuse
Connecting
screws
D(M3X 10)
/E(M4X 10)
/F(M5x12)
Use
Connecting
screws J
E(M4X 10)
Adjust the leftward/
-rightward slide
Connecting) Screw from
screws J Parts List
e Notuse D(M3X 10)
onnecting
screws /E(M4X 10)
Use
Connecting| E(M4X10)
screws J
Adjustment direction