1
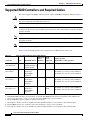
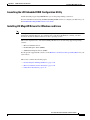
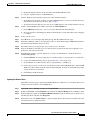
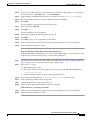
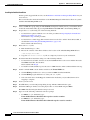
A P P E N D I X
C
RAID Controller Considerations
This appendix contains the following sections:
•
Supported RAID Controllers and Required Cables, page C-2
•
Mixing Drive Types in RAID Groups, page C-3
•
SuperCap Power Modules (RAID Backup Units), page C-3
•
Embedded MegaRAID Controller, page C-5
•
RAID Controller Cabling, page C-17
•
Restoring RAID Configuration After Replacing a RAID Controller, page C-21
•
For More Information, page C-21
Cisco UCS C24 Server Installation and Service Guide
OL-26647-01
C-1
Appendix C
RAID Controller Considerations
Supported RAID Controllers and Required Cables
Supported RAID Controllers and Required Cables
This server supports the RAID controller options, cables, and RAID backup units shown in Table C-1.
Caution
Do not use the embedded MegaRAID controller and a hardware RAID controller card at the same time.
This is not supported and could result in data loss.
Note
This server supports up to two internal PCIe-style RAID controllers, plus one external PCIe-style RAID
controller. Do not mix internal controller types in the server. You can mix internal controllers with an
external controller.
Note
The embedded RAID option is available only with the SFF 16-drive backplane. It does not operate
through an expander.
Note
The cables in this section apply to both single- and dual-CPU configurations.
Table C-1 lists the RAID options for the small form factor (SFF) versions of the server.
Table C-1
Cisco UCS C24 Small Form Factor RAID Options
Maximum Drives
SuperCap RAID
Power
Levels
Module? Supported
Required Cables
(Each PID is a cable-pair kit.)
Controller
Style
Embedded RAID1
on motherboard2
Onboard SFF 16HDD:
No
4 SATA (default) or
8 SAS3 internal
0, 1, 54, 10
SFF 16HDD: UCSC-CABLE-A7
LSI MegaRAID
SAS 9220-8i
PCIe
SFF 24HDD:
16 internal5
SFF 16HDD:
8 internal6
No
0, 1, 10
SFF 24HDD: UCSC-CABLE-A6
SFF 16HDD, 1st-controller: UCSC-CABLE-A7
SFF 16HDD, 2nd-controller: UCSC-CABLE-A8
LSI MegaRAID
SAS 9240-8i
PCIe
SFF 24HDD:
16 internal7
SFF 16HDD:
8 internal
No
0, 1, 5, 10,
50
SFF 24HDD: UCSC-CABLE-A6
SFF 16HDD, 1st-controller: UCSC-CABLE-A7
SFF 16HDD, 2nd-controller: UCSC-CABLE-A8
LSI MegaRAID
SAS 9265CV-8i
PCIe
SFF 24HDD:
24 internal
SFF 16HDD:
8 internal
Yes
0, 1, 5, 6, 10, SFF 24HDD: UCSC-CABLE-A6
SFF 16HDD, 1st-controller: UCSC-CABLE-A7
50, 60
SFF 16HDD, 2nd-controller: UCSC-CABLE-A8
1. The embedded RAID controller must be enabled in the BIOS.
2. Embedded RAID SAS drive control requires an optional SCU ROM upgrade chip to be installed on the motherboard.
3. Support for eight SAS drives requires an optional SCU upgrade ROM module on the motherboard.
4.
5.
6.
7.
Integrated RAID 5 support requires an optional software key.
The 9220-8i controller can create a RAID array with maximum 16 drives, even if it detects more than 16 drives.
In the 16HDD version, two controller cards can be installed to control a total of 16 drives.
The 9240-8i controller can create a RAID array with maximum 16 drives, even if it detects more than 16 drives.
Cisco UCS C24 Server Installation and Service Guide
C-2
OL-26647-01
Appendix C
RAID Controller Considerations
Mixing Drive Types in RAID Groups
Table C-2 lists the RAID options for the large form factor (LFF) version of the server.
Table C-2
Cisco UCS C24 Large Form Factor RAID Options
SuperCap
Power
Module
RAID Levels
Supported
Required Cables
(Each PID is a cable-pair kit.)
Controller
Style
Maximum
Drives
LSI MegaRAID SAS
9220-8i
PCIe
12 internal
No
0, 1, 10
12 drives: 2 mini-SAS
UCSC-CABLE-A11
LSI MegaRAID SAS
9240-8i
PCIe
12 internal
No
0, 1, 5, 10, 50
12 drives: 2 mini-SAS
UCSC-CABLE-A11
LSI MegaRAID SAS
9265CV-8i
PCIe
12 internal
SCPM
0, 1, 5, 6, 10, 50, 60
12 drives: 2 mini-SAS
UCSC-CABLE-A11
Mixing Drive Types in RAID Groups
Table C-3 lists the technical capabilities for mixing hard disk drive (HDD) and solid state drive (SSD) types
in a RAID group. However, see the best practices recommendations that follow for the best performance.
Table C-3
Drive Type Mixing in RAID Groups
Mix of Drive Types
in RAID Group
Allowed?
SAS HDD + SATA HDD
Yes
SAS SSD + SATA SSD
Yes
HDD + SSD
No
Best Practices For Mixing Drive Types in RAID Groups
For the best performance, follow these guidelines:
•
Use either all SAS or all SATA drives in a RAID group.
•
Use the same capacity for each drive in the RAID group.
•
Never mix HDDs and SSDs in the same RAID group.
SuperCap Power Modules (RAID Backup Units)
This server supports installation of up to two SuperCap power modules (SCPMs). The SCPMs mount inside
a cage that is next to the cooling fans (see Figure C-2).
The SCPM is supported only when using the LSI MegaRAID-CV controller card. This supercap module
provides approximately 3 years of backup for the disk write-back cache DRAM in the case of sudden power
loss by offloading the cache to the NAND flash.
For SCPM replacement instructions, see Replacing a SuperCap Power Module (RAID Backup Unit),
page 3-41.
Cisco UCS C24 Server Installation and Service Guide
OL-26647-01
C-3
Appendix C
RAID Controller Considerations
RAID Controller Migration
RAID Controller Migration
This server supports hardware RAID (PCIe controller cards) and embedded software RAID. See
Table C-4 for which migrations are allowed and a summary of migration steps.
Table C-4
RAID Controller Migration
Starting RAID Controller
Migrate to HW RAID Allowed?
Migrate to SW RAID Allowed?
None (no drives)
Allowed
Allowed
Onboard SCU Storage
support is Disabled in BIOS
1.
Install card.
2.
Install cables.
Install desired upgrade
modules to motherboard.
2.
Enable SCU storage support
in BIOS.
3.
Install cables.
Not applicable
Embedded SW RAID
Onboard SCU Storage
support is Enabled in BIOS
1.
Caution
Data migration from
SW RAID to HW RAID
is not supported and
could result in data loss.
Allowed only before there is data
on the drives; data migration is not
supported.
HW RAID
1.
Disable SCU storage support
in BIOS.
2.
Install card.
3.
Install cables.
Not applicable
Not allowed
Onboard SCU Storage
support is Disabled in BIOS
Cisco UCS C24 Server Installation and Service Guide
C-4
OL-26647-01
Appendix C
RAID Controller Considerations
Embedded MegaRAID Controller
Embedded MegaRAID Controller
Note
VMware ESX/ESXi or any other virtualized environments are not supported for use with the embedded
MegaRAID controller. Hypervisors such as Hyper-V, Xen, or KVM are also not supported for use with
the embedded MegaRAID controller.
Note
The embedded RAID option is available only with the SFF 16-drive backplane. It does not operate
through an expander.
This server includes an embedded RAID controller with two mini-SAS connectors on the motherboard
(see Figure C-1).
•
The default setting for this embedded controller is RAID 0, 1, and 10 support for up to four SATA
drives.
•
You can upgrade this support to SAS RAID 0, 1, and 10 support for up to eight SAS drives by
installing a Storage Controller Unit (SCU) upgrade ROM chip on the motherboard. See Installing a
SCU Upgrade ROM Module For Embedded RAID SAS Support, page C-7.
•
You can upgrade this support by adding SAS RAID 5 support with an optional software key. See
Installing a Software RAID Key Module for Embedded RAID 5 Support, page C-8.
Note
You cannot downgrade from using a RAID controller card to using the embedded controller (see RAID
Controller Migration, page C-4). Instructions for installing upgrade modules and enabling the embedded
controller in the BIOS are included here for those upgrading a server with no RAID controller or drives.
Caution
Data migration from SW RAID (embedded RAID) to HW RAID (a controller card) is not supported and
could result in data loss. Migrations from SW RAID to HW RAID are supported only before there is data
on the drives, or the case in which there are no drives in the server (see RAID Controller Migration,
page C-4).
•
You can migrate from using the embedded controller to using a RAID card only before there is data
on the drives. In this case, you must disable the embedded controller. See Disabling the Integrated
RAID Controller in the BIOS, page C-8.
•
The required drivers for this controller are already installed and ready to use with the LSI SWRAID
Configuration Utility. However, if you will use this controller with Windows or Linux, you must
download and install additional drivers for those operating systems. See Installing LSI MegaSR
Drivers For Windows and Linux, page C-9.
This section contains the following topics:
•
Notes on Supported Embedded MegaRAID Levels, page C-6
•
Installing a SCU Upgrade ROM Module For Embedded RAID SAS Support, page C-7
•
Installing a Software RAID Key Module for Embedded RAID 5 Support, page C-8
•
Enabling the Integrated RAID Controller in the BIOS, page C-8
•
Disabling the Integrated RAID Controller in the BIOS, page C-8
•
Launching the LSI Embedded RAID Configuration Utility, page C-9
Cisco UCS C24 Server Installation and Service Guide
OL-26647-01
C-5
Appendix C
RAID Controller Considerations
Embedded MegaRAID Controller
•
Installing LSI MegaSR Drivers For Windows and Linux, page C-9
Notes on Supported Embedded MegaRAID Levels
The following RAID levels are supported by the embedded MegaRAID controller.
•
RAID 0—You can configure a RAID 0 virtual drive (VD) using one or more physical drives (PDs).
This level supports up to eight VDs and PDs.
•
RAID 1—A RAID 1 VD is configured from only two PDs. This level supports up to eight PDs (four
RAID arrays) and eight VDs.
•
RAID 5—You can configure a RAID 5 VD using three or more PDs. This level supports up to eight
PDs and eight VDs.
•
RAID 10—This is a spanned VD; that is, RAID 0 is implemented on two or more RAID 1 VDs. This
level supports up to eight PDs (two to four RAID 1 volumes spanned) and one VD.
Note
None of these RAID levels require drives of the same size. The smallest drive in the array determines
the size of the VD.
Note
An array can be divided into multiple VDs of the same RAID level, except when using RAID 10. Mixed
arrays are not permitted. For example, you cannot configure a three-drive array into RAID 0 and RAID 5
VDs. Unlike RAID 0, 1, and 5, you cannot create multiple RAID 10 VDs from the same array. A single
RAID 10 VD uses up the entire array.
Cisco UCS C24 Server Installation and Service Guide
C-6
OL-26647-01
Appendix C
RAID Controller Considerations
Embedded MegaRAID Controller
Installing a SCU Upgrade ROM Module For Embedded RAID SAS Support
The SCU Upgrade ROM module contains a chip on a small circuit board. This module attaches to a
motherboard header (see Figure C-1). This chip adds SAS support for up to eight drives.
To install a SCU upgrade ROM jumper, follow these steps:
Step 1
Locate the SCU_ROM header (see Figure C-1).
Step 2
Align the connector on the SCU upgrade ROM module with the pins on the header, then gently push the
connector onto the pins.
Step 3
Replace the top cover.
Step 4
Replace the server in the rack, replace cables, and then power on the server by pressing the Power button.
Step 5
Continue with either Installing a Software RAID Key Module for Embedded RAID 5 Support, page C-8
or Enabling the Integrated RAID Controller in the BIOS, page C-8.
Figure C-1
SCU Upgrade ROM and RAID 5 Key Header Locations on the Motherboard
SYS FAN1
PCIe riser 1
SYS FAN2
CPU 1
Port 1
SYS FAN3
PCIe riser 2
CPU 2
Port 0
SYS FAN4
PSU 2 (top)
285261
PSU 1 (bottom)
2
1
1
SCU upgrade ROM header (SCU_ROM)
2
RAID 5 software key header (RAID_KEY)
Cisco UCS C24 Server Installation and Service Guide
OL-26647-01
C-7
Appendix C
RAID Controller Considerations
Embedded MegaRAID Controller
Installing a Software RAID Key Module for Embedded RAID 5 Support
The software RAID key module contains a chip on a small circuit board. This module attaches to a
motherboard header. This chip upgrades SAS support to add RAID 5 support (RAID 0, 1, 5, and 10 for
up to eight drives). See Figure C-1.
Note
You must have the RAID SCU upgrade ROM installed and before you can use the RAID 5 key.
To install a RAID 5 software key module, follow these steps:
Step 1
Locate the RAID_KEY header (see Figure C-1).
Step 2
Align the connector on the RAID key module with the pins on the header, then gently push the connector
onto the pins.
Step 3
Replace the top cover.
Step 4
Replace the server in the rack, replace cables, and then power on the server by pressing the Power button.
Enabling the Integrated RAID Controller in the BIOS
This controller must be enabled in the server BIOS to use it.
Step 1
Boot the server and press F2 when prompted to enter the BIOS Setup utility.
Step 2
Select the Advanced tab, then South Bridge.
Step 3
Set Onboard SATA Controller to Enabled.
Step 4
Select the SATA Mode.
Step 5
Press F10 to save your changes and exit the utility.
Disabling the Integrated RAID Controller in the BIOS
If you change from using this integrated controller to a RAID controller card, you must disable the
integrated controller in the server BIOS.
Step 1
Boot the server and press F2 when prompted to enter the BIOS Setup utility.
Step 2
Select the Advanced tab, then South Bridge.
Step 3
Set Onboard SATA Controller to Disabled.
Step 4
Press F10 to save your changes and exit the utility.
Cisco UCS C24 Server Installation and Service Guide
C-8
OL-26647-01
Appendix C
RAID Controller Considerations
Embedded MegaRAID Controller
Launching the LSI Embedded RAID Configuration Utility
Launch the utility by pressing Ctrl+M when you see the prompt during system boot.
For more information about using the Embedded MegaRAID software to configure your disk arrays, see
the LSI Embedded MegaRAID Software User Guide.
Installing LSI MegaSR Drivers For Windows and Linux
Note
The required drivers for this controller are already installed and ready to use with the LSI SWRAID
Configuration Utility. However, if you will use this controller with Windows or Linux, you must
download and install additional drivers for those operating systems.
This section explains how to install the LSI MegaSR drivers for the following supported operating
systems:
•
Microsoft Windows Server
•
Red Hat Enterprise Linux (RHEL)
•
SuSE Linux Enterprise Server (SLES)
For the specific supported OS versions, see the Hardware and Software Interoperability Matrix for your
server release.
This section contains the following topics:
•
Downloading the LSI MegaSR Drivers, page C-10
•
Microsoft Windows Driver Installation, page C-10
•
Linux Driver Installation, page C-12
Cisco UCS C24 Server Installation and Service Guide
OL-26647-01
C-9
Appendix C
RAID Controller Considerations
Embedded MegaRAID Controller
Downloading the LSI MegaSR Drivers
The MegaSR drivers are included in the C-series driver ISO for your server and OS. Download the
drivers from Cisco.com:
Step 1
Find the drivers ISO file download for your server online and download it to a temporary location on
your workstation:
a.
See the following URL: http://www.cisco.com/cisco/software/navigator.html
b.
Click Unified Computing and Servers in the middle column.
c.
Click Cisco UCS C-Series Rack-Mount Standalone Server Software in the right-hand column.
d.
Click your model of server in the right-hand column.
e.
Click Unified Computing System (UCS) Drivers.
f.
Click the release number that you are downloading.
g.
Click Download to download the drivers ISO file.
h.
Verify the information on the next page, then click Proceed With Download.
i.
Continue through the subsequent screens to accept the license agreement and then browse to a
location where you want to save the drivers ISO file.
Microsoft Windows Driver Installation
This section explains the steps to install the LSI MegaSR driver in a Windows installation.
For the specific supported OS versions, see the Hardware and Software Interoperability Matrix for your
server release.
This section contains the following topics:
•
Windows Server 2008R2 Driver Installation, page C-10
•
Updating the Windows Driver, page C-11
•
Linux Driver Installation, page C-12
Windows Server 2008R2 Driver Installation
Perform the following steps to install the LSI MegaSR device driver in a new Windows Server 2008R2
operating system. The Windows operating system automatically adds the driver to the registry and copies
the driver to the appropriate directory.
Step 1
Create a RAID drive group using the LSI SWRAID Configuration utility before you install this driver
for Windows. Launch this utility by pressing Ctrl+M when LSI SWRAID is shown during BIOS post.
Step 2
Download the Cisco UCS C-Series drivers ISO, as described in Downloading the LSI MegaSR Drivers,
page C-10.
Step 3
Prepare the drivers on a USB thumb drive:
a.
Burn the ISO image to a disc.
b.
Browse the contents of the drivers folders to the location of the embedded MegaRAID drivers:
/<OS>/Storage/Intel/C600/
Cisco UCS C24 Server Installation and Service Guide
C-10
OL-26647-01
Appendix C
RAID Controller Considerations
Embedded MegaRAID Controller
Step 4
Step 5
c.
Expand the Zip file, which contains the folder with the MegaSR driver files.
d.
Copy the expanded folder to a USB thumb drive.
Start the Windows driver installation using one of the following methods:
•
To install from local media: Connect an external USB DVD drive to the server and then insert the
first Windows install disc into the drive. Skip to Step 6.
•
To install from remote ISO: Log in to the server’s CIMC interface and continue with the next step.
Launch a Virtual KVM console window and select the Virtual Media tab.
a.
Click Add Image and browse to select your remote Windows installation ISO file.
b.
Select the check box in the Mapped column for the media that you just added, then wait for mapping
to complete.
Step 6
Power cycle the server.
Step 7
Press F6 when you see the F6 prompt during bootup. The Boot Menu window opens.
Step 8
On the Boot Manager window, select the physical disc or virtual DVD and press Enter. The Windows
installation begins when the image is booted.
Step 9
Press Enter when you see the prompt, “Press any key to boot from CD.”
Step 10
Observe the Windows installation process and respond to prompts in the wizard as required for your
preferences and company standards.
Step 11
When Windows prompts you with “Where do you want to install Windows,” install the drivers for
embedded MegaRAID:
a.
Click Load Driver. You are prompted by a Load Driver dialog to select the driver to be installed.
b.
Connect the USB thumb drive that you prepared in Step 3 to the target server.
c.
On the Windows Load Driver dialog that you opened in Step a, click Browse.
d.
Use the dialog to browse to the location of the drivers folder on the USB thumb drive, and click OK.
Windows loads the drivers from the folder and when finished, the driver is listed under the prompt,
“Select the driver to be installed.”
e.
Click Next to install the drivers.
Updating the Windows Driver
Perform the following steps to update the LSI MegaSR driver for Windows or to install this driver on an
existing system booted from a standard IDE drive.
Step 1
Click Start, point to Settings, and then click Control Panel.
Step 2
Double-click System, click the Hardware tab, and then click Device Manager. Device Manager starts.
Step 3
In Device Manager, double-click SCSI and RAID Controllers, right-click the device for which you are
installing the driver, and then click Properties.
Step 4
On the Driver tab, click Update Driver to open the Update Device Driver wizard, and then follow the
wizard instructions to update the driver.
Cisco UCS C24 Server Installation and Service Guide
OL-26647-01
C-11
Appendix C
RAID Controller Considerations
Embedded MegaRAID Controller
Linux Driver Installation
This section explains the steps to install the embedded MegaRAID device driver in a Red Hat Enterprise
Linux installation or a SuSE Linux Enterprise Server installation.
This section contains the following topics:
•
Obtaining the Driver Image File, page C-12
•
Preparing Physical Installation Diskettes For Linux, page C-12
•
Installing the Red Hat Linux Driver, page C-14
•
Installing the SUSE Linux Enterprise Server Driver, page C-15
Obtaining the Driver Image File
See Downloading the LSI MegaSR Drivers, page C-10 for instructions on obtaining the drivers. The
Linux driver is offered in the form of dud-[driver version].img, which is the boot image for the
embedded MegaRAID stack.
Note
The LSI MegaSR drivers that Cisco provides for Red Hat Linux and SUSE Linux are for the original GA
versions of those distributions. The drivers do not support updates to those OS kernels.
Preparing Physical Installation Diskettes For Linux
This section describes how to prepare physical Linux installation diskettes from the driver image files,
using either the Windows operating system or the Linux operating system.
Note
Alternatively, you can mount the dud.img file as a virtual floppy disk, as described in the installation
procedures.
Preparing Physical Installation Diskettes With the Windows Operating System:
Under Windows, you can use the RaWrite floppy image-writer utility to create disk images from image
files. Perform the following steps to build installation diskettes.
Step 1
Download the Cisco UCS C-Series drivers ISO, as described in Downloading the LSI MegaSR Drivers,
page C-10 and save it to your Windows system that has a diskette drive.
Step 2
Extract the dud.img file:
a.
Burn the ISO image to a disc.
b.
Browse the contents of the drivers folders to the location of the embedded MegaRAID drivers:
/<OS>/Storage/Intel/C600/
c.
Step 3
Expand the Zip file, which contains the folder with the driver files.
Copy the driver update disk image dud-[driver version].img and your file raw write.exe to a
directory.
Note
RaWrite is not included in the driver package.
Cisco UCS C24 Server Installation and Service Guide
C-12
OL-26647-01
Appendix C
RAID Controller Considerations
Embedded MegaRAID Controller
Step 4
If necessary, use this command to change the file name of the driver update disk to a name with fewer
than eight characters: copy dud-[driver version].img dud.img
Step 5
Open the DOS Command Prompt and navigate to the directory where raw write.exe is located.
Step 6
Type the following command to create the installation diskette: raw write
Step 7
Press Enter.
You are prompted to enter the name of the boot image file.
Step 8
Type the following: dud.img
Step 9
Press Enter.
You are prompted for the target diskette.
Step 10
Insert a floppy diskette into the floppy drive and type: A:
Step 11
Press Enter.
Step 12
Press Enter again to start copying the file to the diskette.
Step 13
After the command prompt returns and the floppy disk drive LED goes out, remove the diskette.
Step 14
Label the diskette with the image name.
Preparing Installation Disks With a Linux Operating System:
Under Red Hat Linux and SuSE Linux, you can use a driver diskette utility to create disk images from
image files. Perform the following steps to create the driver update disk:
Step 1
Download the Cisco UCS C-Series drivers ISO, as described in Downloading the LSI MegaSR Drivers,
page C-10 and save it to your Linux system that has a diskette drive.
Step 2
Extract the dud.img file:
a.
Burn the ISO image to a disc.
b.
Browse the contents of the drivers folders to the location of the embedded MegaRAID drivers:
/<OS>/Storage/Intel/C600/
c.
Expand the Zip file, which contains the folder with the driver files.
Step 3
Copy the driver update disk image dud-[driver version].img to your Linux system.
Step 4
Insert a blank floppy diskette into the floppy drive.
Step 5
Confirm that the files are in the selected directory.
Step 6
Create the driver update diskette using the following command:
dd if=dud-[driver version].img of=/dev/fd0
Step 7
After the command prompt returns and the floppy disk drive LED goes out, remove the diskette.
Step 8
Label the diskette with the image name.
Cisco UCS C24 Server Installation and Service Guide
OL-26647-01
C-13
Appendix C
RAID Controller Considerations
Embedded MegaRAID Controller
Installing the Red Hat Linux Driver
For the specific supported OS versions, see the Hardware and Software Interoperability Matrix for your
server release.
This section describes the fresh installation of the Red Hat Enterprise Linux device driver on systems
with the embedded MegaRAID stack.
Step 1
Create a RAID drive group using the LSI SWRAID Configuration utility before you install this driver
for the OS. Launch this utility by pressing Ctrl+M when LSI SWRAID is shown during BIOS post.
Step 2
Prepare the dud.img file using one of the following methods:
Step 3
•
To install from a physical diskette: Use one of the procedures in Preparing Physical Installation
Diskettes For Linux, page C-12.
Then return to Step 4 of this procedure.
•
To install from a virtual floppy disk: Download and save the Cisco UCS C-Series drivers ISO, as
described in Downloading the LSI MegaSR Drivers, page C-10.
Then continue with the next step.
Extract the dud.img file:
a.
Burn the ISO image to a disc.
b.
Browse the contents of the drivers folders to the location of the embedded MegaRAID drivers:
/<OS>/Storage/Intel/C600/
c.
Step 4
Step 5
Copy the dud-<driver version>.img file to a temporary location on your workstation.
Start the Linux driver installation using one of the following methods:
•
To install from local media: Connect an external USB DVD drive to the server and then insert the
first RHEL install disc into the drive.
Then continue with Step 6.
•
To install from remote ISO: Log in to the server’s CIMC interface. Then continue with the next step.
Launch a Virtual KVM console window and select the Virtual Media tab.
a.
Click Add Image and browse to select your remote RHEL installation ISO file.
b.
Click Add Image again and browse to select your dud.img file.
c.
Select the check boxes in the Mapped column for the media that you just added, then wait for
mapping to complete.
Step 6
Power cycle the server.
Step 7
Press F6 when you see the F6 prompt during bootup. The Boot Menu window opens.
Step 8
On the Boot Manager window, select the physical disc or virtual DVD and press Enter.
The RHEL installation begins when the image is booted.
Step 9
Type one of the following commands at the boot prompt:
•
For RHEL 5.x (32- and 64-bit), type:
Linux dd blacklist=isci blacklist=ahci noprobe=<atadrive number>
•
For RHEL 6.x (32- and 64-bit), type:
Linux dd blacklist=isci blacklist=ahci nodmraid noprobe=<atadrive number>
Cisco UCS C24 Server Installation and Service Guide
C-14
OL-26647-01
Appendix C
RAID Controller Considerations
Embedded MegaRAID Controller
Note
Step 10
The noprobe values depend on the number of drives. For example, to install RHEL 5.7 on a
RAID 5 configuration with three drives, enter:
Linux dd blacklist=isci blacklist=ahci noprobe=ata1 noprobe=ata2 noprobe=ata3
Press Enter.
The prompt asks whether you have a driver disk.
Step 11
Use the arrow key to select Yes, and then press Enter.
Step 12
Select fd0 to indicate that you have a floppy diskette with the driver on it.
Step 13
Do one of the following actions:
•
If you prepared the IMG file on a physical diskette in Step 2: Connect an external USB diskette drive
to the target server and then insert the diskette in the A:/ drive and press Enter.
•
If you mapped the IMG file as a virtual floppy in Step 5: Select the location of the virtual floppy.
The installer locates and loads the driver for your device. The following message appears:
Loading megasr driver...
Step 14
Follow the Red Hat Linux installation procedure to complete the installation.
Step 15
Reboot the system.
Installing the SUSE Linux Enterprise Server Driver
For the specific supported OS versions, see the Hardware and Software Interoperability Matrix for your
server release.
This section describes the installation of the SuSE Linux Enterprise Server driver on a system with the
embedded MegaRAID stack.
Us e the following procedure to install the SLES drivers.
Step 1
Create a RAID drive group using the LSI SWRAID Configuration utility before you install this driver
for the OS. Launch this utility by pressing Ctrl+M when LSI SWRAID is shown during BIOS post.
Step 2
Prepare the dud.img file using one of the following methods:
Step 3
•
To install from a physical diskette: Use one of the procedures in Preparing Physical Installation
Diskettes For Linux, page C-12.
Then return to Step 4 of this procedure.
•
To install from a virtual floppy disk: Download and save the Cisco UCS C-Series drivers ISO, as
described in Downloading the LSI MegaSR Drivers, page C-10.
Then continue with the next step.
Extract the dud.img file:
a.
Burn the ISO image to a disc.
b.
Browse the contents of the drivers folders to the location of the embedded MegaRAID drivers:
/<OS>/Storage/Intel/C600/
c.
Step 4
Copy the dud-<driver version>.img file to a temporary location on your workstation.
Start the Linux driver installation using one of the following methods:
Cisco UCS C24 Server Installation and Service Guide
OL-26647-01
C-15
Appendix C
RAID Controller Considerations
Embedded MegaRAID Controller
Step 5
•
To install from local media: Connect an external USB DVD drive to the server and then insert the
first RHEL install disc into the drive. Skip to Step 6.
•
To install from remote ISO: Log in to the server’s CIMC interface and continue with the next step.
Launch a Virtual KVM console window and select the Virtual Media tab.
a.
Click Add Image and browse to select your remote RHEL installation ISO file.
b.
Click Add Image again and browse to select your dud.img file.
c.
Select the check box in the Mapped column for the media that you just added, then wait for mapping
to complete.
Step 6
Power cycle the server.
Step 7
Press F6 when you see the F6 prompt during bootup. The Boot Menu window opens.
Step 8
On the Boot Manager window, select the physical disc or virtual DVD and press Enter. The SLES
installation begins when the image is booted.
Step 9
When the first SLES screen appears, select Installation on the menu.
Step 10
Type one of the following in the Boot Options field:
•
For SLES 11 and SLES 11 SP1 (32- and 64-bit), type: brokenmodules=ahci
•
For SLES 11 SP2 (32-and 64-bit), type: brokenmodules=ahci brokenmodules=isci
Step 11
Press F6 for the driver and select Yes.
Step 12
Do one of the following actions:
•
If you prepared the IMG file on a physical diskette in Step 2: Connect an external USB diskette drive
to the target server and then insert the diskette in the A:/ drive and press Enter.
•
If you mapped the IMG file as a virtual floppy in Step 5: Select the location of the virtual floppy.
“Yes” appears under the F6 Driver heading.
Step 13
Press Enter to select Installation.
Step 14
Press OK.
The following message appears: LSI Soft RAID Driver Updates added.
Step 15
At the menu, select the driver update medium and press the Back button.
Step 16
Continue and complete the installation process by following the prompts.
Cisco UCS C24 Server Installation and Service Guide
C-16
OL-26647-01
Appendix C
RAID Controller Considerations
RAID Controller Cabling
RAID Controller Cabling
This section includes the following topics:
•
Cable Routing, page C-17
•
Cisco UCS C24 Server RAID Cabling Instructions, page C-18
Cable Routing
The RAID controller connectors in this server are shown in Figure C-2. The colored lines indicate the
recommended cable-routing paths from the SAS expander or backplane to the possible controller
locations:
•
The red line is the cable path to a controller in PCIe riser 1. The cable is routed across the chassis
in clips on the air baffle (not shown). This is the only riser available in single-CPU configurations.
•
The blue line is the cable path to a controller in PCIe riser 2.
•
The green line is the cable path to the embedded RAID connectors on the motherboard.
Figure C-2
RAID Controller Cable Routing
SYS FAN1
1
PCIe riser 1
SYS FAN2
CPU 1
Port 1
4
SYS FAN3
2
PCIe riser 2
CPU 2
Port 0
SYS FAN4
PSU 2 (top)
3
5
285262
PSU 1 (bottom)
6
1 Drive backplane
4 PCIe risers for RAID controller cards
2 SAS expander connectors
5 Embedded RAID SAS connector
(SCU_PORT_0)
3 SCPM mounting cage
6 Embedded RAID SAS connector
(SCU_PORT_1)
Cisco UCS C24 Server Installation and Service Guide
OL-26647-01
C-17
Appendix C
RAID Controller Considerations
RAID Controller Cabling
Cisco UCS C24 Server RAID Cabling Instructions
This section contains the following topics:
•
Backplane and Expander Options, page C-18
•
Small Form Factor 24-Drive Backplane With Expander Cabling, page C-18
•
Small Form Factor 16-Drive Backplane (No Expander) Cabling, page C-19
•
Large Form Factor 12-Drive Backplane With Expander Cabling, page C-20
Backplane and Expander Options
The server is orderable in three different versions, each with one of three different front panel/backplane
configurations:
Note
•
Cisco UCS C24 (small form-factor (SFF) drives, with 24-drive backplane and expander).
Holds up to twenty-four 2.5-inch hard drives or solid state drives.
•
Cisco UCS C24 (small form-factor (SFF) drives, with 16-drive backplane, no expander).
Holds up to sixteen 2.5-inch hard drives or solid state drives.
•
Cisco UCS C240 (large form-factor (LFF) drives, with 12-drive backplane and expander).
Holds up to twelve 3.5-inch hard drives.
The SAS expander is required for the SFF 24-drive option and the LFF 12-drive option.
The SFF 16-drive option does not use the SAS expander.
Small Form Factor 24-Drive Backplane With Expander Cabling
The cable connections required for each type of controller are as follows:
•
LSI MegaRAID SAS 9220-8i or 9240-8i PCIe Card (Cable UCSC-CABLE-A6), page C-18
•
LSI MegaRAID SAS 9265CV-8i PCIe Card (Cable UCSC-CABLE-A6), page C-18
LSI MegaRAID SAS 9220-8i or 9240-8i PCIe Card (Cable UCSC-CABLE-A6)
These options can control up to 16 drives.
The required UCSC-CABLE-A6 cable kit has two cables. Cable 1 controls drives 1–8 and cable 2
controls drives 9–16.
Step 1
Connect SAS cable 1 from card connector SAS 0 to the Port0 connector on the expander.
Step 2
Connect SAS cable 2 from card connector SAS 1 on the card to the Port1 connector on the expander.
LSI MegaRAID SAS 9265CV-8i PCIe Card (Cable UCSC-CABLE-A6)
This option can control up to 24 drives.
The required UCSC-CABLE-A6 cable kit has two cables. Cable 1 controls drives 1–12 and cable 2
controls drives 13–24.
Cisco UCS C24 Server Installation and Service Guide
C-18
OL-26647-01
Appendix C
RAID Controller Considerations
RAID Controller Cabling
Step 1
Connect SAS cable 1 from card connector SAS 0 to the Port0 connector on the expander.
Step 2
Connect SAS cable 2 from card connector SAS 1 on the card to the Port1 connector on the expander.
Step 3
If you are using the 9265CV-8i card, you can also install an SCPM for RAID backup. Install the SCPM
(see Replacing a SuperCap Power Module (RAID Backup Unit), page 3-41), then attach the cable from
the card to the SCPM.
Small Form Factor 16-Drive Backplane (No Expander) Cabling
The SFF 16-drive option does not use a SAS expander, so connections from the controller are made
directly to the backplane. The cable connections required for each type of controller are as follows:
•
Embedded RAID (Cable UCSC-CABLE-A7), page C-19
•
LSI MegaRAID SAS 9266CV-8i, SAS 9220-8i, or SAS 9240-8i PCIe Card (Cable
UCSC-CABLE-A7 and -A8), page C-19
Embedded RAID (Cable UCSC-CABLE-A7)
This option can control up to eight drives. This option can be used only with the SFF 16HDD version of
the server because this controller does not operate through an expander.
The required UCSC-CABLE-A7 cable kit has two mini-SAS cables. Cable 1 controls drives 1–4 and
cable 2 controls drives 5–8.
Step 1
Connect mini-SAS cable 1 from the motherboard connector SCU_PORT_0 to the drives 1–4 connectors
on the backplane.
Step 2
Connect the cable 1 SGPIO connector labeled, “S1” to its backplane connector.
Step 3
Connect mini-SAS cable 2 from the motherboard connector SCU_PORT_1 to the drives 5–8 connectors
on the backplane.
Step 4
Connect the cable 2 SGPIO connector labeled, “S2” to its backplane connector.
LSI MegaRAID SAS 9266CV-8i, SAS 9220-8i, or SAS 9240-8i PCIe Card (Cable UCSC-CABLE-A7 and -A8)
These option can control up to 8 drives with one controller. You can control up to 16 drives with two
controllers and two cable kits.
•
Use cable pair UCSC-CABLE-A7 for the first controller.
•
Use cable pair UCSC-CABLE-A8 for the second controller, if used.
First Controller (Drives 1 through 8, Cable UCSC-CABLE-A7):
The required UCSC-CABLE-A7 cable kit has two mini-SAS cables. Cable 1 controls drives 1–4 and
cable 2 controls drives 5–8. Make the following connections to your first controller card:
Step 1
Connect mini-SAS cable 1 from the card connector SAS1 to the drives 1–4 connectors on the backplane.
Step 2
Connect the cable 1 SGPIO connector labeled, “S1” to its backplane connector.
Step 3
Connect mini-SAS cable 2 from the card connector SAS2 to the drives 5–8 connectors on the backplane.
Step 4
Connect the cable 2 SGPIO connector labeled, “S2” to its backplane connector.
Cisco UCS C24 Server Installation and Service Guide
OL-26647-01
C-19
Appendix C
RAID Controller Considerations
RAID Controller Cabling
Second Controller (Drives 9 through 16, Cable UCSC-CABLE-A8):
The required UCSC-CABLE-A8 cable kit has two mini-SAS cables. To control 16 drives in this
configuration, you must add a second controller card to control drives 9–16. Cable 3 controls drives 9–12
and cable 4 controls drives 13–16. Make the following connections to your second controller card:
Step 1
Connect mini-SAS cable 1 from the card connector SAS1 to the drives 9–12 connectors on the
backplane.
Step 2
Connect the cable 1 SGPIO connector labeled, “S1” to its backplane connector.
Step 3
Connect mini-SAS cable 2 from the motherboard connector SAS2 to the drives 13–16 connectors on the
backplane.
Step 4
Connect the cable 2 SGPIO connector labeled, “S2” to its backplane connector.
Large Form Factor 12-Drive Backplane With Expander Cabling
The cable connections required for each type of controller are as follows:
LSI MegaRAID SAS 9266CV-8i, SAS 9220-8i, or SAS 9240-8i PCIe Card (Cable UCSC-CABLE-11)
This option can control up to 12 drives.
The required UCSC-CABLE-11 cable kit has two cables. Cable 1 controls drives 1–6 and cable 2 controls
drives 7–12.
Step 1
Connect mini-SAS cable 1 from connector SAS1 on the card to the SAS1 connector on the expander.
Step 2
Connect mini-SAS cable 2 from connector SAS2 on the card to the SAS2 connector on the expander.
Cisco UCS C24 Server Installation and Service Guide
C-20
OL-26647-01
Appendix C
RAID Controller Considerations
Restoring RAID Configuration After Replacing a RAID Controller
Restoring RAID Configuration After Replacing a RAID Controller
When you replace a RAID controller, the RAID configuration that is stored in the controller is lost. Use
the following procedure to restore your RAID configuration to your new RAID controller.
Step 1
Replace your RAID controller. See Replacing a PCIe Card, page 3-35.
Step 2
If this was a full chassis swap, replace all drives into the drive bays, in the same order that they were
installed in the old chassis.
Step 3
Reboot the server and watch for the prompt to press F.
Note
Step 4
For newer RAID controllers, you are not prompted to press F. Instead, the RAID configuration is
imported automatically. In this case, skip to Step 6.
Press F when you see the following on-screen prompt:
Foreign configuration(s) found on adapter.
Press any key to continue or ‘C’ load the configuration utility,
or ‘F’ to import foreign configuration(s) and continue.
Step 5
Press any key (other than C) to continue when you see the following on-screen prompt:
All of the disks from your previous configuration are gone. If this is
an unexpected message, then please power of your system and check your cables
to ensure all disks are present.
Press any key to continue, or ‘C’ to load the configuration utility.
Step 6
Watch the subsequent screens for confirmation that your RAID configuration was imported correctly.
•
If you see the following message, your configuration was successfully imported. The LSI virtual
drive is also listed among the storage devices.
N Virtual Drive(s) found on host adapter.
•
If you see the following message, your configuration was not imported. This can happen if you do
not press F quickly enough when prompted. In this case, reboot the server and try the import
operation again wen you are prompted to press F.
0 Virtual Drive(s) found on host adapter.
For More Information
The LSI utilities have help documentation for more information about using the utilities.
For basic information about RAID and for using the utilities for the RAID controller cards, see the
Cisco UCS Servers RAID Guide.
For more information about using the Embedded MegaRAID software to configure your disk arrays, see
the LSI Embedded MegaRAID Software User Guide.
Full LSI documentation is also available:
•
LSI MegaRAID SAS Software User’s Guide (for LSI MegaRAID)
Cisco UCS C24 Server Installation and Service Guide
OL-26647-01
C-21
Appendix C
RAID Controller Considerations
For More Information
http://www.cisco.com/en/US/docs/unified_computing/ucs/3rd-party/lsi/mrsas/userguide/LSI_MR_SAS_SW_UG.pdf
Cisco UCS C24 Server Installation and Service Guide
C-22
OL-26647-01