1
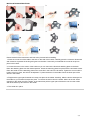
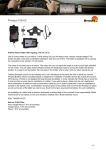
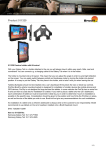
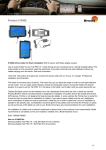
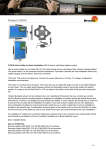
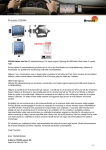
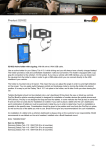
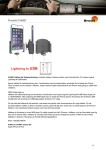
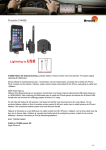
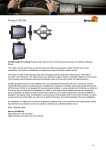
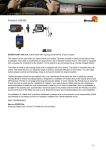
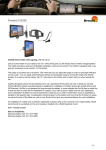
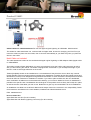
1 April, 2013, www.brodit.com, © 2013 Brodit AB
Product 514451
514451 Holder for Cable Attachment For use with Apple original Lightning to USB Cable. With tilt swivel.
This holder for cable attachment can, combined with an Apple cable, be used for charging your iPad. First you
mount the cable into place onto the holder, then it connects automatically to your iPad every time you place the
device in the holder.
Note! Cable not included.
The cable attachment holder can be combined with Apple original Lightning to USB Adapter Cable (Apple article.
no. MD818ZM/A.
The holder is made of black ABS plastic. It is easy to put the device into the holder, and just as easy to take it
with you when leaving the vehicle. The holder is equipped with a tilt swivel so you can adjust the angle of your
device in order to avoid light reflection on the screen.
Tablets (Surfpads) should not be installed onto a car’s dashboard if they block the view or block key controls.
ProClip (Brodit’s vehicle mounting bracket) is designed for installation of smaller devices like mobile phones and
GPS devices, ProClip is not designed for large devices like tablets. In some vehicles the ProClip has an extra firm
fit and can then be used also for installation of a tablet. If you want to place a tablet onto the car’s dashboard,
each combination of tablet-car must be examined in detail by you in order to determine if such an installation is
possible in the specific case. Consideration should be given to the position and how firmly the ProClip is in place,
as well as the size of the tablet you wish to use. Brodit will not give any recommendations for such installations.
An installation of a tablet onto a vehicle’s dashboard is always done on the customer’s own responsibility. Brodit
recommends to use tablets on the car’s headrest, installed onto a Brodit headrest mount.
EAN: 7320285144514
Item no 514451 fits:
Apple iPad New 4th Gen (For all countries)
Apple iPad New with Retina (Lightning Connector) (For all countries)
1 (2)
INSTALLATION INSTRUCTIONS
1.
2.
3.
4.
Please read all of the instructions and look at the pictures before installing.
1. Place the connector of the cable in the hole on the side of the holder. Carefully press the connector downward
and forward so it passes the locking and goes into the hole. Press until you hear/feel the connector snap into
place in the holder.
2. Loosen the screw in the center of the holder so you can remove the tilt swivel attaching plate on the back.
Place the attaching plate onto the desired position. Screw the attaching plate into place with the enclosed screws.
Place the holder over the attaching plate so the screw fits in the hole in the tilt swivel. Tighten the screw until the
holder is firmly in place, but still can be adjusted. To place the device in the holder: Place the lower part of the
device in the holder.
3. Flip/press the upper part forwards so it snaps into place in the holder. Carefully, slide the device sideways into
the holder so you hear/feel it snaps into place. To remove the device from the holder: Slide it to the left. Press
upwards on the upper part of the holder, in the same time pull the upper part of the device out from the holder
and lift the device up and out from the holder.
4. The holder is in place.
2 (2)