1
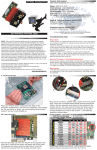
OWC Mercury Aura Envoy
Assembly
Remove the top cover and you will expose the interposer board inside of the OWC
Mercury Aura Envoy.
Insert your SSD module into the interposer board connector - it is keyed so it will only
fit one direction. The drive module plugs straight into the connector and fits snugly.
Replace the bottom cover onto the Mercury Aura Envoy. Reinsert the 2 Phillips screws
through the bottom and apply the 2 rubber feet to complete the assembly.
Your Mercury Aura Envoy connects using the included USB cable. if your SSD module
is unformated, you will need to format it to be able to use it.
http://eshop.macsales.com/tech_center/fwhdd.cfm
R3 1/29/13 JD
OWCMANENVOGAM
Copyright ®2012 Other World Computing All Rights Reserved. Other World Computing’s Limited Warranty is not transferable and subject to limitations.
Mercury Aura Envoy™
Owner’s Manual & Assembly Guide
OWC Mercury Aura Envoy
1.1 System Requirements
Introduction
OWC Mercury Aura Envoy
Assembly
Your computer is a static-sensitive device. It is susceptible
to invisible damage if not protected during installation.
1.1.1 Mac Requirements
•Minimum PowerPC G4 CPU, 128MB RAM
•USB 3.0/2.0 interface, Mac OS X 10.2 or later
We recommend proper grounding by using a grounding
strap. Make sure to work in a clean and static-free area,
and avoid wearing clothing that retains static charges.
For more information, please visit
1.1.2 PC Requirements
•Minimum 500MHz Intel Pentium III CPU, 128MB RAM
•USB 3.0/2.0 interface, Windows 2000 / XP / Vista / Windows 7
http://www.macsales.com/static
1.1.3 Supported SSD Drives
•Apple MacBook Air 2010 - 2011 SSD Drive Module
➀
➁
➃
➂
➄
The OWC Mercury Aura Envoy is only compatible with the factory original MacBook Air
2010-2011 SSD modules. Do not use it with the OWC Mercury Aura Pro SSD module or
any other 3rd party module - you will damage both the SSD and the enclosure.
Mercury Aura Envoy
Owner’s Manual & Assembly Guide
Item
➀ USB 3.0 (A - Micro-B) cable
➁ OWC Mercury Aura Envoy
➂ Adhesive Rubber Feet
➃ Plush Storage Bag
➄ Owner's Manual & Assembly Guide
Using a Phillips P0 screwdriver, remove the 2 Phillips screws that are holding the top
and bottom of the OWC Mercury Aura Envoy together. Note they are two lengths, the
short screw goes on the skinny end of the Aura Envoy, and the longer screw goes on
the thicker end.