Transcript
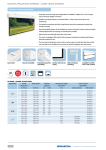
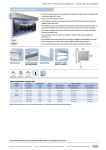
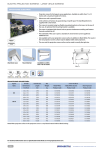
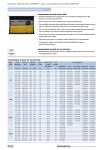
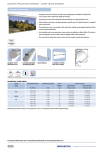
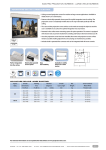
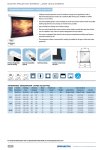
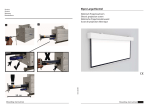
13 Electric Projection Screens • Ceiling recessed projection screens Pre-Installation Box Ceiling mounting kit 170 153 1,5 148 10,2 •Install the Pre-Installation Box in a fixed ceiling to reserve space for the Descender (RF) Electrol. • Prevent damage to the projection screen and the screen casing. Install the Pre-Installation Box in the ceiling during the rough-in stages of construction and place the projection screen during the finishing stage. • Mount the Pre-Installation Box using flexible mounting points at the top of the box or from the sides. •Once installed the flange on the case of the Descender Electrol will completely cover the Pre-Installation Box. Easy Installation during the rough stages Screen Width Edges will be invisible after installation Net Install the p rojection screen at a later stage. kg 180 8 200 9 220 79 •The Ceiling Mounting Kit enables any Elpro Electrol to transform into a ceiling recessed projection screen for inconspicuous installation. •Customise the Elpro Electrol with a black drop to suit your projection situation. Keep in mind that the Ceiling Mounting Kit covers 5 cm of projection surface at the top of the screen. •The mounting kit forms a unified appearance with ceiling tiles. The slat bar closes the feed through opening. •The Ceiling Mounting Kit can be made to any width and is available in any colour for optimal integration with any interior. • Easy to mount using the brackets supplied. Easy installation Product Code Ceiling Mounting Kit accessory Screen Width Weight cm 49,2 137 Net Solid mounting Product Code Weight cm kg 10800101 180 7 10800060 10800102 200 9 10800061 9 10800103 220 10 10800092 240 11 10800104 240 10 10800062 280 12 10800105 280 11 10800063 300 13 10800106 300 12 10800064 320 14 10800127 340 15 10800128 For technical information see our Specification Data Sheets at www.projectascreens.com. 38 S c r e e n s f o r p r o f e ss i o n a l s SCREENS FOR PROFESSIONALS 153 205,5 169 176 194,5 148 140