1
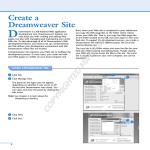
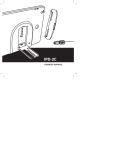
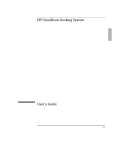
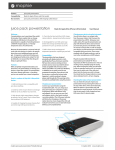
Introduction to the
Dreamweaver Interface
The Dreamweaver interface is made up of three basic
elements: the menu bar, the panels, and the main
workspace. When you first launch Dreamweaver, the
main workspace displays the Start Screen.
W
A Start Screen
TE
RI
AL
ith Dreamweaver CS4, Adobe has radically
reengineered the Dreamweaver interface
to provide a more unified experience
across all of the Creative Suite applications. If you are
familiar with Photoshop or Illustrator, many of the
interface elements will be familiar to you.
MA
B Menu Bar
Provides a central location to select
recently opened files, create new
documents in various file types, or
create documents from samples.
TE
C E F G
D
GH
B
D Extend Dreamweaver
Menu
RI
H
I
Accesses online tools to
add additional features to
Dreamweaver.
E Site Menu
PY
A
Allows you to switch
layouts.
D
Provides access to menus
and commands.
C Layout Menu
CO
J
G Search Box
Search Dreamweaver’s
help files directly by
typing a term here.
4
Provides commands for
setting up and modifying
site definitions.
H Collapse Panels
to Icons
Collapses the
panels to icons.
F Workspace Menu
Allows you to switch between
Dreamweaver’s various
workspace layouts.
I Panels
Collapsible panels
provide most of the
functionality in the
program.
J Property Inspector
Allows you to change
properties of objects on
your Web page.
Explore the Dreamweaver Workspace
chapter
1
Y
ou can get started creating Web pages in
Dreamweaver very quickly by creating a
new, blank page. You can then add content
and design to your page as you like.
For example, in Windows Vista, Dreamweaver can be
launched by clicking the Start button, and then
clicking All Programs. Depending on whether you
purchased Dreamweaver as a stand-alone product or
part of one of the Creative Suite packages, you will
find an appropriately labeled Adobe folder from
which you can click Dreamweaver CS4.
PART I
Open a Blank
Web Page
The Start Page, which displays when Dreamweaver
first opens or when you have no other documents
open, provides quick links to create a blank page in a
variety of formats. HTML creates a basic blank
document. ColdFusion, PHP, and ASP VBScript create
pages that allow you to start building dynamic sites,
a topic that is covered in detail in Part IV of this
book. XSLT is a special format that works with XML
documents. The final three page options create a
Cascading Style Sheet, JavaScript, or an XML
document. The final option in the column lets you
set up a Dreamweaver site, which is covered in
Chapter 2.
Open a Blank Web Page
1
2
Open Adobe Dreamweaver CS4.
Click HTML.
2
•
A new, blank document opens.
•
5
Add Text in
Design View
Y
ou can use Dreamweaver’s Design view to see
a representation of what your page may look
like in a Web browser. You can create entire
pages, and even entire sites, in Design view without
ever touching the underlying code. As you insert
objects into your page in Design view, Dreamweaver
writes the code for you, using proper (X)HTML,
Cascading Style Sheets (CSS), JavaScript, or other
languages based on the document type and your
preferences. Conversely, any items you delete from
Design view have their corresponding code deleted
as well.
The Property Inspector, the panel that runs along the
bottom of the screen, allows you to modify the
properties or settings of objects after you have
inserted them. These changes are immediately
reflected in the Design view interface, as are any other
changes that you make through other panels.
While Design view gives you a representation of what
your page will look like in a Web browser, it also
displays additional page elements that may assist you
in designing and working with your documents but
that would not normally appear in a Web browser.
Add Text in Design View
1
Click Design from the Document toolbar.
The document displays in Design view.
1
2
Type some text in the page.
The text displays as it would in a Web browser.
2
6
chapter
Explore the Dreamweaver Workspace
1
Y
ou can accomplish most of your work in
Dreamweaver in Design view, but there may
be times when you need to edit the
underlying code of a page directly. For these
situations, Dreamweaver provides a powerful codeediting environment.
Code view allows you to enter (X)HTML, CSS,
JavaScript, or other code. It provides code hints for
all of the languages it supports, as well as line
numbers and customizable color-coding to make
reading and editing code easier.
PART I
Enter Code in
Code View
All of the panels that you use in Design view to work
with your pages are available in Code view. Any
changes made in Code view are reflected in Design
view, and vice versa, and so it is possible to freely
switch between the two views as needed while
editing pages.
The Code view toolbar gives you additional
functionality when working in this environment.
Running down the left edge of the screen, the
toolbar lets you open pages, expand and collapse
blocks of code, turn line numbering on and off,
insert and remove comments, and more.
Enter Code in Code View
1
Click Code in the Document toolbar.
2
The document switches to Code view.
2
3
Type < to begin a new HTML tag.
From the code hints, select an element you
want to use and then press Enter.
•
4
5
6
1
•
3
Dreamweaver inserts the tag name.
Type > to finish the tag.
Type the text to be marked up by the tag.
45
6
Type </.
•
Dreamweaver inserts the closing tag.
•
7
Explore
Split View
D
reamweaver offers a third view that provides
the best features of both Design and Code
view. Split view divides the screen in half,
showing Code view on the top of the screen and
Design view on the bottom, although you can switch
these if you prefer. A divider bar that separates the
two allows you to give more screen space to either
view as needed.
Clicking in the Design half of the screen allows you to
work in the same way you would in Design view, but
you are now able to see the underlying code as
Dreamweaver writes it. The reverse is also true: if you
click in the Code half and type code, you see the
results appear in real-time in Design view.
The disadvantage of Split view is that, except for very
large monitors, you do not have much room in either
of the two sections to work effectively, and so many
designers use it sparingly. However, it is a good way to
have Dreamweaver help teach you the code, as you
can focus on your work in the Design section but then
immediately see the associated code.
Explore Split View
1
Click Split in the Document toolbar.
The document displays in Split view.
2
Click-and-drag the gray bar that separates the
two sections to resize them.
1
2
Dreamweaver resizes the sections.
3
4
Click View.
Click Design View on Top.
8
3
4
Explore the Dreamweaver Workspace
chapter
1
PART I
Dreamweaver swaps the position of
the Code and Design views.
5
Click in the Design view and type
some text.
5
•
The text also appears in the Code
view.
•
Can I select the same portion of the page
in both the Code and Design sections of
the Split view?
Yes. Any page element you select in the
Design pane automatically has its code
selected in the Code pane, and vice versa.
There may be times when you need to edit
a piece of code in a particularly long page
where it can be difficult to find the specific
block of text. Using the Split view, you
could scroll the Design section to the
section you need to edit, and immediately
the Code view scrolls to that same section
of the page and places your cursor in the
code that matches the Design selection.
Can I split the screen vertically as well as
horizontally?
Yes. In Dreamweaver CS4, you can orient
the split to show the pages side-by-side,
rather than having one on top of the
other. When you are in Split view, click
View, and then click Split Vertically.
Dreamweaver will remember this setting
until you deselect it, and so if you switch
back to Design or Code view, your screen
will still split vertically next time you switch
to Split view. When you are using the
vertical split, you can choose on which side
the Design screen and Code screens
appear by clicking Edit, and then clicking
Design View on Left.
9
Explore the
Panels
Y
ou can access most of the features of
Dreamweaver through panels along the sides
of the window. Each panel provides a specific
set of functions, and related panels are grouped
together.
You can expand or collapse a panel by double-clicking
the tab that contains the panel’s name. When in a
panel group, individual panels can be accessed by
clicking the tabs. You can move panels to other
locations on the screen or into other groups by
dragging their tabs.
This set of panels that runs along the right edge of the
screen can be collapsed to icons with labels so that it
takes up very little room, a feature that is particularly
handy for designers working on small screens. The set
can be further resized to show only icons as well.
Once the panels have been collapsed to icons, you
can access a panel temporarily by clicking its icon. The
panel collapses again as soon as you click elsewhere
on the screen. The Window menu provides a list of
every panel available in Dreamweaver, and allows you
to open panels that are not currently visible.
Explore the Panels
1
Click Window.
•
2
Double-click a panel’s tab to expand or
collapse it.
•
3
•
•
2
In this example, the panel expands to show
its features.
3
Click the Collapse to Icons button.
•
4
Dreamweaver displays a check mark next to
each panel that is currently open.
1
The main panel set collapses to show icons
and labels.
Drag the left edge of the icons to the right.
The icons collapse further, hiding the labels.
10
4
•
Explore the Dreamweaver Workspace
Click the Expand Panels button.
•
6
1
PART I
5
chapter
The panel set expands.
Click-and-drag the Insert panel to
the top of the screen, just below the
menu bar.
6
5
The panel repositions itself.
7
Drag the tab of a panel.
The panel floats on the screen.
Can I quickly show or hide
all of the panels at once?
Yes. Simply press the F4
key on your keyboard,
which hides all of the
panels. Pressing F4 a
second time brings them
all back, in the positions in
which they were when
you hid them.
Is it possible to hide all of
the panels and then have
them simply appear when
I need them?
Yes. If you hide all of the
panels using the F4
keyboard shortcut, you
see a gray bar where the
panels were. If you simply
move the mouse over that
bar, the panels in that area
reappear, and then
disappear again when you
move your mouse away
from them.
Can I put panels on the
other side of the screen?
Yes. You can drag panels
to any edge of the screen.
When you see a thin blue
line appear, release your
mouse and the panel
docks along that edge.
You can also have two
columns of panels along
either the right or left
edge, or two rows along
the top or bottom.
11
View
Workspaces
D
reamweaver provides a set of panel layouts
called workspaces. You can use the
workspace menu in the upper-right corner
of the screen to switch between workspaces whenever
you want.
Eight workspaces are available by default in the
program. Designer, the default workspace, shows
those panels most likely to be used by Web designers
creating static pages. App Developer and App
Developer Plus display the panels used by those
creating dynamic Web sites, a topic covered in Part IV
of this book.
Classic provides the panels that were available by
default in older versions of Dreamweaver, and places
the Insert panel along the top of the screen. Coder
displays a set of panels along the left edge of the
screen, while Coder Plus adds several more along the
right edge. Designer Compact shows the same panels
as Designer, but collapses them to icons by default.
Dual Screen undocks all of the panels so that they are
floating and can be easily moved to another monitor.
If you select a workspace, change its panel layout, and
then want to revert to the saved version, you can do
so by reselecting the workspace from the menu.
View Workspaces
1
2
Select Classic.
•
3
1
2
Click Designer to access the Workspace menu.
Dreamweaver rearranges the panels.
From the Workspace menu, click Designer
Compact.
12
•
The panels are rearranged.
3
Explore the Dreamweaver Workspace
Click-and-drag the Insert panel into
the middle of the screen.
1
PART I
4
chapter
4
The panel floats on the screen.
5
From the Workspace menu, click
Designer Compact.
The panel layout is restored.
Can I create my own workspaces?
Yes. You should begin by selecting the preinstalled workspace that has the panel
arrangement closest to the one you want.
Then, you can move panels to other
locations on the screen, close those panels
you will not be using, or open and position
additional panels. Once you have the
panel arrangement you want, you can click
the workspace menu, choose New
Workspace, and then give it a logical
name. It then appears with the other
workspaces so that you can switch to it
whenever you want.
5
Can I delete workspaces?
You cannot delete any of the workspaces
that are preinstalled with Dreamweaver, but
you can rename or delete workspaces that
you create by clicking the workspace menu
and selecting Manage Workspaces. This
displays a dialog box that lists all of the
workspaces you have created. When you
select one, you can rename or delete it.
13