1
Introducing iPhone
OS Devices
T
he iPhone, iPod touch, and iPad combine
innovative new computing technologies with a
completely new business model. Technologically,
developing for the iPhone family is challenging but
rewarding. The development environment is loosely based
on the Mac, with some extensions and limitations, but
the user environment is innovative and encourages
creative and novel experiences.
Fortunately, Apple’s code samples include generous
amounts of boilerplate code. When you begin developing
applications, you can copy this boilerplate to your own
projects and reuse it with minor edits. As you gain
experience, you can begin to customize it and extend it
to meet your own requirements. You will also learn how
to add custom messages and message handlers of your
own design.
MA
TE
RI
AL
If you are a Mac developer, you will find many concepts
familiar and can likely start iPhone development after a
brief reorientation. If you are new to the Apple
development environment, give yourself a few weeks to
master the principles and programming models. This
book includes key concepts with worked examples.
Combined with Apple’s documentation, they will enable
you to move rapidly toward understanding and creating
your own applications.
The iPhone OS documentation lists thousands of objects,
message definitions, and function calls. The biggest
challenge for new developers is learning which messages
are used to signal which event. The second-biggest
challenge is mastering the syntax of each call to the OS.
Every message type uses a different syntax, with different
data structures and access methods.
Web Apps and Native Apps
This book includes information about developing native
applications. However, web applications remain an
interesting option on the iPhone. When the iPhone was
first released, no native SDK was available. All applications
were developed as web apps for the iPhone’s Mobile Safari
browser, which was optionally supported by server-side
data management.
RI
GH
TE
Apple’s App Store is a key advantage because Apple
distributes your app and does significant marketing for
you. The ideal iPhone application is simple and elegant,
and its development is tightly focused, which means
development cycles can take months as opposed to years.
Therefore, you see the benefit from your development work
more quickly than you would from a typical desktop
product, and the cost of entry in both time and capital is
significantly lower.
D
The App Store Advantage
CO
PY
Apple’s iPhone SDK is free. To download it, you must sign
up as a developer at http://developer.apple.com/iphone.
Registrations are typically approved within 24 hours. If you
decide to distribute or sell your applications through the
App Store or test them on your own iPhone rather than
the SDK Simulator, you must pay Apple $99 to join the
Standard Developer Program. Individuals should allow a
month for signup. Small businesses should allow two
months.
The App Store model is not perfect. You must allow two
weeks for testing of each submitted application, and not all
applications are accepted. There is no way to check if your
application will be approved ahead of submission. In the
past, Apple has blocked applications that compete with its
own products because its air-time partners have refused to
support them or for other reasons that remain inscrutable.
However, most applications are accepted. Many are
profitable. Some become very profitable indeed.
2
Web apps blend HTML, CSS, JavaScript, and AJAX to
create an interface that mimics the iPhone’s native
interface. Flash is not supported. Web apps are not listed
in the App Store, but you can submit them to Apple, which
lists them in a dedicated area on the Apple web site. You
can also direct users to your web app within Mobile Safari
via a standard URL.
If you are familiar with web technologies and if your
application is relatively simple, you will find it is easier and
faster to create an iPhone web app than a native
application. The disadvantages of apps are limited
performance and limited support for the iPhone’s enhanced
hardware features. Unlike stand-alone applications, most
web apps do not work offline. Web apps are not covered in
detail in this book. They remain a legacy option for projects
that aggregate and summarize web information and
manage user interaction with web data.
iPhone OS devices include the iPhone, iPhone 3G, iPhone
3GS, iPod touch, and iPad. All share a thin form factor with
a unique high-resolution display and a multi-touch
interface. The iPod touch is identical to the iPhone series
but lacks phone and mobile data features, a camera, a
microphone, and GPS. The accelerometer, Mobile Safari
web browser, and Wi-Fi networking are included.
However, the iPod touch is much more than a crippled
iPhone and remains a popular product with buyers and
developers. Approximately 95% of applications in the App
Store are compatible with the iPod touch. It is also more
affordable than an iPhone. For developers, it is possible to
develop, test, and sell complete applications on an iPod
touch. An iPhone is not essential unless you intend to
develop for iPhone-specific hardware features, such as the
camera, GPS, compass, and so on.
GL 2.0 graphics acceleration, and a faster processor than
the base 3G model. There is a small but increasing market
for premium applications for the 3GS, offering extra
features and performance at a premium price. As long as
Apple continues to sell the 3G and the 3GS, developing
exclusively for the 3GS will limit your application’s market.
However, you can assume that most users will upgrade
within 12 to 18 months of each new model’s release date.
The latest iPod touch range includes the same enhanced
graphics and a faster processor.
The iPad extends the iPhone OS family in a new direction
with a larger touch screen, faster processor, and additional
OS features. The core programming model remains largely
unchanged, but the interface supports new options. For
details, see Appendix C.
With the iPhone 3GS comes an improved camera with
video capture, voice control, a compass, enhanced Open
Memory Limits
The iPhone does not support virtual memory. There is
no page file and no option for disk swapping. When your
application runs out of memory, there is no more
memory available. Your application must manage
memory errors effectively. Otherwise, it may be
terminated by the iPhone OS without notice, it may
crash, or it may force a complete reboot of the iPhone.
All your applications must include basic memory-error
handling because they may be run on an iPhone with
limited free memory. You must carefully design
applications that use large media files to avoid exceeding
memory limits.
Chapter 1: Introducing iPhone OS Devices
The iPhone OS Product Range
Battery Life
The iPhone and iPod touch have limited battery life. You
must take care to manage power by suspending software
features in your application when they are not needed.
Hardware features such as the camera, GPS, and
accelerometer generate waste heat, which dramatically
decreases battery life. It can also make the iPhone
uncomfortable to hold and affect its reliability. These
hardware features should never be left running when
they are not required.
The iPad offers improved battery life, and power
management is not quite so critical. However, your
application should still suspend non-essential features
whenever possible.
User Expectations
The iPhone programming model assumes that only one
application is active. Although the iPhone OS is a variant of
Unix, there is no official support for multi-tasking or
background execution. Users expect applications to launch
almost instantly, with an equally instant suspend-ondemand feature. Applications should save and restore their
states automatically, and interfaces should be simple and
elegant and follow Apple’s design guidelines.
You can support users by relying on the standard Cocoa
Touch interface library to manage scrolling, text input, and
other interface essentials. Applications should not include
features that require a complex manual, and operation
should be as intuitive as possible.
3
Install the
iPhone SDK
Y
ou can get started with iPhone development by
downloading and installing the iPhone SDK. The
SDK includes the latest version of the Xcode
development environment as well as a full set of
documentation for the current version of the iPhone OS.
You do not need an iPhone to develop with the SDK.
Xcode includes a simulator on which you can test
applications. The only prerequisite is an Intel Mac and the
most recent version of OS X.
Apple provides three levels of access to the SDK and its
contents. Anyone can read web versions of the
documentation included in the SDK. Useful outline
descriptions of the development cycle and the
documentation for the iPhone’s libraries are available
online. However, access to sample code and examples is
not available.
To download the full SDK, you must register with Apple’s
Developer Connection. Registration is simple and free but
requires confirmation from Apple. Currently, development
is open to almost anyone who expresses interest.
Once registration is confirmed, you can download the
SDK package. Installing the SDK gives you access to
sample code and the development environment. You can
develop and test applications on the Simulator, but you
cannot install them on your iPhone, share them with
others, or upload them to the App Store unless you pay a
fee and enroll in the Standard Developer Program. You
can then provision your iPhone with a unique digital
access key supplied by Apple to confirm it as a valid
development target in Xcode, submit your applications to
Apple for possible inclusion in the App Store, and create
a limited testing program with up to 100 users.
Corporations developing applications for internal
distribution can join the Enterprise Developer Program for
$299. This supports in-house development only. The
program does not allow App Store distribution.
Install the iPhone SDK
1
1
Open a web browser and navigate to http://developer.
apple.com and then follow the links to find the most
current enrollment page.
Note: Apple regularly modifies its developer pages, so the
current URL may be different from the URL shown
here.
2
Click Continue and then follow the instructions that
walk you through the complete signup process.
Note: You must wait until Apple confirms your application
before you can complete the signup process.
3
If you plan to develop applications for the App Store,
select the Standard Developer Program.
4
Pay for and activate your chosen program.
2
3
5
Note: Steps 3 and 4 are optional. You can download and
install the iPhone SDK as soon as Apple confirms
your application.
5
6
Navigate to the download location for the SDK.
Select your OS and then download the compatible
SDK release.
Note: The download may be between 2GB and 5GB.
6
4
4
The SDK download is a standard
DMG file, so double-click it to
mount it.
8
Double-click the MPKG installer
to begin installation.
9
Step through the License
Confirmation and Destination
pages.
0
Select the elements to install.
7
8
9
0
Note: You can leave most defaults
unchanged. You can choose
not to install older versions of
the SDK.
!
Choose Macintosh HD➔
Developer to open the installed
Developer folder.
@
Add the Developer folder to the
Places sidebar for ease of
navigation.
#
Open the Applications folder to
reveal Xcode. Optionally, add
Xcode to the Dock for ease of
navigation.
$
Create a new folder you can use
to keep your projects in one
location.
$
@
Chapter 1: Introducing iPhone OS Devices
7
#
The current cost of professional developer enrollment is $99 for individual developers and small businesses.
Company enrollment requires legal verification of business status and takes two to four weeks to process. You must
fax a copy of your incorporation documents to Apple on demand. Individual enrollment takes one to two weeks;
business enrollment is likely to take four to six weeks.
One of the benefits of the Standard iPhone Developer Program is that it is likely — but not guaranteed — to provide
early access to beta versions of the iPhone OS, including updates to the SDK. You will have a head start of two to
three months over non-enrolled developers. This gives you time to update your apps to make sure they are
compatible with the new iPhone OS when it is released.
Beta versions are a moving target for developers. It is good practice to investigate new OS features when they arrive
in beta and to consider new apps that support them but not to commit application code until the beta OS has
stabilized and Apple mandates a move to the new OS.
5
Introducing Xcode
and the iPhone SDK
Y
ou can develop applications for the iPhone and
iPad with Xcode — Apple’s iPhone and Mac
development environment. Xcode requires an
Intel-compatible Mac running the latest version of OS X.
It does not require an iPhone or iPad because a simulator
is included.
Most but not quite all of the iPhone’s software and
hardware features are modeled in the Simulator. Xcode
includes a complete suite of tools for application
development, including a compiler and editor, interface
designer, web app tool kit, performance profiler, and the
Simulator.
Interface Builder
When you sign up for the iPhone development program,
you receive download links for the latest version of
Xcode. Do not use the version on your OS X installer
disk. It will not be up to date and is likely to include bugs
that have been fixed in the most recent version.
The iPhone version of Xcode includes both Mac and
iPhone development tools. These offer a similar
development environment but use different tools and
libraries. Code developed in one environment is not
guaranteed to run successfully in the other. There are
significant differences between the Mac and iPhone
programming models, and you will not be able to reuse
code without changes.
The Simulator
Interface Builder is a visual interface design tool. It
includes a selection of tools that manage links between
visual interface objects, such as buttons and sliders, that
appear on the iPhone’s display and the software objects
and message handlers defined in your code. Interface
Builder is not a complete visual development environment.
It is a hybrid tool that includes visual features but also
displays lists of objects and methods. You must define
these objects and methods in your code before you can
use them in Interface Builder.
The Simulator appears on your desktop as a virtual iPhone
or iPad. The screen is clickable, and there is a doubletouch feature for testing multi-touch interfaces. There is no
GPS, camera, or accelerometer, but limited work-arounds
for some of these missing features are available. For
example, you can select images from the Simulator’s photo
library in place of direct camera capture. A limited selection
of Apple applications with preset data are built into the
Simulator, including Photos, Contacts, Settings, and the
Safari browser. Other applications are not available.
Interface Builder includes a library with instances of all
the standard iPhone interface objects, including buttons,
sliders, text fields, tables, and pickers. More generic
interface objects, including windows and views, are also
part of the library. These provide a background for the
interface and make it possible to add custom objects to
an application.
When you compile an application, it is installed on the
Simulator and runs immediately. Old applications are not
deleted, but you can rearrange and delete applications just
as you can on the iPhone. The Simulator runs Intel x86
code and not code compiled for the ARM processor used
on the iPhone. Simulator performance is not a guide to
performance on a real iPhone, and running speeds may be
very different. Applications that rely on real-time graphics
and sound or other performance features should be tested
on real hardware.
6
Xcode is based on a modified version of the Gnu Compiler
Collection (GCC) and includes support for all the C variants,
including Objective-C, which is the default language for
Mac and iPhone development, and for other languages that
are not relevant to iPhone development.
Apple’s editor and asset manager was developed around GCC
and is unique to Xcode. It adds useful windowing, asset
listing debugging, and auto-completion features and includes
hooks for the Simulator, performance monitoring, memory
integrity checking, and other performance-oriented features.
Most of the iPhone libraries are written in Objective-C.
Some features of the OS still use conventional C calls. It is
sometimes faster and more efficient to define C functions
in your code than to create complete Objective-C class
definitions. Xcode can handle either option.
Behind the Xcode interface, the compiler remains a
recognizable variant of GCC, expanded with extra Apple
libraries. Although GCC is not a fast compiler, iPhone
applications are often small, so compilation speed is rarely
a problem.
Xcode Instruments
Instruments add code profiling and memory
management to increase efficiency and eliminate
memory errors — one of the prime causes of application
crashes on the iPhone. The package is based on Sun’s
DTrace toolset and can provide a comprehensive view of
activity inside your application. Use it to monitor object
allocation, animation and graphic performance, and
memory leaks as well as to record sequences of user
actions for testing your applications in the Simulator.
Dashcode
Dashcode is Xcode’s web app development tool. Web
apps use similar technology to Apple’s OS X dashboard
widgets, so Dashcode can also be used to develop
widgets. Two template modes select either iPhone or
widget targets. For the iPhone target, the included
templates mimic the iPhone’s native interface features.
The Run button in Dashcode creates a web page that
loads in Mobile Safari in the Simulator. Web apps are
not compiled into separate applications and are not
installed on the iPhone. Dashcode is a legacy
development tool and is not described in further detail in
this book.
Advanced Xcode
Xcode includes too many features to list here in detail.
This book introduces an essential subset of features, but
as you develop more complex applications, you will need
to manage your projects in more sophisticated ways.
Apple’s Xcode Project Management Guide includes a
detailed summary of Xcode’s file and source tree
management features. The guide is available online in
the Developer Connection area of Apple’s site. Because
Apple changes some of its URLs regularly, doing a web
search is the easiest way to locate it. You should work
through this guide as soon as you start reusing code in
your projects and when branching projects.
Chapter 1: Introducing iPhone OS Devices
Xcode and GCC
For advanced developers, Xcode includes scripting and
automation features that use Apple’s Automator plug-in,
which is built into all current versions of OS X.
Automator can simplify development with scripted file
and asset management. Mastering Automator will save
you significant development time on larger projects.
7
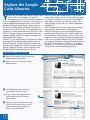
Explore the Sample
Code Libraries
Y
ou can use the sample code libraries to gain a head
start on effective development. To speed up
development, you can reuse code from the libraries
in your own applications. You can also use the libraries as
worked examples that demonstrate how to solve coding
problems and implement the iPhone’s unique features.
However, neither list is comprehensive. You can find
further links to source code on the Class Reference pages.
See Chapter 2 for details. You can also find incomplete
code snippets in some of the reference sections. You
cannot usually use this code as is without significantly
expanding it.
The iPhone’s documentation is updated with each new
release of the OS. Prior to Xcode 3.2, documentation was
organized in sections that matched each OS release. After
Xcode 3.2, the presentation was streamlined. Reference
material, tutorials, and links to sample code appear in a
single browser-like window.
All the sample code listed on the main reference library
page and in the Class Reference is packaged as a
complete Xcode project. You can download this project
and then load it into Xcode, and it should compile and
run immediately without changes. However, some code
samples are saved with legacy settings and may generate
errors. You can usually eliminate the errors by setting a
new target environment by using the drop-down menu at
the top left in the main Xcode window — for example
Simulator - 3.1.2 | Debug — or by saving the main files,
closing Xcode, and then reloading the project.
In Xcode 3.2, you can find links to the sample code library
at the top left of the documentation window, under the
Resource Types tab. The main Documents window also
lists links to the sample code, and you can create a list of
links by clicking the Resource Types sort header in the
title bar and then scrolling down to view the list.
Explore the Sample Code Libraries
1
Open the Documentation Library by choosing
Help➔Developer Documentation.
2
Choose iPhone OS Library from the Home
drop-down menu.
3
Click Sample Code under the Resource
Types header in the left-hand pane.
•
4
8
A list of sample code examples appears in
the Documents pane of the Reference
Library window.
Optionally, you can click the Resource Type
sort tag in the Documents pane to sort all
the documents by type and group the
sample code content together.
2
1
3
4
Review the list of sample code
examples.
6
Optionally, click Title to sort the
examples by name.
7
Optionally, click Resource Type,
Topic, Framework, or Date to
re-sort the examples by the
corresponding criteria.
8
Optionally, scroll down to review
the rest of the list and then select
an example by clicking its title.
9
Review information about the
example, including the version
number and build requirements.
0
Optionally, you can view one or
more of the files included in the
example project by choosing it
from the View Source Code dropdown menu.
8
7
6
5
9
Chapter 1: Introducing iPhone OS Devices
5
0
Further examples of source code are available from various sources online. One of the most useful is the iPhone
Developer site at www.theiphonedev.com. The Source Code tab on the site lists about 50 applications with links to
source code. Most applications are relatively simple, but some are more adventurous and push the limits of what is
possible on the iPhone.
Unlike the Apple sample code examples, these applications are more or less complete. Although you can reuse or
repurpose their code, this does not mean the code is in the public domain or that you can use it as you want. Most
applications are licensed under one of the many open-source licenses that cover open code. If you add this code to
your own projects, you must accept the restrictions in the license.
9
Introducing Xcode’s
Work Areas
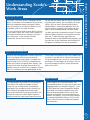
Introducing Xcode’s Work Areas
A File Name
B Toolbar
C Search Field
The file name displays the
name of the file currently
being edited. Project files
often have very similar names.
Use this to double-check that
you are editing the correct file.
The Toolbar includes the main Build and Run
tool that compiles a project. The Info tool
displays information about a selected item.
Click the Tasks button to stop an active
operation. The Action pop-up menu displays a
smart list of actions relevant to a selected item.
Enter a search string to search the Detail View
for a match. The search field does not search
the Text Editor. You can use it to search for
groups and files in a project but not for
symbols in code.
D Detail View
The Detail View shows the
item or items selected in
the Groups & Files list, with
summary and status fields
for each. From left to right,
the summary fields are File
Name, Build Status, Code
(which lists file sizes), Build
Errors, Build Warnings, and
Target Membership (which
specifies whether the file is
included in the current
build target). These icons
are not named, and there is
no hovering screen tip to
remind you of their function.
I
A
C
D
H
B
E
F
G
E Text Editor
G Status Bar
H Groups & Files List
Use the Text Editor to edit the code of
the file you have selected in the Detail
View or in the Groups & Files list. The
text area includes a complex navigation
bar at the top, with features that aid
speedy navigation and code
management.
The status bar displays a confirmation
message if the compilation was
successful or an error count if the
compilation failed. It also displays
information about the status of the
current run once an application has
been installed in the Simulator or in an
attached iPhone.
The Groups & Files list displays a complete
summary of all files and other information
associated with a project, including a
complete file list, a class summary, a list of
included frameworks, compile targets, and
other resources.
F Text Editor Navigation Bar
Use the Previous and Next arrows and the File History menu to move through your
edit history. The Function Menu displays a list of code sections. On the right, from
left to right, the Bookmarks, Breakpoints, Class Hierarchy, and Included Files icons
open drop-down menus when clicked. Counterpart button swaps between header
and implementation files, and a Lock button prevents editing. You can split the Text
Editor to view multiple files by clicking the Split icon under the Lock button.
10
I Compilation Configuration
Choose options from the Configuration
drop-down menu to run the compiled
application in the Simulator or on an
attached iPhone. This menu also
summarizes active targets and sets
debug or final release status.
The Groups & Files List
The Groups & Files list is the key to managing an Xcode
project. It summarizes all the components of a project and
defines the compilation products and targets. However,
many of its features are not intuitive or obvious, are not
immediately visible, or are simply confusing.
You can use the Classes folder to review the list of classes
in your project. Projects that use the Xcode Templates list
all the pre-included classes here. However, if you add a
new custom class, it is not moved to this folder
automatically. You must move it manually.
You can load most source code files into the Text window
by clicking them. However, you must double-click to open
nib files, which are used in Interface Builder, because
Interface Builder is a stand-alone application and is not
built into Xcode. If you double-click a source code file, it
opens in a new maximized floating Text Editor window.
You often need to add a framework to a project. The menu
option for adding a framework is not included in the main
menu tree. To add a framework, right-click on the
Frameworks folder, choose Add➔Existing Frameworks, and
then select one or more frameworks from the floating list
that appears. See Chapter 3 for more on frameworks.
Chapter 1: Introducing iPhone OS Devices
Understanding Xcode’s
Work Areas
Symbolic Links and Real Files
One of the more confusing features in Xcode is that the list
of files in the Groups & Files list may not mirror the
corresponding files in a project folder. If you delete a file
from the Groups & Files list, the file is removed from the
project, but it remains in the project folder. Similarly, if you
rename a file in Xcode, the original name on disk is not
updated. If you move a custom class so it appears in Classes
folder, it is not moved to the corresponding folder on disk.
Smart Groups
The Implementation Files and Nib Files at the bottom of
the Groups & Files window are examples of Smart
Groups. You can use Smart Groups to automatically
group project files according to search criteria that you
define. Choose Project➔New Smart Group to add a
group. Select Simple Filter Smart Group to add files with
a simple file name search and the Regular Expression
option to include files using a regular expression search.
The file names in the Groups & Files list are symbolic links
to real files. If you right-click on a file and then choose Get
Info from the pop-up menu, you will see a name and path
specification. The name appears in the Groups & Files list
and can be changed to anything. The path specification
points to the real file.
Further Features
Xcode includes a rich set of further features, with
corresponding windows, in its menu tree. Xcode’s many
debugging windows are described in Chapter 1. To use
the Class Model tool, choose Design➔Class Model➔
Quick Model, and it displays a graphical view of the
relationships between project classes and lists their
properties and methods. For more on properties and
methods, see Chapter 2. You can view a Class Browser
by choosing Project➔Class Browser. This lists all the
classes used in the project, including those imported
from frameworks.
11
Build a Sample
Application
Y
ou can use Xcode’s features to quickly build and
test the sample code applications included in the
documentation. Compilation is a one-click process
in Xcode. You do not need to know anything about
Objective-C, frameworks, or other features of the iPhone
OS to build and test the sample applications. The only
prerequisite is an ability to use the Finder to create and
name folders while saving files and to select a target
platform in Xcode.
archive that includes a complete directory tree for the
project. You will need to uncompress the archive
manually before you can load the project and optionally
copy the files to a working directory. From there, you can
load the project into Xcode by double-clicking the file
with the .xcodeproj extension.
There are two ways to build a sample application. The
first is to use the sample code found in the
documentation. This includes a quick link. Clicking the
Open Project in Xcode button and choosing a Save As
location loads the project into Xcode. Behind the scenes,
a compressed version of the project is decompressed and
copied into the directory you nominate. The project files
are then loaded into Xcode — ready to be built.
To select a target platform, click the Compilation
Configuration drop-down menu. By default, only the
iPhone Simulator option is available. You can also
choose a debug configuration for testing or a release
configuration to create a leaner application that requires
less memory. You can install a release build on your own
iPhone, but you cannot upload it to the App Store. For
information about creating a configuration suitable for
distribution via the App Store, see Appendix 1.
If you are downloading a project from an online
collection, the files are usually compressed into an
For convenience, you may find it helpful to keep all your
applications in one or more subfolders of a main project
or archive folder.
Build a Sample Application
1
Select a sample application from the
documentation.
Note: See the section earlier in this
chapter for more on finding sample
source code.
2
3
4
2
Click Open Project in Xcode.
Select a target folder.
Optionally, click New Folder to
create a new target folder.
Note: You do not need to create a folder
for the project itself. It is
automatically created in a new
subfolder.
5
3
Click Choose to confirm your
selection.
The sample application is copied to
the target folder, decompressed, and
then automatically loaded in Xcode.
12
4
5
Select the Simulator option from the
Compilation Configuration menu.
7
Click Build and Run to build and run
the application.
8
Review the status of the compilation
process in the status bar.
6
7
The application is automatically
installed in the Simulator.
8
9
Use the Simulator to test and explore
the features of the sample
application.
The Simulator runs the application as
if it were installed on an iPhone.
9
Chapter 1: Introducing iPhone OS Devices
6
Note: Optionally, you can quit the
Simulator when done by choosing
iPhone Simulator➔Quit iPhone
Simulator. You can also leave the
Simulator running. You will be asked
to confirm that it should quit and
reload if you recompile.
To test applications on a real iPhone, you will need to provision it. To provision a phone, you must sign up for the
full iPhone Developer Program, register, be accepted, and pay a fee. You can then set up Xcode with a set of
provisioning keys and also add further keys for specific handsets.
The provisioning process is complex. You create three software keys — one for yourself or your managing corporate
entity, one for each developer in the project, and one for each handset. You must copy the first two keys to your
project folder, install the handset key on the iPhone, and then add it to the Provisioning Profiles tag under the
iPhone Development tab in Xcode’s Organizer window. You can view the Organizer by choosing Window➔Organizer
in Xcode.
You can find detailed walkthrough instructions for the provisioning process on the developer pages of your Apple
account once you have been accepted into the program.
13
Choose a
Project Template
Y
ou can speed up the development process by
beginning a project with one of the Xcode project
templates. Each template includes a minimal set of
files and features and implements an application with a
certain type of interface. For example, the View-based
Application template creates a blank screen, which is an
example of an iPhone view — a screen that you can fill with
settings and information. The Utility Application template
creates an application with two views as well as buttons to
flip between them. For more on views, see Chapter 3.
Templates are not complete sample applications. If you
compile and run them, they either do nothing at all or
very little. Many of them do not respond to user actions.
But they do offer a skeleton for an application. You can
fill out this skeleton by adding further features to create a
working application. Templates are built into the Xcode
workflow and are not an optional feature. Whenever you
create a new project, you begin by selecting one of the
templates. Although it is possible to create an application
from scratch without using templates, this is not
straightforward and is not recommended.
Many of the templates include features that have been
commented out. You can add extra features to your
application by removing the comments. However, even
with commented sections, the list of features included in
the templates is minimal. In a typical application, you will
need to add further features by hand. You can save further
development time by creating custom templates to your own
design. There is no limit on how complex a template can be.
Choose a Project Template
1
2
Open Xcode.
3
If it is not already selected,
click Application.
4
5
Choose a template.
6
Click Choose to confirm
your selection.
2
Choose File➔New Project.
3
Review a brief description
of the template and its
features.
A Save As dialog box
appears, allowing you to
specify a file location for
the new project.
14
4
5
6
Navigate to the folder in which you
would like to save your new project.
8
7
Note: You may find it useful to create a
Temp folder for quick experiments
and tests — separate from your
main Project folder.
8
Type a name for the new project.
Note: The project is saved inside a folder
with the new name.
9
Click Save to create the new project.
The project is created by using the
selected template and is automatically
loaded into Xcode.
0
9
Review the list of files in the project.
Optionally, you can build and run the
project.
The project is now ready for editing.
0
Chapter 1: Introducing iPhone OS Devices
7
You can get the most from templates by creating your own. With custom templates, you can move beyond the
minimal features included in the standard templates to create skeleton applications with a more comprehensive set
of features.
In Xcode 3.2, the template files are available in /Developer/Platforms/iPhoneOS.platform/Developer/Library/
Xcode/Project Templates/Application.
Each folder in this directory appears in the Xcode’s Template window. To create a custom template, drag+copy one
of the folders to create a duplicate — for example, Navigation-based Application 2. Open the folder to find the __
PROJECTNAME__.xcodeproj file. Double-click this file to open it in Xcode. You can then edit source code, add
further source code or Interface Builder files, include custom icons, and so on. To rename the template, rename its
folder.
Do not change the __PROJECTNAME__ and __PROJECTNAMEASIDENTIFIER__ labels. These labels are
automatically replaced when you create a new project.
15
Work with Xcode’s
Auto-Completion Features
Y
ou can use the Code Sense auto-completion
feature in Xcode to speed up and simplify
development. It minimizes typing and reminds
you of the names of important variables and other
program features.
appropriately named code blocks. For example, a for-loop
appears with initial, condition, increment, and
statement code blocks. Tab to each block to select it and
then begin typing as normal to fill it with code. Tab again
to move to the next block.
Code Sense is a semiautomated tool that fills in code as
you type. It searches the application’s symbol table for
matches. If there is more than one symbol or feature with
a similar name, Code Sense inserts the first match it finds.
Code Sense also includes bracket-matching indicators for
both curly and plain brackets. When you type a closing
bracket, Code Sense flashes the matching open bracket. In
limited and apparently somewhat random contexts, Code
Sense may sometimes add an opening square bracket
where one is needed. You can use this feature to ensure
that your brackets are correctly balanced.
You can accept its match by typing Return or you can
continue typing to narrow the search and specify a
different match. When you accept a match, Code Sense
automatically skips the cursor over the symbol it entered
so you can continue editing the remainder of the code.
Code Sense is not supernaturally intelligent and often
makes mistakes, so you should review its guesses. But it
is a very useful time-saver. It is worth taking the time to
master it so you can benefit from its features without
having to think about them consciously.
For language features, including conditionals and loops,
Code Sense inserts summaries of the syntax with
Work with Xcode’s Auto-Completion Features
1
2
Open the Apple sample
Hello World application in
Xcode and then click the
MyViewController.m file
to load it in the Text
Editor.
1
Type - (void)viewDidA.
Code Sense inserts
various guesses as you
type.
3
Type Return to select the
guess that includes the
string viewDidAppear.
4
Type a curly open bracket
({) and then type Return.
2
3
Code Sense automatically
indents the cursor on the
next line.
5
Type if.
Code Sense automatically
inserts conditions and
statement code blocks for
an if statement and then
adds appropriate curly and
plain brackets around them.
16
5
4
Press Tab to select the statement
code block and then type an.
Code Sense auto-completes an as
animated.
7
Type Return to accept and skip and
then type == Y.
6
7
Code Sense auto-completes Y as
YES.
8
Tab to the Statement code block and
then replace it with a call to NSLog
and a string literal.
Code Sense does not attempt to
auto-complete the string literal.
Note: Code Sense should recognize and
auto-complete NSLog but does not.
This is a bug.
9
Chapter 1: Introducing iPhone OS Devices
6
8
9
Add a final closing curly bracket.
Code Sense automatically moves the
closing bracket to the far left and
then flashes the corresponding
opening bracket.
You can use a shortcut to select from the list of possible options offered by Code Sense. Instead of narrowing down
the search options by typing, you can also press F5 to display a box with a scrollable list of suggestions. Xcode’s
first guess is pre-selected, but you can scroll through this list to select a different option. This list is simply the list of
symbols in the application. Xcode does not attempt to filter the list for relevance or appropriateness.
Other keyboard shortcuts are available. By default, Control+/ (forward slash) skips between code blocks. Control+.
(period) inserts a series of guesses. Control+, (comma) reveals the suggestion box. You can change these key
bindings in the Code Sense tab in the Xcode Preferences. For more on Xcode preferences, see the section “Work
with Application Preferences and Settings” later in this chapter.
17
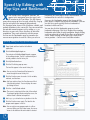
Speed Up Editing with
Pop-Ups and Bookmarks
X
code includes three navigation shortcuts. All
appear in the navigation bar at the top of each
file window in the Text Editor. The File History
menu shows a pop-up list of recently edited files. Pop-up
lists for each project are managed independently.
The Function menu shows a list of function, variable, and
method definitions in the current file. You can extend this
list and add custom locations to it by adding #pragma
directives to your code. These directives do not affect
compilation. They work exclusively with this menu.
You can use the Bookmarks menu to remember the
current cursor position in each file. When you select a
bookmark, the cursor moves to the saved location. The
bookmark list for each file is independent.
However, the Bookmarks group in the Groups & Files
pane shows a complete list of project bookmarks. You can
use this list to move quickly between bookmarked
locations in different files.
You can also click the Bookmarks group to reveal a
bookmark editor page. This list is designed for renaming
bookmarks rather than for quick navigation. Single-clicking
each item selects the relevant file but does not position the
cursor. Double-clicking an item moves the cursor to the
correct position — but in a new Text Editor window.
Speed Up Editing with Pop-Ups and Bookmarks
1
Open Xcode and then load the Hello World
application.
2
Click HelloWorldAppDelegate.m.
2
3
The contents of HelloWorldAppDelegate.m appear
in the editing window. The file is automatically but
invisibly added to the file history list.
3
4
4
Click MyViewController.m.
Click the File History pop-up menu.
The two files appear in the recent history list.
Note: You can use the Forward and Back arrows to
move through the recent history list.
5
Click the Function menu to reveal a list of variables,
methods, and functions.
Note: Until you select an item, the Function menu title is
<No selected symbol>. You can display the menu
by clicking this text.
6
Click the –viewDidLoad method.
Note: The cursor is not placed at the start of the method.
If you begin typing without moving the cursor, the
method name is deleted and replaced.
7
8
5
6
8
Add a #pragma directive to any location in the file.
Click the Function menu again. The label for the
pragma mark appears in the list.
Note: You can add as many pragma marks to a file as
you need. When you click a label name, the cursor
moves to the label and the entire label is selected.
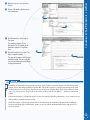
18
7
Move the cursor to any location in
the file.
0
Choose Edit➔Add to Bookmarks to
add a bookmark.
Chapter 1: Introducing iPhone OS Devices
9
0
9
!
Click Bookmarks in the Groups &
Files pane.
The bookmark appears in the
Bookmarks list. An editable list of
bookmarks appears in the Detail
View.
@
Click the Bookmark icon in the Text
Editor navigation toolbar.
!
@
The pop-up list appears with the new
bookmark added. You can move the
cursor to the bookmarked location by
clicking the bookmark.
In addition to bookmarks and navigation shortcuts, Xcode includes a Favorites feature. To show the Favorites
toolbar, choose View➔Layout➔Show Favorites Bar. The toolbar appears as a blank gray area below the main
Xcode toolbar. You can drag items from the Groups & Files pane and then drop them on the toolbar for quick
access. To remove an item, drag it back to the Groups & Files pane. Do not delete it — this deletes it from the
project.
The Favorites feature is a simple file selector. It does not include positioning information, so you cannot use it to
move quickly to a specific location in a file.
The bookmarks list in the Groups & Files pane is the only feature in Xcode that can move between different
locations in different files. Unfortunately, there is no way to undock the Bookmarks feature and open it in a
separate window.
19
Debug
Your Code
Y
ou can use Xcode’s debugging features to
eliminate errors in your code. The debugging
environment is unusually sophisticated. You can
set breakpoints at line numbers or at specific symbols.
You can single-step through the code after a breakpoint,
and you can monitor variables. You can also set
breakpoint actions, which force Xcode to perform various
actions when it reaches certain breakpoints.
Xcode includes four separate but related debugging
windows. You can debug directly in the Text Editor,
setting breakpoints and single-stepping through code.
You can use the mini debugger, which is a floating
window that summarizes the application state. There is
also a full debugger window, which provides more
detailed information about variables and execution status.
Finally, there is a general-purpose console window. It
provides runtime status messages, including crash
dumps. You can also send messages of your own to the
console window. The console is independent of the main
iPhone display. Messages sent to it are not visible to
iPhone users. It is equivalent to sending the stdout
stream to a terminal in Unix.
Identical debugging features are available on the
Simulator and on an attached iPhone. You can monitor
execution on a real iPhone, check variables, and receive
crash dumps and other real-time status information.
To use the debugging features, choose the Debug option
from the Compiler Configuration drop-down menu. When
you build and run, your application is generated with a
full symbol table and other debugging information.
Remember to select the release setting for a final build
run. Otherwise, your application will use more memory
than it needs to and will run slowly.
Advanced developers can use further features, such as
conditional breakpoints, breakpoint templates, breakpoint
actions, and watchpoints. For details, see “Managing
Program Execution” in the “Xcode Debugging Guide”
section of the Xcode documentation.
Debug Your Code
1
Open Xcode and then load the Hello
World application.
2
Click the MyViewController.m file to
open it in the Text Editor window.
3
Scroll down to the updateString
method declaration and then place the
cursor at the start of the last line before
the closing curly bracket.
4
2
4
Choose Run➔Manage Breakpoints➔
Add Breakpoint at Current Line.
An arrow appears next to the selected
line of code to indicate that a breakpoint
has been added.
5
Choose the Debug build option from the
Compiler Configuration drop-down
menu.
6
Click the Breakpoints switch to select it
if it is not already selected.
7
Click Build and Debug to create a debug
build and then install it in the Simulator.
20
3
5
6
7
Type a test string into the application in
the Simulator to trigger the breakpoint.
Note: In this example, the debug breakpoint
is triggered when you attempt to
update the string. But the breakpoint
can be placed anywhere in the
application and triggered at any point.
9
8
Review the changes that appear in the
Text Editor window.
The breakpoint location is highlighted,
an arrow appears next to it, and the
navigation bar changes to display
pause, resume, single-step, and other
debugging icons.
0
Choose Run➔Debugger to open a new
debugging window.
!
Review the list of functions and
methods in the Overview pane.
@
Click the updateString method to
highlight it and show its variables.
#
Click self in the right-hand variable
viewer to show the variables used in
the updateString method and to
reveal the string variable that has been
updated with your new test value.
9
@
!
0
#
Chapter 1: Introducing iPhone OS Devices
8
You can now review other variables
and use the Step Over, Step Into, and
Step Out buttons at the top of the
window to continue testing and
debugging.
Xcode’s console is usually hidden. You can show it by choosing Run➔Console in Xcode. To send messages to the
console, add NSLog statements to your code. For example:
NSLog(@”Hello, iPhone Console!”);
This prints Hello, iPhone Console! on the console, with an associated time stamp.
You can use console messages to debug applications that are difficult to manage using the standard debugging
tools. Multi-threaded applications can be particularly challenging. Adding a conventional breakpoint can disrupt
the interaction between threads. You can use NSLog to display the status of variables and program execution
without disrupting thread interaction.
You can also use it to monitor simpler status messages generated by a single thread. However, the other debugging
tools offer more sophistication for problem-solving at this level.
NSLog works in both debug and release builds. For best performance, you should remove all NSLog statements
from an application before final release. You should also select the Release build option for a final build so
debugging information is not unnecessarily included.
21
Profile and Improve
Your Code
Y
ou can use Xcode’s Instruments to monitor
features of operation of your application in real
time; for example, you can watch memory
allocations, check processor activity, and monitor file
accesses. Instruments do not use the debugging system
and do not require a debug build. You can use
Instruments with a release build. You can run them on
the Simulator or on an iPhone handset. These two
environments create different results with different
features and options. But the principles of profiling an
application’s features using one or more Instruments are
the same for both.
The Instruments display is split into four areas. A toolbar
at the top shows key settings. Under it, the Instruments
timeline displays important changes in the status of the
settings and features you select for monitoring. Beneath
the timeline is a detailed view pane, which shows
relevant variables and other monitored settings.
To the left of the detailed view is a control pane. Use this
to select between the different options that can appear in
the detailed view.
To use Instruments, build an application using the Build
feature, choose Run➔Run with Performance Tool, and
then choose from the list of available instruments in the
drop-down menu. The list of instruments available for
iPhone development is a small subset of those available
on the Mac. The tools do not always distinguish between
Mac and iPhone monitoring, so you should use caution
when viewing and interpreting the results.
You can save an Instruments run to review it later or to
compare it with other runs. Saving it saves the timeline
and the current detailed view. You cannot scroll back to
watch changes in the detailed view, but you can move the
timeline play point backward and forward to watch a
summary of changes in a run.
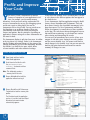
Profile and Improve Your Code
1
Open Xcode and then load the
Hello World application.
2
Scroll down to find the line with
the [dViewController
release]; statement and then
comment it out.
3
Note: This deliberately creates a
memory leak in the code.
3
4
Choose Build➔Build to build the
application without running it.
2
Choose Run➔Run with Performance
Tool➔Leaks to load the memory leak
profiler.
The Simulator loads the application
and runs it, and the Leaks and Object
Allocation Instrument window
automatically appears.
22
4
Review the timeline in the Leaks and
ObjectAlloc window.
Note: The Hello World application
includes a small memory leak,
which is visible in the Leaks
timeline. This is a bug in the
Simulator.
6
5
Review the memory allocations
shown in the detailed view.
Note: This is a complete list of all the
memory allocations in the
application.
7
Type a test string in the application
in the Simulator to trigger a
deliberate memory leak.
8
Review how the allocations listings
are updated as memory is assigned.
9
Watch as the bar graph display flags
the leak with a red indicator and a
step change in the bar height.
6
9
7
Chapter 1: Introducing iPhone OS Devices
5
8
The Leaks instrument gives a clear
indication of memory leaks in the
application.
The Instruments tool is modular. The presets listed in the Instruments menu display one or two monitoring tools
from a wider selection of options. You can assemble a list of tools to suit your own requirements. To add a
monitoring tool to the list, click the gear icon in the bottom-left corner of the Instruments window, choose Add
Instrument from the pop-up menu, and then select an instrument from the list that appears next to it. Some of the
instruments are designed for the Mac environment and either do not work on the iPhone or do not display useful
information. To remove an instrument from a collection, drag it to the Trash.
Advanced developers can build their own monitoring tools. Choose Instrument➔Build New Instrument to view an
Instruments development panel. You can use this to create a tool to monitor a selection of various system and
runtime events and states.
23
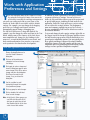
Work with Application
Preferences and Settings
Y
ou can customize many of the features in Xcode
by using the Preferences feature. You can set the
preferences to modify the working environment to
suit your own coding style and to reveal some of the
features in Xcode that are not visible with the default
settings. For example, you can change the debugging
preferences so Debugger and Console windows
automatically appear during a debugging run.
The full list of preferences is long and detailed. For
example, you can change the colors and fonts in the Text
Editor, modify some of the features of the Code Sense
auto-completion tool, change the key bindings in the
menu tree, set up distributed builds on a network, and
load extra documentation. You can also set up source
code repositories for shared online development.
Work with Application Preferences and Settings
Choose Xcode➔Preferences to
view the Xcode Preferences
dialog box.
2
Click one of the preferences
categories to view and change
the settings.
3
Click apply to make a change and
leave the dialog box open to make
more changes. Click OK to make a
change and close the dialog box.
Click Cancel to undo the last
change, if any, and close the
dialog box.
4
Use the scrollbar to scroll
horizontally through the complete
list of preference groups.
5
6
Click any group to make changes.
Click or double-click individual
items to make changes.
Note: In the Fonts & Colors group, you
can Shift+click the entire list of
text types to select them all and
then double-click the list to show
a text size and font selector.
24
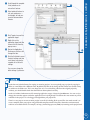
In addition to Xcode’s preferences, each project features
a separate collection of settings. You can use these to
define the files and folders that are part of the project and
to specify build targets, including the final name for the
application. Unlike the Xcode preferences, project settings
are not collected in a single location. The programmer
name and company copyright tag are not set in Xcode —
they are automatically read from the default user card in
the Contacts database.
To view and change the other project settings, right-click on
the Targets icon in the Groups & Files pane and then choose
Get Info from the pop-up menu. Click the Build tab to view
general project compilation options. You can typically leave
these options unchanged. Advanced developers familiar
with all the features of the GCC compiler can fine-tune the
compilation process by modifying them and saving custom
settings to create specialized compilation templates.
1
2
3
5
4
6
Scroll through the complete
list of preferences to
review their features.
8
Select optional features to
suit your preferences —
for example, to load nonessential documentation
libraries.
9
Click Targets to reveal the
application target.
0
Right-click on the
application target and then
choose Get Info from the
pop-up menu.
!
Review the Application
Preferences and then click
through the tabs.
@
Click the Build tab to reveal
the build settings and then
scroll down to review the
complete list of all build
settings.
Chapter 1: Introducing iPhone OS Devices
7
7
8
!
9
0
@
You can now change the
build settings if you desire.
Xcode does not include features for copying or renaming projects. You can typically copy a project by copying its
folder to a new folder with a different name. By default, the links in the Groups & Files window are created so they
are relative to the folder root. This is not always the case. To avoid editing a file from the original project by
accident, you should double-check that the links have been updated correctly.
Xcode 3.2 includes the Rename tool for renaming application targets. Choose Project➔Rename. You can use it to
change the name that appears under the application icon in Springboard. This feature does not rename any of the
other files in the project. It is also buggy and might delete your project file.
There is no easy way to rename an entire project in one click, including all the source files. One work-around is to
create a template from your project using placeholder template names for key files. Alternative semiautomated
solutions are available online. For example, see http://mohrt.blogspot.com/2008/12/renaming-xcode-project.html.
25