1
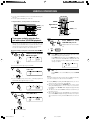
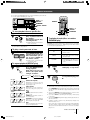
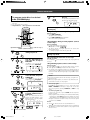
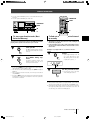
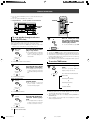
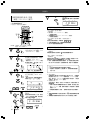
Operating Instructions
使用說明書
◊Û¿X.?≥
◊Û¿X¯?≥
'
FILE-TYPE COMPACT DISC PLAYER
檔案式雷射唱碟唱機
POWER ON DEMO display
電源打開演示(P O W E R
Set the line voltage selector switch to the
position of your area before connecting
the power cord. (Refer to page 2.)
English
請在連接電源線之前,將線路電壓選擇開關設
定至貴地所用電壓位置。(參見16頁。)
中國語
ON
D E M O )顯示
POWER ON DEMO display mode allows
you to see variations of the display. To
enter the POWER ON DEMO display mode,
press STANDBY/ON and then 4 1
within 1 second after turning on the power.
電源打開演示(POWER ON DEMO)顯示模式
可讓您看到各式各樣的顯示。按下電源
(STANDBY/ON)按鍵後的一秒鐘之內,再按
下4 1 按鍵,便可進入電源打開演示
(POWER ON DEMO)顯示模式。
To cancel the POWER ON DEMO display
mode, press any button.
如果要解除電源打開演示(P O W E R
ON
D E M O)顯示模式,只需按任意按鍵即可。
Thank you for buying this Pioneer product.
Please read through these operating instructions so you
will know how to operate your model properly. After you
have finished reading the instructions, put them away in a
safe place for future reference.
In some countries or regions, the shape of the power plug
and power outlet may sometimes differ from that shown in
the explanatory drawings. However, the method of
connecting and operating the unit is the same.
÷ This player is for consumer use. If the player is used in a
business (for example, used for a long period at a restaurant),
the player will not be covered under warranty.
÷ CD Video, VIDEO CD, CD graphics, DVD and CD-ROM discs
cannot be played with this player.
K041_En
15
Ch
IMPORTANT
CAUTION
RISK OF ELECTRIC SHOCK
DO NOT OPEN
The lightning flash with arrowhead symbol,
within an equilateral triangle, is intended to
alert the user to the presence of uninsulated
"dangerous voltage" within the product's
enclosure that may be of sufficient
magnitude to constitute a risk of electric
shock to persons.
CAUTION:
TO PREVENT THE RISK OF ELECTRIC
SHOCK, DO NOT REMOVE COVER (OR
BACK). NO USER-SERVICEABLE PARTS
INSIDE. REFER SERVICING TO QUALIFIED
SERVICE PERSONNEL.
CAUTION
This product contains a laser diode of higher class
than 1. To ensure continued safety, do not remove any
covers or attempt to gain access to the inside of the
product.
Refer all servicing to qualified personnel.
The following caution label appears on your unit.
The exclamation point within an equilateral
triangle is intended to alert the user to the
presence of important operating and
maintenance (servicing) instructions in the
literature accompanying the appliance.
D3-4-2-1-1_En
CLASS 1
LASER PRODUCT
D3-4-2-1-8_En
CAUTION : USE OF CONTROLS OR ADJUSTMENTS OR PERFORMANCE OF PROCEDURES OTHER THAN THOSE
SPECIFIED HEREIN MAY RESULT IN HAZARDOUS RADIATION EXPOSURE.
CAUTION : THE USE OF OPTICAL INSTRUMENTS WITH THIS PRODUCT WILL INCREASE EYE HAZARD.
D6-8-2-1_En
WARNING: Slot and openings in the cabinet are
provided for ventilation and to ensure reliable
operation of the product and to protect it from
overheating, to prevent fire hazard, the openings
should never be blocked and covered with items,
such as newspapers, table-cloths, curtains, etc. Also
do not put the apparatus on the thick carpet, bed,
D3-4-2-1-7b_En
sofa, or fabric having a thick pile.
You can find the voltage selector switch on the rear
panel of multi-voltage models.
The factory setting for the voltage selector is 220240V. Please set it to the correct voltage for your
country or region.
• For Taiwan, please set to 110-127V before using.
WARNING: The apparatus is not waterproofs, to
Before changing the voltage, disconnect the AC power
cord. Use a medium size screwdriver to change the
voltage selector switch.
prevent fire or shocks hazard, do not expose this
apparatus to rain or moisture and do not put any
water source near this apparatus, such as vase,
flower pot, cosmetics container and medicine
D3-4-2-1-3_En
bottle etc.
Voltage selector
220-240V
WARNING:
D3-4-2-1-5_En
BEFORE PLUGGING IN THE UNIT FOR THE FIRST
TIME, READ THE FOLLOWING SECTION CAREFULLY.
The voltage of the available power supply differs
according to country or region. Be sure that the
power supply voltage of the area where this unit
will be used meets the required voltage (e.g., 230V
D3-4-2-1-4_En
or 120V) written on the rear panel.
2
En
PRE1297-A/En/02-08
2
110-127V
04.1.6, 11:29 AM
NOTE: This equipment has been tested and found to comply with the limits for a Class B digital device, pursuant to
Part 15 of the FCC Rules. These limits are designed to provide reasonable protection against harmful interference in
a residential installation. This equipment generates, uses, and can radiate radio frequency energy and, if not
installed and used in accordance with the instructions, may cause harmful interference to radio communications.
However, there is no guarantee that interference will not occur in a particular installation. If this equipment does
cause harmful interference to radio or television reception, which can be determined by turning the equipment off
and on, the user is encouraged to try to correct the interference by one or more of the following measures:
–
–
–
–
Reorient or relocate the receiving antenna.
Increase the separation between the equipment and receiver.
Connect the equipment into an outlet on a circuit different from that to which the receiver is connected.
Consult the dealer or an experienced radio/TV technician for help.
D8-10-1-2_En
Information to User
Alteration or modifications carried out without appropriate authorization may invalidate the user’s right to operate
the equipment.
D8-10-2_En
CAUTION: This product satisfies FCC regulations when shielded cables and connectors are used to connect the
unit to other equipment. To prevent electromagnetic interference with electric appliances such as radios and
televisions, use shielded cables and connectors for connections.
D8-10-3a_En
The STANDBY/ON switch is secondary connected
and therefore, does not separate the unit from mains
power in STANDBY position. Therefore install the
unit suitable places easy to disconnect the MAINS
plug in case of the accident. The MAINS plug of unit
should be unplugged from the wall socket when left
D3-4-2-2-2a_En
unused for a long period of time.
WARNING: No naked flame sources, such as
lighted candle, should be placed on the apparatus.
If naked flame sources accidentally fall down, fire
spread over the apparatus then may cause fire.
D3-4-2-1-7a_En
Operating Environment
Operating environment temperature and humidity:
+5 ºC – +35 ºC (+41 ºF – +95 ºF); less than 85 %RH
(cooling vents not blocked)
Do not install in the following locations
• Location exposed to direct sunlight or strong artificial
light
• Location exposed to high humidity, or poorly
D3-4-2-1-7c_En
ventilated location
CONTENTS
BEFORE YOU USE THE PLAYER .......................................
CAUTIONS REGARDING HANDLING .................................
CONNECTIONS ..................................................................
NAMES OF PARTS .............................................................
HOW TO LOAD THE DISCS ...............................................
4
5
6
7
8
BASIC OPERATIONS
To listen in order from the first track ............................... 9
To select the disc and track ............................................ 9
To select a play mode ..................................................... 9
VARIOUS OPERATIONS
To program and play only the discs you want to hear ... 10
To start playback from a specific disc ...........................
To play a track you want to hear ...................................
To repeat playback ........................................................
To playback tracks/discs at random ..............................
To program tracks/discs in a desired order ...................
To store your favorite tracks .........................................
To find out which discs you’ve listened to recently ......
To scan quickly through tracks on a disc .......................
To use the TIME button ................................................
11
11
11
11
12
13
13
14
14
TROUBLESHOOTING ....................................................... 15
SPECIFICATIONS .............................................................. 15
3
En
PRE1297-A/En/02-08
3
04.1.6, 11:29 AM
BEFORE YOU USE THE PLAYER
HERE'S WHAT YOU CAN DO!
Up to 25 CDs can be registered by classifying
them into 3 categories (CUSTOM). P. 10
PUT BATTERIES INTO THE REMOTE
CONTROL UNIT (PD-F507 only)
For example, if you register you own discs in CUSTOM I, your
mother's discs in CUSTOM II and your father's discs in CUSTOM
III or if you select three kinds of music genres or artists and
register them in the three CUSTOM banks, you can play all of the
discs classified under one of the three CUSTOM banks. Addition
of discs to already-registered discs is also possible. Each of the
three CUSTOM banks can register up to 25 discs.
Immediately access and play your favorite tracks
from among the 25 discs loaded in the player.
P. 13
The Best Selection Memory function lets you store and play
favorite tracks with the touch of a single button (up to 15 tracks).
Easy access to the disc(s) you've listened to
recently. P. 13
The Previous Disc Scan function recalls the last disc you played
and then moves one by one through the previously played discs
(auto-memory of last 15 discs played).
CONFIRM SUPPLIED ACCESSORIES
Remote control
unit x 1(PD-F507 only)
1
¡
4
7
8
3
Output cable x 1
¢
Î
Open the lid of the battery compartment on the rear of the remote
control unit, and insert the batteries, taking care to align the ª and
· polarities correctly.
NOTES:
÷ In order to prevent battery leakage, remove the batteries when
not using the remote control unit for an extended period (one
month or more). If leakage occurs, carefully wipe away any
battery fluid inside the compartment, and replace the batteries
with new ones.
÷ Do not allow books or other objects to rest on top of the remote control unit, since the buttons may be depressed, causing
faster exhaustion of the batteries.
Incorrect use of batteries may cause leakage or rupture.
Always be sure to follow these guidelines:
A. Always insert batteries into the battery compartment
correctly matching the positive ª and negative ·
polarities, as shown by the display inside the
compartment.
B. Never mix new and used batteries.
C. Batteries of the same size may have different voltages,
depending on brand. Do not mix different brands of
batteries.
D. When disposing of used batteries, please comply with
governmental regulations or environmental public
instruction’s rules that apply in your country/area.
REMOTE CONTROL OPERATIONS
(PD-F507 only)
SizeAA/R6P dry cell batteries x 2
(PD-F507 only)
Control cable x 1
(PD-F407 only)
When operating the remote control unit, point the unit's infrared
signal transmitter at the remote control receiver (Remote Sensor) on
the front panel of the player. The remote control unit can be used
within a range of about 7 meters from the remote sensor, and within
angles of up to about 30 degrees.
Index label sheet x 1
CD liner notes file x 1
1
2 3
6
7
4
5
8 9 10
11 12 13 14 15
16 17 18 19 20
21 22 23 24 25
÷ Please use the index label sheet
with the CD liner notes file.
4
NOTE:
If the remote control sensor window is in a position where it receives
strong light such as sunlight or fluorescent light, control may not be
possible.
BEFORE YOU USE THE PLAYER
En
PRE1297-A/En/02-08
4
04.1.6, 11:29 AM
CAUTIONS REGARDING HANDLING
Condensation
Location
Install the unit in a well-ventilated location where it will not be
exposed to high temperatures or humidity.
Do not install the unit in a location which is exposed to direct rays
of the sun, or near hot appliances or radiators. Excessive heat can
adversely affect the cabinet and internal components. Installation
of the unit in a damp or dusty environment may also result in a
malfunction or an accident. (Avoid installation near cookers etc.,
where the unit may be exposed to oily smoke, steam or heat.)
Do not install the unit on a tottered stand, nor in an unstable or
inclined surface.
When this unit is brought into a warm room from previously cold
surroundings or when the room temperature rises sharply,
condensation may form inside, and the unit may not be able to
attain its full performance. If this occurs, allow the unit to stand for
about an hour or raise the room temperature gradually.
Cleaning and handling compact discs
Precautions regarding installation
÷ Placing and using the compact disc player for long periods on
heat-generating sources such as amplifiers will affect
performance. Avoid placing the player on heat-generating
sources.
÷ Install this compact disc player as far as possible from tuners
and TV sets. A compact disc player installed in close proximity
to such equipment may cause noise or degradation of the picture.
÷ Such noise may be particularly noticeable when an indoor
antenna is used. In such cases, make use of an outdoor antenna,
or turn off power to the compact disc player.
÷ Please place this unit on a level surface.
÷ The presence of fingerprints or smudges on the surface of the
disc will not directly affect the recorded signals, but depending
on the degree of contamination, the brightness of the light
reflected from the signal surfaces may be reduced, causing
degradation of sound quality. Always keep your discs clean by
wiping them gently with a soft cloth from the inner edge toward
the outer periphery.
÷ If a disc becomes very dirty, dip a soft cloth in water, and after
wringing it out well, wipe the dirt away gently, and then remove
any water drops with another soft, dry cloth.
÷ Do not use record cleaning sprays or anti-static agents on discs.
Also, never clean discs with benzene, thinner, or other volatile
solvents, since damage to the disc surface may result.
Record
cleaning
sprays
Cleaning the player
To clean the PLAYER wipe with a soft, dry cloth. For stubborn dirt,
wet a soft cloth with a mild detergent solution made by diluting
one part detergent to 5 or 6 parts water, wring well, then wipe off
the dirt. Also use a dry cloth to wipe the surface dry. Do not use
volatile liquids such as benzene and thinner which are harmful to
the unit.
Storing discs
÷ Discs are made of the same kinds of plastic used for conventional
analog audio records. Be careful not to allow discs to warp;
always store discs in their cases vertically, avoiding locations
with high heat or humidity, or extremely low temperatures.
Avoid leaving discs in cars, since the seat of a car in direct
sunlight can become unbelievably hot.
÷ Always read and abide by the precautionary notes listed on disc
labels.
Thinner
Benzene
With this unit, use a Compact Disc carrying the mark shown
below. Do not use other disc, for this may result in malfunction
or damage.
÷ When holding discs, do not touch their signal surfaces. Hold by
the edges, or by one edge and the center hole.
÷ Do not affix gummed labels or tape to the label surfaces. Also,
do not scratch or damage the label.
÷ Discs rotate at high speed inside the player. Do not use damaged
(cracked or warped) discs.
÷ Do not play a CD with a special shape (having other shape than a
circular disc, such as a heart shaped disc). Otherwise malfunction
may occur.
'
CD lens cleaner
The player's pickup lens should not become dirty in normal use, but
if for some reason it should malfunction due to soiling, consult your
nearest PIONEER authorized service center. Lens cleaners for CD
players are commercially available, but special care should be exercised
in their use since some may cause damage to the lens.
Re-transporting
When re-transporting this unit in the future, remove all discs from the
rack. Turn off the STANDBY/ON switch, wait for "OFF" to go out from
the display, and unplug the power cord.
CAUTIONS REGARDING HANDLING
En
PRE1297-A/En/02-08
5
04.1.6, 11:29 AM
5
CONNECTIONS
÷ Before making or changing the connections, switch off the power switch and
disconnect the power cord from the AC outlet.
CONTROL
OUT
To the CONTROL IN jack
Control cable ( PD-F407 only)
C
C
the Pioneer component
= of
bearing the Î mark.
( PD-F407 only)
CD player
Stereo amplifier
CD
L
White
Output cable
L
A-1
White
L
Plug into the wall
outlet at last.
IN
LINE OUT
R
DIGITAL
OUT
R
R
Red
Red
L
CONTROL
OUT
R
OPTICAL
IN
OUT
Power cord
OPTICAL
DIGITAL IN
A-2
B
Optical Fiber Cable
The illustration shows the flat blade 2-pin AC plug model.
A Making connections
1 Connect the OUTPUT jacks of this unit to the input jacks (CD or
AUX) of the amplifier. Make sure that the white plug is
connected to the left (L) jack and the red plug to the right (R)
jack.
÷ Be sure not to connect this unit to the amplifier’s PHONO
jacks, as sound will be distorted and normal playback will not
be possible.
2 Connect the power cord to a household AC wall outlet.
÷ Make sure plugs are inserted fully into the wall outlet.
NOTE:
Do not connect the power cord to an AC outlet on your amplifier.
B Connecting the OPTICAL FIBER CABLE
(PD-F507 only)
This unit can be connected to an amplifier equipped with an optical
digital jack.
1. Remove the protective dust cap from this unit’s DIGITAL OUT
OPTICAL jack.
2. Use an optical fiber cable to connect the DIGITAL OUT OPTICAL
jack of this unit to the optical input jack of the amplifier.
÷ Align the plug of the optical fiber cable with the optical digital jack
and fully insert the plug to make a secure connection.
Use a separately sold optical fiber cable for the optical digital jack
connections.
Precautions concerning use of optical fiber cables
÷ Fully insert the optical fiber cable plugs all the way into the jacks.
÷ Be careful not to fold or crimp the cable. When coiling an optical
fiber cable for storage, make sure the diameter of the coil is 15 cm
or larger.
÷ Use an optical fiber cable with a length of 3 m or less.
÷ Protect the optical fiber cable plugs from scratches and dust.
÷ When the unit is not connected using an optical fiber cable, be sure
to keep the protective dust cap plugged into the optical digital
output jack at all times.
6
This output terminal is
PD-F507 only.
C System remote control with a Pioneer stereo
amplifier that has the Î mark(PD-F407 only)
When a Pioneer stereo amplifier bearing the Î mark is used,
connect the CONTROL IN jack on the rear panel of the CD player
to the CONTROL OUT jack of the amplifier. This will enable the
CD player to be controlled using the remote control unit supplied
with the stereo amplifier. If you do not plan to use this feature, it
is not necessary to connect the CONTROL IN/OUT jacks.
÷ The remote control unit supplied with the amplifier can be used
to control Play, Stop, Pause, Track/Disc Search and Disc Change
operations.
÷ For instructions regarding connections and operation, refer to
the operating instructions provided with your stereo amplifier.
NOTES:
÷ When a control cable is connected to the player’s CONTROL
IN jack, direct control of the player with the remote control unit
is not possible. Operate the player with the remote control unit
by aiming it at the amplifier.
÷ Be sure to connect both of the control cable's plugs securely to
the CONTROL IN and CONTROL OUT jacks. Do not connect
only one end of the cable.
÷ Be sure to turn off the power of the amplifier before connecting
the power cord and output cable.
POWER-CORD CAUTION
Handle the power cord by the plug. Do not pull out the plug by
tugging the cord and never touch the power cord when your hands
are wet as this could cause a short circuit or an electric shock. Do
not place the unit, a piece of furniture, etc., on the power cord, or
pinch the cord. Never make a knot in the cord or tie it with other
cords. The power cords should be routed such that they are not
likely to be stepped on. A damaged power cord can cause a fire or
give you an electrical shock. Check the power cord once in a while.
When you find it damaged, ask your nearest PIONEER authorized
service center or your dealer for a replacement.
CONNECTIONS
En
PRE1297-A/En/02-08
6
04.1.6, 11:29 AM
NAMES OF PARTS
FRONT PANEL
÷The numbers in
P.
mark are reference pages.
MODE button
TIME button
Hood
P. 9
HI-LITE button
P. 14
P. 14
P. 12
PROGRAM button
CLEAR button
P. 8
P. 10
BEST button
P. 12
P. 13
FILE-TYPE
COMPACT DISC PLAYER
◊Û¿X.?≥
DISC (–,+) buttons
DISC
Î
DISC
CUSTOM
CLEAR
TIME
TRACK
MIN
ALL
RANDOM
SINGLE
PREVIOUS DISC
MODE
REPEAT
SEC
1 REMAIN PGM
SCAN
HI-LITE
BEST
P. 11
PREVIOUS
BEST
PROGRAM
PREVIOUS button
RANDOM
P. 13
REPEAT
REPEAT button
STANDBY indicator
STANDBY
P. 11
STANDBY/ON
3
8
7
41
¡¢
RANDOM button
'
P. 11
FILE-TYPE CD MECHANISM
1-BIT-DLC
DIRECT LINEAR CONVERSION
P. 9
Play button (3)
STANDBY/ON
switch P. 9
Track/Manual search
buttons (41/¡¢)
Stop button (7)
P. 9
P. 9
Pause button (8)
P. 9
DISPLAY
REMOTE CONTROL UNIT (PD-F507only)
Lights during random play.
Lights when you choose
the play mode.
Lights during repeat play.
÷The numbers in
P.
mark are reference pages.
Lights when the PROGRAM HI-LITE button
(PGM) button is pressed.
P. 14
PREVIOUS
button P. 13
POWER switch
BEST button
P. 9
P. 13
MODE button
P. 9
P. 10
REPEAT button
1
P. 11
Digit buttons
Lights when the
BEST button is
pressed.
Lights during
custom
programming
and play.
Lights when a CD
is being played.
Lights during
pause mode.
Lights when the
remaining time is
displayed.
Flashes during
TRACK SCAN.
Flashes during
DISC SCAN.
Flashes when the PREVIOUS
button is pressed.
P. 9
P. 10 P. 12
DISC SET button
P. 9
PGM button
POWER
HI-LITE PREVIOUS
REPEAT
MODE
PGM
CLEAR
1
2
3
TIME
4
5
6
7
8
9
0
TRACK
SET
DISC
SET
P. 10 P. 12
Manual search
buttons (1/¡)
–
BEST
P. 14
TRACK SET button
DISC
P. 9
+
1
¡
4
¢
7
8
3
RANDOM
FILE-TYPE CD PLAYER
REMOTE CONTROL UNIT
CU-P0090
P. 9
P. 12
TIME button
P. 9
Stop button (7)
P. 12
CLEAR button
Î
Track search
buttons (4/¢)
P. 9
RANDOM button
Pause button (8)
P. 9
P. 12
DISC (–, +)
buttons P. 11
P. 11
Play button (3)
P. 9
NAMES OF PARTS
En
7
HOW TO LOAD THE DISCS (Be sure to read this before operation)
÷ The hood cannot be opened if disc is being played.
÷ The hood cannot be opened for approximately 10 seconds after
playback has finished, or during disc search.
÷ Be careful not to pinch your fingers when opening and closing the
hood.
÷ Open and close the hood slowly.
Loading discs into the rack
The rack is for discs No. 1 - 25 .
÷ You can load up to 25 discs in each rack.
Gently lift the handle
to open the hood.
÷ If a disc is inserted with its label side facing to the left, it cannot be
played back. Be sure to load all discs with their label sides facing
to the right.
«
WARNING:
Do not put your hand, or any other
objects inside the rack, otherwise injury
or part damage may result.
The rack comes out.
Load the disc into the
rack with the label
side (printed surface)
facing to the right.
Label side faces right
÷ By using the racks, you
can load a total of 25 discs.
Gently push the
handle down to
close the hood.
÷
÷
÷
÷
Do not put anything other than CDs inside the rack.
Do not use adapters for 8-cm CDs.
Load only one disc into each disc slot.
Inserting an 8-cm CDs in between two 12-cm CDs, will make it
difficult to remove the 8-cm CD.
We recommend inserting 12-cm CDs starting from the right side
and 8-cm CDs starting from the left side of the rack.
÷ The unit will not operate if the hood is open. Be sure to close the
hood before attempting any operations.
÷ CDs cannot be played if
the hood is open.
To remove the discs...
Open the hood when playback has stopped.
Remove the disc from the rack.
8
÷ The hood cannot be opened if the rack is currently playing a disc,
during disc search, or during the first 10 seconds after playback
has finished.
If you try to open the hood in one of the previous situations,
“LOCK” will flash in the display. Close the hood immediately and
wait for “LOCK” to go out from the display before opening the
hood.
Playback will stop if you open the hood for longer than 2 seconds
when “LOCK” is flashing.
÷ Be sure to remove all discs from the rack, set the STANDBY/ON
switch to off, wait for "OFF" to go out from the display, and unplug
the power cord before moving the unit.
÷ When moving the product, be careful not to tilt it or apply strong
impact to it.
HOW TO LOAD THE DISCS
En
PRE1297-A/En/02-08
8
04.1.6, 11:29 AM
BASIC OPERATIONS
÷ You can operate PD-F507 by remote control unit and also by the
main unit.
÷ You can operate PD-F407 by the main unit.
MODE
STANDBY indicator
Digit buttons
1¡
7
8
41/¡¢
7
8
3
To listen in order from the first track
TRACK SET
DISC SET
MODE
4¢
3
To select the disc and track
(PD-F507 only)
Press STANDBY/ON.
To turn the power off...
Press STANDBY/ON again.
STANDBY indicator lights.
\
Use the digit buttons to
select the disc, then press
DISC SET.
\
Use the digit buttons to
select the track, and press
TRACK SET.
Load discs into the rack.
P. 8
«
Close the hood.
÷ Playback is not possible when the
hood is open.
Label side faces right
÷ DISC SET or TRACK SET should be pressed in less than 5
seconds after pressing the last numeric button.
÷ If the disc has not been loaded in the selected position, "** no
dISC" is displayed for 3 seconds.
To select a play mode
Press MODE during play or stop mode.
Press a few times to choose the mode you desire.
Playback occurs according to the chosen mode.
Press 3.
The tracks are played in order
starting from the first track on the
disc with the lowest disc No.
3
÷ If you choose a play mode beforehand, the tracks/discs are played
back according to the respective play mode.
To stop play
Press7.
7
(see page P. 10 to create a custom file).
3 ALL
3 SINGLE
In stop mode:
3 ALL
Press 8.
3 SINGLE
During playback:
To start play again, press 3 or 8.
8
To skip to another track
¡¢
Tap 41/¡¢ (or 4/¢ on
the remote control unit).
To fast forward/reverse.
41
(ΙΙ, ΙΙ
ΙΙ, ΙΙΙ
ΙΙΙ)
CUSTOM (ΙΙΙ 2 ΙΙ 2 Ι) 2
To pause play
41
ALL:
All discs are played back
SINGLE: One disc is played back
CUSTOM: Only discs stored in the CUSTOM file are played back
¡¢
Hold down 41/¡¢ (or
1/¡ on the remote control unit).
÷ When you select SINGLE during playback, only the current disc
will be played.
÷ If you press MODE during program mode, the program contents
will be erased.
Notes!!
÷ When you turn the power ON, playback starts according to the last
selected play mode.
÷ If you did not select a play mode, playback starts in ALL.
<Last disc memory>
When you press 7 or turn the power OFF, the unit memorizes the disc
that was being played. The next time you press 3, playback will start
from that same disc.
BASIC OPERATIONS
9
En
PRE1297-A/En/09-15
9
04.1.6, 11:33 AM
VARIOUS OPERATIONS
÷ You can operate PD-F507 by remote control unit and also by the
main unit.
÷ You can operate PD-F407 by the main unit.
MODE
÷ The parenthesis ( ) show operations for the main unit.
CLEAR
Digit buttons
DISC (–, +)
CLEAR
MODE
DISC SET
DISC (–, +)
3
3
To program and play only the discs
you want to hear (CUSTOM playback)
\
This unit lets you program up to 25 of your favorite discs. For
example, you can store all the discs of your favorite artist, or some
other group of personal selections, and play only those discs.
You can even add other discs to the custom later on.
Operation example) Storing discs 3 and 12 in the CUSTOM ΙΙ file.
During stop mode, press
MODE so that the CUSTOM
ΙΙ indicator lights.
(
)
3
Press MODE to select
CUSTOM and press 3.
Playback starts from the lowest disc
No.
(
=
3
)
Checking the numbers of the stored discs.
Press TIME repeatedly (3 times) during stop mode so that
the display changes as shown below.
Press DISC (–/+). Each time you press DISC (–/+), a disc
number stored in the CUSTOM file is displayed. When all
the disc numbers have been displayed, the disc number
changes to a blank.
÷ If some disc number appears, press CLEAR.
Use the digit buttons to
select disc.
3
CUSTOM
(
)
÷ If you use DISC (–, +) to select a disc, it will be programmed
automatically after approximately 2 seconds.
Press DISC SET.
CUSTOM
1
Repeat steps 2 and 3 to
store other discs.
2
\
(
10
Erasing all the discs from the each CUSTOM
file.
Press MODE to choose CUSTOM, then press the CLEAR
button.
Note!!
You cannot change the discs stored in the CUSTOM file. Likewise,
you cannot erase just one disc from the CUSTOM file.
¶ Pressing DISC (–, +) during CUSTOM playback lets you choose
among other discs stored in the CUSTOM file.
¶ If you use the digit buttons and DISC SET on the remote control
during CUSTOM playback to choose a disc not stored in the
CUSTOM file, “**- no dISC” will be displayed for approximately
3 seconds.
¶ The discs stored in the CUSTOM file will not be erased when you
turn off the power.
¶ When a disc appointed to the CUSTOM file is not loaded in the
rack, “**- no dISC” is displayed for approximately 3 seconds, the
disc is erased from memory, and CUSTOM searches for the next
disc.
)
VARIOUS OPERATIONS
En
PRE1297-A/En/09-15
10
04.1.6, 11:33 AM
VARIOUS OPERATIONS
÷ You can operate PD-F507 by remote control unit and also by the main unit.
÷ You can operate PD-F407 by the main unit.
DISC (–, +)
REPEAT
RANDOM
41 / ¡¢
7
REPEAT
3
7
To start playback from a specific disc
Press DISC (–, +) during
play or pause to choose a
disc number.
During pause, press 3 after
choosing the disc.
÷ Playback starts from the first track
of the chosen disc.
÷ When using the remote control, press DISC (–, +) to choose a disc,
then press 3 to start playback.
To play a track you want to hear
41
¡¢
Press41/¡¢ during play or pause to choose
the track number you desire (or press 4/¢ on
the remote control).
÷ During pause, press 3 after
choosing the track.
DISC (–, +)
4¢
RANDOM
3
To playback tracks/discs at random
(RANDOM play)
RANDOM selects tracks at random from the disc(s) in the current play
mode and plays each track once. Playback stops when all the tracks
on the disc(s) have played back once.
Play mode selected
Play contents
ALL
Plays all tracks in all discs in a
random order.
SINGLE
Plays all the tracks from a single
disc at random.
CUSTOM
Plays all tracks in the discs stored
in the CUSTOM file in a random
order.
To repeat playback (REPEAT play)
Press RANDOM during
either play or stop mode.
Press the REPEAT button
during playback.
Each time you press the
button, the repeat mode
changes as follows.
3 One track repeat
2
OFF
One track
3 ALL repeat
(ALL/SINGLE/CUSTOM)
7
To stop random play, press
7.
(One track repeat)
Repeats the current or a selected
track in either normal, random, or
program play mode.
(ALL repeat)
ALL
Repeats in one of the following 3
ways according to the play mode
P. 9
SINGLE
.
ALL:Repeats all the tracks on all the
discs (1 - 25).
SINGLE:Repeats all the tracks on
the selected disc.
CUSTOM:All of the discs classified
under one of the three CUSTOM
banks are played repeatedly.
(OFF)
Cancels repeat play and returns the
unit to normal play mode.
CUSTOM
÷ To stop repeat playback, press 7.
Notes!!
÷ Random play cannot be activated during the program mode. (If you
press RANDOM during program play, the program contents will
be erased and the unit will start to play tracks at random from all
the discs.
÷ If you press REPEAT during random play, the contents of the
random mode are repeated. (RANDOM REPEAT)
÷ If you press DISC (–, +) during random play, random play
is canceled.
÷ If you press MODE during random play, random play switches to
the selected mode.
÷ If all discs contain 17 tracks or less, random play can play every
track in the discs once.
If any of the discs contain more than 17 tracks, random play plays
the same number of tracks as the total number of tracks in the
discs, but the tracks with track number 17 or more are not always
played once.
VARIOUS OPERATIONS
En
PRE1297-A/En/09-15
11
04.1.6, 11:33 AM
11
VARIOUS OPERATIONS
To program tracks/discs in a desired
order (PROGRAM play)
3
÷ You can operate PD-F507 by remote control unit and also by the
main unit.
÷ You can program up to 32 steps
÷ The parenthesis ( ) show operations for the main unit.
Press 3.
The program play starts from the
track that was programmed first.
DISC
TRACK
MIN
SEC
PGM
The following operations can be performed during
normal play
<Programming tracks during normal play>
(Direct program)
1. Press PGM (PROGRAM).
•Program mode is activated.
2. Press PGM (PROGRAM) during playback.
•The current track is programmed
<Programming during normal playback (remote
control only)>
Operation example) Programming disc 2 , track 7 as step 1,
and disc 5, track 3 as step 2.
Press PGM (PROGRAM)
during stop mode.
PROGRAM
(
)
\
Use the digit buttons to
select the disc, and press
DISC SET.
(Use DISC (–, +) to select the disc
number,then press PROGRAM.)
)
The “PGM” indicator blinks.
\
(Use 4/¢ to select the track
number, then press PROGRAM.)
DISC
TRACK
MIN
SEC
DISC
TRACK
MIN
SEC
PGM
41
=
¡¢
)
PGM
Repeat steps 2 and 3 to
program additional discs
and tracks.
\
Once the track times have been
added, the PGM indicator stops
blinking and the following display
appears (Total Time).
\
DISC
TRACK
MIN
SEC
12
(Pause program)
If you press 8 at step , you can program a pause. When you press
8 , “PA” appears in the display instead of the disc number.
÷ For example, when making a program for recording both sides of
a cassette tape, press 8 to insert a pause after programming the
tracks for one side. After turning the tape over, press 8 to resume
recording.
Notes
÷ You cannot program a pause as the first step, or program two
pauses in a row.
÷ When you program a pause, it counts as 1 step and reduces the
total number of tracks you can program.
÷ To erase a program...
Press 7 twice during playback (or once in stop mode). Press
MODE or RANDOM in either play or stop mode. You can also
erase the program by pressing PREVIOUS (or BEST in stop
mode).
÷ To cancel a program step
In stop mode, each time you press CLEAR, the last step in the
program is erased.
÷ If a programmed disc is missing or inserted backwards during
program play, “**-no dISC” appears in the display, the step is
automatically erased, and playback proceeds to the next step.
÷ Program contents are stored in memory even when the power
is turned off (STANDBY).
Notes!!
PGM
=
(
(Full disc program)
If you skip step
of the operation example, disc 2 is programmed
as step 1.
<Programming a pause (remote control only)>
Use the digit buttons to
select the track, and press
TRACK SET.
(
The following operations can only be performed
during stop mode
<Programming an entire disc as one step>
=
(
(Pre-programming)
You can program during normal playback
(\ Operation example
)
• The player changes to program play when the current track
finishes playing back.
• To change to program mode directly, press 3.
=
41
¡¢
=
)
÷ If step
is carried out before the accumulated time is
displayed, the program play starts and the time is not displayed.
÷ The display is not shown if the total time of the program is 100
minutes or more.
VARIOUS OPERATIONS
En
PRE1297-A/En/09-15
12
04.1.6, 11:33 AM
VARIOUS OPERATIONS
÷ You can operate PD-F507 by remote control unit and also by the
main unit.
÷ You can operate PD-F407 by the main unit.
PREVIOUS
BEST
PREVIOUS
BEST
7
To store your favorite tracks (Best
Selection Memory)
To use the one-touch memory, just press the BEST button while
playing a track you like. You can store up to 15 tracks.
Press BEST while playing a
track you like.
The BEST indicator flashes and the
disc and track number are stored in
memory.
3
7
3
To find out which discs you’ve listened
to recently
÷ This function scans the discs in reverse order, starting from
the last disc you played.
÷ It can remember up to 15 discs. If the total number of discs
exceeds 15, the oldest disc will be erased to make room for
the new disc.
Example) If you played discs 1, 2, 9,12 and 13 in order.
Press the
button.
• It plays approximately 1 min. 10
sec. of the first track of each
disc,starting from the last disc
you played:13,12, 9, 2, 1.
<To listen to the memorized tracks>
Press BEST during stop
mode.
The BEST indicator lights and
playback starts from the most
recently memorized track.
PREVIOUS
DISC
TRACK
MIN
SEC
ALL
SCAN
PREVIOUS
Blink
• If you press CLEAR during best playback, the current track is
erased and the next track starts to play.
• You cannot memorize a track twice by pressing BEST during best
playback.
• The memorized contents are stored, even when power is turned
off (STANDBY).
• If you press BEST to memorize a track when 15 tracks are already
memorized, the oldest track is erased from the memory and the
new track is memorized.
3
Press 3 when you reach
the disc you want to hear.
• Previous disc scan is canceled
and normal play resumes.
÷ To cancel scanning, press 7 .
÷ Discs played during random, program,HI-LITE scan and best
selection memory play are not included in the PREVIOUS scan.
÷ If the first track is less than 1 minute long, about 10 seconds from
the beginning will be played. If the first track is less then 10
seconds long, the entire track will be played.
VARIOUS OPERATIONS
En
PRE1297-A/En/09-15
13
04.1.6, 11:33 AM
13
VARIOUS OPERATIONS
÷ You can operate PD-F507 by remote control unit and also by the
main unit.
÷ You can operate PD-F407 by the main unit.
÷ The parenthesis ( ) show operations for the main unit.
HI-LITE
TIME
HI-LITE
TIME
3
3
To scan quickly through tracks on a
disc (HI-LITE scan)
<To return to normal playback>
Press 3 when you reach
the trackyou want to hear.
HI-LITE scan is canceled and
normal play resumes.
3
This function plays a 10 second portion located 1 minute from the
start of each track on all the discs in the current play mode.
÷ Regardless of the ALL or SINGLE play mode, the play mode
indicator goes off and all of the discs will be scanned.
(
<Disc scan>
Press HI-LITE during either
play or stop mode.
HI-LITE
÷ The unit plays a 10 second portion
located 1 minute into the first
track of each CD, starting from
the first CD.
Press once
HI-LITE
(
÷ To cancel HI-LITE scan, press7.
)
)
3
Notes!!
÷ You can use 4/¢ to skip to another track during track scan.
÷ If the player is in ALL REPEAT mode, the HI-LITE scan will repeat.
÷ If the track is less than 1 minute long, about 10 seconds from the
beginning will be played. If the track is less then 10 seconds long,
the entire track will be played.
÷ When REPEAT is pressed, HI-LITE scan playback will be repeated.
To use the TIME button
The “DISC” and “SCAN” indicator blinks.
<Track scan>
Press HI-LITE twice during
either play or stop mode.
HI-LITE
÷ The unit plays a 10 second portion
located 1 minute into each track
of each CD, starting from the first
CD.
Press twice
HI-LITE
(
)
Press TIME during playback.
TIME
Each time you press TIME, the
display changes as follows.
TIME
(
)
The “SCAN” indicator blinks.
<Program scan>
HI-LITE
Press HI-LITE
program mode.
Disc number and Track number and
= Elapsed time
«
Remaining time (TRACK)
during
«
Remaining time (DISC)
÷ The unit plays a 10 second
portion located 1 minute into
each track inthe program.
«
Total time (TOTAL)
Press once
HI-LITE
(
)
The “SCAN” indicator blinks.
<Best selection memory scan>
Press HI-LITE during best
selection memory playback.
HI-LITE
Notes!!
÷ During program mode, the TOTAL display shows the program
step and total elapsed time of the program.
÷ Time remaining on the disc is not displayed during RANDOM or
PROGRAM play.
÷ Time remaining on the track may not be displayed for tracks
numbered greater than 24.
÷ The unit plays a 10 second portion
located 1 minute into each track
in the best selection memory.
Press once
HI-LITE
(
)
The “SCAN” indicator blinks.
14
VARIOUS OPERATIONS
En
PRE1297-A/En/09-15
14
04.1.6, 11:33 AM
TROUBLESHOOTING
Incorrect operations are often mistaken for trouble and malfunctions. If you think that there is something wrong with this component, check the
points below. Sometimes the trouble may lie in another component. Investigate the other components and electrical appliances being used.
If the trouble cannot be rectified even after exercising the checks listed below, ask your nearest PIONEER authorized service center or your dealer
to carry out repair work.
Symptom
No sound
Probable cause
Remedy
÷ Output cables are connected incorrectly or loosely.
÷ Incorrect operation of stereo amplifier.
÷ Connect properly.
÷ Check the settings of amplifier switches and
sound volume controls.
÷ Clean away dirt.
÷ Press 3 or 8.
÷ Reload the disc with the label side rightward.
÷ Pin plugs and/or amplifier terminals are dirty.
÷ Player is in pause mode.
÷ The disc is loaded with the label side leftward.
÷ Insert the disc correctly with the label side
rightward.
÷ Clean the smudges from the disc and then play
it again.
When playback is started, it
stops immediately.
Pause or stops during playback.
÷ Disc is inserted in the wrong way.
Remote control will not function.
(PD-F507 only)
÷ Dead batteries.
÷ Obstruction between player and remote control
unit.
÷ Smudges, etc., on the disc.
÷ Replace batteries.
÷ Relocate remote control unit or remove
obstruction.
Abnormal functioning of this unit may be caused by static electricity, or other external interference. To restore normal operation, unplug the AC power
cord and then plug it in again.
Display on the unit
SELF-DIAGNOSTICS FUNCTION
The unit incorporates the self-diagnostic function.
When an abnormality is detected during operation of the unit, an error
message (service No.) appeares on the units display automatically.
Treat the error by following the instructions in ”Countermeasures”.
Service No.
DISC
TRACK
MIN
SEC
Service No.
Unit Status
Countermeasures
U1
The disc may not be loaded properly in the rack.
÷ Reload the discs properly.
(Insert one disc only in a slot .)
÷ Check if there is a foreign object attached onto
the disc.
÷ Check if there is a foreign object in the rack.
U2
There is an operation error in the mechanical section.
÷ Check if there is a foreign object in the rack.
÷ Unplug the power cord then plug it in again.
If the same display appears again, there may be an error in the mechanical section. When requesting servicing, please also let us know the
service number displayed on the unit.
SPECIFICATIONS
1. General
3. Output terminal
Type ........................................... Compact disc digital audio system
Power requirements
Flat blade 2-pin AC plug model ............ AC 110–127V/220–240V
(switchable) 50/60 Hz
Power consumption ................................................................. 13W
Operating temperature ............................................... +5°C - +35°C
Weight ( without package ) .................................................... 4.8 kg
External dimensions ......................... 420(W) X 312(D) X 193(H) mm
Audio line output
Control input/output jacks (PD-F407 only)
Optical digital output jack (PD-F507 only)
2. Audio section
Frequency response ................................................... 2 Hz - 20 kHz
Level difference between channels ................. 1.0 dB or less (EIAJ)
Output voltage .................................................. 2 ± 0.3 Vrms (EIAJ)
Wow and flutter ............................... less than ±0.001 % (W.PEAK)
( below measurable level ) (EIAJ)
Channels ............................................................ 2-channel ( stereo )
4. Accessories
÷
÷
÷
÷
÷
÷
÷
Remote control unit (PD-F507 only) .......................................... 1
Size AA/R6P dry cell batteries (PD-F507 only) .......................... 2
Control cable (PD-F407 only) ..................................................... 1
Output cable ............................................................................. 1
CD liner notes file ..................................................................... 1
Index label sheet ....................................................................... 1
Operating instructions ............................................................... 1
NOTE:
Specifications and design subject to possible modification without
notice, due to improvements.
TROUBLESHOOTING/SPECIFICATIONS
En
PRE1297-A/En/09-15
15
04.1.6, 11:33 AM
15
歡迎惠購 Pioneer 產品。
請通讀此操作說明書以便使您正確地操作本
機。閱讀完說明書之後請妥善保管,以備日後
查用。
在某些國家或地區,電源插頭和插座可能與說
明圖中所表示的稍有不同,但本機的連接和操
作方法是一樣的。
D3-4-2-1-5_ChH
16
Ch
目
在您使用唱機之前 .........................
使用注意事項 .............................
連線 .....................................
部件名稱 .................................
如何裝載唱盤 .............................
18
19
20
21
22
基本操作
從第一張唱盤起按順序播放 ............... 23
選擇唱盤和曲目 ......................... 23
選擇播放模式 ........................... 23
彔
各種操作
編程序以播放您所期望的唱盤
(定做(CUSTOM)播放) .................
從指定的唱盤開始播放 ...................
播放您想聽的曲目 .......................
重復播放(重復(REPEAT) 播放) ........
隨機播放 曲目 唱盤
(隨機(RANDOM)播放) .................
按期望順序播放 曲目 唱盤
(編程(PROGRAM)播放) ................
保存您喜愛的曲目 .......................
尋找最近聽過的唱盤 .....................
快速掃描唱盤上的曲目(精彩掃描) .......
使用時間(TIME)按鍵 ...................
24
25
25
25
25
26
27
27
28
28
故障排除 ................................. 29
規格 ..................................... 29
17
Ch
在您使用唱機之前
這就是您可作的!
給遙控器裝電池(只限於 PD-F507)
唱碟可被分為3個組(定做),每組最多可包含25張
唱碟 P. 24 。
例如,您可以將自己的唱碟定做為第I組(定做I,CUSTOM I);
您母親的唱碟定做為第II組(定做II,CUSTOM II);您父親的唱
碟定做為第III組(定做III,CUSTOM III)。當然,您也可以根
據音樂的類型或作音樂家名稱來定做分組。您可以播放3組之中的
任何一組的所有唱碟。在已經定做好的分組中也可以隨時添加唱
碟。每個定做分組最多可包含25張唱碟。
在唱機中裝載的25張唱盤中,即時選取并播放您所喜
愛的曲目 P. 27 。
最佳選擇記憶功能,可使您只按一鍵便可存儲并播放您所喜愛的曲
目(最多達15首)。
方便的選取最近剛聽過的唱盤 P. 27 。
既往唱盤掃描功能可將以往聽過的唱盤逐張裝載(自動記憶最近的
15張唱盤)。
確認附屬品
輸出電纜 X 1
遙控器 X 1
(只限於 PD-F507)
1
¡
4
7
8
3
打開位於遙控器背面的電池盒的蓋子,放入電池。請注意按標示的 ª
和 · 極放好。
注意:
÷ 為防止電池泄漏,在長時間(個月或更長)不使用遙控器時,務必
將電池取出。如果出現泄漏,請將電池液仔細擦干淨,再換上新電
池。
÷ 不要將書或其他物品壓在遙控器上,因為重物會壓下遙控器的按
鍵,引起電池過早消耗。
不正常地使用電池會導致泄漏或破裂。
請務必遵守以下規則:
A. 安放電池到電池盒時,一定要按盒內所標示的正 ª 負 ·
極性,當放置。
B. 新舊電池不可混合使用。
C. 雖然尺寸相同,但不同牌號的電池可能有不同的電壓。所
以,不可混合使用不同牌號的電池。
D.處理廢舊電池時,請遵守政府條例或適用於貴國或地區的環
境公共指令規則。
遙控器操作(只限於 PD-F507)
¢
在操作遙控器時,請將其紅外線信號傳送器對准播放機面的遙控接收
器(遙控傳感器)。遙控器可在距離遙控傳感器7米 之範圍內使用,
與遙控傳感器所成的角度亦應在30度之內。
Î
控制連線 X 1
(只限於PD-F407)
AA/R6P型干電池 X 2
(只限於 PD-F507)
注意:
如果遙控傳感器的窗口位於受到強光或螢光照射之處,則無法進行控
制。
CD襯里筆記檔案 X 1
索引標簽紙 X 1
1
2 3
6
7
4
5
8 9 10
11 12 13 14 15
16 17 18 19 20
21 22 23 24 25
÷ 請將 索引標簽紙與 CD襯里筆記
檔案一起使用。
18
在您使用唱機之前
Ch
使用注意事項
安裝
請把機器放置於通風良好,并且不是高溫或潮濕的場所。
請勿把本機放在處於陽光直接照射,或附近有爐子或散熱器的地方,
過熱會對機轂及內部部件產生壞影響。而且,把機器放在潮濕及多塵
的地方,會引起誤動作或事故。(避免將本機放置於有油煙、蒸氣或
高溫等地方及靠近廚房處)。
也不要把本機放在不穩定或傾斜的表面處。
結露
若從一較寒冷環境,把機器一下子拿到較暖和房間、或者房間溫度突
然升高,機內會結露,從而造成機器功能失靈。為防止這種情況發
生,請慢慢使房間內溫度升高,或在打開機器電源開關之前,請把機
器放置一小時再用。
清潔及使用唱碟時
關於安裝前的注意事項
÷ 若長期把機器放在如放大器等的放熱源上使用,則會對性能產生影
響。因此應避免將其置於此類地方。
÷ 盡量將本機放置遠離調諧器機電視機。若該唱機放置場所接近於這
些設備,則可能引起噪音或圖像劣化。
÷ 使用室內天線時,噪音會特別明顯。這時請使用室外天線或關掉本
機電源。
÷ 唱碟表面若有指紋或污點,不會直接影響錄音信號,但依程度而
異,會減少從信號面反射的光線亮度,這會引起質劣化。請保持唱
碟清潔,平常用軟布輕輕從中心向外沿抹。
÷ 請把機器放於水平的平坦場所。
÷ 若唱碟臟了,用軟布蘸水,擰干後輕抹唱碟臟處。然後用一干軟布
抹去水痕。
÷ 不要使用唱碟清潔噴液或防靜電藥劑及其他活性劑。千萬不可用
苯、稀釋液或其他揮發性液體否則會損壞唱碟表面。
唱碟
清潔噴液
清潔唱機
用柔軟干布清潔本機。遇到頑固的污臟,可用由1份清潔劑加5或6份水
稀釋成的中性清潔劑將軟布蘸濕并擰干後,把臟物擦拭掉。然後再用
干布擦干表面。請勿使用對機器有害的苯劑稀釋劑等揮發性溶劑。
唱碟的保存
÷ 唱碟由同樣種類的塑料制成,這些塑料用於一般摹擬式音頻錄音。
切勿唱碟彎曲:平時將唱碟放在唱碟盒內垂直放置保存,并且避免
放置在高熱、潮濕或超低溫的地方。也請避免將唱碟放在汽車里,
因為直射陽光照射的密閉汽車里溫度會極度上升。
÷ 請閱讀并遵守唱碟標簽上的注意事項。
唱碟透鏡清潔器
正常使用的話,唱機的拾音透鏡不會變臟,若由於某種原因使唱機誤
動作了,請與附近的PIONEER專門維修中心聯系。唱碟機的透鏡清潔
器雖在市面上有出售,但使用時千萬要小心,不要弄毀透鏡。
稀釋液
苯
在本機上,只能使用標有以下標記的CD碟片。不要使用其它碟片
,否則會引起故障或造成損壞。
÷ 拿唱碟時,請勿觸摸信號面。拿住邊緣,或用手卡住邊緣與中心孔
。
÷ 不要在標簽一面貼其他標簽或膠布。也不要剝離或損壞標簽。
÷ 唱碟在唱機內將高速旋轉,因此不要使用已破損的唱碟如有縫或卷
曲的唱碟。
÷ 在本機上可以使用標有以下標記的CD碟片。不可使用其它碟片,
否則將產生故障或損壞。
'
再次搬運
如果將來再次搬運本機,請從唱盤架上取下所有唱盤﹔關上電源待機
開關(POWER STANDBY ON),等到顯示器上的“OFF”(關)消
失後,拔下電源線。
使用注意事項
Ch
19
連線
÷ 在進行或變更連線之前,請先關斷電源開關,再從交流插座上拔下電源線。
CONTROL
OUT
C
控制連線(只限於PD-F407)
C
連接到具有Î標記的 PIONEER
機器的控制輸入(C O N T R O L
IN)插孔上。
(只限於 PD-F407)
CD 唱機
立體聲放大器
CD
L
白
L
輸出連線
A-1
白
最後 ,將插頭插入
牆 上的電源插座。
IN
L
LINE OUT
R
DIGITAL
OUT
R
R
L
紅
紅
CONTROL
R
OPTICAL
IN
OUT
OUT
電源線
OPTICAL
DIGITAL IN
OPTICAL
A-2
B
光纜
本圖所示的是扁平兩腳交流插頭模式。
A 連線
1 將本機的輸出(OUTPUT)插孔和放大器的輸入(INPUT)插孔相
連。請確保白色插頭一定插入左(L)插孔﹔紅色插頭一定插入右
(R)插孔。
÷ 絕不可將本機連接到放大器的唱機(PHONO)插孔上。這樣會使
聲音失真并使正常放音不能進行。
2 將電源線連接到牆上的交流插座上。
÷ 確認插頭完全插入插座之中。
注意:
不可將插頭插入放大器上的交流插座。
B 連接光纜(只限於PD-F507)
本機可與裝有光學數字式插孔的放大器相連接。
1. 拆下本機的光學數字輸出(DIGITAL OUT OPTICAL)插孔上的防
塵罩。
2. 用光纜將本機的光學數字輸出(DIGITAL OUT OPTICAL)插孔與
放大器上的光學輸入插孔相連接。
÷ 將光纜的插頭完全插入光學數字式插孔,確保牢靠連接。
連接光學數字式插孔時,請用另售的光纜。
只有PD-F507才配有該輸 出端子。
C 與具有 Î 標記的PIONEER立體聲放大器相連的系
統控制(只限於PD-F407)
在使用具有 Î 標記的PIONEER立體聲放大器時,可將其控制輸出
(CONTROL OUT)插孔與CD 唱機後面板上的控制輸入(CONTROL
IN)插孔相連接。這樣,就可使用立體聲放大器的遙控器來控制CD 唱
機。如果您不打算使用此功能,則沒有必要進行上述的控制輸出
(CONTROL
OUT)插孔的連接。
÷ 放大器上附帶的遙控器可進行播放、停止、暫停、曲目 唱盤搜索
和換唱盤等操作。
÷ 關於連接和操作等事項請參考放大器附帶的說明書。
注意:
÷ 當唱機的控制輸入(CONTROL IN)插孔被連接後,并不等於可
直接用遙控器 操作 唱機。只能通過將遙控器對准放大器才可操作
唱機。
÷ 在控制輸出(CONTROL OUT)插孔和控制輸入(CONTROL IN)
插孔兩方都要插好連線,不可只連一方。
÷ 在連接電源線和輸出連線之前,請關掉放大器的電源。
電源線注意事項
使用光纜的注意事項
÷ 將光纜的插頭完全插入插孔。
÷ 不可折迭光纜。在收藏光纜時,請將其環繞成圈,并保証該圈的直
徑在15厘米以上。
÷ 使用的光纜應在3米之內。
÷ 光纜的插頭應妥善保護,以防灰塵和擦傷。
÷ 當機器之間不使用光纜連接時,為了防止塵埃,一定要在輸出插孔
上蓋好防塵罩。
20
連線
Ch
握持電源線時應拿住其插頭部位。拔出電源插頭時不可拉住電源線
往外拔,當您的手潮濕時,不可觸摸電源線,以免造成短路或觸
電。不可將機器、家具等物置於電源線之上,亦不可夾持電源線。
不可在電源線上打結或將其與其他連線捆綁在一起。電源線配置時
要選擇不會被踩到的路徑。損壞的電源線會引起火災或使您觸電。
隔一段時間應檢查一次電源線。當您發現電源線損壞時,可向附近
的PIONEER授權的維修中心或經銷商咨詢,請求更換。
部件名稱
前面板
÷ 括號
P.
中的數字是可供參考的頁碼。
模式 (MODE) 按鍵 P. 23 P. 24
時間(TIME)按鍵 P. 28
精彩(HI-LITE)按鍵 P. 28
程序(P R O G R A M )按鍵 P. 26
清除 (CLEAR) 按鍵
艙蓋 P. 22
最佳(B E S T )按鍵 P. 27
P. 26
+)按鍵 P. 25
唱盤(DISC-
既往(P R E V I O U S )按鍵 P. 27
重復 (REPEAT) 按鍵 P. 25
待機 (STANDBY) 指示燈
隨機 (RANDOM) 按鍵 P. 25
曲目 手動搜索按鍵 P. 23
(4 1/¡ ¢)
播放按鍵(3)P. 23
待機 開 (STANDBY/
ON) 開關 P. 23
停止按鍵(7)P. 23
暫停按鍵(8)P. 23
遙控器(只限於PD-F507)
顯示器
÷ 括號
P.
中的數字是可供參考的頁碼。
精彩 (HI-LITE) 按鍵
在隨機播放中點亮。
當您選擇播放模式時點亮。
既往 (PREVIOUS)
按鍵 P. 27
P. 28
在重復模式中點亮。
電源 (POWER) 開關
在按下程序 ( P R O G R A M
(PGM) ) 按鍵後點亮。
最佳 (BEST)
按鍵 P. 27
P. 23
模式 (MODE) 按鍵
P. 23 P. 24
重復 (REPEAT) 按鍵 P. 25
數字按鍵
1
P. 23 P. 24 P. 26
在程序定做及播放
時點亮。
當最佳(B E S T )
按鍵按下時點亮。
唱盤設定 (DISC SET) 按鍵
P. 26
REPEAT
MODE
PGM
CLEAR
1
2
3
TIME
在曲目掃描(T R A C K
S C A N )時閃爍。
在唱盤掃描(DISC SCAN)時閃爍。
停止按鍵 (7) P. 23
BEST
4
5
6
7
8
9
DISC
SET
0
TRACK
SET
程序 (PGM) 按鍵 P. 26
清除 (CLEAR) 按鍵 P. 26
–
時間 (TIME) 按鍵 P. 28
曲目設定(TRACK SET)
按鍵 P. 23 P. 26
DISC
+
1
¡
4
¢
7
8
3
RANDOM
FILE-TYPE CD PLAYER
REMOTE CONTROL UNIT
CU-P0090
在播放C D 時點亮。
在暫停時點亮。
HI-LITE PREVIOUS
P. 23 P. 24 P. 26
手動搜索按鍵 (1/¡)
當顯示剩余時間時點亮。
POWER
Î
唱盤 (DISC-/+) 按鍵 P. 25
曲目搜索按鍵
(4/¢) P. 23
隨機 (RANDOM) 按鍵 P. 25
暫停按鍵 (8) P. 23
播放按鍵 (3) P. 23
當既往(P R E V I O U S )按鍵按下時閃爍。
部件名稱
Ch
21
如何裝載唱盤(使用之前必須閱讀)
÷
÷
÷
÷
在唱盤架上裝載唱盤
在每個唱盤架中,您都可裝入25張唱盤。
輕推把手,打開艙蓋。
在播放中,不能打開艙蓋。
播放完畢的10秒鐘內或正在搜索之中,艙蓋便不能打開。
在打開或關閉艙蓋時,請小心,別夾手。
請慢慢地打開或關閉艙蓋。
÷ 如果裝入唱盤時,將標簽面朝左,則無法播放。請確保所有唱盤的
標簽面朝右。
不可將手或任何其他物品置於唱盤架之內。
«
警告:
不可將手或其它物件伸入碟片架內,否則將造成損傷或機器
損壞。
唱盤架露出。
將唱盤裝入架中,使標
簽面(印刷面)朝右。
標簽面朝右
÷ 使用唱盤架,您可裝入25
張唱盤。
輕拉把手,關上艙蓋。
÷
÷
÷
÷
CD之外的其他物品一律不可進入唱盤架內。
對於8厘米 唱盤,不要使用轉接器。
在每個插槽中只能放一張唱盤。
在12厘米 唱盤之間放置8厘米 唱盤將導致8厘米 唱盤取出困難。
建議您在唱盤架的左方放置12厘米 唱盤,在右方裝載8厘米 唱盤。
÷ 當艙蓋打開時機器無法工作。所以,在進行操作之前請關上艙蓋。
÷ 如果艙蓋被打開,CD無法
播放。
取出唱盤時…
當播放停止時,打開艙蓋。
從唱盤架上取出唱盤。
22
如何裝載唱盤
Ch
÷ 如果唱盤架中的唱盤正在播放、被搜索,以及播放完畢的10秒鐘
內,艙蓋不能打開。
在上述情況下,如果您試圖打開艙蓋,則顯示器上將有“LOCK”
(上鎖)字樣閃爍。盡快關上艙蓋,等到顯示器上的“LOCK”字
樣消失,再逮開艙蓋。
當“LOCK”字樣閃爍時,如果您打開艙蓋長於2秒鐘,則播放將自
動停。
÷ 請務必從碟片架中取出所有碟片,將STANDBY/ON(待機/開)開
關設置於關閉位置,待“OFF”字樣從顯示器上消失后,拔下電源
插頭,再移動機器。
÷ 在搬運機器時,請不要傾斜或使其受到沖擊。
基本操作
÷ 您可使用遙控器或在主機上操作PD-F507。
÷ 您可在主機上操作PD-F407。
待機 (STANDBY) 指示燈
MODE
數字按鍵
MODE
DISC SET
41/¡¢
7
8
3
從第一張唱盤起按順序播放
按下待機/打開(STANDBY/
O N )開關。
1/¡
÷ 艙蓋打開時無法播放。
標簽面朝右。
3
8
選擇唱盤和曲目(只限於PD-F507)
\
使用數字按鍵來選擇唱盤,然
後按唱盤設定(DISC SET)
按鍵。
\
使用數字按鍵來選擇曲目,然
後按曲目設定(TRACK SET)
按鍵。
P. 22
關上艙蓋。
4/¢
7
再次按下待機/ 打開(S T A N D B Y /
O N )開關。
待機(S T A N D B Y)指示燈點亮。
在唱盤架中裝入唱盤。
TRACK SET
÷ 在按下最後一個數字鍵之後的五秒鐘之內,必須按下唱碟設定
(DISC SET)或曲目設定(TRACK SET)按鍵。
÷ 如果選擇的位置上沒有唱碟,則持續3秒鐘顯示出“無唱碟”
(NO DISC)字樣。
選擇播放模式
在播放或停止模式下,按模式
(MODE)按鍵。
按下 3。
將從號碼最小的唱盤開始,按順序播
放曲目。
3
÷ 如果您事先設定了播放模式,則曲目 唱盤的播放將按相應的模式
進行。
停止播放
7
按 7。
按下數次,直到出現期望的模式為止。
根據選擇的模式進行播放。
ALL(所有):
SINGLE(單個):
CUSTOM(定做):
(I,II,III)
在停止模式時:
8
按 8。
快進
41
¡¢
3 ALL
3
SINGLE
÷ 在播放中如果選擇單個唱盤(SINGLE)模式時,只播放當前的唱
盤。
÷ 在程序模式中如果按下模式(MODE)按鍵,將消去程序的全部內
容。
按 4 1/¡ ¢(或遙控器上的
4/¢)。
注意!!
÷ 當您打開電源時,機器即以上一次選擇的模式開始播放。
÷ 如果您在播放時沒有選擇模式,機器便以ALL(所有)模式進行播
放。
快倒
¡¢
3 SINGLE
再次播放時,按下 3 或 8。
跳到另一曲目
41
3 ALL
CUSTOM (III+II+I) 2
在播放模式中:
暫停播放
所有的唱盤都被播放。
播放一張唱盤。
只播放那些存儲在定做(CUSTOM)檔案中的
唱盤(定做檔案可參考第24頁)。
按住 4 1/¡ ¢(或遙控器上
的 1/¡)。
<前次唱盤記憶>
當您按下 7 或關閉電源時,機器會記憶正在播放的唱盤。當您下一次
按下 3 時,機器即從同一唱盤開始播放。
基本操作
Ch
23
各種操作
÷ 您可使用遙控器或在主機上操作PD-F507。
÷ 您可在主機上操作PD-F407。
÷ 括號()中所示的是主機的相應操作。
MODE
DISC (—/+)
CLEAR
MODE
CLEAR
數字按鍵
DISC SET
DISC (—/+)
3
3
編程序以播放您所期望的唱盤
(定做(C U S T O M )播放)
本機讓您對自己喜愛的唱盤,最多可達25張,進行編程。例如,您可
以裝入您所喜愛的藝朮家的作品以及其他個人選擇的作品,只聽這些
唱盤。
您也可往定做的單子上追加其他唱盤。
3
\
按下M O D E (模式)按鍵,
選擇C U S T O M , 然后按下
3。
操作例:將唱盤3和12存儲進定做(CUSTOM II)檔案。
(
在停止模式下,按下模式
(M O D E )按鍵,用戶定做
(C U S T O M )I I 指示器點
亮。
(
)
CUSTOM
(
) 從號碼最小的唱盤開始播放。
檢查存儲的唱盤的數目。
在停止模式下,反復(3次)按下時間(TIME)按鍵,顯
示器將變為下面所示。
按下唱碟(DISC (-/+))按鍵。每按下該按鍵一次,存儲在用
戶定做文檔中的唱碟號碼就逐一顯示出來。當文檔中所有的
號碼都顯示完畢後,就顯示出空格。
÷ 如果您使用唱盤(DISC(-
約2秒鐘後被自動編程。
+))來選擇唱盤,該唱盤便在大
按下唱盤設定(DISC SET)。
CUSTOM
1
2
\
(
各種操作
)
從各個定做分組文檔中消去所有的唱碟。
按下(模式)M O D E 按鍵,選擇(定做)C U S T O M ,然后按
下(清除)C L E A R 按鍵。
)
Ch
3
使用數字按鍵選擇唱盤。
3
24
=
重復步驟2和3以存儲另一張
唱盤。
注意!!
您無法更改定做(CUSTOM)檔案中的唱盤,同樣地,您也無法從定
做(CUSTOM)檔案中消去某一個唱盤。
÷ 在定做(CUSTOM)播放時,按下唱盤(DISC(- +)按鍵可
讓您在定做(CUSTOM)檔案中選擇唱盤。
÷ 在定做(C U S T O M )播放時,按下遙控器的數字按鍵或唱盤設定
(DISC SET)按鍵,選擇了一張沒有在定做(CUSTOM)檔案登
記的唱盤,顯示器上將出現“** no dISC”(無此唱盤)字樣,并
持續顯示3秒鐘。
÷ 在關斷電源時,定做(CUSTOM)檔案中的內容不會被消掉。
÷ 當指定了定做(CUSTOM)檔案中記錄的唱盤,但該唱盤沒有裝入
時,顯示器上將出現“** no dISC”(無此唱盤)字樣,并持續顯
示3秒鐘,然後該唱盤將從存儲器刪除,定做(CUSTOM)搜索繼
續到下一唱盤。
各種操作
÷ 您可使用遙控器或在主機上操作PD-F507。
÷ 您可在主機上操作PD-F407。
DISC (— +)
REPEAT
RANDOM
REPEAT
41 / ¡¢
7
3
3
從指定的唱盤開始播放
7
在播放或暫停時,按下唱盤
(DISC(- +))按鍵以
選擇唱盤。在暫停時,選擇
了唱盤之後要按下 3。
÷ 播放將從選擇的唱盤的第一首曲
目開始。
÷ 如果使用遙控器,按下唱盤(DISC(-
,然後按下 3 便開始播放。
+))按鍵以選擇唱盤
¡¢
隨機播放 曲目 唱盤
(隨機(R A N D O M )播放)
隨機(RANDOM)功能可將當前模式下所選擇的唱盤中的所有曲目以
隨機方式播放,且每曲目只播放一次。所有唱盤上的所有曲目播放完
畢之後便停止播放。
選擇的播放 模式
播放您想聽的曲目
41
DISC (— +)
4 /¢
RANDOM
在播放或暫停時,按下 4
1/¡ ¢ 以選擇曲目(或
按下遙控器上的
4 /
¢)。
播放內容
全部(ALL)
以隨機次序,播放所有碟片中的所有
曲目。
單唱盤(SINGLE)
隨機地播放唱盤上的所有曲目。
定做(C U S T O M )
以隨機次序,播放(定做)CUSTOM
檔案中的所有碟片中的所有曲目。
在暫停時,選擇了曲目之後要按下 3
。
重復播放(重復(REPEAT) 播放)
在播放或停止模式下,按下
隨機(R A N D O M )按鍵。
在 播 放 時 按 下 重 復
(R E P E A T )按鍵。按下一
次該按鍵,模式按如下順序
變化。
3 單曲目重復
3 全部 (ALL) 重復
(全部 (ALL)/單唱盤 (SINGLE)/定做 (CUSTOM))
關 (OFF) 2
單曲目
(單曲目重復)
7
按下 7 以停止隨機播放。
在正常、隨機或編程模式下,重復播
放當前曲目或選擇的曲目。
(全部(ALL)重復)
全部(ALL)
單唱盤(SINGLE )
定做(C U S T O M )
÷ 停止 播放 時,按 下 7。
根據模式的不同,按下列三種方式之
一,重復播放 P. 23 。
全部 (ALL): 重復所有唱盤(1-25)
上的所有曲目。
單唱盤 (SINGLE): 重復所選擇的唱
盤上的所有曲目。
定做 (CUSTOM):三個用戶分組之一組
中的所有唱碟都被反復播放。
(關(OFF))
取消重復播放,返回正常模式。
注意!!
÷ 在編程模式下不能啟動隨機播放(如果您在編程播放時按下了隨機
(R A N D O M )按鍵,則程序的內容會被消除,然後在所有唱盤中
隨機地選擇曲目 播放)。
÷ 如果您在隨機播放時,按下重復(REPEAT)按鍵,隨機播放的內
容會被重復(隨機重復(RANDOM REPEAT))。
÷ 如果您在隨機播放時,按下唱盤(DISC(- +))按鍵,隨機
播放便被解除。
÷ 如果您在隨機播放時,按下模式(MODE)按鍵,隨機播放就會停
止,而轉入其他選擇的模式。
÷ 如果所有碟片中的曲目數不多於17,則隨機播放將一個不漏地播放
所有曲目一次。
如果有的碟片中的曲目數多於17,雖然隨機播放的總曲目數與碟片
中的總曲目數相等,但對於第17曲或大於17的曲目,并不總是能播
放一次。
各種操作
Ch
25
各種操作
按期望順序播放 曲目 唱盤
(編程(P R O G R A M )播放)
3
按下 3。
編程播放從編入的第一首曲目開始
播放。
DISC
TRACK
MIN
÷ 您可使用遙控器或在主機上操作PD-F507。
÷ 您可最多編程到32步。
÷ 括號()中的內容供主機操作。
SEC
PGM
下列操作能在正常播放下進行。
<在正常播放下進行曲目編程>
(直接編程)
1. 按下編程(P G M (P R O G R A M ))按鍵。
÷ 編程模式啟動。
2. 在播放時按下編程(P G M (P R O G R A M ))按鍵。
÷ 當前曲目被編程。
<在正常播放下進行曲目編程(只適於遙控器)>
(預編程)
您可在正常播放時編程。(\操作例
)
÷ 在當前曲目播放完之後,唱機將轉換到編程播放。
÷ 按下 8 以直接轉換到編程模式。
操作例: 將唱盤2,曲目7當作第1步來編程。
唱盤5,曲目3作為第2步。
下列操作只能在停止播放下進行。
在停止模式下按下編程(P G M
(P R O G R A M ))按鍵。
<將整張唱盤編為一步>
(全盤編程)
如果您跳過操作例子的第3步
使用數字按鍵選擇唱盤,然後按
下唱盤設定(DISC SET)。
<編入一個暫停(只適於遙控器))
(暫停編程)
如果您在第4步
時按下 8,您便編入一個暫停。當您按下 8 時,
在顯示器上出現的不是唱盤號碼而是“PA”字樣。
÷ 例如,在為磁帶的兩面錄音而編程時,在一面的曲目編程完畢之
後,按下 8 以插入暫停。在將磁帶倒好後,再按 8 以繼續錄音。
PROGRAM
(
)
\
(使用唱盤(DISC(- +))來選
擇唱盤號碼,然後按下編程
(P R O G R A M )按鍵。)
=
(
)
編程(PGM)指示燈開始閃爍。
\
使用數字按鍵選擇曲目,然後
按下曲目設定(TRACK SET)
按鍵。
(使用 4/¢ 來選擇曲目號碼,
然後按下編程(PROGRAM)按鍵。)
DISC
TRACK
MIN
SEC
DISC
TRACK
MIN
SEC
PGM
(
41
¡¢
=
)
PGM
重復步驟2和3以選擇其他唱盤
和曲目。
\
當曲目的時間被加上之後,編程
(P G M )指示燈停止閃爍,顯示器出
現如下畫面(總時間)。
DISC
TRACK
MIN
SEC
\
PGM
=
(
26
各種操作
Ch
=
41
¡¢
=
)
,唱盤2就被編為第1步。
注意!!
÷ 您不可將暫停作為第1步或連續編入2個暫停。
÷ 當您編入一個暫停時,它將占據一步,從而使可編程曲目數
減少一個。
÷ 消除一個編程...
在播放時按下 7 兩次(或在停止模式下按下 7 一次)。在播放或
停止模式下按下模式(M O D E )按鍵或隨機(R A N D O M )按鍵。
另外,按下既往(PREVIOUS)按鍵也可消除一個程序。(或在停
止模式下,按下最佳(BEST)按鍵)。
÷ 取消編程中的一步
在停止模式下,每按下(清除)CLEAR按鍵一次,編程中最后一步
就被清除掉。
÷ 如果一個程序中的唱盤缺席或裝反,播放時,顯示器上將出
現“**-no dISC”字樣。程序中相應的一步將被消除,播放繼
續到下一步。
÷ 即使當電源關斷時(待機),程序的內容也保存在存儲器中。
注意!!
÷ 如果在累積時間顯示之前就進行第5步
,編程播放開始且不顯
示時間。
÷ 如果編程中的總時間等於或大於100小時,則顯示器上不顯示。
各種操作
÷ 您可使用遙控器或在主機上操作PD-F507。
÷ 您可在主機上操作PD-F407。
PREVIOUS
BEST
PREVIOUS
BEST
7
7
3
保存您喜愛的曲目(最佳選擇記憶)
在播放您所喜愛的曲目時,只要按下最佳(BEST)按鍵,您便可使用
單觸記憶。您可保存最多15首曲目。
在播放您所鐘愛的曲目時,
按下最佳(B E S T )按鍵。
3
尋找最近聽過的唱盤
÷ 該功能從最近聽過的唱盤開始,以倒序掃描唱盤。
÷ 該功能可記憶最多15張唱盤,如果超過15,則最早的內容將被消
除以給新唱盤留出空間。
例:如果您順次播放 唱盤1,2,9,12和13。
按下既往(P R E V I O U S )按
鍵。
最佳(BEST)指示燈閃爍,相應的
唱盤號碼和曲目號碼記憶於存儲器之
中。
<聽記憶的曲目>
DISC
在停止模式下,按下最佳
(B E S T )按鍵。
最佳(BEST)指示燈點亮,且從最
近記憶的曲目開始播放。
÷ 如果您在最佳播放時按下清除(CLEAR)按鍵,則當前曲目被消
除,開始播放下一曲目。
÷ 在進行最佳播放時,不允許為了記憶同一曲目兩次而再度按下最佳
(B E S T )按鍵。
÷ 即使當電源關斷時(待機),記憶的內容也保存在存儲器中。
÷ 當記憶的曲目滿15首時,如果您再按下最佳(BEST)按鍵,則最
早記憶的內容將被消除以記憶新的曲目。
TRACK
MIN
SEC
÷ 從最近播放過的唱盤開始,以
13,12,9,2,1的順序,播放每
張唱盤的第1 首曲目約1 分1 0 秒
種。
ALL
PREVIOUS
SCAN
閃爍
3
當您找到想聽的唱碟時,按
下 3 按鍵。
÷ 既往唱盤掃描模式被取消,進入
正常播放。
÷ 按下 7 以取消掃描。
÷ 在隨機、編程、精彩掃描和最佳記憶中播放的唱盤不在既往
(PREVIOUS)之列。
÷ 如果第一首曲目短於1分鐘,則只播放約10秒鐘。如果第一首曲目
短於10秒鐘,則播放整個曲目。
各種操作
Ch
27
各種操作
÷ 您可使用遙控器或在主機上操作PD-F507。
÷ 您可在主機上操作PD-F407。
÷ 括號()中的內容供主機操作。
HI-LITE
TIME
HI-LITE
TIME
3
3
快速掃描唱盤上的曲目(精彩掃描)
從曲目開頭起算的1分鐘處開始,播放當前模式下所有唱盤的所有曲目
10秒鐘。
÷ 不論是在全部(ALL)還是在單張(SINGLE)播放模式下,播放模
式指示器熄滅,所有唱碟被掃描一遍。
<唱盤掃描>
HI-LITE
<返回正常播放>
在播放或停止模式下,按下
精彩掃描(HI-LITE)按鍵。
3
當找到期望的曲目時,按下
3。精彩掃描(HI-LITE)將
被取消,返回正常播放。
÷ 從曲目開頭起算的1分鐘處開始,
播放當前模式下所有唱盤的第一
首曲目10秒鐘。
按一次
÷ 按下 7 以取消精彩掃描(HILITE)。
HI-LITE
(
)
唱盤(DISC)和掃描(SCAN)指示燈閃爍。
<曲目掃描>
HI-LITE
÷ 從曲目開頭起算的1分鐘處開始,
播放當前模式下所有唱盤的所有
曲目10秒鐘。
按二次
HI-LITE
(
在播放或停止模式下,按下
精彩掃描(HI-LITE)按鍵兩
次。
)
HI-LITE
)
3
注意!!
÷ 在進行曲目掃描時,您可使用 4/¢ 以跳到下一曲目。
÷ 如果唱機在全部重復(ALL REPEAT)模式,精彩掃描(HI-LITE)
將重復進行。
÷ 如果曲目短於1分鐘,則只播放約10秒鐘。如果第一首曲目短於10
秒鐘,則播放整個曲目。
÷ 當按下重復(REPEAT)按鍵時,精彩掃描(HI-LITE)將重復進
行。
使用時間(TIME)按鍵
掃描(SCAN)指示燈閃爍。
<程序掃描>
(
在編程模式下,按下精彩掃
描(HI-LITE)按鍵。
在播放時按下時間(TIME)
按鍵。
TIME
每按下時間(TIME)按鍵一次,顯
示器將按如下順序變化。
÷ 從曲目開頭起算的1分鐘處開始,
播放編程的所有曲目10秒鐘。
按一次
HI-LITE
(
)
TIME
(
掃描(SCAN)指示燈閃爍。
)
= 唱盤號碼、曲目號碼及經過時間
«
剩余時間(T R A C K )
«
<最佳選擇記憶掃描>
在最佳選擇記憶掃描模式
下,按下精彩掃描(H I LITE)按鍵。
HI-LITE
按一次
HI-LITE
(
)
掃描(SCAN)指示燈閃爍。
28
各種操作
Ch
÷ 從曲目開頭起算的1分鐘處開始,
播放最佳選擇記憶的所有曲目10
秒鐘。
剩余時間(DISC)
«
總時間(T O T A L )
注意!!
÷ 在編程模式下,顯示器出現程序步數和總時間。
÷ 在隨機(R A N D O M )和編程(P R O G R A M )播放時,唱盤剩余時間
不被顯示。
÷ 曲目號碼大於24時,曲目剩余時間不被顯示。
故障排除
不當操作往往意味著麻煩和故障。如果您認為機器有問題,請先檢查下列各點。有時,故障出自別的機器之中。此時則應檢查別的機器和電器。如果經過下列的檢查之
後仍不能使機器正常工作,請與附近的PIONEER授權維修中心或經銷商聯系以便維修。
症狀
可能的原因
排除方法
無聲音。
÷
÷
÷
÷
÷
輸出連線連接不當或松動。
立體聲放大器操作不當。
針型插頭及(或)放大器端子不干淨。
唱機在暫停模式。
唱盤的標簽面朝左放置。
÷
÷
÷
÷
÷
妥當連接。
檢查放大器的開關設定和音量旋鈕。
清除臟物。
按下 3 或 8。
重新放置唱盤使標簽面朝右。
當開始播放時,立即停止。
在播放中暫停或停止。
÷
÷
唱盤插入錯誤。
唱盤臟污。
÷
÷
將唱盤標簽面朝右裝入。
清除唱盤上的臟污再播放。
遙控器不工作。(只限於PD-F507)
÷
÷
電池耗盡。
唱機和遙控器之間有障礙物。
÷
÷
更換電池。
換個地方用遙控器或除去障礙物。
靜電或其他外部干擾可能引起本機功能異常。關掉電源再打開,或拔掉電源插頭再插上,將會使其恢復正常。
自診斷功能
本機的顯示器
本機裝備 自診斷功能。
當操作發生異常時,在機器的顯示器出現錯誤信息(維修號碼)。這些錯誤可根
據以下說明予以排除。
維修號碼
DISC
TRACK
MIN
SEC
維修號碼
解決辦法
機器症狀
U1
唱盤架中的唱盤裝載不當。
÷
÷
÷
重新裝好唱盤。(在插槽中只放一張唱盤)
檢查唱盤上是否有粘異物。
檢查唱盤架上是否有異物。
U2
機器的機械部分出現操作錯誤。
÷
÷
檢查唱盤架上是否有異物。
拔下電源線再重新插上。
如果相同的錯誤再次出現,則說明機械部分可能有問題。在請求維修時,請告知機器上出現的維修號碼。
規格
1.一般
3.輸出端子
類型 .............................................. CD數字式音響系統
電源
平刀口2插頭 AC 插頭機型 .................... 110 - 127/220 - 240,
(可切換) 50/60 Hz
功率 ........................................................... 13W
使用溫度 ........................................... +5 ºC-+35ºC
重量(不帶包裝) ............................................ 4.8 kg
外形尺寸 ............................ 420 (W) X 312 (D) X 193 (H) mm
音頻線輸出
控制輸入 輸出插孔(只限於PD-F407)
光學數字輸出插孔(只限於PD-F507)
2.音響部
頻率響應 .............................................. 2 Hz -20 kHz
通道間音量差 .................................. 1.0 dB或者更小(EIAJ)
輸出電壓 ......................................... 2±0.3 Vrms(EIAJ)
速度不均勻性 .................................. 小於±0.001%(W.PEAK)
(在可測水平之下)(EIAJ)
通道 ............................................... 2通道(立體聲)
4.確認附屬品
÷
÷
÷
÷
÷
÷
÷
遙控器(只限於PD-F507) .......................................
AA/R6P型干電池(只限於PD-F507) ...............................
輸出電纜 ......................................................
控制連線(只限於PD-F407) .....................................
CD 襯里筆記檔案 ...............................................
索引標記紙 ....................................................
使用說明書 ....................................................
1
2
1
1
1
1
1
注意:
因為改良等原因,機形和規格可能隨時變化,恕不另行通知。
日本先鋒公司出版
版權 © 2004 日本先鋒公司
版權所有
29
Ch
Published by Pioneer Corporation.
Copyright © 2004 Pioneer Corporation.
All rights reserved.
PIONEER CORPORATION
4-1, Meguro 1-Chome, Meguro-ku, Tokyo 153-8654, Japan
PIONEER ELECTRONICS (USA) INC.
P.O. BOX 1540, Long Beach, California 90810-1540, U.S.A. TEL: (800) 421-1404
PIONEER ELECTRONICS OF CANADA, INC.
300 Allstate Parkway, Markham, Ontario L3R OP2, Canada TEL: (905) 479-4411
PIONEER EUROPE NV
Haven 1087, Keetberglaan 1, B-9120 Melsele, Belgium TEL: 03/570.05.11
PIONEER ELECTRONICS ASIACENTRE PTE. LTD.
253 Alexandra Road, #04-01, Singapore 159936 TEL: 656-472-1111
PIONEER ELECTRONICS AUSTRALIA PTY. LTD.
178-184 Boundary Road, Braeside, Victoria 3195, Australia, TEL: (03) 9586-6300
PIONEER ELECTRONICS DE MEXICO S.A. DE C.V.
Blvd.Manuel Avila Camacho 138 10 piso Col.Lomas de Chapultepec, Mexico,D.F. 11000 TEL: 55-9178-4270
K002_En
<04C00001>
32
Ch
Printed in
<PRE1297-A>