1
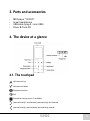
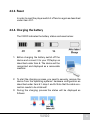
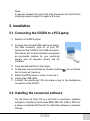
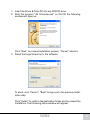
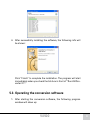
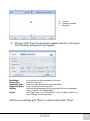
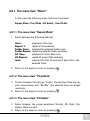
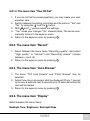
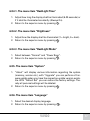
Manual
1
Content
1. Features
3
2. Specifications
3
3. Parts and accessories
4
4.The device at a glance
4
4.1. The touchpad
4.2. Handling the touchpad
4.3. General operating instructions
4.3.1. Power on/off
4.3.2. Activate/deactivate key lock
4.3.3. Reset
4.3.4. Charging the battery
4
5
5
5
5
6
6
5. Installation
7
5.1. Connecting the ViViDO to a PC/Laptop
5.2. Installing the conversion software
5.3. Operating the conversion software
7
7
9
6. Operating the player
11
6.1. The main menu
6.2. The menu item “Music“
6.3. The menu item “Photo“
6.4. The menu item “Video“
6.5. The menu item “Navigation“
6.6. The menu item “Text“
6.7. The menu item “Record“
6.8. The menu item “Settings“
6.8.1. The menu item “Music“
6.8.1.1. The menu item “Repeat Mode“
6.8.1.2. The menu item “Play Mode“
6.8.1.3. The menu item “EQ Select“
6.8.1.4. The menu item “User EQ Set“
6.8.2. The menu item “Record“
6.8.3. The menu item “Auto Browse“
6.8.4. The menu item “Display“
6.8.4.1. The menu item ”BackLight Time“
6.8.4.2. The menu item “Brightness“
6.8.4.3. The menu item ”BackLight Mode“
6.8.5. The menu item “System“
6.8.6. The menu item “Language“
11
11
12
12
13
13
14
14
15
15
15
15
16
16
16
16
17
17
17
17
17
ViViDO
2
Dear customer!
Congratulations for purchasing this premium quality SHARKOON product. For a
long life time and to take full advantage of this product we recommend that you
read this manual completely.
Have a good time with our product!
SHARKOON Technologies GmbH
1.Features
• • • • • • • 1.8" TFT color display
Illuminated touchpad for easy navigation
Music and video playback (supports e.g. MP3, AVI and other formats)
Built-in microphone
Energy-saving mode for extended battery runtime
Supports USB 2.0
Supported operating systems: Windows ME, 2000, XP, Vista,
Mac OS 10, Linux
2. Specifications
• • • • • • • • • • • Display resolution: 160 x 128 pixel
Dimensions: 90 x 42 x 9 mm
Supported audio formats: MP3 (8 to 320 kbps), WMA (32 to 320 kbps)
Supported video formats: AVI, RM, VOB, DAT and RMVB
Supported picture format: JPEG
Frequency response: 20 Hz to 20 kHz
Maximum output power: 10 mW + 10 mW
Power supply: 3.7 V Lithium ion battery with 220 mAh
Battery runtime (approx.): 2 hours (video playback), 6 hours (MP3
playback) in power saving mode
Working temperature: 5 ˚C to 40 ˚C
Weight: 32 g
ViViDO
3
3. Parts and accessories
• • • • MP4 player “ViViDO”
In-ear headphones
USB cable (plug A / mini USB)
Driver & Tools CD
4. The device at a glance
4.1. The touchpad
Volume/scroll up
Volume/scroll down
Play/pause/confirm
Exit
Proceed to settings menu (if available)
(pressed shortly): next/forward; (pressed long): fast forward
(pressed shortly): previous/back (pressed long): rewind
ViViDO
4
4.2. Handling the touchpad
The touchpad is very sensitive. To avoid operating errors it should
be handled as shown below:
4.3. General operating instructions
4.3.1. Power on/off
After switching on the device the welcome screen will be displa yed at first, then the main menu.
On
Off
4.3.2. Activate/deactivate key lock
Press the buttons
and
simultaneously and keep them pressed
for at least 2 seconds. The key lock icon will appear/disappear in
the display.
ViViDO
5
4.3.3. Reset
In order to reset the player switch it off and on again as described
under item 4.3.1.
4.3.4. Charging the battery
The ViViDO indicates the battery status as shown below:
1. Before charging the battery switch off the
device and connect it to your PC/laptop as
described under item 5. The device will be
recognized and displayed as a removable
medium:
2. 3. To start the charging process, you need to securely remove the
device from the operating systems’ hardware configuration as
described under item 5.1. step 4. and 5. Note that the cable connection needs to be obtained!
During the charging process the status will be displayed as
follows:
ViViDO
6
Note:
It requires at least 3 hours to fully load the player. For the first two
charging cycles charge it for approx. 8 hours.
5. Installation
5.1. Connecting the ViViDO to a PC/Laptop
1. Switch on the MP4 player.
2. Connect the included USB cable to an available USB connector (type A) of your PC/
laptop and the ViViDO’s mini USB connector.
The device will be automatically recognized
as removable medium by your operating
system and all required drivers will be
installed:
3. 4. 5. 6. 7. Copy the desired files to the player.
To securely remove the device, double-click the icon in the task
bar. A menu will open up.
Select the MP4 player in order to remove it.
Unplug the USB cable.
Connect the earphones’ 3.5 mm stereo plug to the headphone
connector at the ViViDO.
5.2. Installing the conversion software
On the Driver & Tools CD you will find a conversion software
suitable to transform the formats WMV, RM, AVI, VOB or DAT into
a player-compatible AVI format. To install the software, proceed as
follows:
ViViDO
7
1. Insert the Driver & Tools CD into any CD/DVD drive.
2. Start the program “AV Converter.exe“ on the CD, the following
window will open up:
Click “Next” to proceed installation process, “Cancel” aborts it.
3. Select the target directory for the software:
To abort, click “Cancel”, “Back” brings you to the previous instal lation step.
Click “Install” to confirm the destination folder and to proceed the
installation. The following status window will appear:
ViViDO
8
4. After successfully installing the software, the following info will
be shown:
Click “Finish” to complete the installation. The program will start
immediately when you check the tick box in front of “Run AVICon verter 2.1”.
5.3. Operating the conversion software
1. After starting the conversion software, the following program
window will show up:
ViViDO
9
A – Info bar
B – Selection window
C – Menu bar
2. Choose “Add” from the menu bar to select videos for conversion.
The following dialogue box will appear:
Resolution: Source File: Target File Path: Target File Name: Setting: Scope: the resolution for the converted file is pre-set
select the source file
select the target directory for the converted file
enter a name for the converted file
select the desired settings for the converted file from the dropdown
menus “Quality” and “Aspect Ratio”
with “Begin from” and “Time duration” you can specify a part of the
source file that shall be converted
Confirm your settings with “Save” or discard them with “Close”.
ViViDO
10
3. The file chosen with “Save” will be displayed in the pop up
window. With “Add” you can select more files. “Del” deletes the
currently selected file from the list. “Convert Now” commences
the conversion process, “Stop” interrupts it. Leave the program
with “Close”.
6. Operating the player
6.1. The main menu
Switch on the device as described above (chapter 4.3.1) and wait
until the main menu will be displayed. The following menu items
may be selected:
Music / Photo / Video / Settings / Navigation / Text / Record
6.2. The menu item “Music“
1. Navigate through the main menu using the
or the
button.
Select “Music” by pressing
.
2. The music playback will start immediately.
3. Fast forward/rewind by using or (press and hold); pause/
stop playback with
. Volume is adjusted using the
or the
button.
4. Select the previous/next title by using or (pressed shortly).
5. Touching brings you directly to the settings menu (see item
6.9.1.) which you can leave by pressing .
6. Touching exits the music playback; the folder list will be displa yed.
7. Scroll through the folder list by using
or
and select the
desired folder/title with ; playback will start automatically. Return
to the main menu by pressing
.
ViViDO
11
6.3. The menu item “Photo“
1. Navigate through the main menu using the
or the
button
and select “Photo” by pressing
.
2. The folder list will open up.
3. Scroll through the list by using
or
and select the desired
picture by pressing
.
4. Choose the previous/next picture by using or (pressed short ly). Alternatively you can activate/deactivate the slide show func tion by pressing
.
5. Touching brings you directly to the settings menu (see item
6.9.4.) which you can leave by pressing .
6. Exit the picture playback and return to the folder list by pressing
. Touching the
button again brings you back to the main
menu.
6.4. The menu item “Video“
1. 2. 3. 4. Navigate through the main menu using the
or the
button.
Select “Video” by pressing
.
The folder list will open up.
Scroll through the folder list by using
or
and select the
desired title with ; playback will start automatically.
Fast forward/rewind by using or (press and hold); pause/stop
playback with
. Volume is adjusted using the
or the
button.
Note:
Depending on the video format (panel or landscape format) the
functions of the
and the key are possibly swapped with the
functions of the
and the
key. A video should be paused before
fast forwarding or rewinding it.
5. Touching
brings you back to the main menu.
ViViDO
12
6. Scroll through the folder list by using
or
and select the
desired folder/title with ; playback will start automatically. Re turn to the main menu by pressing
.
6.5. The menu item “Navigation“
1. 2. 3. 4. Select the menu item “Navigation” by pressing
display all files currently saved on the ViViDO.
The folder list will open up.
Select the desired file by pressing
.
Return to the main menu by touching
.
in order to
6.6. The menu item “Text“
1. Select the menu item “Text” by pressing
text files saved on the ViViDO.
in order to display
Note:
The text files need to be saved on the ViViDO as TXT files.
2. 3. 4. The folder list will open up.
Choose the desired text document by touching
. Use the
touchpad’s
and the
button to scroll through the document.
Alter natively you can activate/deactivate the auto scroll function
by pressing
.
You can create up to 9 bookmarks for the currently displayed text.
To create a bookmark scroll to the desired text passage and touch
the
button. In the sub menu “Save Book Mark“ choose an
available storage space and confirm with . Leave the sub menu by
touching
without saving the bookmark.
In the same way you can simply overwrite already existing bookmarks.
ViViDO
13
5. 6. To load a bookmark press the
button.
In the sub menu “Load Book Mark” select the desired bookmark
and confirm with . Leave the sub menu by touching
without
loading a bookmark.
Touching brings you directly to the settings menu (see item
6.9.4.) which you can leave by pressing .
Return to the main menu by pressing
.
6.7. The menu item “Record“
1. 2. 3. 4. 5. 6. Select the menu item “Record” by pressing
in order to create
your own recordings.
Start/pause the recording by touching (pressed shortly).
Pressing brings you directly to the settings menu (see item
6.9.3.) which you can leave by touching .
Stop the recording by pressing (press and hold).
The file will be saved to the sub folder “Voice” in the “Music”
folder.
Return to the main menu by touching
.
6.8. The menu item “Settings“
In the sub menu “Settings” you may choose one of the following
menu items:
Music / Record / Auto Browse / Display / System / Language
ViViDO
14
6.8.1. The menu item “Music“
In this menu the following menu items can be chosen:
Repeat Mode / Play Mode / EQ Select / User EQ Set
6.8.1.1. The menu item “Repeat Mode”
1. Select between the following settings:
Once: playback a title once
Repeat 1: repeat a title endlessly
Folder Once: playback the selected folder once
Folder Repeat:repeat the selected folder endlessly
All Once: playback all music files once
All Repeat: repeat all music titles endlessly
Intro: playback the first 10 seconds of each title in the
selected folder
2. Return to the superior menu by pressing
.
6.8.1.2. The menu item “Play Mode“
1. 2. Choose between the settings “Order” (the selected titles are played consecutively) and “Shuffle” (the selected titles are played
randomly).
Return to the superior menu by pressing
.
6.8.1.3. The menu item “EQ Select“
1. Select between the preset equalizers: Normal, 3D, Rock, Pop,
Classic, Bass and Jazz.
2. Return to the superior menu by pressing
.
ViViDO
15
6.8.1.4. The menu item “User EQ Set“
1. 2. 3. 4. 5. If you do not like the preset equalizers, you may create your own
equalizer here.
Switch between the sliding controllers and the buttons “Yes” and
“No” by using the
and the
button.
With and you can adjust the settings.
“Yes” saves your changes “No” discards them. The device automatically returns to the superior menu.
Return to the superior menu by pressing
.
6.8.2. The menu item “Record“
1. 2. Select between the menu items “Recording quality” (and adjust
“High quality” or “Normal”) and “Recording volume” (choose
between +1 and +5).
Return to the superior menu by pressing
.
6.8.3. The menu item “Auto Browse“
1. 2. 3. The items “TXT book Browse” and “Photo Browse” may be
selected.
Adjust how long a document shall be displayed (Photo: 1 second
up to max. 5 seconds; text: 2 seconds up to 10 seconds) before the
next will be loaded.
Return to the superior menu by pressing
.
6.8.4. The menu item “Display“
Select between the menu items:
BackLight Time / Brightness / BackLight Mode
ViViDO
16
6.8.4.1. The menu item ”BackLight Time“
1. Adjust how long the display shall be illuminated (5-30 seconds) or
if it shall be illuminated constantly (Always On).
2. Return to the superior menu by pressing
.
6.8.4.2. The menu item “Brightness“
1. Adjust how the display shall be illuminated (1 = bright, 5 = dark).
2. Return to the superior menu by pressing
.
6.8.4.3. The menu item ”BackLight Mode“
1. Select between “Normal” and “Power Save”.
2. Return to the superior menu by pressing
.
6.8.5. The menu item “System“
1. 2. “About” will display various information regarding the system
(memory, version etc.), with “Upgrade” you can perform a firmware update when you have the respective update version available. With “Default Set” you can restore the factory settings. Thereby all personal settings will be deleted.
Return to the superior menu by pressing
.
6.8.6. The menu item “Language“
1. Select the desired display language.
2. Return to the superior menu by pressing
ViViDO
.
17
Warning:
For potential loss of data, especially due to inappropriate handling, SHARKOON assumes no
liability.
All named products and descriptions are trademarks and/or registered trademarks of the respective manufacturers and are accepted as protected.
As a continuing policy of product improvement at SHARKOON, the design and specifications
are subject to change without prior notice. National product specifications may vary.
The legal rights of the enclosed software belong to the respective owner. Please observe the
license terms of the manufacturer before using the software.
All rights reserved especially (also in extracts) for translation, reprinting, reproduction by copying or other technical means. Infringements will lead to compensation.
All rights reserved especially in case of assignation of patent or utility patent. Means of delivery
and technical modifications reserved.
© SHARKOON Technologies GmbH 2007
www.sharkoon.com
ViViDO