1
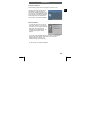
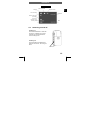
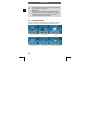
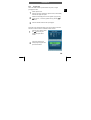
ODYS MC-A5
Thank you for choosing our product. Please read the manual carefully
to make best use of all functions of the product and to guarantee a long
service life. Store the manual in a safe place for later reference.
1 Contents of package ........................................................3
2 Introduction.......................................................................4
3 Getting started ..................................................................5
3.1
Parts of your camera ............................................................. 5
3.2
Inserting the battery ............................................................... 7
3.3
Using the power supply/charger unit...................................... 8
3.4
Inserting and Removing the SD card ..................................... 9
3.5
Attaching the carrying strap ................................................. 10
3.6
Installing the driver............................................................... 11
3.6.1 Installing the mass storage drivers (Windows 98) ................... 11
3.6.2 Installing the driver in PC camera mode .................................. 12
4 Operation.........................................................................14
4.2
Switching on and off ............................................................ 15
4.3
Operating modes ................................................................. 16
4.4
Video recording mode.......................................................... 17
4.5
Taking photographs ............................................................. 18
4.5.1 Single shot................................................................................. 19
4.5.2 Continuous shots ...................................................................... 20
4.5.3 Self-Timer .................................................................................. 20
4.6
Movie playback (MP4) ......................................................... 21
4.7
Playback mode .................................................................... 22
4.7.1 Playing photos........................................................................... 22
4.7.2 Playing videos ........................................................................... 23
4.7.3 Playing audio............................................................................. 24
4.7.4 Voice notes for pictures ............................................................ 24
1
EN
Table of contents
ODYS MC-A5
EN
4.8
Recording audio .................................................................. 25
4.9
System settings ................................................................... 26
4.10 Mass storage mode ............................................................. 27
4.11 PC camera mode................................................................. 28
4.12 File management................................................................. 29
4.12.1 Deleting files ..............................................................................29
4.12.2 Protecting files against deletion ................................................30
4.13 Connecting to the TV ........................................................... 31
5 Specifications ................................................................. 32
6 Troubleshooting ............................................................. 33
7 Further information ........................................................ 35
7.1
7.2
7.3
7.4
7.5
Safety instructions ............................................................... 35
Maintenance and care ......................................................... 35
Photo tips ............................................................................ 36
Battery tips .......................................................................... 36
Notes on the power supply .................................................. 37
Warranty conditions ....................................................... 38
2
ODYS MC-A5
1
Contents of package
EN
Please ensure that the following items are included in the box:
1 x digital video camera ODYS MC-A5
1 x user manual
1 x Lithium battery
1 x USB cable
1 x AV cable
1 x CD-ROM (driver and application software)
1 x carrying case
1 x wrist strap
1 x power supply / charger unit
Caution
Please read the general safety instructions in chapter 7
before using the camera. Pay particular attention to the
instructions on safely concluding the digital transfer between
the camera and computer in chap. 4.10.
3
ODYS MC-A5
EN
2
Introduction
This product is a digital imaging device with a digital video recorder,
integrated digital camera, digital audio recorder and PC camera. It
allows you to record videos, take digital photographs, make voice
recordings or use as a webcam.
Your ODYS MC-A5 is equipped with a highly integrated digital video
processor and powerful processing algorithms. With its highly
developed CMOS image sensor, high resolution TFT LCD monitor and
numerous functions, the camera offers an excellent cost/performance
ratio. The device is compact, elegant and energy-efficient. It also
comes with a full range of accessories and optional components.
Product properties
• MPEG4 video recording, 30 pictures/second, synchronous voice
recording
• Still image capture with 5 megapixel image resolution
• Still image and video clip playback
• Digital sound recording: Voice notes for images or continuous sound
recording
• Web camera for internet communication
• MP4 file playback
• Audio and video output; headset or TV
• Portable USB mass storage
• 2.36" TFT LCD monitor that can be rotated 270°
• Automatic shutdown conserves battery
Support
URL: http://www.odys.de
See our website for the latest information on this product, on other
products by our company and on our company itself. If you have
questions or problems, please read the FAQs on our website or contact
our customer support service [email protected].
4
ODYS MC-A5
Getting started
3.1
Parts of your camera
EN
3
Familiarise yourself with the parts of your camera before use. That
makes it easier to operate the camera.
1
2
3
4
5
6
7
8
9
8
Joystick and OK button
Shutter release
Mode button
Menu button
On/off Button
Strap eye
Microphone
Loudspeaker
Operating /
Battery charging LED
10
11
12
13
14
15
16
7
9
1
2
3
4
5
6
Lens
Flash
Audio Out jack
Video Out jack
USB terminal
SD card slot
Cover of the battery
compartment
10
11
13
12
14
16
15
5
EN
ODYS MC-A5
Shutter release: Use the shutter release in recording mode to take pictures
or to start and stop video recordings. Play and pause a video clip in MP4
mode.
Microphone: Converts sound waves into electronic signals when the
camera is in sound recording mode.
Flash: If the surrounding area is too dark, the flash provides more light for
your photograph (see chapter 4.5 for settings).
Lens: Optically transfers the images of the subject to be recorded onto the
CMOS sensor.
USB terminal: When connected to the power supply adaptor, the video
camera is supplied with power and the internal battery is charged.
Interface to the PC (universal serial bus), the camera operates as a PC
camera (WebCam) or mass storage via the interface.
Audio output: Establishes an audio connection between the camera and a
TV using the AV cable. Headphones can also be connected.
Video output: Establishes an video connection between the camera and a
TV using the AV cable. You can play back video clips or images on the TV.
Loudspeaker: Plays voice recordings and key signals.
Operating and Battery charging LED:
The LED is not illuminated when the camera is switched off.
Illuminated LED red: the camera is switched on and ready for use.
Flashing LED red: the flash is charging.
Illuminated LED green: the battery is being charged using the power supply
adaptor.
Illuminated LED orange: the camera is switched on as the batteries are
charging.
Mode button: Selects the operating modes
Joystick: Used for additional functions: menu selection, digital zoom, scroll
function, volume adjustment. Use your thumbs to control the joystick.
OK button: Press the joystick in the middle to select the desired option from
the sub-menu or to confirm a function
Strap eye: For attaching a carrying strap
Cover of the battery compartment: Slide down the cover of the battery
compartment to open the compartment and replace the battery
Menu button: Opens and closes the menu
SD card slot: Slot for inserting and removing the SD card
On/off button: For switching the camera on and off
LCD display: Shows images, videos, the menu and status symbols and
movie playback list
6
ODYS MC-A5
3.2
Inserting the battery
1
To open the battery compartment,
slide down the cover.
2
Insert the battery into the battery
compartment, ensuring that the
metal terminals of the battery and
compartment are in contact with
each other. Close the cover of the
battery compartment.
3
Before using your camera for the
first time, charge the battery using
the power supply adaptor
provided.
EN
Use the included lithium-ion battery.
Do not remove the battery whilst the camera is on. Please
also read the battery tips in chap. 7.4.
7
ODYS MC-A5
3.3
Using the power supply/charger unit
EN
External power supply:
Even if there is no battery in the camera, you can power the video
camera using the power supply adaptor.
1
Connect the camera to your
computer using either the power
supply adaptor or a USB cable.
2
Plug the power supply/charger
unit into a socket. Press the
on/off button on the camera and
use the video camera as normal
Charging the battery
Insert the battery to be charged in the battery compartment of the
camera and connect to the power supply as shown above. The
operating and battery charging LED turns green. Charging an empty
battery lasts approximately four hours; when the battery is fully
charged, the LED is no longer illuminated.
The battery also charges when the camera is attached to the PC and is
being used as a mass storage medium or a PC camera.
8
ODYS MC-A5
3.4
Inserting and Removing the SD card
EN
You can use SD or MMC cards to increase the memory capacity.
Switch off the camera before inserting the card. Insert the card as
follows (photographs and videos are no longer stored in the internal
memory, but stored on the card).
Inserting the card
1
Open the cover of the card slot.
2
Insert the card in the card slot
until it locks into place.
3
Close the cover of the card slot.
Removing the card
Open the cover of the card slot. Press the card downwards briefly to
unlock it. Remove or change the card and close the card slot cover
again.
9
ODYS MC-A5
3.5
Attaching the carrying strap
EN
Attach the carrying strap for your convenience and for safety reasons.
1
Pass the loop of the carrying strap
through the eye as shown in the
illustration.
2
Pull the other end of the carrying
strap through the loop of the thin cord
and pull the carrying strap tight.
Caution
1. Do not hang the camera around your neck using the
carrying strap to avoid danger. This applies to children
in particular.
2. When carrying the camera on the strap, ensure that you
do not hit the camera against anything.
3. When attaching the carrying strap, place the camera on
a solid surface to ensure that it cannot fall down and be
damaged.
10
ODYS MC-A5
The camera has two USB driver modes: Mass Storage Mode and PC
Camera Mode. In mass storage mode, the camera acts as a portable
memory (removable storage medium). The PC camera mode uses the
PC video components (webcam). The procedure for installing the
drivers for each of the two modes is described below.
3.6.1
Installing the mass storage drivers (Windows 98)
The operating systems Windows Me, 2000 and XP include the necessary
drivers and thus automatically identify the camera as a removable
storage medium. In this case, you do not need to install any additional
drivers. The description of the driver installation procedure refers to
Windows 98.
1. Switch the camera to mass storage
mode (see chapter 4.10) and connect
the camera to your computer using the
USB cable. The Found New Hardware
Wizard appears on your PC monitor.
Click “Next” to open the next window.
2. Select “Search for the best driver
for your device” and click “Next”. Insert
the driver CD provided into the CDROM drive.
3. Select “Specify a location” and click “Browse”. Specify the driver CD
in your CD-ROM drive (X:\DSC Drivers\Mass, for example).
11
EN
3.6 Installing the driver
EN
ODYS MC-A5
4. Now click “Next”. The system
installs the driver and the following
window appears:
5. Click “Finish” to complete
installation.
6. You may be prompted to insert the
Windows 98 CD during the installation
process:
3.6.2
Installing the driver in PC camera mode
For webcam mode, a driver must be installed for each operating
system.
12
ODYS MC-A5
Automatic installation
EN
Run the setup program before connecting the camera to a PC.
Insert the driver CD provided into the
CD-ROM drive. Open the "Drivers"
folder in the CD ROM and double click
on "setup.exe". The installation process
begins and the accompanying dialogue
window appears a few seconds later.
Click Finish to complete the installation.
Manuel Installation
1. Switch the camera to PC camera
mode (see chapter 4.11) and connect
the camera to your computer using the
USB cable. Insert the driver CD
provided into the CD-ROM drive. The
accompanying dialogue window
appears.
2. The rest of the installation process is the same as described for
mass storage mode (location of the driver on the driver CD:
X:\DSC Drivers\pc_cam\win_xp or
X:\DSC Drivers\pc_cam\win98_2k).
3. Click “Finish” to complete installation.
13
ODYS MC-A5
EN
4
Operation
4.1 LCD descriptions display
All the symbols shown on the LCD display are listed and described
below. Familiarising yourself with these symbols makes it easier to
operate the camera.
Capture mode
Capture mode
White balance
Flash mode
(Flash off)
Resolution
Image
quality
Memory type
used (internally)
Number of
photographs
available
Date and
Time
Battery status
Digital
zoom
Video recording mode
Video recording mode
File format
Video
resolution
White balance
PC camera
Image
quality
Memory type
used (internally)
Battery status
Date and
Time
Digital
zoom
14
ODYS MC-A5
Playback mode
Playback mode
Voice recording
EN
File is protected
File type
Resolution
Memory type used
(internally)
File count /
total file countt
Date
Battery status
4.2
Switching on and off
Switching on
Press the On/Off button to switch the
camera on. Following a short video
animation, the camera switches to
video recording mode.
Switching off
Press and hold the On/Off button to
switch the camera off. The LCD goes
blank.
On/off button
15
ODYS MC-A5
EN
In order to conserve the battery, the camera is deactivated
automatically after it has been idle for a specific time period
("Auto Power Off" in setup menu).
Malfunctions
If the camera system hangs up and the on/off button is no
longer effective, briefly remove the battery from the battery
compartment (reset). Place the battery back in and the
camera should resume normal operation.
4.3
Operating modes
The video camera offers the following six operating modes. When the
camera is switched on, it is automatically in video recording mode.
16
Capture (Camera)
Video recording
Playback
System Setting
Voice recording
Movie playback (MP4)
ODYS MC-A5
Mode selection
Press the mode button to
call the mode selection
menu.
2
Select your required mode
by moving the joystick up
or down.
3
Confirm your chosen mode
using the OK button.
4.4
Mode button
EN
1
Video recording mode
Switch the camera on and press the shutter release to start recording a
video. Press the shutter release again to stop recording.
Move/pan the camera slowly to make good videos. Do not
forget to end the video recording mode; otherwise the entire
memory space is used.
Settings in the video recording menu
1
Press the menu button to
call the video recording
menu.
17
ODYS MC-A5
Select your desired option by moving the joystick up or down
and confirm using the OK button.
3
Choose the setting you require using the joystick and press the
OK button.
EN
2
You have the choice of the following menu settings for video recording:
Video format
ASF, MOV, WMF
Resolution (pixel)
640x480, 320x240
Image quality
Fine, Normal, Basic
White balance
Auto, sunny, cloudy, fluorescent, tungsten
Exposure compensation +2 to -2 in ½ steps
(EV)
Photo Effect
Normal, Sepia, B/W (Black/White), Soft and Vivid
Anti-vibration
On, Off
4.5
Taking photographs
In capture mode, you have three different capture options:
Single shot
When the shutter release is pressed, a
single photograph is taken.
Continuous shots
When the shutter release is pressed, a
series of four photographs is taken.
Self-Timer
The photograph is taken 10 seconds after
the release is pressed
18
ODYS MC-A5
4.5.1
Single shot
EN
When the shutter release is pressed all the way down, a single
photograph is taken.
1
Select capture mode.
2
Select the LCD display and move the joystick up by pressing
( ) to zoom in, or move the joystick down by pressing ( ) to
zoom out.
3
Press the shutter release to take a photograph.
When the camera is switched to capture mode, it automatically
activates the single shot option.
Follow the menu instructions below to get to the single shot function if
either the continuous shots or self-timer function is active:
1
2
Press the menu button. Select
symbol using the
the
joystick and press OK to
confirm.
Choose the "Single shot"
setting using the joystick and
press the OK button.
19
ODYS MC-A5
EN
4.5.2
Continuous shots
When the shutter release is pressed, a series of four photographs is
taken. Hold the camera steady when pressing the shutter release.
To change to the continuous shots function, follow the menu
instructions below:
1
2
4.5.3
Press the menu button. Select
the
symbol using the
joystick and press OK to
confirm.
Choose the "Continuous
shots" setting using the
joystick and press the OK
button.
Self-Timer
The photograph is taken 10 seconds after the release is pressed.
To use the self-timer function, simply
follow the menu instructions above.
20
ODYS MC-A5
Capture options
Single shot, Continuous shots, Self-Timer
White balance
Auto, sunny, cloudy, fluorescent, tungsten
EN
You have the choice of the following menu settings for capture:
Exposure compensation +2 to -2 in ½ steps
(EV)
Resolution (pixel)
2816x2112, 2560x1920, 2048x1536, 1600x1200,
800x600
Image quality
Fine, Normal, Basic
Photo Effekt
Normal, Sepia, B/W (Black/White), Soft and Vivid
Flash Mode
Auto, On, Off
4.6
Movie playback (MP4)
When you select this mode, a movie playback list is displayed.
Use the joystick and the shutter release to control movie playback. The
following table outlines the button commands.
Movie playback
◄
►
▲
▼
OK
Shutter
release
Fast rewind,
Back to playback list when the
video has ended
Fast forward
Increase volume
Reduce volume
Pause and continue playback
Start and stop movie playback
Movie playback list
Select the previous file
Select the next file
Play the selected movie
21
ODYS MC-A5
EN
Downloading MP4 files
If the playback list in movie playback mode is empty, you first need to
download MP4 files from your PC.
1
To do this, connect the video camera to your PC as a mass
storage medium using the USB cable.
2
Open the corresponding removable storage medium drive of
the camera, and create a folder named "MPEG" in the root
directory if there is not one already.
3
Convert any existing video files into MP4 format using the
software provided, and copy the new MP4 videos into the
MPEG folder.
For detailed instructions, refer to "Guidelines for MP4 File
Play" on the CD ROM.
4.7
Playback mode
If playback mode is activated, the last picture, video or voice recording
is displayed. The symbol in the top left corner of the LCD display
indicates the file type.
4.7.1
Playing photos
Full screen
The image is displayed in its entirety on the LCD.
Use the joystick buttons ◄ and ► to display the previous or next
picture. Use the ▲ or ▼ buttons to zoom in and out.
22
ODYS MC-A5
Thumbnail view
EN
Several photographs are displayed in a thumbnail view on the LCD.
1
Press the menu button. Press ▲ or ▼ to select the symbol
and press OK to confirm.
2
Select the desired thumbnail view (2x2, 3x3 or 4x4) using the
▲ or ▼ joystick buttons and press OK. You can now select a
picture using ▲, ▼, ◄ and ► and display it across the entire
screen by pressing OK.
3x3
4.7.2
Playing videos
The
symbol on the screen signifies a video file.
1
Press the shutter release to start playing the video. Press the
shutter release again to stop playing.
2
Press the joystick buttons ▲ or ▼ during playback to set the
volume.
3
Use the joystick buttons◄ or ► to rewind or fast-forward the
video.
23
ODYS MC-A5
EN
4.7.3
Playing audio
The symbol "WAV" in the top left corner of the LCD display indicates
an audio file.
1
Press the shutter release to
start and stop voice recording
playback.
2
Press the joystick buttons ▲ or
▼ during playback to set the
volume.
4.7.4
Voice notes for pictures
Recording voice notes
1
2
Select the picture to be commented on as required using ◄ and
► in playback mode.
Press the shutter release to start
recording the voice notes.
“VOICE RECORDING” appears
on the LCD. Press the shutter
release again to stop voice
recording.
Playing voice notes
When the symbol appears in a picture on the LCD display, the
picture contains voice notes.
1
24
Press the shutter release to start playing the voice notes.
ODYS MC-A5
Press the shutter release again
to stop playing the voice notes.
You can replay these voice
notes.
EN
2
Deleting voice notes
See chapter 4.12.1 „Deleting files“.
4.8
Recording audio
Select this operating mode by following the relevant steps in chapter
4.3.
Press the shutter release once to start sound recording. Press the
shutter release again to stop sound recording.
File name
Duration of the
recording
The sound is recorded as a WAV file. The length available
depends on the size of the memory.
25
ODYS MC-A5
EN
4.9
System settings
Select this operating mode by following
the relevant steps in chapter 4.3. The
mode System settings allows you to
change important system settings for
your video camera. It contains a total of
12 options.
You have the choice of the following menu settings:
Date settings
Year/month/day
Date/time display
Year/month/day/hours/minutes
Year/month/day
hours/minutes
Time stamp
on
TV system
NTSC
Key tones
on
am(pm)
off
PAL
off
Format
internally
SD card
Select memory
internally
SD card
LCD self-off
15 s
30 s
Camera self-off
60 s
120 s
Language
English, French, German, Spanish, Italian and
Dutch
Factory reset
reset
System version
…
26
cancel
never
never
ODYS MC-A5
The camera must be set to Mass storage mode to transfer files
between the camera and your PC. In doing so, the camera behaves as
a disk drive.
1
Switch on the video camera and stop video recording mode (by
changing to capture mode, for example).
2
Connect the digital camera to the
PC using the USB cable. The
camera is detected as a mass
storage device and the corresponding message appears in the
display.
3
Open Windows Explorer or My Computer to access the contents
of the camera memory. You can copy, move and delete image
and video files.
27
EN
4.10 Mass storage mode
ODYS MC-A5
Caution
Disable the digital camera from the operating system correctly
EN
using the “Remove Hardware Safely” option
. Ensure that no
files are being transferred between the camera and the computer.
Click the task bar on the right-hand side below the
symbol and
select the “Remove USB Mass Storage Device – Drive (X:)” in the
following dialog window. Then the message now appears that the
hardware can be removed. Now remove the USB-cable from the
camera.
4.11 PC camera mode
In this case, PC camera means that camera connected to your PC
using the USB interface is used as a peripheral video device on your
PC (Webcam). You can transmit a video data stream to your PC. Using
special application software, you can display and save moving pictures
on the monitor or transfer them using a network.
1
2
Switch the camera on and keep the video recording mode
activated.
Connect the digital
camera to the PC
using the USB cable.
The camera now
functions as a PC
camera.
Read through the PC camera drive installation instructions in
chapter 3.6.2 before using the video camera as a PC camera.
If you are using the camera as a PC camera and wish to
change to mass storage mode, press the mode button.
28
ODYS MC-A5
Press the menu button in playback mode. The file management menu
opens.
4.12.1 Deleting files
Files consists of pictures, videos and voice notes.
The following delete options are available:
Delete current file: The current file is deleted.
Delete sound: The voice notes of the current picture are deleted.
Delete all files: All files are deleted (except for protected files).
Format: Formats the memory. All files in the memory are deleted. In some
cases, it is necessary to format new memory cards or those which have
previously been used in other systems prior to use in the camera.
1
Select the desired delete option
using the ▲ or ▼ joystick button
and press OK.
2
Select Yes using ▲ or ▼ and
press OK to confirm. Select "NO"
to abort the procedure.
29
EN
4.12 File management
ODYS MC-A5
EN
4.12.2
Protecting files against deletion
This camera offers a lock function to avoid accidentally deleting
selected images and videos and to prevent you from adding or deleting
voice notes.
1
Select the file to be protected in
playback mode. Press the menu
button. Press ▲ or ▼ to select the
symbol
and press OK to
confirm.
2
Select Lock using ▲ or ▼ and
press OK to confirm.
3
Protect (LOCK):
The current file is protected.
symbol appears on the
The
image in the LCD.
Unprotect (UNLOCK):
The current file is unlocked and
can be deleted. The
symbol is
no longer displayed.
30
ODYS MC-A5
SD cards can be write-protected using an integrated lock. If
the SD card in the camera is write-protected, you cannot
save images, videos or sound recordings to it, delete existing
data or format the card. The data can only be played back.
4.13 Connecting to the TV
Connect the video/audio
output of the camera to the
video/audio input on the
television using the AV cable
provided, and select the
corresponding video input
(see TV operating
instructions).
The camera LCD turns off if the connection is correct. You can now
play back your videos and images on the television set.
The TV system specified in the system settings menu should
match that of your television set. Select PAL or NTSC as
required.
31
EN
Caution
ODYS MC-A5
EN
5
Specifications
Sensor
Effective resolution
Interpolated
resolution
Image quality
Colour
LCD monitor
Lens
Zoom factor
Focal length
Shutter speed
Exposure
White balance
Shutter release in
succession
Sequence
Playback delay
Self-Timer
Flash
Flash charge time
Flash range
Memory medium
File format
PC camera
Recording videos
Video playback
Sound recording
Sensitivity
Compatible systems
5.17 Megapixel CMOS
2560x1920, 2048x1536, 1600x1200, 800x600
2816x2112
Fine, Normal, Basic
24-bit (RGB)
2.36 inch TFT/LCD monitor
F2.8, Fixfocus
Digital zoom, 4x for Recording and 16x for Playing
1 m ~ infinity
1/2 - 1/4000 sec
Auto -2 to +2 EV in steps of ½ EV
Auto, Daylight, Cloudy, Fluorescent and Tungsten
< 3 sec
Interfaces
Power supply
Dimensions
series of four photographs
< 3 sec
10 second delay with LED display
Auto, flash on, flash off
< 8 sec (at room temperature and with full battery)
1-2m
32 MB internally, SD or MMC card externally
JPEG + Exif2.2
30 fps CIF pictures
MPEG-4, QVGA or VGA @ 30 fps
MP4 playback
Sound recording and playback
Auto
Windows 98/Me/2000/XP
and Mac OS 8.0 and above
English, French, German, Italian, Dutch and
Spanish
USB 2.0, AV output
rechargeable lithium-ion battery
98 mm x 56 mm x 20 mm
Weight
~ 105 g (without battery)
Language
32
ODYS MC-A5
6
Troubleshooting
Symptoms
Camera does not
switch on.
Cause and solution
Cause:
Solution:
Camera suddenly
shuts down
Cause:
Solution:
Short battery life
No flash
Pictures are not clear
EN
If your camera does not work properly, please check the following
items. If the problem still exists please contact your dealer.
Cause:
Solution:
Cause:
Solution:
Cause:
Solution:
Battery is inserted incorrectly or dead,
No voltage from power supply adaptor
Check the polarity or replace,
Check power supply adaptor
Battery is dead, power supply adaptor
switches off
Charge battery, Check power supply
adaptor
The battery is not fully charged or is too
old
Fully charge or replace battery
Battery is weak or flash mode is off
Insert fresh battery or switch flash on
The lens is dirty or was moved while the
picture was taken.
Clean the lens or keep the camera still
while taking a picture
Card is inserted incorrectly, poor contact
Insert the card correctly, clean contacts
NO CARD is displayed Cause:
when the SD card is
Solution:
inserted
No mass storage and Cause: Driver is not installed correctly, incorrect
PC camera function
setting.
Solution: Install the driver correctly, set the
respective online mode correctly
No key tones
Cause: Key tones are switched off
Solution: Activate the key tones
Several pictures
Cause: Pictures are protected before being
cannot be deleted.
deleted.
Solution: Switch off protection function
The LCD image has
Cause: Insufficient lighting, strong
spots on it.
electromagnetic interference
Solution: Improve lighting conditions, use flash,
avoid interference
33
EN
ODYS MC-A5
Pictures are not saved Cause: SD card is damaged, memory is full, SD
after being taken
card is write-protected, incorrect format
Solution: Replace card, remove some files, switch
off write protection, format card
Camera switches off
after 5 minutes. LCD
switches off.
Variations in colour
Cause: Camera shuts down automatically.
Solution: Restart camera.
White balance does not correspond to the
current lighting conditions
Solution: Set correct white balance or set to auto
Images are too light or Cause: Centre of motif is too dark of too bright,
too dark
Incorrect exposure balance
Solution: Avoid having bright or dark objects in the
centre of the motif or adjust the exposure
balance
34
Cause:
ODYS MC-A5
7.1
Further information
Safety instructions
Although this product is safe, please observe the following information
and warnings.
Caution
• Do not modify or dismantle the camera. Contact your dealer for
repairs and inspections.
• Do not shake the camera or subject it to hard knocks. The
camera may be damaged if it falls.
• Ensure that no water or moisture enters the camera. This can
cause short circuits and accidents.
• Do not expose the camera to direct sunlight for extended time
periods; keep the camera away from strong electromagnetic
fields and smoke.
Note
When using the flash, do not look directly into it, as this can
damage the eyes.
7.2
Maintenance and care
Keep the camera and in particular, the lens and LCD clean. Never
touch the lens with your fingers.
Please clean the body, lens and LCD as follows:
• Do not use thinning or cleaning agents which contain petrol. This could
damage the camera.
• Clean the camera body with a soft cloth.
• Lens: First remove dust with a lens brush. Then clean with a soft cloth.
• Do not use powerful cleaning agents on the body and lens (contact your
dealer if dirt cannot be removed).
• Do not apply pressure to the LCD or use hard objects to clean it.
35
EN
7
ODYS MC-A5
7.3
Photo tips
EN
For excellent photographs, please observe the following tips:
• Do not move the camera quickly to prevent the photos being out of focus.
Hold the camera steady when pressing the shutter release. Do not move
the camera immediately after pressing the shutter release. Wait until you
hear the sound signal before moving the camera.
• Look at the subject through the viewfinder before pressing the shutter
release.
• Check the angle if the subject is backlit. Move to the side to reduce the
backlighting.
• Use the flash in dark conditions.
• Move/pan the camera slowly to make good videos. Pans that are too fast
result in out of focus and blurry videos.
7.4
Battery tips
Incorrect handling of the batteries can cause them to leak, become hot
or explode. Observe the following safety instructions:
• Only use the rechargeable batteries and power supply adaptor that were
supplied with the video camera.
• It is normal for the battery to heat up whilst charging. However, stop
charging if the battery overheats significantly.
• Do not heat batteries or dispose of them in fires.
• Do not transport batteries with metallic objects, as they can come into
contact with the battery poles and cause damage.
• Do not expose batteries to moisture. Always store them in a dry area.
• Do not dismantle, deform or modify batteries. Never remove the cover of
the battery. Do not subject the battery to hard impact. Never use leaking
or damaged batteries.
• Keep batteries out of reach of children.
• Ensure that the polarity is correct when inserting the batteries into the
camera.
• Battery power is reduced in cold environments (-10 °C or colder, applies
to alkaline batteries in particular)..
36
ODYS MC-A5
EN
• If the camera is not to be used for a longer period of time, remove the
battery.
• Used batteries should be disposed of properly to protect the environment.
7.5 Notes on the power supply
Observe the following safety instructions:
• Ensure that it is securely connected and handle the connector with care.
• During operation, the power supply unit becomes warm. This is normal.
After serious overheating, do not reuse the power supply unit.
• Do not dismantle the power supply unit. This can lead to accidents.
• Do not use the device in very hot and humid conditions.
• Do not subject the device to hard knocks.
The design, technical data and documentation can be changed at any
time without notification.
37
ODYS MC-A5
Warranty conditions
EN
EN
The following conditions comprise the requirements and scope of our warranty conditions and do
not affect our legal and contractual warranty obligations.
We offer a warranty on our products in accordance with the following conditions:
1. We will remedy free of charge any product damage or defect that is proven to be based on a
manufacturing fault, provided the end user reports this immediately upon noticing it and within a
period of 24 months following the date of purchase.
The warranty does not cover batteries and other parts, which are considered consumables, parts
that break easily such as glass or plastic or defects based on normal wear and tear. There is no
warranty obligation in the event of marginal differences compared to the target appearance and
workmanship provided these have a negligible effect on the product's fitness for use, in the event
of damage caused by chemical or electrochemical effects, by water or generally from abnormal
conditions.
2. The warranty will be performed in such a way that we shall decide whether to repair the defective
parts or to replace them with working parts free of charge. AXDIA reserves the right to exchange
the product for a replacement product of equal value if the product that is sent in cannot be
repaired within a reasonable time or at reasonable cost. The product can also be exchanged for a
different model of the same value. Requests cannot be made for repairs to be carried out on site.
Parts that have been replaced or exchanged become our property.
3. The warranty claim does not apply if repairs or other work is carried out by unauthorized persons
or if our products are equipped with additional parts or accessories that are not approved for our
products.
4. Warranties that have been activated do not cause the warranty period to be extended, nor do
they trigger a new warranty period. The warranty period for any replacement parts installed ends
with the warranty period for the entire product.
5. Any other or further claims are excluded, especially those for replacement due to damage caused
outside of the product, provided there is no obligatory legal liability. We therefore accept no
liability for accidental, indirect or other consequential damage of any kind, which leads to usage
restrictions, data loss, loss of earnings or interruption to business.
Asserting a warranty claim
1. To make use of the warranty service, you must contact the AXDIA Service Center by e-mail, fax
or phone (see below for contact details). You can also use the service form on our website or on
the back of the warranty conditions.
2. AXDIA Service Center will try to diagnose and solve your problem. If it is determined that a
warranty claim exists, you will be given an RMA number (Return Material Authorization) and you
will be asked to send the product to AXDIA.
IMPORTANT: AXDIA will only accept parcels that have an RMA number.
Please observe the following when sending the product:
1. Send the product suitably packaged with carriage and insurance paid. Do not enclose any
accessories with the products (no cables, CD's, memory cards, manuals, etc.), unless the AXDIA
Service Centre specifies otherwise.
2. Mark the RMA number on the outside of the package in such a way that it is visible and clearly
legible.
3. You must enclose a copy of the sales slip as proof of purchase.
4. Once AXDIA has received the product, it will meet its warranty obligations in accordance with the
warranty conditions and will return the product to the sender with carriage and insurance paid.
38
ODYS MC-A5
Service outside of warranty
AXDIA will not accept any packages that have not first been approved by AXDIA by means of an
RMA (Return Material Authorization).
AXDIA INTERNATIONAL GmbH
Service Center
Halskestrasse 15
D-47877 Willich
Service Hotline (Mo-Fr. 9:00 - 17:00)
Tel: +49-2154-8826-101
Fax: +49-2154-8826-111
Email: [email protected]
Web: www.odys.de
39
EN
AXDIA can refuse any service claim made that is not covered by the warranty. If AXDIA agrees to
provide a service outside the warranty, the customer will be invoiced for all repair and transport
costs.
EN
ODYS MC-A5
40