1
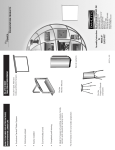
49444-97193 ModB ClassRite InF
3/18/05 8:34 AM
Page 1
QUALITY FEATURES FOR BETTER PICTURES,
EASIER OPERATION, LONGER LIFE
• Exclusive Camlok Roller System
• Attractively styled
• Easily installed
• Economically priced
• Completely self-storing
OPERATING INSTRUCTIONS
FOR
MANUAL
WALL/CEILING
SCREENS
SC-MAN WHT-84
SC-MAN WHT-100
SC-MAN WHT-120
SC-MAN GRY-92H
SC-MAN GRY-106H
InFocus Corporation
97193 3/05
27700 SW Parkway Ave
Wilsonville OR 97070
800-294-6400
www.InFocus.com
49444-97193 ModB ClassRite InF
3/18/05 8:34 AM
YOU HAVE MADE A WISE
SELECTION…
in choosing an InFocus projection screen
designed and engineered to produce the
sharpest, most pleasing pictures with
maximum convenience.
PROTECT YOUR SCREEN by keeping it rolled in its
protective case when not in use. Always
examine both front and back of surface before
re-rolling into case to make certain screen is
free of dust, dirt or other foreign matter. Use a
very soft duster brush gently to remove foreign
particles.
INSTALLATION
FOR CEILING SUSPENSION
If the screen is to be
ceiling mounted, two
screw hooks placed in a
beam or other solid
surface will do the job.
NOTE: Whichever method is used, the screen
should be free to swing forward and back and
not be anchored rigidly. Mount the screen so
that bottom of picture surface, when fully
extended, will be above heads of viewers.
OPERATING INSTRUCTIONS
Care in mounting and care in correct operation
will mean a long and satisfactory life for your
InFocus wall/ceiling screen. Locate the screen
where the audience can best see it and where
other furnishings in the room permit. Mount the
screen so that bottom of picture surface, when
fully extended, will be above heads of viewers.
BUILT-IN HANGERS
InFocus wall/ceiling screens may be mounted
on wall, map rails, suspended from ceiling or
extension brackets. Wall screens must be
mounted level and with the case-back parallel to
the wall.
FOR WALL MOUNTING –
Use the keyhole slot at
the back of the hanging
bracket for flush wall
suspension. Position
screws or other
fasteners into wall and
hang screen by using
slots.
Page 2
FOR
CEILING
FOR
WALL
FOR MAP RAIL MOUNTING –
Use keyhole slots in flat brackets. Do not use
“D” rings.
TO LOWER PICTURE SURFACE
Pull screen down all the way. HESITATE – then
allow screen to retract VERY SLOWLY until it
locks in place.
TO RAISE PICTURE SURFACE
Pull down on the pull bail, then raise quickly, as
a window shade. Keep control of the picture
surface. Do not allow it to roll uncontrolled into
the case or damage is sure to result.