1
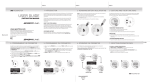
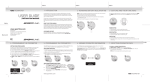
English version
EA2500010 Sweex Wireless Desktop Set
Introduction
Thank you for buying the Sweex Wireless Desktop Set. This is a complete desktop set with a wireless keyboard, wireless optical mouse and a
receiver. No more cables over and under your desk and no more problems with leads that are just that litle bit too short.
Multimedia keyboard with 22 multimedia keys. These keys give you fast access to the Internet, e-mail, your CD ROM controls and much more.
The wireless optical mouse has 400 CPI and is equipped with very sensitive sensor technology. The mouse also has three programmable buttons.
You can adjust the settings for left or right-hand use and the speed for double-clicking and scrolling.
For the correct operation of this product we advise you to first read this manual carefully. If after reading the manual you still encounter problems
with the installation or operation, you can find more information on our website at www.sweex.com.
Contents of package
Before installing the device, please check that all necessary parts are present. The box should contain the following parts:
• Wireless Multimedia Keyboard
• Wireless Optical Mouse
• Receiver
• CD ROM with drivers
• This manual
Should one of the above parts be missing, please contact your supplier.
Specifications
Receiver
• Carrier frequency: 27MHz
• Numbers of ID: 256
• Maximum transfer rate: 2.0 Kbps
• Auto power saving mode
Keyboard
• Maximum operating distance: 2.5 meters
• Power: 3 x AA battery
• Switch reliability: 5 million
• Dimension: 484 x 209 x 45 mm (lxwxh)
2
W W W. S W E E X . C O M
English version
Mouse
• Maximum operation distance: 1.5 meters
• 400 CPI, advanced optical sensing technology
• Power: 2 x AAA battery
• Plug and Play
System requirements
Pentium 233 or higher
Two PS/2 ports
CD-ROM driver (for driver and software installation)
Standard sound card (Optional for “you’ve got mail” software)
A POP 3 e-mail server
Windows 98SE, 2000 or XP
Warning!
• Do not use this keyboard near water or other fluids.
• If this keyboard is opened, you may come into contact with live parts. Therefore never try to repair this device yourself.
• If you want to clean the keyboard, only use a damp cloth and definitely no aerosols or cleaning products.
• Continuous use of a keyboard, irrespective of the brand, may lead to serious health complaints. For this reason we advise you to take regular
breaks, sit right in front of your keyboard and use the wrist support, if supplied. In case of doubt with regard to the most desirable work
position we advise you to contact your general practitioner.
Installation
Before starting with the installation we advise you to make sure the operating system you are using is up to date. This can be checked easily by
clicking on the "Tools" toolbar button and then selecting the "Windows Update" option in Windows Explorer.
Battery installation
Open the battery cap, which is on the reverse side of the keyboard or mouse, insert the alkaline batteries, and put the cap back. Every time after
having changed batteries, please re-setup the mouse or keyboard, or mouse and keyboard depending on which unit you have changed batteries.
For re-setup, please follow the setup of "SETUP FOR USE ".
3
English version
Warning!
To conserve the battery power and extend battery usage time, hold the "ID Reset" button for 3 seconds until the optical sensor flashes. The
mouse is set to "Sleeping Mode". Press the "ID Reset" button again to reactivate the mouse.
Hardware installation
1. Shut down your computer system.
2. Connect the green connector of the receiver to the PS/2 connection port of the computer, or connect the purple connector of the receiver to
the PS/2 connection port.
3. Turn on your computer system.
Software installation (driver)
1. Insert the CD/Driver into the CD-ROM player.
2. The computer will enter the setup screen.
3. Select "Keyboard".
4. Click the "Office Keyboard" option under "Keyboard + Mouse 2 in 1".
5. Click on the appropriate item for setup.
6. Follow the setups indicated in the screen to complete the keyboard setup.
7. Restart your computer system.
8. Run the "AutoRun.exe" of the CD/Driver.
9. The computer will enter the setup screen.
10. Select " Keyboard ".
11. Click the "Mouse" option under " Keyboard + Mouse 2 in 1".
12. Select "3D 3Buttons".
13. Click on the appropriate item for setup.
14. Follow the setups indicated in the screen to complete the keyboard setup.
15. Restart your computer system.
4
W W W. S W E E X . C O M
English version
1
2
3
4
5
6
7
8
9
10 11
12 13 14
15
16 17 18 19 20 21 22
Internet key zone
1. Back
2. Forward
3. Stop
4. Refresh
5. Search
6. Favorites
7. Web/Home
The previous web page in the memory appears.
The next web page in the memory appears.
Stops the search for a web page.
Refreshes the current internet page.
Opens the search function in the Web browser.
Starts your favourite websites.
Starts up the default browser.
Multimedia key zone
8. Mute
9. Media (Media)
10. Pre-track
11. - Volume
12. + Volume
13. Next track
14. Stop
15. Play/Pause
Switches off the sound. When you press it again, the sound is switched on again.
Start a media program.
Sets the media player to the previous track.
Decreases the volume level.
Increases the volume level.
Sets the media player to the next track.
Stops playback of the media file.
Plays back the media file. When pressed again, playback of the file is interrupted.
Application key zone
16. Mail
17. My computer
18. Calculator
19. Sleep
20. Power
21. Wake up
22. Fn
Starts up the default e-mail application.
Opens “This Computer”.
Starts the calculator.
On computers with a power management program, the "Sleep" hot key enables you to:
Start your screen saver, log off Windows or shut down Windows.
On computers with a power management program, the "Power" hot key
enables you to: log off Windows, shut down Windows.
On computers with a power management program, the "Wake up" hot key
enables you to restore, or wake up your computer.
Keyboard lock on/off by pressing “Fn”+F11 key.
5
English version
User setup
Mouse
Aim the front point of the mouse towards the receiver. Press the button on the rear side of the mouse and release, then press the connector
button on the receiver and release within 15 seconds. Move the mouse and if the cursor is moving then the setup of the mouse is completed. If
the cursor is not moving, please repeat the setup procedure.
Keyboard
Press the button on the rear side of the keyboard and release, then press the connector button on the receiver and release within 15 seconds.
Press the "Num Lock " key, if the Num indicator led of the receiver is changing status then the setup of the keyboard is completed. If not,
please repeat the setup procedure.
Mouse button function setup
Enter setup from the control desk or directly right-click into the mouse pattern shown in the right bottom corner of the screen and select active
mouse properties. The functions are as followed:
Button:
Pointers:
Pointers options:
Wheel:
Hardware:
Setup for using right or left hand, setup of the speed of clicking the mouse buttons twice, setup of scroll speed.
Choose your type of pointer.
Setup of the moving speed and the length of the dragging tail.
Setup for hot key functions and zoom.
Type of mouse.
Press "OK" (Okay) after the setup is completed to store the new setup.
Troubleshooting
If the keyboard doesn't function well, please follow the steps below:
1. Check if the connector in the PS/2 port is connected properly.
2. Check if the positive (+) and negative (-) pole of the battery is placed correctly. If the power is low, the mouse will become slow.
3. Reset: Follow the setup of "User setup".
Warning!
Do not put the transmitter and receiver on a metal cabinet or metal desk. It is better not to have a metal or interference source around. This will
affect the RF communication and reduces the communication distance.
6
W W W. S W E E X . C O M
English version
How to remove the driver
From the window's taskbar, click on “Start” (Start), then select “Setup” (Setup), “Control Desk” (Control Desk), “Add/Remove Program”
(Add/Remove Program). Find the file “wireless keyboard” and click “Add/Remove” (Add/Remove) in the window “Confirm File Deletion”
(Confirm File Deletion), click “Yes” (Yes).
E-mail program
E-mail function
The combined E-mail multimedia keyboard detects the POP3 functions and utilizes the multimedia hot key functions. The E-mail program is
always on the run when the computer is switched on and the icon will appear on the bottom right side of the screen. Click on the icon with the
left mouse button to activate the e-mail multimedia functions.
Hot Key configuration
Move the cursor to the keyboard icon. Click on the icon with your right mouse button to pop-up the menu.
Move the cursor to "configuration". Click on your left mouse button to pop-up the picture menu.
Move the cursor to the key that needs to be customized and click on your left mouse button to pop-up the menu.
Setting E-mail detect function
Move the cursor to the keyboard icon. Click on the icon with your right mouse button to pop-up the menu.
7
English version
Move the cursor to "E-mail Detection" and click on your left mouse button to pop-up the menu.
Warranty
All articles that are carried under the name Sweex Essentials have a three year term of guarantee. Only the Sweex digital photo and video
cameras have a two year term of guarantee. We offer a warranty of six months on rechargeable batteries.
Settlement of guarantee takes place only via the dealer where you have purchased the product in question.
8
W W W. S W E E X . C O M