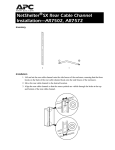
1
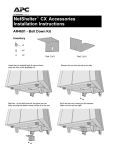
®
NetShelter
®
2-Post Rack — AR200 & AR201
Unpacking and Inspection
Before unpacking:
1. Inspect the carton for damage. If you detect damage, notify the carrier.
2. Remove the components from the carton and inspect them for shipping damage.
Note: The mounting hardware is enclosed in a separate plastic bag located inside one of the packaging
inserts glued to the main carton. Remove it before discarding the carton.
Inventory
The following table lists the parts that are included with the NetShelter 2-Post Rack.
Inventory of the NetShelter 2-Post Rack
Component
Quantity
Rack
3" Extruded Upright Rail
2
1½" × 1½" Extruded Top Angle
2
3½" × 6" Extruded Bottom Angle
2
Hardware
3/8"-16 × ¾" Hex Head Bolt
12
3/8" Split Lock Washer
12
#12-24 Screw (for installing equipment)
24
Tools Required
You will need a 9/16" box-end wrench to assemble the rack.
990-6040A
1/2
6/00
Installation
Refer to figures 1 and 2:
1. Place the uprights on a flat surface, approximately 20" apart, with the larger face of each
upright facing away from the other upright.
2. Place one bottom angle at the base of each
upright, aligning the four holes on the smaller
face of the angle with the 3/8" tapped holes of
each upright. Loosely attach using the hex
head bolts and split lock washers, as shown in
Figure 2. Finger-tighten only.
3. Repeat step 2 for one top angle at the top of
each upright. Again, finger-tighten only.
4. Turn the assembly over and repeat steps 2–4
with the remaining top and bottom angles.
5. Push the center of the uprights outward and,
using a 9/16" box end wrench, tighten all
screws.
Caution: Do not exceed 20 ft-lb of torque
when tightening screws.
6. Stand the rack up and place it in the desired
position and secure it to the floor (hardware
not provided).
Do not install equipment until the rack
is secured to the floor.
2/2