1
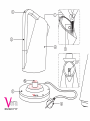
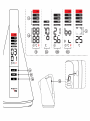
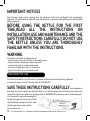
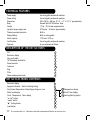
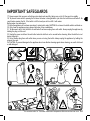
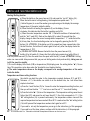
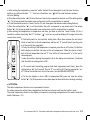
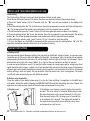
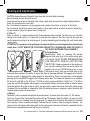
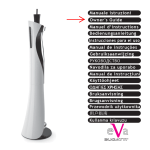
"See on the internal pages: (DE), (ES), (PT), (NL), (RU), (CS), (RO), (FI), (GR), (DA), (PL), (TR)"
14-VERAMANUALE2
VERA INSTRUCTIONS
e-mail
(IT) Tutti i dettagli del testo sono stati attentamente controllati. L'azienda si riserva il diritto di fornire
qualsiasi chiarimento in caso nel testo ci siano errori di stampa o informazioni fuorvianti.
Attenzione: L'azienda mantiene aggiornati i dettagli di prodotto presenti nel manuale istruzioni, incluse
le revisioni delle specifiche tecniche; si riserva comunque la facoltà di apportare modifiche senza
preavviso. La prospettiva, la forma e il colore del prodotto si ispirano al prodotto reale standard.
(EN) All the details of the text have been carefully checked. Our company reserves the full right to
explain the elaboration of the text if there is any printing error or misleading information.
Note: Please be reminded that our company keeps updated every product detail shown on the instruction book, including technical specification. We reserve to revise the instruction book without prior
notice. All product’s outlook, shape and color are based on the standard of actual physical products.
(FR) Tous les détails du texte ont été contrôlés attentivement. Notre entreprise se réserve le droit de
fournir tous les éclaircissements qui s’imposeront au cas où le texte contiendrait des erreurs
d’impression ou des informations trompeuses.
Attention : Nous continuerons de mettre à jour les détails de produit présents dans le manuel
d’instructions, compris les révisions des spécifications techniques. Nous nous réservons toutefois la
faculté d’apporter des modifications sans préavis. La perspective, la forme et la couleur du produit
s’inspirent du produit standard réel.
(ZH)
Käyttöohjeet
Instukcja obslugi
Kullanma kılavuzu
用户指南
IMPORTANT NOTICES
Dear Customer, thank you for choosing Vera, the electronic kettle from Casa Bugatti. Like any domestic
appliance, this kettle must be used with care and attention to prevent people getting burnt and the kettle
getting damaged.
BEFORE USING THE KETTLE FOR THE FIRST
TIME,READ ALL THE INSTRUCTIONS ON
INSTALLATION,USE AND MAINTENANCE AND THE
SAFETYINSTRUCTIONS CAREFULLY.DO NOT USE
THE KETTLE UNLESS YOU ARE THOROUGHLY
FAMILIAR WITH THE INSTRUCTIONS.
WARNING
No liability is accepted for damage due to:
- incorrect use or use other than for its intended purpose
- using the kettle continuously without any water
- repairs carried out by unauthorised persons
- use of non-original spare parts or accessories
- plug-in Vera kettle in a non-earthed socket
Instruction for use
For further information, or in the event of problems that have not been sufficiently addressed
in these instructions, contact Customer Care at CASA BUGATTI .
SAVE THESE INSTRUCTIONS CAREFULLY
and remember to
pass them on to those who will use the kettle after you. If the instructions are lost before you use the kettle,
request the instruction booklet from Customer Care at CASA BUGATTI or send an e-mail to diva@casabugatti.
it or download it from www.casabugatti.it
On the first page of the cover you will find
the illustrations relating to the text. Keep
the first page open as you read the
instructions on use.
15
For conversion table for °Fahrenheit and altitude’s temperature difference see the inner cover
Conversion table
°Celsius - °Fahrenheit
Contents
Pag. 17
Technical features
Pag. “ Description of kettle parts
Pag. “
Kettle Function
Pag. 18-20
Important safeguards
Pag. 21
Installation and starting up
Advice and recommendations on use
Pag. 21-22 Setting up and battery back up
Pag. 23 Heating / Boil water
Pag. 23-24 Temperature setting
Pag. 23-24 Timer setting
Pag. 25 Clock setting
Pag. 25 Special instruction
Pag. 21-25
Pag. 26
Cleaning and maintenance
Pag. 27
Troubleshooting
Pag. 27-28
Warranty
°C
45
46
47
48
49
50
51
52
53
54
55
56
57
58
59
60
61
62
63
64
65
66
67
68
69
70
71
72
°F
113,0
114,8
116,6
118,4
120,2
122,0
123,8
125,6
127,4
129,2
131,0
132,8
134,6
136,4
138,2
140,0
141,8
143,6
145,4
147,2
149,0
150,8
152,6
154,4
156,2
158,0
159,8
161,6
°C
73
74
75
76
77
78
79
80
81
82
83
84
85
86
87
88
89
90
91
92
93
94
95
96
97
98
99
100
°F
163,4
165,2
167,0
168,8
170,6
172,4
174,2
176,0
177,8
179,6
181,4
183,2
185,0
186,8
188,6
190,4
192,2
194,0
195,8
197,6
199,4
201,2
203,0
204,8
206,6
208,4
210,2
212,0
For conversion table for °Fahrenheit and altitude’s temperature difference see the inner cover
16
TECHNICAL FEATURES
Power supply
Power rating
Dimensions Body
Weight
Length of power supply cord
Thermal overload protection Display Battery
kettle capacity Certifications Warranty
See rating plate underneath machine
See rating plate underneath machine
220 x 180 x h. 300 mm – 8 1/2 ‘’ x 7’’ x 11 3/4 ‘ approximately
Pressed Solid 18/10 Stainless Steel
1,7 Kg – 37,5 Pounds approximately
0,75 meter – 30 inches approximately
Built in
Built in: rechargeable
1,75 litres / 47 fl.oz
See rating plate underneath machine
As per attached certificate
DESCRIPTION OF THE KETTLE PARTS
Lid
Electronic display
Stay-cool handle
18/10 stainless steel kettle
Power base unit
Connector
Plug
Filter
Water maximum level mark
1
2
3
4
5
5a
6
7
8
KETTLE ELECTRONIC CONTROLS
Electronic display
Segment indication : “Kettle is heating/boling”
Clock-timer+Temperature Celsius Degree+Program icons
Water level display
Clock – Temperature – Timer display
“on/off” button
“mode” button
“▲” Setting button
reset button
17
2
9
10
11
12
14
15
16
18
10A Temperature display
10B Clock-Timer display
10C Heating/Boiling display
For conversion table for °Fahrenheit and altitude’s temperature difference see the inner cover
IMPORTANT SAFEGUARDS
READ ALL INSTRUCTIONS CAREFULLY. THE
KETTLE MUST BE USED ONLY BY ADULTS
WHO HAVE BEEN TRAINED IN ITS USE.
SAVE THESE INSTRUCTIONS CAREFULLY.
1.TO PREVENT SERIOUS INJURIES , ELECTRIC
SHOCKS AND FIRE TO PEOPLE DO NOT IMMERSE
CORDS, PLUGS, POWER BASE OR THE KETTLE
ITSELF IN WATER OR OTHER LIQUIDS, EITHER
PARTIALLY OR TOTALLY
WARNING: DANGER OF BURNS!
PAY ATTENTION TO HOT SURFACES!
Do not touch hot surfaces. Use only the handle to pick-up the kettle. Use an oven glove when touching hot
parts such as body (4) , lid (1) and all surfaces of the kettle:
DANGER OF BURNS!
2. The kettle has been designed for HOUSEHOLD USE ONLY.
Use kettle only for its intended use. Do not make any technical modifications that might cause risks.
3. Close supervision is necessary when any appliance is used near children. The appliance can be used by children aged from 12
years and above and persons with reduced physical, sensory or mental capabilities or lack of experience and knowledge if they
have been given supervision or instruction concerning use the appliance in a safe way and understand the hazards involved.
4. Never touch live electrical parts. They may cause electric shocks and serious personal injury. Connect the power base unit (5) to
a wall socket having the appropriate voltage. The voltage must correspond to the voltage indicated on the rating plate underneath
the kettle (4). Make sure that the socket that you are using is earthed
. Do not use the kettle with bare or wet feet.
5. Figure A: power cord with plug. A short power cord with plug is supplied to reduce the risk of becoming entangled in objects,
to prevent people for tripping over it and to prevent the cord from wrapping around a longer cord. Long detachable power cords
or extension cords are available but they may be used only if a QUALIFIED ELECTRICIAN can confirm that they comply with wiring
regulations. DO NOT USE plug/socket adapters. If a long detachable power cord or extension cord is used:
For conversion table for °Fahrenheit and altitude’s temperature difference see the inner cover
18
IMPORTANT SAFEGUARDS
a)The electrical rating of the detachable power cord or extension cord should be at least as great as the electrical
rating of the kettle indicated underneath the kettle itself.
b)The extension cord must be of the 3-wire/pole type and must be earthed. A long cord or extension cord must never
protrude from furniture or over counter tops or table tops where it may be pulled on by children or tripped over.
c)Do not place kettle or cords on or near a hot gas ring or electric hotplate, or in or near the oven.
d) Do not use outdoors.
Do not let the cords hang over the edge of the table or counter, or touch hot surfaces.
Do not operate the kettle with a damaged cord or plug or after the appliance develops faults, or has been damaged
in any manner. Return appliance to the nearest authorized service facility for examination or repair. The use of
accessory attachments not recommended by the appliances manufacturer may result in fire, electric shock or serious
injuries to persons.
e) If the power cable or plugs are damaged, they must be replaced by the manufacturer or with authorized service
centre or by a qualified person in order to prevent all risks.
6. Figure B: Make sure that children cannot play with the kettle. Children are not aware of the dangers of electrical
appliances. Cleaning and user maintenance should not be made by children without supervision.
7. Place the kettle on a flat surface, making sure that the feet adhere firmly to the support surface so that the
appliance cannot be overturned. Do not place the kettle on or near hot surfaces or near naked flames.
CAUTION: Do not operate the kettle on an inclined plane.
8. Figure C: Pay attention to hot surfaces. Use handles or knobs or wear oven gloves. Be very careful when touching
very hot parts such as lid (1) , body (4) and all surfaces of the kettle.
WARNING! DANGER OF BURNS!
The kettle body (4) and lid (1) become very hot during use.
9. Figure D: To ensure that the kettle works correctly, place it on a flat surface in an adequately lighted and hygienic
environment with an easily accessible electrical socket. Keep the kettle at least 10 cm (4 inches) away from the
walls.
10. Figure E: Never touch the appliance with wet or damp cloths or hands. Always unplug the kettle when it is not in
use and before cleaning. Do not unplug the appliance by pulling on the cord but only holding the plug. Allow kettle
to cool before fitting or removing parts, and before cleaning. The kettle must be cleaned with a dry or slightly
dampened non-abrasive cloth soaked with a few drops of neutral non-corrosive detergent (never use solvents or
alkaline cleaning agents). Clean the outside surfaces of the kettle ONLY.
11. Do not use the kettle under or near flammable material such as curtains, wallpaper, walls and the like.
12. In the event of faults, defects or suspected faults after a fall, unplug the kettle immediately. Never start up a
faulty appliance. The repairs must be carried out by the CASA BUGATTI Service Centre. Contact your dealer and/or
contact Customer Care at CASA BUGATTI or send an e-mail to [email protected] . In the event of fire, use carbondioxide (CO2) extinguishers. Do not use water or powder extinguishers.
13. The kettle is only to be used with the stand provided.
14. Never fill the kettle with water when it is positioned on the power base unit.
15. Never fill the kettle above the «MAX» mark on the control display panel (2). The kettle has a safety system that
will not permit it to switch on if the level is over at 1,75 litres (47 fl.oz) . By the way if the kettle is overfilled of
water, when boiling water may be ejected.
15a. CAUTION: Do not operate the kettle unless the heating element, placed into the kettle, is fully immersed.
16. Never boil water with the lid open.
19
For conversion table for °Fahrenheit and altitude’s temperature difference see the inner cover
IMPORTANT SAFEGUARDS
17. Always ensure that you pour out boiling water slowly and carefully, taking care not to tilt the spout too rapidly.
18. To prevent burns avoid to opening the lid when the water is being boiled or just after the kettle has switched off. Be
careful when opening the lid, if the kettle is still hot and you wish to refill it with water.
Boiling water can cause burns.
19. Move the appliance with extreme care when it contains hot water. CAUTION: Do not move the kettle while is switched on.
20. Only clean the appliance using a damp cloth when it has cooled down.
21. To disconnect verify that the kettle is switched off and remove plug from wall outlet. Always unplug the appliance by
holding the plug not the cord.
22. Unplug the power cord from the wall outlet when the kettle is not in use and before cleaning. Allow the kettle to cool
before cleaning it.
23. Note: Remove plug from wall outlet when you are not using the kettle. Always unplug the appliance by holding the
plug not the cord.
24. CAUTION: To prevent damages to the appliance do not use alkaline cleaning agents when cleaning, use a soft cloth and
a mild detergent.
A
B
D
!
!
C
!
E
!
For conversion table for °Fahrenheit and altitude’s temperature difference see the inner cover
20
Installation and starting up
The original packaging has been designed for dispatch by post. Keep it in case you need to return the kettle to
the supplier. Before installing the kettle, comply with all the points of the safety instructions on the previous
pages. After removing the kettle from its packaging, make sure that it is in perfect condition and make sure
that no kind of matter, packaging material, warranty sheets or the like have accidentally fallen inside the
kettle during transport or when opening the packaging.
The plastic bag in which the kettle is packaged should be kept out of reach of children as it poses a suffocation
hazard.
In order to remove dust that may have accumulated on the kettle, simply dust it off with a dry soft cloth.
After you have carried out the above steps and have strictly followed the safety standards, proceed to connect
to the power supply.
Connecting to power supply: electric current can kill! Follow safety instructions !
Plug the power cord (6) of the Vera kettle into a power socket, the voltage of which corresponds to the
voltage indicated on the rating plate underneath the kettle.
To disconnect, make sure that the kettle is not running and if it is running press the on/off button (14) to stop
all the heating operation. Do not unplug the kettle from the power point by pulling on the cord. Always unplug
the appliance by holding the plug (6). The Vera kettle will show that it is connected to the power when the
display is on. To switch off completely the kettle plug (6) has to be removed from the socket.
Make sure that the electric socket that you are using is suitably earthed. Never use faulty or damaged
power cords. Use an extension cord only after making sure that it is in perfect condition (adhere strictly to the
safety instructions specified in point 5).
Never allow parts carrying live voltage to come into contact with water: it may cause a short circuit!!!
(follow all the safety instructions specified on page 4 point 3 and page 5 points 6-13-15).
Advice and recommendations on use
Setting up the kettle and battery back up
1) the Vera Kettle is an electronic kettle and all functions are controlled by the Controls on the handle.
The functions selected are shown on the Display Panel on the handle (3) .
a) The display shows the water level,
b) Use the controls to set the temperature of the water needed
c) Use the controls to set the timer. You can heat water to be ready at a pre-set time
d) The display panel has a clock
2) Follow all safety and operating instructions specified in this manual.
3) Place the power base unit (5) and kettle (4) on a stable flat surface which is not hot and do not place near
a heat source. The surface must be dry. Keep the appliance and its cord out of reach of children. During use,
do not place the base unit on a metal tray or a metal surface.
4) Vera kettle is fitted with a back up battery to remember your settings. Before operating the kettle, please
fully charge the battery for 12 hours. (For more information see page 12 point c)
21
For conversion table for °Fahrenheit and altitude’s temperature difference see the inner cover
After 12 hours charge we suggest to reset the panel by pressing the reset buttons on the back of the handle following
the steps shown into the “SPECIAL INSTRUCTION” paragraph at point C). When take off the kettle from the power
base (5), the kettle will de-activate all functions, shows the water level, the time and the (P) preset function if it
is activated.
5) When the plug (6) of the power base unit (5) is inserted into the socket Vera Display will illuminate.
The display indicates the clock and the water level “ml minimum” will flash to inform the user that
the kettle is empty/at the minimum level (under 800ml): the kettle needs to be filled by water.
6) Filling the kettle:
a) remove the kettle body from the power base unit. Hold it by the handle (3)
b) open the lid (1) : press on the rubber “point” (picture “a”) on the lid (1) and press down firmly
(picture “b”). Then release (picture “c”) and the lid will open
automatically. The lid is not removable and the max opening is shown in the picture “d”.
on off
mode
50°
a
b
on off
mode
8
c
d
c) fill the kettle with water directly under the tap or fill it by pouring water from a bottle, jug
or jar to the needed level ( attention the minimum level that allow the kettle to operate is “800
ml”). Do not add water past the maximum fill level. On the display (2) in the water level sector
(11), the water level is shown by the level lights. The blue levels are: ml mimimum (between 0
and 800ml), 800ml (about 22 oz), 1250ml (about 35 oz), 1500ml (about 40 oz) and the red level
is 1750ml (about 47oz). While the kettle is being filled with water the lights will illuminate one
after the other as each level is reached.
If the water inside the kettle is over 1750ml (about 47oz) and less than 1950ml (about 54oz) only
the top red light level is illuminate. If the water level is over 1950ml (about 54oz) the top red
light level starts to flash showing that the kettle is over filled and the kettle will not operate.
If the water level is under then 800ml (about 22oz) the blue “ml minimum” light level will be
blink showing that the kettle is nearly empty. In this case, for safety reason and heating element
protection, the kettle will not operate because the water level is too low : check and eventually
fill the kettle with water till, on the display, the blue light of the level “ml minimum” stop
to blink and the blue light of the level “800ml” is on. Only in this way the kettle can start to
operate.
In case the battery is not charged or does not work the water level sectors (11) are not shown
on the display (2). ATTENTION: to avoid to overfill of water the kettle, make sure that never
the water level is over the mark (8) inside the kettle. CAUTION: Do not move the kettle while
is switched on.
For conversion table for °Fahrenheit and altitude’s temperature difference see the inner cover
22
Advice and recommendations on use
Heating / Boiling function
a) Place the kettle on the power base unit (5) and press the “on/off” button (14). When the kettle starts boiling/heating, the temperature symbol mark “°C “
( Celsius Degrees) is on and the number grow up showing on the display the average temperature of the water inside the kettle.
b) When the kettle is heating the segments (9) on the display (2) runs
clockwise; this indicates that the kettle is working and is ON.
c) When the water temperature reaches 100 °C the kettle switches off automatically and the “boil” word(10C) flash on the display(2) for about 10 seconds then the
display change to show the current average water temperature“ °C” inside the kettle.
d) At any time, the function boiling water can be stopped by pressing the On/Off
button (14). ATTENTION: If the button on/off is pressed two times consecutively after the boil function, the kettle will restart again to boil only after the display shows the temperature of 95°C
e) POURING OUT WATER: Remove the kettle from the power base unit (5),
holding it by its handle (3). Ensure that the kettle body remains level while lifting it from the power base unit (5).–Pour the water from the spout with the lid (1) closed. ATTENTION : boiling
water can cause scalds. Always ensure that you pour out boiling water slowly and carefully, taking care not
to tilt the spout too rapidly.
f) To turn the display to the clock (10B) or temperature (10A) display press the setting button “▲” (16) one
time. This operation can be done when the Vera kettle is not heating/boiling.
g) The water temperature shown on the display correspond to an average temperature of the water
inside the kettle.
Temperature and timer setting functions
Vera kettle can heat the water to the temperature required (between 45°C and 98°C –
Tolerance ± 3°C). Vera kettle can switch on at the desired time, too. Just follow these
simple instructions:
a) Press the “mode” button (15) for 1 second to enter the temperature setting function, and
then you will see the blue “ °C ” icon turn on and the red “ P ” icon starts flashing.
b) Press the button“▲” (16) to set the temperature. The temperature setting cannot be set
higher than 98°C and cannot be set lower than 45°C. One click corresponds to 1°C. If the
“▲” setting button (16) is pressed continuously the temperature number rises until the
required temperature has been reached. When 98°C is reached and the “▲” setting button
(16) is still pressed the temperature numbers start again form 45°C.
If you need to set only the temperature you can go to the instruction g) of this paragraph.
If you need to set the timer, please, continue with the instruction c) of this paragraph.
on off
mode
on off
mode
23
For conversion table for °Fahrenheit and altitude’s temperature difference see the inner cover
c) After setting the temperature, press the “mode” button(15) one time again to set the timer function,
and then you will see the blue “ °C ” icon turn off and hour icon “ ” will turn and the hours numbers
will start flashing.
d) Press the setting button “▲”(16) to set the hour. One click corresponds to one hour and if the setting button
“▲” (16) is kept pressed the number rises continuously until the required time is reached.
e) To set the minutes press the “mode” button (15) one time again and minute numbers being flashing.
f) Press the setting button “▲” to set the minutes. One click corresponds to one minute and if the setting
button “▲” (16) is kept pressed the number rises continuously until the required time is reached.
g) After setting the temperature or temperature and time, you have to press the “mode” button (15) for 4
seconds to confirm the setting. Red ”P” and blue “
” icons turn on, and the display will change to show the
current time (clock).
h) The kettle waits for the heat/boil setting time. When Vera achieves the set time it
starts to heat/boil at the set temperature and the red “P” icon will be off (see the point
o) at the end of this paragraph).
i) If only the setting of the temperature is required, press the on/off button (14) the Vera
kettle begins to heat/boil the water at the set temperature. When Vera starts to heat/
boil at the set temperature the red “P” icon will be off (see the point “o” at the end of
this paragraph)
l) when the kettle is heating the segments (9) on the display runs clockwise. It indicates
that the kettle is working and it is ON.
on off
mode
m) To cancel/reset the setting program (boil/heat temperature and timer), press the
setting button “▲” for 3 seconds. The red “P” icon will be off. Then by pressing the “on/
off” button Vera kettle starts to boil the water (see the BOILING FUNCTION).
n) To turn the display on clock (10B) or temperature(10A) press one time the setting
button “▲” (16) This operation can be done when the Vera kettle is not heating or boiling.
o) ATTENTION:
The timer-temperature function is not a permanent function.
For safety reasons the setting timer-temperature function has to be set each time the kettle is used.
The water temperature shown on the display correspond to an average temperature of the water inside the
kettle (Tolerance ± 3°C)
For conversion table for °Fahrenheit and altitude’s temperature difference see the inner cover
24
Advice and recommendations on use
Clock setting
The Clock setting (24 hours) can be set when Vera does not heat or boil water.
Place Vera on the power base unit (5) and set the time very easily by following these simple steps:
a) Press the “mode” button (15) for 3 Seconds, until the “ ” icon and hour numbers on the display start
flashing.
b) Press the setting button “▲” (16) to set the hour. One click corresponds to one hour and if the setting button
“▲” (16) is keep pressed the number rises continuously until the required time is reached.
c) To set the minutes press the “mode” button (15) one time again and minute numbers start flashing.
d) Press the setting button “▲” to set the minutes. One click corresponds to one minute and if the setting
button “▲” (16) is kept pressed the number rises continuously until the required time is reached.
e) After setting the minute, press “mode” button (15) for 3 Seconds to finish the setting.
f) To turn the display on clock(10B) or temperature(10A) press one time the setting button “▲” (16) This
operation can be done when the Vera kettle is not heating or boiling.
Special instruction
A) Safety cut-off
Vera is protected against damage resulting from use with an insufficient volume of water. In case user press
the button on/off (14) and on the kettle display the blue light “ml minimum” blink, the kettle will not operate
and eventually fill the kettle with water till, on the display, the blue light of the level “ml minimum” stop to
blink and the blue light of the level “800ml” is on. Only in this way the kettle can start to operate.
In case user press the button on/off (14) and the kettle is empty or nearly empty and for wrong water level
signal the kettle start to heat, a safety cut-off will automatically disconnect the power supply if the heating
element over heats. Should the kettle ever boil dry during operation, you must leave it to cool for 10 minutes
before refilling it with cold water. Pull up the kettle from the power base, after cooling down. The safety
cut-off will reset automatically once the kettle has cooled.
B) Before using Vera kettle
Clean the inside of Vera kettle before using it for the first time by filling it completely (to the MAX level)
with water, boiling the water following the BOILING FUNCTION and then discarding the water. Repeat this
operation two times and any time that the kettle has not been used for long time.
C) Display reset
18
18
25
If the display is not showing correctly the functions need to
be reset. This is for safety to refresh all MCU memory inside. Place the Vera kettle on the power base unit (5). Plug it in. Press the reset button (18) by using a part of a metal clip or by toothpick for 5 seconds . The display will be back to
the original settings and all pre set settings (clock, timer
and temperature) will be lost.
For conversion table for °Fahrenheit and altitude’s temperature difference see the inner cover
Cleaning and maintenance
CAUTION: Always disconnect the kettle from the electrical outlet before cleaning.
Before cleaning, be sure the kettle is cold.
Clean the exterior surface of the kettle with a clean, damp cloth to preserve its original highly polished
finish. Dry and polish with a soft cloth.
Do not use abrasive cleansers or scouring agents of any kind on the interior or exterior of the kettle.
Do not immerse the kettle or power base in water or other liquid, and be sure that the electric kettle plug
(6) and connector (5a) of the power base (5) is kept dry.
a) Filter (7)
Scale, or calcium, is a natural substance that forms when hard water is boiled. The filter serves to retain the
calcium in the water kettle. It is important to clean the filter regularly. The filter clips into the spout and
can be removed by pulling it up from the spout. It can be cleaned by gently brushing with a soft brush under
running water.
ATTENTION: This operation can be perfomed only when the kettle is not working and when the kettle has
cooled down. DO NOT REMOVE THE FILTER WHEN VERA KETTLE IS WORKING AND WHEN THE SUFACE IS
HOT. BOILED WATER AND STEAM CAN BURN!!!
b) Decalcification
Decalcification refers to removing the calcium
deposits which may form in the interior metal parts
of the kettle. TO GET THE BEST PERFORMANCE FROM
YOUR VERA KETTLE, DECALCIFY YOUR UNIT FROM
TIME TO TIME. Frequency depends on the hardness of
your tap water and how often you use the kettle. We
suggest to do it every 100-200 boiling cycles, or every
two weeks or every time you see white spots on the
internal bottom surface of the kettle: it means that there is limestone sediment. We suggest use of a kettle
descaler in order to dissolve these chalky deposits or lime build up. Follow the instructions on the descaler
package. By the way BUGATTI suggests the following natural way: if a commercial descaler is not available,
fill the kettle with 500 ml (16,90 US oz/ 17,59 UK oz) white vinegar and 500 ml (16,90 US oz/ 17,59 UK oz)
water. Use a soft brush together with vinegar to clean the plastic water level sensor holder in order to remove
the chalky deposit. Bring the vinegar to a boil. You may need to repeat this several times with cooled vinegar
to remove the calcium build up completely. When the descaling process is complete, empty the kettle and
rinse out several times with clean water.
c) Battery
The battery can be removed and replaced by user because it is placed inside the handle (3). The battery
life is over 2 years. After that period the battery still has 70% capacity. When the display (2) cannot stay ON,
while the kettle (4) is removed from the power base (5), means that the battery has reached its minimum
level capacity. Contact an authorised Bugatti Customer Service Center in order to change the battery : the
service center will send you the battery pack and its replacement instruction. Attention : remember that the
batteries are consumable parts and they are out of warranty.
For conversion table for °Fahrenheit and altitude’s temperature difference see the inner cover
26
Troubleshooting
If the Vera kettle develops faults or defects or if irregularities are suspected, unplug it immediately. If
you cannot eliminate the fault by following the instructions in this manual, contact Customer Care at
CASA BUGATTI. Repairs carried out incorrectly expose the user to grave danger. No liability is accepted
for damage or injury caused by repairs carried out incorrectly and in such cases warranty rights are
voided.
Trouble
Possible Cause
The display on handle The kettle is not well
doesn’t switch on
positioned on the power
base (5) and the plug (6)
is not well insert in the
socket . The rechargeable
battery
is
still
not
correctly charged.
Solution
“Check if the plug (6) of the power base (5) is well
connected to the wall socket. Check that there is
electricity in your system. Remeber, before operating
the kettle, please fully charge the battery for 12
hours.”
Il display does not show The kettle does not work Make the RESET function for the display as per Special
instruction of this manual
proper information
for long time
The watel level light are There is lime scale on the Make the RESET function for the display as per Special
instruction of this manual and if the problem does
on without water inside water level sensors
not leave make the descaling as per point b) of the
the kettle.
Cleaning and maintenance chapter.
The kettle does not work There is lime scale into Make the descaling as per point b) of the Cleaning and
properly or stops before the kettle
maintenance chapter.
boiling.
If the water tastes bad.
Water is in the kettle for
more then 12 hours - The We suggest to change the residual water after each
kettle is not well washed boiling cycles. Rinse the kettle sufficient time in order
after the descaling cycle to remove completely the descaling product
The kettle, after pressing The water level inside
the button on/off(14) the kettle is lower than Fill the kettle with water till, on the display, the blue
does not start to heat.
“800ml” and the blue light light of the level “ml minimum” stop to blink and the
“ml minimum”, on the blue light of the level “800ml” is on.
display on handle, blinks.
The water inside the The kettle is used at an
kettle, during the heating, altitude over 500/1000
Have a look to the third cover page instruction:
comes to the boil but the meter on the sea level
ALTITUDE WATER BOILING TEMPERATURE during the
temperature shown on the
BOIL FUNCTION.
display on the handle is
lower than 99°C.
27
For conversion table for °Fahrenheit and altitude’s temperature difference see the inner cover
WARRANTY
1) A warranty is deemed to be the replacement or repair free of charge of the parts making up the kettle that
were faulty at the time of purchase due to manufacturing faults.
2) In the case of irreparable or repeated faults which are due to manufacturing faults as above, at the
manufacturer’s sole discretion, the machine will be replaced.
3) The warranty does not cover damage due to:
a) incorrect or faulty use
b) defects caused by accidental breakages or carelessness
c) failure to follow instructions and warnings, incorrect installation, cleaning and maintenance
d) maintenance and/or modifications performed by unauthorised personnel
e) use of non-original spare parts
f) carriage
g) using any kettle function without water continuously
h) any other circumstance that cannot be ascribed to manufacturing faults. Any claims not envisaged by law
are excluded.
4) The warranty does not cover damage due to improper use and in particular due to non-domestic use.
5) The manufacturer accepts no liability for any direct or indirect harm or injury to persons, things and
domestic animals that may arise from failure to abide by all the safety instructions contained in this manual,
especially failure to abide by the instructions on installation, use and maintenance of the kettle.
6) Replacement or repair shall not extend the warranty period. The warranty does not cover the replacement
of consumables, such as the resistances, battery, etc.
7) The warranty runs from the date of receipt of evidence of purchase and of receipt of the warranty card
by CASA BUGATTI.
SERVICE CENTRE
In the event of a kettle fault, contact an authorised BUGATTI dealer, who will return the kettle to the
manufacturer.
The purchaser is responsible for all carriage and/or dispatch costs for all repairs covered or not covered by
warranty. If possible, keep the kettle’s original packing for dispatch.
Important: If the nonconforming product is to be serviced by someone other than contact an authorised
BUGATTI dealer, please remind the service to call our Consumer Service Center to ensure that the problem
is properly diagnosed, the product serviced with the correct parts, and to ensure that the product is still
under warranty.
DISPOSAL OF THE PRODUCT IN CONFORMITY TO EUROPEAN DIRECTIVE 2002/96/EC.
At the end of its working life the product must not be disposed of alongside urban waste. It can be
delivered to local-authority separated waste collection centres or to dealers who provide this service.
Separated disposal of a household appliance enables possible negative consequences for the environment
and health arising from improper disposal to be eliminated and enables the materials of which it is made to
be recovered in order to make significant power and resource savings. The symbol of a moveable waste bin
marked with a cross displayed on the product indicates that as a household appliance it must be disposed of
separately.
For conversion table for °Fahrenheit and altitude’s temperature difference see the inner cover
28