1
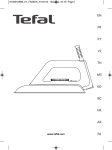
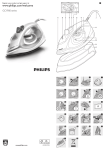
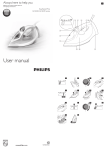
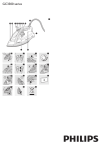
-- 务必在稳固、平整且水平的表面上放置和使用
熨斗。
-- 切勿让电源线触及高温电熨斗底板。
-- 注意:表面很烫 (图 2)
表面在使用中容易变得很烫(对于在产品上标有
“烫”符号的电熨斗)。
注意
-- 产品只能使用带接地线的插座。
-- 定期检查电线,防范潜在的危害。
-- 将产品插入电源插座之前,请将电源线完全
解开。
-- 使用时熨斗的底板会非常烫,触碰底板会导致
烫伤。
-- 根据用户手册“清洁和保养”一章中的说明定
期为熨斗除垢。
-- 当完成熨烫、清洁产品、注水或倒空水箱以及
即使短时间离开熨斗时:将蒸汽控制旋钮调
至“干熨”位置,熨斗竖放,并且从电源插座
中拔下电源插头。
-- 切勿将香水、醋、淀粉、除垢剂、烫衣剂或其
它化学品注入水箱内。
-- 本产品仅限于家用。
电磁场 (EMF)
这款飞利浦产品符合关于电磁场 (EMF) 的相关标
准。据目前的科学证明,如果正确使用并按照本
用户手册中的说明进行操作,本产品是安全的。
使用本产品
给水箱注水
注意: 根据设计,您的产品适合使用自来水。
如果您所居住的区域水质非常硬,水垢积聚会
非常快。在此情况下,建议将 50% 的蒸馏水和
50% 的自来水混合,以延长产品的使用寿命。
注意: 不要将香水、醋、淀粉、除垢剂、烫衣剂
或其他化学品放入水箱。
1将蒸汽控制旋钮调至
位置(干熨)。  (图 3)
2将水注入水箱,至最高水位 (MAX)。 (图 4)
3将注水口盖关闭。
选择温度和蒸汽设定
表1
面料类型
麻
棉
羊毛
丝绸
合成纤维
(如聚丙
烯、尼龙、
聚酰胺、
聚脂)。
温度设 蒸汽设 蒸汽喷
定
定
射
最大
是
;,
是
3
;,
2
1
1
ECO
否
否
否
喷雾装
置
是
是
是
否
否
注意: 如上表所示,请勿在低温时使用蒸汽或蒸
汽束喷射,否则,熨斗可能泄漏热水。 1参阅表 1,将温度旋钮调至适合衣物的适当设
置。 (图 5)
2将熨斗竖放并插入电源插座。温度指示灯亮
起,表示熨斗正在加热。 (图 6)
3温度指示灯熄灭时,熨斗即已达到适当的温度。
4参阅表 1,选择与设定温度对应的蒸汽设定。
 (图 7)
注意: 要使用增压蒸汽 ,请按住蒸汽控制旋
钮,持续保持在增压蒸汽位置 。
功能
喷水功能
-- 按喷水按钮可湿润要熨烫的衣物。
这有助于去除顽固褶皱。 (图 8)
蒸汽喷射功能 (仅限于特定型号)
-- 按下然后释放蒸汽喷射按钮可获得强劲的蒸汽
喷射,轻松去除顽固皱褶。 (图 9)
垂直蒸汽 (仅限于特定型号)
-- 您可以在竖直握住熨斗时使用蒸汽喷射功能,
用于去除悬挂衣物、窗帘上的褶皱。 (图 10)
安全自动关熄功能(仅限于特定型号)
-- 如果熨斗在水平位置 30 秒或在垂直位置 8 分
钟未被移动,熨斗会自动关闭。自动关熄指示
灯会开始闪烁。 (图 11)
-- 要使熨斗重新加热,请拿起或轻轻移动熨斗,
直至自动关熄指示灯熄灭。
低能耗 蒸汽设定
-- 选择 低能耗 蒸汽设定而不是最大蒸汽设定 ;,
节能的同时又能获得满意的熨烫结果。  (图 12)
干熨
-- 将蒸汽控制旋钮调至 (干熨)可进行无蒸汽
熨烫。  (图 3)
清洁和保养
清洁
1将蒸汽控制旋钮调至 (干熨),
拔下熨斗插头,使其冷却。  (图 3)
2将水箱中的水全部倒出。
3用湿布和非腐蚀性(液体)清洁剂抹去底板上
的水垢和其它沉积物。
注意:为了保持底板光滑,应避免底板与金属物
体碰撞。切勿使用磨砂布、醋或其他化学品清洁
底板。
注意:定期用自来水冲洗水箱。冲洗后倒空水箱。
除水垢功能
注意事项:要延长产品的使用寿命并保持良好的
蒸汽性能,应每两周使用一次自动除垢功能。如
果您当地的水硬度很高(即熨烫过程中底板中出
现薄片),则需更经常地使用自动除垢功能。
1确保产品的插头已经拔掉,且蒸汽控制旋钮已
调至 (干熨)。  (图 3)
2向水箱注水,直至最高水位 (MAX)。 (图 4)
请勿将醋或其它除垢剂注入水箱。
3将熨斗插头插入插座,将温度旋钮调至最
MAX(最高)。 (图 13)
4当温度指示灯熄灭时,拔下熨斗的电源插头。
5在水池上方手持熨斗。将蒸汽控制旋钮调至自
动除垢位置并按住。 (图 14)
6轻轻摇动熨斗,直至水箱中的水全部用光。
(图 15)
注意: 水垢冲出时,蒸汽和沸水也会从底板中
冲出。
7将蒸汽控制旋钮调回
(干熨)。  (图 3)
注意: 如果从熨斗中冲出的水仍有水垢颗粒,
则应再次使用除水垢功能。
完成除水垢过程后
1将熨斗插头插入插座。让熨斗加热,
使底板干燥。
2当温度指示灯熄灭时,拔下熨斗的电源插头。
3将熨斗在一块布上轻轻移动,去除底板上残留
的水渍。
4让熨斗冷却,然后存放好。
存储
1拔掉熨斗的插头,将蒸汽控制旋钮调至
(干熨)。  (图 3)
2将电源线绕在电源线存储装置上,将熨斗竖立
存放。 (图 16)
环保
-- 弃置产品时,请不要将其与一般生活垃圾扔在
一起,应将其交给指定的回收中心,这样做有
利于环保。 (图 17)
保修和支持
如果您需要信息或支持,请访问 www.philips.com/
support 或阅读单独的全球保修卡。
故障种类和处理方法
本章归纳了使用本产品时最常见的一些问题。
如果您无法根据以下信息解决问题,请访问
www.philips.com/support 查阅常见问题列表,
或联系您所在国家/地区的客户服务中心
(联系详情,请参阅全球保修卡)。
问题
熨烫过程
中,底板漏
水或衣物上
出现湿点。
蒸汽束喷射
功能无法正
常工作(底
板漏水)。
可能的原因
设定温度太
低,无法
进行蒸汽
熨烫。
您在水箱
中放入了
添加剂。
您在很短的
时间内过于
频繁地使用
了蒸汽喷射
功能。
问题
可能的原因
您在过低的
温度下使用
了蒸汽喷射
功能。
在熨烫过程 硬水会在底
中底板内冒 板内形成水
出水垢和杂 垢。
质。
熨斗冷却后, 水箱中还有
或存放期间, 水,熨斗被
有水从底板 水平放置。
漏出。
注水口盖
水箱装得
漏水。
过满。
解决方法
将熨烫温度设为可以
使用蒸汽喷射功能的
温度(21 至最大
(MAX))。
使用自动除垢功能
(请参阅“清洁和保
养”一章中的“自动
除垢功能”一节)。
使用后,倒空水箱并
将蒸汽控制旋钮调
至“干熨”位置。
熨斗应竖立存放。
切勿让水位超过水箱
的最大 (MAX) 水位
标示。倒掉水箱中多
余的水。
将蒸汽控制 您未将蒸汽 如果要使用增压蒸
旋钮按到增 控制旋钮保 汽,必须将蒸汽控制
压蒸汽位置 持在增压蒸 旋钮持续保持在增压
时,蒸汽控 汽位置。
蒸汽位置。对于其他
制旋钮会
蒸汽设置,则不必这
跳回。
样做。
解决方法
设定适合蒸汽熨烫的
温度。参阅表 1。
Always there to help you
Question?
有疑问?
Contact Philips
请联系飞利浦
EasySpeed
GC1029-GC1017 series
EasySpeed
GC1029-GC1017 系列
User manual / 用户手册
, GC1029
漂洗水箱并且不要
往水箱内注入任何
添加剂。
稍等片刻后再使用蒸
汽束喷射功能。
保留备用
150331
4239.000.8663.4
ENGLISH
Introduction
Congratulations on your purchase and welcome to Philips!
To fully benefit from the support that Philips offers, register
your product at www.philips.com/welcome.
General description (Fig. 1)
1 Spray nozzle
2 Cap of filling opening
3 Steam control
-- CALC CLEAN = Calc-Clean function
-= dry ironing
-- ECO = optimal steam
-- ; = maximum steam
-= turbo steam
4 Steam boost button (specific types only)
5 Spray button
6 Temperature dial
7 Temperature light (specific types only: with safety-auto off indication)
8 Mains cord
9 Type plate
10 Water tank with MAX water level indication
11Soleplate
Important
Read this user manual carefully before you use the appliance and save it for
future reference.
Danger
-- Never immerse the iron in water.
Warning
-- Check if the voltage indicated on the appliance corresponds to the local
mains voltage before you connect the appliance.
-- Do not use the appliance if the plug, the mains cord or the appliance
itself shows visible damage, or if the appliance has been dropped
or leaks.
-- If the mains cord is damaged, you must have it replaced by Philips, a
service centre authorised by Philips or similarly qualified persons in
order to avoid a hazard.
-- Never leave the appliance unattended when it is connected to the mains.
-- Always unplug the appliance from the socket outlet before you fill the
water tank with water.
-- This appliance is not intended for use by persons (including children)
with reduced physical, sensory or mental capabilities, or lack of
experience and knowledge, unless they have been given supervision or
instruction concerning use of the appliance by a person responsible for
their safety.
-- Children should be supervised to ensure that they do not play with the
appliance.
-- Keep the appliance and its mains cord out of reach of children.
-- Always place and use the iron on a stable, level and horizontal surface.
-- Do not let the mains cord come into contact with the hot soleplate of
the iron.
-- CAUTION: Hot surface (Fig. 2)
Surfaces are liable to get hot during use (for irons with ‘hot’ symbol marked
on the appliance).
-------
---
Caution
Only connect the appliance to an earthed wall socket.
Check the mains cord regularly for possible damage.
Fully unwind the mains cord before you plug it in the wall socket.
The soleplate of the iron can become extremely hot and may cause
burns if touched.
Descale the iron regularly according to the instructions in chapter
‘Cleaning and maintenance’ in the user manual.
When you have finished ironing, when you clean the appliance, when
you fill or empty the water tank and also when you leave the iron even
for a short while: set the steam control to the ‘dry ironing’ position, put
the iron on its heel and remove the mains plug from the wall socket.
Do not put perfume, vinegar, starch, descaling agents, ironing aids or
other chemicals in the water tank.
This appliance is intended for household use only.
Electromagnetic fields (EMF)
This Philips appliance complies with all standards regarding electromagnetic
fields (EMF). If handled properly and according to the instructions in this
user manual, the appliance is safe to use based on scientific evidence
available today.
Using the appliance
Filling the water tank
Cleaning and maintenance
Cleaning
Note:Your appliance has been designed to be used with tap water. If you live
in an area with very hard water, fast scale build-up may occur. In this case, it is
recommended to mix 50% distilled water and 50% tap water to prolong the
lifetime of your appliance.
Note: Do not put perfume, vinegar, starch, descaling agents, ironing aids,
chemically descaled water or other chemicals in the water tank.
1Set the steam control to position
(dry ironing).  (Fig. 3)
2Fill the water tank up to the MAX indication (Fig. 4).
3Close the cap of the filling opening.
1Set the steam control to
cool down.  (Fig. 3)
(dry ironing), unplug the iron and let it
2Pour any remaining water out of the water tank.
Table 1
Possible cause
Solution
Water drips from
the soleplate or
wet spots appear
on the garment
during ironing.
The set
temperature is
too low for steam
ironing.
Set an ironing temperature
that is suitable for steam
ironing. See table 1.
You have put an
Rinse the water tank and do
additive in the water not put any additive in the
tank.
water tank.
3Wipe flakes and any other deposits off the soleplate with a damp
cloth and a non-abrasive (liquid) cleaning agent.
Caution: To keep the soleplate smooth, avoid hard contact with metal objects.
Never use a scouring pad, vinegar or other chemicals to clean the soleplate.
Note: Regularly rinse the water tank with tap water. Empty the water tank after
rinsing it.
Selecting temperature and steam setting
Problem
The steam
boost function
does not work
properly
(water leaks out
of the soleplate).
Calc-Clean function
Fabric type
Temperature
setting
Steam setting
Steam
boost
Spray
Linen
MAX
;,
Yes
Yes
Cotton
3
;,
Yes
Yes
IMPORTANT:To prolong the lifetime of your appliance and
to maintain good steaming performance, use the Calc-Clean
function once every two weeks. If the water in your area is very
hard (i.e. when flakes come out of the soleplate during ironing),
use the Calc-Clean function more frequently.
Wool
2
ECO
No
Yes
1Make sure the appliance is unplugged and the steam control is set to
Silk
1
No
No
Synthetic fabrics
(e.g. acrylic,
nylon, polyamide,
polyester).
1
No
No
t (dry ironing).  (Fig. 3)
2Fill the water tank to the MAX indication (Fig. 4).
Do not pour vinegar or other descaling agents into the water tank.
3Plug in the iron and set the temperature dial to MAX (Fig. 13).
4Unplug the iron when the temperature light goes out.
Note: As indicated in the table above, do not use steam or steam boost at a low
temperature, otherwise hot water may leak from the iron.
5Hold the iron over the sink. Push the steam control to the Calc-Clean
1Consult table 1 to set the temperature dial to the appropriate setting
6Gently shake the iron until all water in the water tank has been used
2Put the iron on its heel and plug it in. The temperature light goes on
Caution: While scale is flushed out, steam and boiling water also come
out of the soleplate.
for your garment (Fig. 5).
to indicate that the iron is heating up (Fig. 6).
position and hold it (Fig. 14).
up (Fig. 15).
3When the temperature light goes out, the iron has reached the
correct temperature.
4Consult table 1 to select a steam setting that corresponds to the
temperature you have set (Fig. 7).
Note:To use turbo steam , keep the steam control pressed to the turbo
steam position
continuously.
After the Calc-Clean process
2Unplug the iron when the temperature light goes out.
-- Press the spray button to moisten the article to be ironed. This helps
remove stubborn creases (Fig. 8).
Steam boost function (specific types only)
-- Press and release the steam boost button for a powerful boost of steam
to remove stubborn creases (Fig. 9).
Vertical steam (specific types only)
-- You can use the steam boost function when you hold the iron in
vertical position for removing creases from hanging clothes, curtains
etc (Fig. 10).
Safety auto-off function (specific types only)
-- The iron switches off automatically if it has not been moved for
30 seconds in horizontal position or 8 minutes in vertical position.
The auto-off light starts flashing (Fig. 11).
-- To let the iron heat up again, pick up the iron or move it slightly until the
auto-off light goes out.
ECO steam setting
-- Select the ECO steam setting instead of the maximum steam setting
; to save energy, yet to achieve satisfactory ironing results.  (Fig. 12)
Dry ironing
(dry ironing) to iron without steam.  (Fig. 3)
3Move the iron gently over a piece of cloth to remove any water stains
on the soleplate.
4Let the iron cool down before you store it.
Storage
1Unplug the iron and set the steam control to t (dry ironing).  (Fig. 3)
2Wind the mains cord round the cord storage facility and store the
iron on its heel (Fig. 16).
Environment
-- Do not throw away the appliance with the normal household waste
at the end of its life, but hand it in at an official collection point for
recycling. By doing this, you help to preserve the environment (Fig. 17).
Guarantee and support
If you need information or support, please visit www.philips.com/
support or read the separate worldwide guarantee leaflet.
Troubleshooting
This chapter summarises the most common problems you could encounter
with the appliance. If you are unable to solve the problem with the
information below, visit www.philips.com/support for a list of frequently
asked questions or contact the Consumer Care Centre in your country
(see the worldwide guarantee leaflet for contact details).
Wait a while before you
use the steam boost
function again.
You have used
the steam boost
function at a too
low temperature.
Set an ironing temperature
at which the steam boost
function can be used
( 21 to MAX).
Flakes and
Hard water forms
impurities come
flakes inside the
out of the soleplate soleplate.
during ironing.
Use the Calc-Clean function
(see chapter ‘Cleaning and
maintenance’, section
‘Calc-Clean function’).
Water drips from
the soleplate after
the iron has cooled
down or has been
stored.
Empty the water tank and
set the steam control to
position ‘dry’ after use.
Store the iron on its heel.
You have put the
iron in horizontal
position while there
was still water in the
water tank.
Water leaks from
You have overfilled
the cap of the filling the water tank.
opening.
Do not fill the water tank
beyond the MAX indication.
Pour excess water out of
the water tank.
When I push the
steam control to
the turbo steam
position, the steam
control jumps back.
If you want to use turbo
steam, you have to keep the
steam control in the turbo
steam position continuously.
For other steam settings,
this is not necessary.
(dry ironing).  (Fig. 3)
Note: Repeat the Calc-Clean process if the water that comes out of the iron still
contains scale particles.
1Plug in the iron. Let the iron heat up to let the soleplate dry.
Features
Spray function
-- Set the steam control to
7Set the steam control back to
You have used
the steam boost
function too often
within a very short
period.
You did not keep
the steam control
in the turbo steam
position.
注意事项
使用本产品之前,请仔细阅读本使用说明书,
并妥善保管以备日后参考。
危险
-- 切勿将熨斗浸泡到水里。
警告
-- 在将产品连接电源之前,请先检查产品所标电
压与当地的供电电压是否相符。
-- 如果插头、电源线或产品本身已经明显损坏,
或产品曾坠落或出现渗漏,请勿再使用产品。
-- 如果电源软线损坏,为避免危险,必须由制造
厂或其维修部或类似的专职人员来更换。
-- 电源接通期间,使用者不得离开。
-- 在向水箱注水之前,务必从电源插座上拔下产
品的电源插头。
-- 器具不打算由有肢体、感官或精神能力缺陷或
缺少使用经验和知识的人(包括儿童)使用,
除非有负责他们安全的人对他们进行与器具使
用有关的监督或指导。
-- 请照看好儿童,本产品不能用于玩耍。
-- 将产品和电源线放在儿童接触不到的地方。
1
简体中文
简介
感谢您的惠顾,欢迎光临飞利浦!为了您能充分
享受飞利浦提供的支持,请在 www.philips.com/
welcome 上注册您的产品。
基本说明 (图 1)
1 喷雾嘴
2 注水口盖
3 蒸汽控制
-- CALC CLEAN = 自动除垢功能
-= 干熨
-- ECO = 低能耗
-- ; = 最大蒸汽量
-= 增压蒸汽
4 蒸汽喷射按钮 (仅限于特定型号)
5 喷雾按钮
6 温度旋钮
7 温度指示灯 (仅限于特定型号:
带安全自动关熄指示灯)
8 电源线
9 型号铭牌
10水箱,带最大 (MAX) 水位标示
11底板
2
3
4
5
6
7
8
9
10
11
12
13
14
15
16
17