1
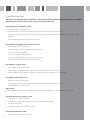
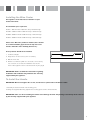
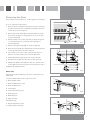
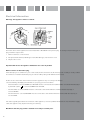
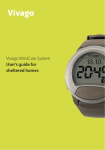
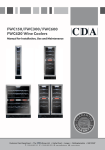
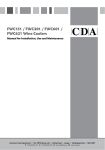
fwc152 / fwc303 / fwc603 /
fwc623 Wine Coolers
Manual for Installation, Use and Maintenance
Passionate about style
Customer Care Department • The
Group Ltd. • Harby Road • Langar • Nottinghamshire • NG13 9HY
T : 01949 862 012 F : 01949 862 003 E : [email protected] W : www.cda.eu
1
Important
The CDA Group Ltd cannot be held responsible for injuries or losses caused by incorrect use or installation of this
product. Please note that CDA reserve the right to invalidate the guarantee supplied with this product following incorrect
installation or misuse of the appliance or use in a commercial environment.
This appliance is not designed to be used by people (including children) with reduced physical, sensorial or mental
capacity, or who lack experience or knowledge about it, unless they have had supervision or instructions on how to use
the appliance by someone who is responsible for their safety.
Under no circumstances should any external covers be removed for servicing or maintenance except by suitably
qualified personnel.
Do not use the appliance if the plug, the mains cord or the appliance itself is damaged. If the mains cord is damaged,
you must have it replaced by the manufacturer, or an authorised service centre or similarly qualified persons in order to
avoid a hazard.
Children should be supervised to ensure that they do not play with the appliance. Keep the mains cord out of the reach
of children. Do not let the mains cord hang over the edge of the table or worktop on which the appliance stands.
Appliance information:
Please enter the details on the appliance rating plate below for reference, to assist CDA Customer Care in the event of a
fault with your appliance and to register your appliance for guarantee purposes.
Appliance Model
Serial Number
CE Declarations of Conformity:
This appliance has been designed, constructed and marketed in compliance with safety requirements of EEC Directive
2006/95/EEC (Low voltage) and requirements of EMC Directive 2004/108/EEC.
IMPORTANT INFORMATION FOR CORRECT DISPOSAL OF THE PRODUCT IN ACCORDANCE WITH EC DIRECTIVE
2002/96/EC.
Please render the appliance unusable before disposal. This includes removing the plug and breaking the door fixings to
prevent children being trapped inside the appliance during play, or any other risk of injury.
At the end of its working life, the product must not be disposed of as urban waste. It must be taken to a special local
authority differentiated waste collection centre or to a dealer providing this service.
Disposing of a household appliance separately avoids possible negative consequences for the environment and health
deriving from inappropriate disposal and enables the constituent materials to be recovered to obtain significant savings
in energy and resources. As a reminder of the need to dispose of household appliances separately, the product is
marked with a crossed-out wheeled dustbin.
2
Before first use
You must allow the appliance to settle for at least twenty four hours prior to switching the power on.
It is recommended that you remove all internal and external packaging and clean the interior of the appliance prior to first
use, using a solution of bicarbonate of soda and warm water and then thoroughly dry the interior.
The appliance may have an odour to it at first use. This will disappear as the appliance cools.
Please note:
• The appliance will work continuously until it gets to the correct temperature.
• If the appliance is switched off, you should allow five minutes before switching it on again to prevent the risk of
unnecessary damage to the compressor.
•The LED display may not show the selected temperature whilst the appliance first gets to the correct temperature. This
is normal, and the display will be corrected automatically once the appliance has run for a few hours.
Use
• Only store wine in sealed containers
• Do not overload the cabinet
• Only open the door when necessary
• Do not cover the shelves with aluminium foil or anything else that will prevent air from circulating around the cabinet.
• To prevent damage to the door seal, ensure the door is fully open before removing the shelves.
• This is a self-defrosting appliance. The compressor will not run during the thirty minute defrost cycle.
• Do not pull the shelves beyond the anti-stop position (approximately one third out) when fully loaded.
• This appliance is intended to be used exclusively for the storage of wine.
• In the event of a power failure, leave the door closed as much as possible to maintain the internal working temperature.
Should the power failure continue for a prolonged period, you should take steps to protect the contents of the wine cooler
against a rise in temperature. The wine cooler will remember the selected temperature settings and revert to these settings
once the power is restored
This appliance is suitable for use in an extended temperature climate (N) and has a normal operating ambient
temperature of 16-32°C. Use of the appliance below 10°C may cause performance issues that are not indicative of a fault.
Normal operation will resume once the appliance is within the specified range.
Fwc152, fwc303 & fwc623 will not be able to reach the required temperature if the ambient temperature is lower than
that required.
3
Use and Controls
fwc152
1
2
4
3
Key:
1 – Power button
2 – Light button
3 – "+" button
4 – "-" button
fig. 1
fwc303
1
2
3
4
Key:
1 – Power button
2 – Light button
3 – "+" button
4 – "-" button
fig. 2
To switch the power on/off
Press and hold the power button for five seconds.
To change the temperature
• Press the "+" or "-" buttons until the required temperature is shown on the display.
• The preset temperature is 12˚C / 54˚ F.
• To change the temperature display from Fahrenheit to Celsius, or Celsius to Fahrenheit, press and hold the light button
for five seconds.
• To view the set temperature, touch the "+" or "-" button at any time and the set temperature will flash in the LED display
for five seconds.
• The display shows the current internal temperature when the wine cooler is on.
Optimal temperature selection
Whilst wine is best stored at temperatures between 13 and 15˚ C, your wine can also be stored at drinking temperature. For
red wine this is between 15 and 17˚C, and for white wine between 12 and 13˚C.
To use the internal light
• Press the light button to switch the light on or off.
4
Use and Controls
fwc603 & fwc623
1
2
3
4
5
6
fig. 3
Key:
1 – Power button
2 – Left/Upper zone
"+" button
3 – Left/Upper zone
"-" button
4 – Right/Lower zone
"+" button
5 – Right/Lower zone
"-" button
6 – Light button
To switch the power on/off
Press and hold the power button for five seconds.
To change the temperature
• Press the "+" or "-" buttons for the appropriate zone until the required temperature is shown on the display.
• The preset temperature is 10°C/50°F for left/upper zone and 16°C/60°F for right/lower zone.
• To change the temperature display from Fahrenheit to Celsius, or Celsius to Fahrenheit, press and hold the light button
for five seconds.
• To view the set temperature, touch the appropriate "+" or "-" button at any time and the set temperature will flash in the
LED display for five seconds.
• The display shows the current internal temperatures when the wine cooler is on.
Optimal temperature selection
Whilst wine is best stored at temperatures between 13 and 15˚C, your wine can also be stored at drinking temperature, for
red wine this is between 15 and 17˚C, and for white wine between 12 and 13˚C.
To use the internal light
• Press the light button to switch the light on or off.
Please note:
The temperature in the lower zone must be set either the same or higher than the temperature in the upper zone. For
optimal performance, the temperatures in the two zones should differ by at least 4˚ C.
5
Use (All Models)
Humidity Control (all models except fwc152)
The wine coolers are equipped with a humidity control
system to maintain optimal humidity within the wine cooler.
Fill the humidity reservoir approximately 3/4 full with water.
Place the reservoir over the special lugs toward the back
of the top shelf only, as shown in fig. 5. Ensure it is located
correctly to prevent water spillage.
Check the water level regularly and refill if required.
fig. 5
Temperature display
The temperature display will show the current internal temperature.
The display flashes:
• When a different temperature is being set
• If the internal temperature is +/- 5˚ away from the set temperature. This serves as a warning to prevent damage to the
contents of the appliance should the temperature be too high.
Dynamic Cooling and Silent modes
The appliance has two different running modes.
• Silent mode
Once the required temperature is reached, the appliance will run without the fan. The wine cooler is factory set to silent
mode.
To change to dynamic cooling mode, touch and hold the "-" button for approximately five seconds (left hand "-" button on
fwc603 & fwc623). The wine cooler will beep five times to confirm dynamic cooling is on.
• Dynamic cooling mode
The fan cycles on and off to circulate the air even after the required temperature is reached. This ensures consistent
humidity and temperature distribution in the wine cooler, creating perfect conditions for long term storage.
Using the dynamic mode increases the level of noise in operation.
To change to silent mode, touch and hold the "+" button for approximately five seconds (left hand "+" button on fwc603 &
fwc623). The wine cooler will beep three times to confirm silent mode is on.
Sabbath mode
Sabbath mode is available for the observance of certain religious holidays. This will switch off the displays, interior light
and audible alarms. The cooling process will continue.
To switch the Sabbath mode on, touch and hold the power and light keys simultaneously for five seconds. The indicator
light will flash four times and confirm the Sabbath mode is on. Sabbath mode will switch off automatically after 96
hours, but to switch the Sabbath mode off at any time, touch and hold the power and light keys simultaneously for five
seconds.
6
Care and Cleaning
Always disconnect the appliance from the mains electrical
supply before any cleaning or maintenance.
• Do not use abrasive products or detergents. After washing,
rinse and dry thoroughly.
• The exterior of the appliance and the door seal should be
cleaned using mild soapy water and dried thoroughly.
• The interior cabinet should be cleaned using a solution of bicarbonate of soda and lukewarm water.
• Clean the shelves separately by hand using soap and water. Do
not put them in the dishwasher.
• Ensure that the cloth is only moist when cleaning the control
panel and electrical parts, and that all water is thoroughly dried
ofbefore reconnecting the power.
• Once cleaning is complete, reconnect the mains electrical
supply.
• If the appliance is not to be used for prolonged periods of
time, unplug and clean the appliance thoroughly. The door
should be left slightly ajar to prevent the formation of odours or
condensation.
Removing the shelves (fwc303/603/623)
To remove the shelves from the wine cooler, first remove all bottles
from the shelf, then pull the shelf forwards until the groove on either
side of the shelf is level with the plastic peg on either side of the
cabinet (as shown in fig 7). Then lift the shelf up and pull forwards.
fig. 7
To replace the shelves, follow the steps above in reverse order.
Temperature alarm
If the temperature rises or falls outside the set temperature range,
an alarm will sound and the display will flash.
• The wine cooler has not yet reached the set temperature (when
first switched on)
• There has been a power failure
• The wine cooler has been overloaded
• The door is not closed properly
7
Troubleshooting
If you have any problems with your appliance, you should check the troubleshooting guide prior to calling CDA
Customer Care to prevent unnecessary service calls and potential cost.
If the appliance is not working, check
• There is power to the appliance
• The house fuses or circuit breakers are intact and the fuse in the plug has not blown.
• The plug socket is functioning correctly. To check this, plug another electrical appliance in to see if the socket is
working.
• The ambient temperature is between 16º to 38ºC.
The appliance is working, but not very well, check
• The appliance is not overloaded.
• The thermostat is set to an appropriate temperature.
• The door is closing properly.
• The door gasket is sealing properly.
• There is enough ventilation at the side and rear walls.
• The ambient temperature is between 16º to 38ºC.
The appliance is noisy, check
• The appliance is level and stable.
• The cooling gas will make some noise, even when the compressor is not running.
• During operation, it is normal for the fan to run, even when the compressor is not running.
The light does not work, check
• There is power to the appliance.
• The house fuses or circuit breakers are intact and the fuse in the plug has not blown.
• The light button is not set to off.
Please note:
The LED lighting cannot be replaced without a service call. If the light fails, contact CDA Customer Care.
The door will not close properly, check
• The appliance is level and stable.
• If the door has been removed, it may not have been correctly refitted.
• The door seal is dirty.
• The shelves are not positioned correctly.
The display show “E1” or “E2”
• The temperature sensor has failed.
8
Installing the Wine Cooler
This appliance is intended to be installed in a space
between two units.
The minimum space required is:
fwc152 – 150 mm wide x 555 mm deep x 825 mm high
fwc303 – 300 mm wide x 580 mm deep x 825 mm high
fwc603 – 600 mm wide x 580 mm deep x 825 mm high
fwc623 – 600 mm wide x 580 mm deep x 825 mm high
Please note: When the product is installed, there should
be a small ventilation gap between the top of the unit
and the underside of the worktop (6 mm or ¼”)
These products should not be installed:
1. In direct sunlight.
2. Adjacent to a heat source (oven or radiator).
3. Below a hob unit.
fig. 6
4. Where a continuous plinth is to be used, it is necessary cut a section out so that the ventilation slots at the front of the appliance are not obstructed in any way fig 6.
IMPORTANT: Failure to follow the instructions regarding
installation and ventilation may invalidate the warranty
supplied with your appliance.
To Install the Handle
IMPORTANT: Do not overtighten the screws, and do not use power tools to install the handle.
1. Carefully locate the handle over the fixing pins.
2. Using the supplied allen key, tighten the securing grub screw to fix the handle.
IMPORTANT: Take care when installing the handle not to damage the door. Any damage caused may not be covered
by the warranty supplied with your appliance.
9
Installation
This appliance is designed to fit under worktops between 820 – 890mm in height, using the adjustable plinth plate to
ensure that the feet are concealed from view.
Loosen but do not remove the rear ventilation trim screws. Slide the rear plinth to the required height. Tighten the trim
screws to lock the plinth in position.
10
Reversing the Door
It is possible to reverse the door on this appliance, if required.
To do so, follow the steps below:
1. Remove the rear ventilation trim (2) by removing screws (1)
and then remove the front ventilation trim (4) by removing
screws (3) as shown in figure 7.
2. Remove the lower hinge (5) by removing the four screws 6) as shown in figure 8. Support the door as you do this
to prevent damage.
3. Gently lower the door away from the top hinge and place
on a padded surface to avoid the risk of damage as
shown in figure 9.
fig. 7
4. Remove the upper hinge (10) as shown in figure 10.
5. Unscrew and transfer pins (7/8) from the lower hinge plate
to the opposite side as shown in figure 8.
6. Pop out the cover caps on the opposite side and use
them to cover the screw holes on the original side.
7. Fit the alternative upper hinge on the opposite side.
8. Rotate the door 180º and relocate it on the top hinge.
9. Refit the modified lower hinge into the door and secure it
to the appliance body using the screws removed in step 1.
10. Refit both ventilation trims.
Please note:
fig. 8
Keep the spare hinge plate(s) to be able to reverse the door
back again.
1 - Rear ventilation trim screw access and screw
2 - Rear ventilation trim
3 - Front ventilation trim screw
4 - Front ventilation trim
5 - Lower hinge
6 - Lower hinge fixing screw
fig. 9
7 - Short hinge pin
8 - Main hinge pin
9 - Hinge bracket
10 - Upper hinge
11 - Upper hinge fixing screw
12 - Replacement top hinge
fig. 10
11
Electrical Information
Warning! This appliance must be earthed.
The mains lead of this appliance has been fitted with a BS 1363A 13 amp fused plug. To change a fuse in this type of
plug, follow the steps below:
1. Remove the fuse cover and fuse.
2. Fit replacement 13A fuse, ASTA approved to BS 1362 type, into the fuse cover.
3. Replace fuse cover.
Important: Do not use the appliance without the fuse cover in position.
How to connect an alternative plug
If the fitted plug is not suitable for your socket outlet, then it should be cut off and disposed of safely to avoid possible
shock hazard. A suitable alternative plug of at least 13 Amp rating to BS 1363 should be used.
As the colours of the wires in the mains lead of this appliance may not correspond with the
coloured markings identifying the terminals in your plug, proceed as follows:• The wire which is coloured GREEN and YELLOW must be connected to the terminal which is marked with letter (E) or
or coloured GREEN and YELLOW.
by the Earth symbo
• The wire which is coloured BLUE must be connected to the terminal which is marked with the letter (N), or coloured BLACK.
• The wire which is coloured BROWN must be connected to the terminal which is marked with the letter (L) or coloured RED.
If in doubt regarding the electrical connection of this appliance, consult a qualified electrician. Do not shorten the supply
cable, the appliance may require removing for servicing.
N.B. Ensure that the plug socket is situated in an easily accessible place.
12
CDA
Brand
Model Identifier
fwc152ss
fwc152bl
fwc303ss
fwc303bl
fwc603ss
Category of the Household
Refrigerating Appliance
2
230-240V~/50Hz
Voltage/Frequency
Dimensions (WxDxH cm)
fwc623ss
14.8x57x82
29.5x61.5x82
59.5x61.5x82
59.5x61.5x82
Weight (kg)
19
27
45
47
Energy Efficiency Class
B
A
B
B
186
139
183
195
Annual Energy Consumption
(AEc) (kWh/year)
Storage Volume (l)
Coldest Storage Temperature
(°C)
The energy consumption is based on standard test results for 24 hours. Actual
energy consumption will depend on how the appliance is used and where it is
located.
20
60
135
120
5
Automatic
Defrosting Type
Climate class: N [climate class ].
Climate Class
Airborne Acoustical Noise
Emissions in dB(A) re1 pW
Installation Type
This appliance is intended to be used at an ambient temperature between “16”
[lowest temperature ] °C and “32” [highest temperature ] °C.
44
43
43
43
Built-under
This appliance is intended to be used exclusively for the storage of wine.
13
14
15
To contact our Customer Care Department, or for Service,
please contact us on the details below.
Passionate about style
Customer Care Department • The
Group Ltd. • Harby Road • Langar • Nottinghamshire • NG13 9HY
T : 01949 862 012 F : 01949 862 003 E : [email protected] W : www.cda.eu
16