1
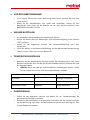
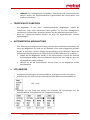
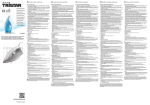
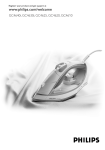
STEAMIRON9381 U938CH1 GEBRAUCHSANWEISUNG MODE D’EMPLOI ISTRUZIONI PER L’USO INSTRUCTION FOR USE Gebrauchsanweisung ○ Mode d’emploi ○ Istruzioni per l’uso ○ Instruction for use D / F / I / E BÜGELEISEN FER À REPASSER FERRO DA STIRO IRON Deutsch A) Sprühdüse B) Wassereinfüll‐Öffnung C) Dampfregler D) Dampfstosstaste E) Sprühtaste F) LCD‐Anzeige G) Elektronische Temperaturregelung H) Elektronische Temperaturregelung I) Soft‐Touch Griff J) Netzkabelschutz K) Wassertank L) Bügelsohle M) Selbstreinigungstaste Français A) Buse de pulvérisation B) Orifice de remplissage d’eau C) Bouton rotatif contrôle vapeur D) Bouton jet de vapeur E) Bouton vaporisateur F) Écran LCD G) Contrôle électronique de temperature H) Contrôle électronique de temperature I) Poignée souple J) Protection cordon d’alimentation K) Réservoir d’eau L) Semelle M) Bouton d’auto‐ nettoyage Italiano A) Ugello spray B) Foro di riempimento C) Rotella di regolazione del vapore D) Pulsante colpo di vapore E) Pulsante spray F) Display LCD G) Controllo elettronico della temperature H) Controllo elettronico della temperature I) Impugnatura soft touch J) Protezione cavo di alimentazione K) Serbatoio dell’acqua L) Piastra di appoggio M) Pulsante di autopulizia English A) Spray nozzle B) Water filling inlet C) Steam control turning knob D) Burst of steam button E) Spray Button F) LCD screen G) Electronic temperature control H) Electronic temperature control I) Soft touch grip J) Power cord protector K) Water tank L) Soleplate M) Self‐cleaning button Gebrauchsanweisung ○ Mode d’emploi ○ Istruzioni per l’uso ○ Instruction for use Deutsch SICHERHEITSHINWEISE o Lesen Sie erst alle Hinweise, bevor Sie das Gerät in Betrieb nehmen. o Kinder ab 8 Jahren und Personen mit eingeschränkten physischen, sensorischen oder geistigen Fähigkeiten, mangelnder Erfahrung und Kenntnisse dürfen das Gerät nur gebrauchen, wenn sie von einer für ihre Sicherheit zuständigen Person beaufsichtigt werden oder ihnen der sichere Gebrauch des Gerätes gezeigt wurde und sie die damit verbundenen Gefahren verstanden haben. Reinigungs‐und Wartungsarbeiten dürfen nicht von Kindern ohne Beaufsichtigung durchgeführt werden. Kinder dürfen nicht mit dem Gerät Gebrauchsanweisung ○ Mode d’emploi ○ Istruzioni per l’uso ○ Instruction for use spielen. Gerät und Netzkabel von Kindern unter 8 Jahren fernhalten. o Stellen Sie sicher, dass die auf dem Typenschild angegebene Leistung an Ihrer Steckdose verfügbar ist. Verwenden Sie das Bügeleisen nur für die in der Bedienungsanleitung angegebenen Zwecke. o Wenn das Gerät in der Nähe von Kindern benutzt wird, ist besondere Vorsicht geboten. Lassen Sie das Bügeleisen nie unbeaufsichtigt, wenn es angeschlossen ist oder sich auf einem Bügelbrett befindet. Die Berührung von heissen Metallteilen, heissem Wasser oder Dampf kann zu Verbrennungen führen. o Das Bügeleisen darf nicht unbeaufsichtigt bleiben, solange es an die Stromversorgung angeschlossen ist. Gebrauchsanweisung ○ Mode d’emploi ○ Istruzioni per l’uso ○ Instruction for use o Ziehen Sie den Netzstecker, bevor Sie den Wassertank auffüllen. o Trennen Sie das Bügeleisen immer von der Stromversorgung: 1. Wenn Sie es reinigen 2. Wenn Sie den Wassertank auffüllen oder entleeren 3. Wenn der Bügelvorgang abeschlossen ist o Verwenden Sie das Bügeleisen auf keinen Fall, wenn Kabel oder Netzstecker beschädigt sind, das Gerät herunter gefallen oder anderweitig beschädigt ist. Aus Gründen der elektrischen Sicherheit dürfen Sie das Gerät nicht selbst auseinander nehmen. Bringen Sie es zur Prüfung und Reparatur in eine Fachwerkstatt. o Achten Sie darauf, dass das Netzkabel nicht mit heissen Oberflächen in Kontakt kommt. Gebrauchsanweisung ○ Mode d’emploi ○ Istruzioni per l’uso ○ Instruction for use o Um die Gefahr von Stromschlägen auszuschliessen, darf das Bügeleisen weder in Wasser noch in eine andere Flüssigkeit getaucht werden. o Das Bügeleisen muss auf einer stabilen Unterlage verwendet und abgestellt werden. o Achten Sie darauf, dass die Station, in die das Bügeleisen gestellt wird, auf einer stabilen Unterlage steht. o Das Bügeleisen darf nicht mehr benutzt werden, wenn es herunter gefallen ist, sichtbare Beschädigungen aufweist oder wenn Wasser austritt. Gebrauchsanweisung ○ Mode d’emploi ○ Istruzioni per l’uso ○ Instruction for use VOR DER INBETRIEBNAHME o o Es ist normal, das bei der ersten Benutzung etwas Rauch entsteht, der sich aber rasch verzieht. Wenn Sie die Dampffunktion zum ersten Mal verwenden, richten Sie den Dampfstrahl nicht direkt auf die Wäsche, da sich noch kleinere Partikel in den Dampfdüsen befinden könnten. WASSER AUFFÜLLEN o o o o Wir empfehlen die Verwendung von destilliertem Wasser. Achten Sie darauf, dass sich Dampfregler und Temperaturregelung in der Position “OFF” befinden. Halten Sie das Bügeleisen aufrecht. Die Wassereinfüllöffnung steht jetzt waagerecht. Füllen Sie Wasser in die Wassereinfüllöffnung, bis der Wasserstand die Markierung “MAX” erreicht. Füllen Sie nie mehr Wasser ein. TEMPERATUR EINSTELLEN o Beachten Sie die Bügelhinweise auf dem Etikett des Kleidungsstücks. Falls keine Hinweise vorhanden sind, Sie aber die Art des Gewebes kennen, beachten Sie bitte die folgende Tabelle. HINWEIS: Wenn ein Stoff aus unterschiedlichen Gewebetypen besteht, richtet sich die Temperatur immer nach dem empfindlichsten Gewebe. Gewebe Temperaturregelung Erforderliche Temperatur Synthetik ● Niedrige Temperatur Seide, Wolle ●● Mittlere Temperatur Baumwolle, Leinen ●●● MAX Hohe Temperatur DAMPFBÜGELN o o Stellen Sie das Bügeleisen aufrecht und wählen Sie am Temperaturregler die geringste/eine niedrige Temperatur. Stecken Sie den Netzstecker in die Steckdose und stellen Sie den Temperaturregler auf die Markierung “high heat". Die Kontrollleuchte leuchtet auf. Dies zeigt an, dass sich das Bügeleisen aufheizt. Gebrauchsanweisung ○ Mode d’emploi ○ Istruzioni per l’uso ○ Instruction for use o o o o Sobald die Kontrollleuchte erlischt, ist die eingestellte Temperatur erreicht und das Bügeleisen betriebsbereit. Während des Bügelns leuchtet die Kontrollleuchte immer wieder auf und erlischt wieder, da der Thermostat versucht, die eingestellte Temperatur beizubehalten (Sie müssen deshalb das Bügeln nicht unterbrechen). Stellen Sie den Dampfregler in die gewünschte Position. Die Dampferzeugung beginnt, sobald das Bügeleisen waagerecht steht. SPRÜHEN o o o Stellen Sie das Bügeleisen aufrecht und wählen Sie am Temperaturregler die geringste/eine niedrige Temperatur. Drücken Sie die Sprühtaste, um das Kleidungsstück nach Bedarf zu besprengen. HINWEIS: Vergewissern Sie sich vor Verwendung der Sprühfunktion, dass sich genügend Wasser im Wassertank befindet. Sie müssen die Sprühtaste bei der ersten Inbetriebnahme gegebenenfalls mehrmals betätigen, bis sie funktioniert. DAMPFSTOSSBÜGELN ODER BÜGELN MIT VERTIKALDAMPF o o Drücken Sie die Dampfstosstaste, um einen kräftigen Dampfstoss zu erzeugen, der das Gewebe durchdringen und selbst die hartnäckigsten Falten glätten kann. Warten Sie ein paar Sekunden, bevor Sie die Taste erneut betätigen. Wenn Sie die Dampfstosstaste mehrmals hintereinander betätigen, können Sie auch vertikal bügeln (Vorhänge, hängende Kleidung usw.) HINWEIS: Die Dampfstossfunktion kann nur bei hohen Temperaturen verwendet werden. Stoppen Sie die Dampfabgabe, wenn sich die Kontrollleuchte einschaltet, und setzen Sie das Bügeln erst fort, wenn sie wieder erloschen ist. TROCKENBÜGELN o Zum Bügeln ohne Dampf folgen Sie bitte den Anweisungen in Abschnitt “Dampfbügeln”, nur dass der Dampfregler in der Position "OFF" (kein Dampf) verbleiben muss. ANTI‐KALK‐SYSTEM o Im Wassertank sorgt ein Spezialfilter für die Enthärtung des Wassers und beugt so Kalkbildung an der Bügelsohle vor. Es handelt sich um einen Permanentfilter, der nicht ausgetauscht werden muss. Gebrauchsanweisung ○ Mode d’emploi ○ Istruzioni per l’uso ○ Instruction for use HINWEIS: nur Leitungswasser verwenden. Destilliertes und entmineralisiertes Wasser ändert die physiochemischen Eigenschaften des Filtersystems und macht es unwirksam TROPFSCHUTZ‐FUNKTION o o Das Bügeleisen ist mit einer Tropfschutzfunktion ausgestattet: sobald die Temperatur unter einen bestimmten Wert gefallen ist, wird der Dampfprozess automatisch unterbrochen, damit kein Wasser aus der Bügelsohle austreten kann. Dank der Tropfschutz‐Funktion können Sie auch die empfindlichsten Textilien optimal bügeln. AUTOMATISCHE ABSCHALTUNG o Eine elektronische Sicherheitsvorrichtung schaltet das Heizelement automatisch ab, wenn das Bügeleisen für mehr als 30 Sekunden nicht mehr waagerecht gehalten wurde. In aufrechter Position erfolgt die Abschaltung nach 8 Minuten. Wenn das Heizelement abgeschaltet wurde, fängt die Auto‐Off Kontrollleuchte an zu blinken. Sobald Sie das Bügeleisen wieder in die Hand nehmen, erlischt die Auto‐Off Kontrolleuchte wieder. Die Kontrollleuchte leuchtet auf. Dies zeigt an, dass sich das Bügeleisen wieder aufheizt. Warten Sie, bis die Kontrolleuchte erlischt. Dann ist das Bügeleisen wieder betriebsbereit. LCD‐ANZEIGE o o Anzeige der Einstellungen für unterschiedliche Textiltypen und der Temperatur. Schliessen Sie das Gerät an einer polarisierten 230V Wechselstromsteckdose an. OFF = AUS o Betätigen Sie die Taste und wählen Sie entweder die Einstellungen für die unterschiedliche Textiltypen oder die Temperaturanzeige aus. Gebrauchsanweisung ○ Mode d’emploi ○ Istruzioni per l’uso ○ Instruction for use ELEKTRONISCHE TEMPERATURREGELUNG o Betätigen Sie die Taste und wählen Sie entweder die Einstellungen für die unterschiedliche Textiltypen oder die Temperaturanzeige aus. GEWEBE‐ UND TEMPERATURANZEIGE o Betätigen Sie den elektronischen Temperaturregler zur Auswahl der Einstellung für das gewünschte Gewebe. Die Leuchten im Wassertank leuchten auf und fangen an zu blinken. Sobald sie aufhören zu blinken, hat das Bügeleisen die gewählte Temperatur erreicht. HINWEISE ZU REINIGUNG UND LAGERUNG o Heben Sie das Bügeleisen nach dem Gebrauch hoch und drehen Sie die Einfüllöffnung nach unten, um das restliche Wasser aus dem Tank zu entfernen. o Schliessen Sie das Gerät an die Steckdose an und stellen Sie den Temperaturregler für 1 bis 2 Minuten auf “MAX”, damit das restliche Wasser verdunsten kann. Ziehen Sie dann den Netzstecker und lassen Sie das Gerät abkühlen, bevor Sie es lagern. ACHTUNG! o Der Benutzer darf das Bügeleisen nicht unbeaufsichtigt lassen, solange es an die Stromversorgung angeschlossen ist. o Setzen Sie sich mit Ihrem Händler oder einer zugelassenen Kundendienstwerkstatt in Verbindung, wenn das Netzkabel beschädigt ist. ENTSORGUNG o Für eine sachgerechte Entsorgung ist das Gerät dem Fachhändler, der Servicestelle oder der Firma Rotel AG zurückzugeben. Gebrauchsanweisung ○ Mode d’emploi ○ Istruzioni per l’uso ○ Instruction for use Français CONSIGNES DE SÉCURITÉ o Lire toutes les instructions avant usage. o Les enfants âgés de 8 ans et plus et les personnes ayant des déficiences physiques, sensorielles ou mentales, ou qui ne possèdent pas l’expérience et la connaissance nécessaires, ne doivent utiliser l’appareil que s’ils sont supervisés ou que des instructions leur ont été fournies par une personne responsable de leur sécurité pour l’utilisation sûre de l’appareil et après avoir compris les dangers y associés. Les opérations de nettoyage et de maintenance ne doivent pas être effectuées par des enfants sans surveillance. Il est interdit aux enfants de jouer avec l’appareil. Tenir l’appareil et le Gebrauchsanweisung ○ Mode d’emploi ○ Istruzioni per l’uso ○ Instruction for use câble d’alimentation hors de la portée des enfants de moins de 8 ans. o Assurez‐vous que la puissance utilisée corresponde bien à celle indiquée sur la plaque signalétique. o N’utilisez le fer que comme décrit dans le manuel d'instructions. o Il est nécessaire de surveiller étroitement l'appareil lorsque celui‐ci utilisé à proximité d'enfants. Ne laissez pas le fer sans surveillance lorsqu'il est branché ou sur une planche à repasser. On peut se brûler en touchant des pièces métalliques, de l'eau ou de la vapeur brûlante. o Gardez le fer hors de portée des enfants. o Le fer ne doit jamais être laissé sans surveillance pendant qu'il est connecté à l'alimentation secteur. Gebrauchsanweisung ○ Mode d’emploi ○ Istruzioni per l’uso ○ Instruction for use o Retirez la fiche de la prise de courant avant de remplir le réservoir d'eau. o Débranchez le fer de l'alimentation électrique secteur avant: 1. De nettoyer 2. De remlir ou vider le reservoir d’eau 3. Et immédiatement après l’usage o Ne faîtes jamais fonctionner le fer avec un cordon d’alimentation ou une fiche endommagée, après que celui‐ci soit tombé ou ait été endommagé d’une quelconque façon. Afin d’éviter tout risque d’électrocution, ne démontez pas le fer, apportez‐le à un technicien qualifié pour contrôle et réparation. o Ne laissez pas le cordon au contact de surfaces brûlantes. o Afin de vous protéger contre le risque d’électrocution, n’immergez pas le fer dans l'eau ou tout autre liquide. Gebrauchsanweisung ○ Mode d’emploi ○ Istruzioni per l’uso ○ Instruction for use o Le fer doit être utilisé et posé sur une surface stable. o Veillez à ce que la surface sur laquelle placer le support du fer soit stable. o N’utilisez pas le fer si celui‐ci est tombé, s’il présente des signes visibles de dommages ou en cas de fuite. Gebrauchsanweisung ○ Mode d’emploi ○ Istruzioni per l’uso ○ Instruction for use AVANT LA PREMIÈRE UTILISATION o o Il est normal qu’une petite quantité de vapeur soit produite la première fois ce qui cessera ensuite rapidement. Ne dirigez pas, lorsque vous utilisez la fonction vapeur pour la première fois, le jet de vapeur vers le linge car celle‐ci pourrait contenir des débris des évents de vapeur. REMPLISSAGE D‘EAU o o o o Nous recommandons d’utiliser de l’eau distillée. Assurez‐vous que le bouton rotatif de contrôle de vapeur et celui du contrôle de température soient en position «ARRÊT» Maintenez le fer en position verticale de sorte que l'orifice de remplissage de l'eau se trouve en une position horizontale. Remplir d'eau par l’orifice de remplissage jusqu'à ce que celle‐ci atteigne la marque « MAX » indiquée sur le bord du fer et ne dépassez jamais cette marque. RÉGLAGE DE LA TEMPÉRATURE Suivez les instructions à repasser sur l'étiquette du vêtement. S’il n'en existe pas mais que vous connaissez le genre de tissu, veuillez svp consulter le tableau suivant. o REMARQUE: si le tissu est de genre composite, sélectionnez toujours la température requise pour les tissus les plus délicats. Tissu Réglage température Température voulue o Synthétiques ● Température basse Soie, laine ●● Température moyenne Coton, lin ●●● MAX Température élevée REPASSAGE À LA VAPEUR o o o Placez le fer en position verticale et réglez le bouton de commande de température sur chaleur minimum. Insérez la fiche dans la prise et tournez le bouton de réglage sur la température «Chaleur élevée». Le voyant indique que le fer est en train de se réchauffer. La température de consigne est atteinte lorsque le voyant est éteint le fer étant alors prêt à l'emploi. Gebrauchsanweisung ○ Mode d’emploi ○ Istruzioni per l’uso ○ Instruction for use o o o Pendant le repassage, le voyant du fer passe automatiquement de marche à arrêt car le thermostat maintient la température de consigne (vous pouvez continuer à repasser pendant ce processus). Tournez le bouton rotatif de contrôle de la vapeur dans la position requise. Le fer se met à produire de la vapeur dès qu’il se trouve en position horizontale. PULVÉRISATION o Appuyez sur le bouton pulvérisateur afin de pulvériser de l'eau sur les vêtements aussi souvent que nécessaire. REMARQUE: lorsque vous utilisez la fonction de pulvérisation d'eau, assurez‐ vous qu'il y en ait suffisamment dans le réservoir d'eau. Vous pourriez avoir à pomper plusieurs fois avec le bouton de pulvérisation la première fois que vous utilisez le fer afin de démarrer la fonction de pulvérisation. REPASSAGE À LA VERTICALE OU AU JET DE VAPEUR o Appuyez sur le bouton jet de vapeur afin de produire un puissant jet pouvant pénétrer à l’intérieur des tissus et lisser les plis les plus difficiles. Attendez quelques secondes avant d'appuyer à nouveau. o En appuyant à intervalles sur le bouton jet de vapeur, vous pouvez aussi repasser à la verticale le fer verticalement (rideaux, vêtements accrochés, etc.) REMARQUE: la fonction jet de de vapeur ne peut être utilisée qu’à haute température. Arrêtez le jet de vapeur lorsque le voyant s’allume puis ne commencez à repasser à nouveau qu'après que le voyant se soit éteint. REPASSAGE À SEC o Pour repasser sans vapeur, suivez les instructions à la section « Repassage à la vapeur», le bouton rotatif de commande de vapeur doit rester cependant en position «ARRÊT» (pas de vapeur). SYSTÈME ANTICALCAIRE o Un filtre spécial à l'intérieur du réservoir d'eau adoucit l'eau et empêche l'accumulation de tartre dans la semelle. Le filtre permanent et n'a pas besoin d'être remplacé. o REMARQUE: utilisez uniquement de l'eau du robinet. L'eau distillée ou déminéralisée rend le système anticalcaire inefficace en modifiant ses caractéristiques physico‐ chimiques. Gebrauchsanweisung ○ Mode d’emploi ○ Istruzioni per l’uso ○ Instruction for use SYSTÈME ANTI‐GOUTTES o Ce fer est équipé d’une fonction anti‐gouttes c.‐à‐d. que celui‐ci s’arrête lorsque la température est trop faible afin d’empêcher l'eau de couler sur la semelle. Grâce à ce système anti‐gouttes, vous pouvez parfaitement repasser les tissus les plus délicats. ARRÊT AUTOMATIQUE o Un dispositif de sécurité électronique arrêtera automatiquement l'élément de chauffage si le fer n'a pas été manipulé pendant plus de 30 secondes en position horizontale. Ceci se passera en position verticale après 8 minutes. Le témoin lumineux d’arrêt aromatique se met à clignoter pour indiquer que l'élément de chauffage a été coupé. En relevant de nouveau le fer, le témoin lumineux d‘arrêt s’éteindra. Le témoin lumineux d’alimentation s’allumera indiquant que le fer de met de nouveau à chauffer. Attendez jusqu’à le témoin lumineux d’alimentation s’éteigne indiquant que le fer est prêt à fonctionner. ÉCRAN LCD o o Affiche le réglage de tissu et les témoins de températures. Branchez le cordon sur une prise de courant polarisée 230VAC. OFF = ARRÊT o Sélectionnez le réglage des tissus et témoins de température en appuyant sur le bouton CONTRÔLE ÉLECTRONIQUE DE LA TEMPÉRATURE Gebrauchsanweisung ○ Mode d’emploi ○ Istruzioni per l’uso ○ Instruction for use o Sélectionnez le réglage des tissus et témoins de température en appuyant sur le bouton. TÈMOINS TISSUS ET TEMPÉRATURE o Appuyez sur la commande électronique de température afin de sélectionner le réglage de tissu désiré. Les témoins du réservoir d'eau s’allument et se mettent à clignoter. Ceux‐ci cessent de clignoter lorsque le fer a atteint la température sélectionnée. CIMMENT NETTOYER ET STOCKER o Après utilisation, soulevez le fer avec les orifices de remplissage vers le bas afin vider l'eau restante du réservoir d'eau. o Insérez la fiche dans la prise et réglez le bouton de contrôle de température sur «MAX» pendant 1 à 2 minutes afin de faire s’évaporer l'eau restante puis débranchez le fer et laissez le se refroidir avant de le ranger. ATTENTION! o l'utilisateur sera tenu de ne pas quitter les lieux pendant que la fiche reste connectée à la prise de courant o En cas de cordon d'alimentation endommagé, contactez votre revendeur ou un centre de service agréé pour reparation o En cas de réparation, de remplacement du cordon, de la fiche ou de réglage, consultez svp un technicien qualifié ou amenez l'appareil à un centre de service autorisé. ELIMINATION o A la fin de la phase d’utilisation, la machine doit être remise au détaillant ou à un point de service après‐ventre, ou renvoyées directement à Rotel AG, qui se chargera de l’éliminination ou du recyclage. Gebrauchsanweisung ○ Mode d’emploi ○ Istruzioni per l’uso ○ Instruction for use Italiano AVVERTENZE DI SICUREZZA o Prima dell'uso leggere tutte le istruzioni. o L’utilizzo di questo apparecchio non è previsto da parte di persone e bambini a partire dagli 8 anni con ridotte capacità fisiche, sensoriali o mentali o con esperienza e conoscenza inadeguate, se non dietro supervisione o istruzione iniziale sull’utilizzo dell’apparecchio da parte di chi è responsabile della loro sicurezza e illustrazione degli eventuali pericoli collegati. Lavori di pulizia e manutenzione non vanno affidati a bambini se non dietro supervisione. I bambini non possono giocare con l’apparecchio. Tenere lontano apparecchio e cavo di rete dai bambini di età inferiore agli 8 anni. Gebrauchsanweisung ○ Mode d’emploi ○ Istruzioni per l’uso ○ Instruction for use o Controllare che la corrente elettrica utilizzata corrisponda a quella indicata sulla targhetta. o Utilizzare il ferro da stiro solo per gli usi previsti, secondo quanto descritto nel manuale di istruzioni. o L'apparecchio può essere usato in presenza di bambini solo sotto stretto controllo. Non lasciare mai il ferro da stiro incustodito quando è collegato alla presa di corrente o appoggiato sull'asse da stiro. Il contatto con parti di metallo calde, acqua molto calda o vapore può provocare ustioni. o Il ferro non dovrebbe mai restare incustodito quando è collegato alla presa di corrente. o Staccare la spina dalla presa a muro prima di riempire il serbatoio con acqua. o Staccare il ferro dalla presa di corrente: Gebrauchsanweisung ○ Mode d’emploi ○ Istruzioni per l’uso ○ Instruction for use 1. Prima di pulirlo 2. Prima di riempire o svuotare il serbatoio dell’acqua 3. Subito dopo l’uso o Non utilizzare mai il ferro se il cavo di alimentazione o la spina sono danneggiati, se il ferro è caduto o se è stato danneggiato in qualsiasi altro modo. Per evitare il rischio di scosse elettriche, non smontare in prima persona il ferro da stiro ma portarlo a un centro di assistenza qualificato perché venga ispezionato e riparato. o Il cavo di alimentazione non deve toccare le superfici calde. o Per evitare il rischio di folgorazione non immergere il ferro nell'acqua o in altri liquidi. o Il ferro deve essere usato e riposto su una superficie stabile. Gebrauchsanweisung ○ Mode d’emploi ○ Istruzioni per l’uso ○ Instruction for use o Quando si appoggia il ferro sul suo supporto, accertarsi che la superficie su cui poggia il supporto sia stabile. o Non usare il ferro se è caduto, se presenta segni visibili di danni o se perde acqua. Gebrauchsanweisung ○ Mode d’emploi ○ Istruzioni per l’uso ○ Instruction for use PRIMA DELL’UTILIZZO INIZIALE o o Durante il primo utilizzo la produzione di una piccola quantità di fumo è normale e comparirà entro breve. Quando si usa per la prima volta la funzione del vapore non indirizzare il getto di vapore verso i panni da stirare poiché nei fori di uscita potrebbero trovarsi dei residui di fabbricazione. RIEMPIMENTO DEL SERBATOIO DELL’ACQUA o o o o Raccomandiamo di usare acqua distillata. Controllare che sia la rotella di regolazione del vapore che il selettore per la regolazione della temperatura siano posizionati su “OFF”. Tenere il ferro verticale in modo che il foro di riempimento si trovi in posizione orizzontale. Riempire il serbatoio attraverso il foro di riempimento fino a raggiungere il segno “MAX” indicato sul lato del ferro; non superare mai questo livello. IMPOSTAZIONE DELLA TEMPERATURA o Seguire le istruzioni per la stiratura riportate sull'etichetta dell'indumento. Se non sono disponibili istruzioni, ma si conosce il tipo di tessuto, consultare la tabella seguente. NOTA: se il capo è realizzato con diversi tipi di tessuto, selezionare sempre la temperatura indicata per il tessuto più delicato. Tessuto Temperatura richiesta Regolazione della temperatura Tessuti sintetici ● Temperatura bassa Seta, lana ●● Temperatura media Cotone, lino ●●● MAX Temperatura alta STIRATURA A VAPORE o Appoggiare il ferro in posizione verticale e ruotare il selettore per la regolazione della temperatura sul minimo/temperatura bassa. Gebrauchsanweisung ○ Mode d’emploi ○ Istruzioni per l’uso ○ Instruction for use o o o o o Inserire la spina nella presa, quindi ruotare il selettore della temperatura fino al segno “temperatura alta”. La spia si accende, per segnalare che il ferro si sta scaldando. Una Volta raggiunta la temperatura impostata, la spia si spegne e il ferro è pronto per essere usato. Mentre si stira, la spia sul ferro si accende e spegne automaticamente; questo indica che il termostato è attivo e mantiene la temperatura impostata (durante questa fase si può continuare a stirare). Ruotare la rotella di regolazione del vapore sulla posizione richiesta. La produzione di vapore inizia non appena il ferro viene tenuto in posizione orizzontale. SPRAY o Premere il pulsante spray per inumidire i panni tutte le volte che si ritiene necessario. NOTA: Quando si usa la funzione spray, verificare che nel serbatoio vi sia acqua a sufficienza. La prima volta che si utilizza questa funzione può essere necessario premere e rilasciare più volte il pulsante spray per avere la quantità d'acqua necessaria ad avviare la funzione spray. STIRATURA CON COLPO DI VAPORE O VAPORE VERTICALE o o Premere il pulsante colpo di vapore per generare un getto di vapore sufficientemente potente da penetrare nei tessuti ed eliminare le pieghe più difficili e resistenti. Attendere alcuni secondi prima di premere nuovamente il pulsante. Premendo il pulsante colpo di vapore ad intervalli è possibile stirare anche in verticale (tende, tessuti appesi, ecc.) NOTA: La funzione colpo di vapore può essere usata solo se è impostata la temperatura alta. Interrompere il getto di vapore quando la spia si accende, iniziare nuovamente a stirare quando la spia si sarà spenta. STIRATURA SENZA VAPORE o Per stirare senza vapore seguire le istruzioni della sezione “Stiratura a vapore”, la rotella di regolazione del vapore dovrebbe tuttavia rimanere in posizione “OFF” (niente vapore). Gebrauchsanweisung ○ Mode d’emploi ○ Istruzioni per l’uso ○ Instruction for use SISTEMA ANTICALCARE o Uno speciale filtro situato nell'acqua ammorbidisce l'acqua e impedisce la formazione di calcare sulla piastra. Il filtro è permanente e non necessita di essere sostituito. o NOTA: usare solo acqua del rubinetto. L'acqua distillata e l'acqua demineralizzata annullano l'efficacia del sistema anticalcare alterandone le caratteristiche fisico‐ chimiche. SISTEMA ANTIGOCCIA o Questo ferro è provvisto della funzione goccia stop: il ferro smette automaticamente di produrre vapore quando la temperatura è troppo bassa, impedendo così all'acqua di gocciolare sulla piastra d'appoggio. o Grazie al sistema antigoccia, è possibile stirare alla perfezione anche i tessuti più delicati. SPEGNIMENTO AUTOMATICO o Un dispositivo elettronico di sicurezza spegnerà automaticamente l'elemento riscaldante se il ferro è rimasto fermo e inutilizzato per più di 30 secondi in posizione orizzontale. In posizione verticale, questo accade dopo 8 minuti di inutilizzo. Per indicare che l'elemento riscaldante è stato spento, la spia di spegnimento automatico inizierà a lampeggiare. Quando si prende nuovamente in mano il ferro da stiro, la spia di spegnimento automatico si spegne. La spia di accensione si accende indicando che il ferro si sta scaldando di nuovo. Attendere che la spia si spenga. A questo punto il ferro è pronto per l'uso. DISPLAY LCD o Visualizza l'indicatore del tessuto e della temperatura. o Inserire la spina del cavo in una presa elettrica polarizzata da 230V CA. OFF = ALTERATO Selezionare l'indicatore del tessuto e della temperatura premendo il pulsante: Gebrauchsanweisung ○ Mode d’emploi ○ Istruzioni per l’uso ○ Instruction for use CONTROLLO ELETTRONICO DELLA TEMPERATURA o Selezionare l'indicatore del tessuto e della temperatura premendo il pulsante. INDICATORE TESSUTO E TEMPERATURA o Premere il controllo elettronico della temperatura per selezionare l'impostazione di tessuto desiderata. Le luci nel serbatoio dell'acqua si accenderanno e contemporaneamente inizieranno a lampeggiare; smetteranno di lampeggiare quando il ferro raggiunge la temperatura selezionata. PULIZIA E CONSERVAZIONE o Dopo l'uso, sollevare il ferro da stiro col foro di riempimento rivolto verso il basso per svuotare il serbatoio. o Inserire la spina nella presa e impostare il selettore della temperatura su “MAX” per 1‐2 minuti in modo da far evaporare l'acqua rimasta, quindi scollegare il ferro dalla presa di corrente e lasciarlo raffreddare prima di riporlo. ATTENZIONE! o L'utilizzatore non deve allontanarsi finché la spina è inserita nella presa di corrente. o Se il cavo di alimentazione è danneggiato, per farlo riparare contattare il rivenditore o un centro di assistenza autorizzato. SMALTIMENTO o Per lo smaltimento corretto, la macchina deve essere restituita al rivenditore specializzato, al servizio di assistenza o alla ditta Rotel AG. Gebrauchsanweisung ○ Mode d’emploi ○ Istruzioni per l’uso ○ Instruction for use English SAFETY INSTRUCTIONS o Read all instructions before using. o Children aged 8 years or over and persons with reduced physical, sensory or mental capabilities, lack of experience or knowledge may only use the appliance if they are supervised by a person who is responsible for their safety or if they have been shown how to use the appliance safely and they have understood the risks inherent in its use. Cleaning and maintenance tasks may not be carried out by children without supervision. Children may not play with the appliance. Keep appliance and flex out of reach of children under 8 years Gebrauchsanweisung ○ Mode d’emploi ○ Istruzioni per l’uso ○ Instruction for use o Make sure the power used corresponds with the one indicated on the rating label. o Use the iron only for needed use as descried in the instruction manual. o Close supervision is necessary when any appliance is used near children. Do not leave iron unattended while connected or on an ironing board. Burns can occur from touching hot metal parts, hot water or steam. o Keep the iron out of reach of children. o The iron should never be left unattended while it is connected to the mains supply. o The plug must be removed from the sock‐ outlet before the water reservoir is filled with water. o Unplug the iron from the mains electrical supply before: 1. Cleaning 2. Filling with water or emptying the water tank Gebrauchsanweisung ○ Mode d’emploi ○ Istruzioni per l’uso ○ Instruction for use 3. Immediately after use o Never operate the iron with damaged power cord or plug, or after it has fallen or been damaged in any way. To avoid the risk of electric shock, do not disassemble the iron, take it to a qualified serviceman for examination and repair. o Do not let cord touch hot surfaces. o To protect against a risk of electric hazards, do not immerse the iron in water or any other liquid. o The iron must be used and rested on a stable surface. o When placing the iron on its stand, ensure that the surface on which the stand is placed is stable. o The iron is not to be used if it has been dropped, if there are visible signs of damage or if it is leaking. Gebrauchsanweisung ○ Mode d’emploi ○ Istruzioni per l’uso ○ Instruction for use BEFORE FIRST USE o o It is normal for small amount of smoke to be produced the first time, this will quickly disappear. When using the steam function for the first time, do not direct the steam towards the laundry, as there could be debris from the steam vents. FILLING WITH WATER o o o o We recommend the use of distilled water. Make sure that both the Steam Control turning Knob and Temperature Control Dial are in “OFF” position. Hold the iron upright so that the water‐filling inlet is in a horizontal position. Fill with water through Water Filling Inlet until the water reach the “MAX” mark indicated on the side of the iron, and never fill above this mark. SETTING TEMPERATURE o Follow the ironing instructions on the garment label. If there is no instruction but you do know the kind of fabric, please consult the following table. NOTE: If the fabric consists of various kinds of fabrics, always select the temperature required by the most delicate fabrics. Fabric Temperature control Temperautre requirement Synthetic ● Low temperature Silk, wool ●● Medium temperature Cotton, linen ●●● MAX High temperature STEAM IRONING o o o Place the iron in a vertical position and set the temperature control dial at the minimum/low heat setting. Insert the plug into the socket, and then turn the temperature control dial to the “high heat” marking. The pilot light will come on, indicating that the iron is heating up. When the pilot light turns off, the set temperature has been reached and the iron is ready to use. Gebrauchsanweisung ○ Mode d’emploi ○ Istruzioni per l’uso ○ Instruction for use o o o During ironing, the pilot light on the iron automatically switches on/off as the thermostat maintains the set temperature (you may continue ironing during this process). Turn the steam control turning knob to the required position. Steam is produced as soon as the iron in held horizontally. SPRAYING o Press the spray button to spray water on clothes, as often as required. NOTE: When using the water spray function, ensure that there is enough water in the water tank, and you may have to pump the spray button serval times at first time you use the iron in order to start the spraying function. BURST OR VERTICAL STEAM IRONING o o Press the burst of Steam button to generate a powerful burst of steam that can penetrate the fabrics and smooth the most difficult and tough creases. Wait for a few seconds before pressing again. By pressing the Burst of Steam Button at intervals you can also iron vertically (curtain, hung garments, etc.) NOTE: The burst steam function can only be used at high temperature. Stop the emission when the pilot light turns on, then start ironing again only after the pilot light has turned off. DRY IRONING o For ironing without steam, follow the instruction in section “steam ironing”, however, the steam control turning knob should remain in position “OFF” (no steam). ANTI‐CALC SYSTEM o A special filter inside the water tank softens the water and prevents scale build‐up in the soleplate. The filter is permanent and does not need replacing. NOTE: Use tap water only. Distilled and demineralized water makes the anti‐ calc system ineffective by altering its physicochemical characteristics. Gebrauchsanweisung ○ Mode d’emploi ○ Istruzioni per l’uso ○ Instruction for use ANTI‐DRIPPING SYSTEM o o This iron is equipped with drip stop function: the iron automatically stops steaming when the temperature is too low to prevent water from dripping out of the soleplate. With the anti‐dripping system, you can perfectly iron even the most delicate fabrics. AUTO SHUT‐OFF o An electronic safety device will automatically switch the heating element off if the iron has not been moved more than 30 seconds in a horizontal position. If in a vertical position, this will happen after 8 minutes. To indicate that the heating element has been switched off, the atuo‐off pilot light will start blinking. When picking up the iron again, the auto‐off pilot light will turn off. The power pilot light will turn on.This indicates that the iron is heating up again. Wait for the power pilot light to turn off. Then the iron is ready for use. LCD SCREEN o o Displays the fabric setting and the temperatures indicators. Plug the cord into a polarized 230V / AC electrical outlet. o Select the fabric setting and temperature indicator by pressing on the button: Silk Wool Cotton Linen ELECTRONIC TEMPERATURE CONTROL o Select the fabric setting and temperature indicator by pressing on the button. Gebrauchsanweisung ○ Mode d’emploi ○ Istruzioni per l’uso ○ Instruction for use FABRIC & TEMPERATURE INDICATOR o Press on the Electronic Temperature Control to select the desired fabric setting. The lights in the water tank will light up, at the same time lights will start to flash, they will stop flashing when the iron reaches the sellected temperature. HOW TO CLEAN AND STORE o o After using, lift the iron with the filling hole downwards to empty the remaining water from the Water tank. Insert the plug into the socket, and set the Temperature Control Dial to “MAX” for 1‐2 minutes to evaporate the remaining water, and then unplug the iron and let it cool down before storing it. ATTENTION! o o When the plug connecting with the power socket, the user is not allowed to leave. When the power cord is damaged, contact your dealers or an authorized service center for repair. DISPOSAL o For proper disposal, the unit is to return to the dealer, the service agent or the company Rotel AG. Gebrauchsanweisung ○ Mode d’emploi ○ Istruzioni per l’uso ○ Instruction for use D / F / I / E 2 JAHRE GARANTIE 2 ANNÉE DE GARANTIE 2 ANNI DI GARANZIA 2 YEARS WARRANTY o Garantieverpflichtung Wir verpflichten uns, dieses Gerät kostenlos wieder instand zu setzen, falls es bei sachgemässer Behandlung innerhalb der Garantiezeit versagen sollte. Wir beseitigen alle Mängel, die auf Material‐ oder Fabrikationsfehlern beruhen. Die Garantieleistung erfolgt durch Instandsetzung oder Austausch mangelhafter Teile nach unserer Wahl. Eine Garantieleistung entfällt für Schäden an Verschleissteilen, für Schäden und Mängel, die durch unsachgemässe Behandlung oder Wartung auftreten (insbesondere Verkalkung und gewerblicher Einsatz). Sie wird nur gewährt, wenn entweder die Garantiekarte mit Kaufdatum, Händlerstempel und Unterschrift versehen oder die Kaufquittung mit dem Gerät an die zutreffende Servicestation eingesandt wird (siehe Adresse unten). Rücksendungen sollen in der Originalverpackung erfolgen. Transportkosten gehen zu Lasten des Käufers. Bitte vergessen Sie nicht, der Sendung Ihre Adresse und, falls der Fehler nicht offensichtlich ist, eine Erklärung beizufügen. o Obligation de garantie Nous nous engageons à réparer gratuitement cet appareil s'il devait tomber en panne durant la période de garantie, pour autant que celui‐ci ait été utilisé de manière appropriée. Nous éliminons toutes les défectuosités du à des vices de matière ou de fabrication. La prestation de garantie se fait en effectuant une réparation ou en échangeant les pièces, selon notre choix. La garantie n'est pas accordée pour les dommages survenant sur les pièces d'usure, pour les dommages et vices dus à une manipulation ou un entretien inapproprié (en particulier l'entartrage et l'utilisation à des fins professionnelles). Elle n'est accordée que si la date d'achat, le cachet du revendeur et la signature figurent sur carte de garantie ou si la quittance d'achat a été retournée avec l'appareil au point de service compétent (voir adresse ci‐dessous). Les renvois doivent se faire dans l'emballage d'origine. Les frais de transport sont à la charge de l'ache‐teur. Veuillez ne pas oublier d'indiquer votre adresse et, si le défaut n'est pas évident, de joindre une explication à votre envoi. o Impegno di garanzia Ci impegniamo a riparare gratis questo apparecchio, qualora – malgrado un uso corretto ‐ si fosse gua‐stato durante il periodo di garanzia. Eliminiamo tutti i difetti causati da difetti del materiale o di fabbrica. La prestazione di garanzia avviene con il ripristino o la sostituzione di pezzi difettosi a nostra discrezione. Una prestazione di garanzia decade nel caso di danni a pezzi soggetti a usura, di danni e difetti dovuti a trattamento o a manutenzione non corretti (in particolare calcificazione e utilizzo industriale). Viene concessa solo se la cartolina di garanzia munita della data d’acquisto, del timbro del rivenditore e della firma o la ricevuta d’acquisto e l’apparecchio vengono inviati al rispettivo servizio di assistenza (vedi indirizzo in basso). L’invio deve avvenire nell’imballaggio originale. Le spese di trasporto sono a carico dell’acquirente. Non dimenticatevi p.f. di allegare all’invio il vostro indirizzo e, qualora il difetto non fosse chiaro, anche una spiegazione. o Warranty commitment We commit ourselves to repairing this device for free provided it has been handled properly and a failure has occured within the period of warranty. We repair all defects caused by material or manufacturing faults. The warranty will be performed by repair or replacement of defective parts at our discretion. A warranty does not cover damage due to parts worn‐off and damage and defects that occur due to improper usage, treatment or maintenance (particularly calcification and commercial use). A warranty will only be granted if the warranty card showing the date of purchase, dealer's stamp and signature or the purchase receipt together with the device is sent to the relevant service station (see address below). Returns are to be made in the original package. Transport costs will be borne by the purchaser. Please do not forget to state your address and, should the error not be obvious, include an explanation together with your parcel. Servicestation: Service après‐vente: Servizio Assistenza: Service station: Rotel AG Parkstrasse 43 5012 Schönenwerd Telefon 062 787 77 00 E‐mail: [email protected] Gebrauchsanweisung ○ Mode d’emploi ○ Istruzioni per l’uso ○ Instruction for use