1
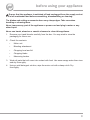
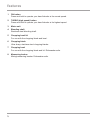
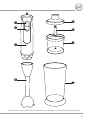
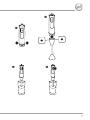
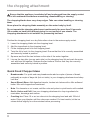
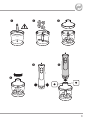
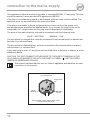
®
2 in 1
hand blender
instruction booklet
selection of recipes included
Actual product may differ slightly from the one illustrated
product safety
READ CAREFULLY AND KEEP FOR FUTURE REFERENCE
This product can be used by children aged 8 years and above,
and persons who require supervision, provided:
• they are familiar with the hazards associated with the
product, and,
• they receive instruction by a competent person on how to
safely use the product.
Children must not play with the product. Cleaning and user
maintenance must not be done by children unless they are
aged 8 or older and are supervised.
Always disconnect the appliance from the mains supply socket
if it is left unattended and before assembling, disassembling or
cleaning.
If the supply cord is damaged, it must be replaced by the
manufacturer, its service agent or similarly qualified persons in
order to avoid a hazard.
!!Never use this appliance for anything other than its intended use. This appliance is for
household use only. Do not use this appliance outdoors.
!!Always ensure that hands are dry before handling the plug or switching on the
appliance.
!!Always use the appliance on a stable, secure, dry and level surface.
!!This appliance must not be placed on or near any potentially hot surfaces (such as a
gas or electric hob).
!!Never immerse any part of the appliance or power cord and plug in water or any other
liquid.
!!Never let the power cord hang over the edge of a work top, touch hot surfaces or
become knotted, trapped or pinched.
!!Do not use the appliance if it has been dropped or if there are any visible signs of
damage.
!!Never use any accessory or attachment not recommended by the manufacturer.
!!Make sure that all attachments are securely and correctly fitted before operating the
appliance.
!!The blades and cutting accessories have very sharp edges. Take care when handling
or cleaning them.
!!Allow moving parts to come to a stop before changing or cleaning accessories.
!!Never process hot or boiling liquids. Allow them to cool before processing.
!!We do not recommend that you use your blender in a non-stick pan to avoid damaging
the pan.
2
before using your appliance
Ensure that the appliance is switched off and unplugged from the supply socket
if it is left unattended and before assembling, disassembling or cleaning.
The blades and cutting accessories have very sharp edges. Take care when
handling or cleaning them.
Never immerse any part of the appliance or power cord and plug in water or any
other liquid.
Never use harsh, abrasive or caustic cleaners to clean this appliance.
1. Remove your hand blender carefully from the box. You may wish to store the
packaging for future use.
2. Check the contents:
•
Motor unit
•
Blending attachment
•
Chopping bowl and lid
•
Chopping blade
•
Measuring beaker
3. Wash all parts that will come into contact with food. Use warm soapy water then rinse
and dry thoroughly.
4. Using a mild detergent solution, wipe the motor unit with a damp cloth. Dry
thoroughly.
3
features
1
ON button
Press and hold to operate your hand blender at its normal speed.
2
TURBO (high speed) button
Press and hold to operate your hand blender at its highest speed.
3
Motor unit
4
Blending shaft
Stainless steel blending shaft.
5
Chopping bowl lid
For use with the chopping blade and bowl.
6
Chopping blade
Ultra sharp, stainless steel chopping blades.
7
Chopping bowl
For use with the chopping blade and lid. Dishwasher safe.
8
Measuring beaker
Mixing/measuring beaker. Dishwasher safe.
4
q
w
e
t
y
u
r
Due to our policy of continuous improvement, the actual product may differ slightly from the one illustrated in these instructions.
5
the blending attachment
Using the blending attachment
For the most consistent results, food should be processed in small quantities and be cut
into 1 inch cubes before blending.
1. Squeeze and hold the two buttons on the side of the motor together.
2. Line up the two dots (one on each side) of the blending shaft with the buttons.
Release the two buttons. Ensure that the motor unit and the blending attachment are
correctly assembled and securely locked in position.
3. Insert the blending attachment into the food.
4. Press the ON or TURBO (high speed) button.
When pureeing food, it is important to use enough liquid (juice, milk, cream, broth, etc) to
create a smooth mixture.
•
Adjust the consistency of the mixture by adding more liquids or soft solids.
•
Don’t use the blending attachment to process meat or cheese.
•
The blending attachment can be used directly in a pan though we do not recommend
that you do this in a non-stick pan to avoid damaging the pan.
Do not operate the unit continuously for more than 60 seconds without giving it
a rest period of one minute
6
w
q
e
r
7
the chopping attachment
Ensure that the appliance is switched off and unplugged from the supply socket
if it is left unattended and before assembling, disassembling or cleaning.
The chopping blades have very sharp edges. Take care when handling or cleaning
them.
Never place the chopping blade assembly on the motor body by itself.
Do not operate the chopping attachment continuously for more than 30 seconds
(20 seconds on hard food) without giving it a rest period of one minute. The
chopping attachment is not suitable for processing hot food.
Position the chopping bowl on a dry flat surface close to the mains supply socket.
1. Lower the chopping blade into the chopping bowl.
2. Add the ingredients to the chopping bowl.
3. Fit the chopping bowl lid to the chopping bowl.
4. Twist the lid to lock it to the chopping bowl. Ensure that the lid is correctly assembled
and securely locked in position.
5. Squeeze and hold the two buttons on the side of the motor together.
6. Line up the two dots (one on each side) on the chopping bowl lid and push the motor
unit and bowl lid together. Release the two buttons. Ensure that they are correctly
assembled and securely locked in position.
Quick Food Chopper Ideas
•
Breadcrumbs: For quick and easy breadcrumbs add a couple of pieces of bread,
preferably a couple of days old (but not stale), in your chopping attachment and chop
until fine.
•
Sweet Biscuit Base: Add digestive biscuits, broken into halves with a little softened
butter. Mix until chopped and combined.
•
Nuts: For desserts or nut roasts, add the nuts and pulse in quick bursts until crushed.
•
Garlic, Herbs and Chill: Use your chopping attachment to chop ingredients for
marinades, dressings and sauces.
•
Crushing ice: Place 10 or so ice cubes into the chopping bowl and add 150ml of
water. Pulse your blender until the cubes are crushed. For best results, let the ice
cubes defrost slightly for a few minutes before processing.
8
q
w
e
t
y
r
9
recipes
Tomato and Chickpea Soup
Olive Oil
400ml of vegetable stock
2 carrots, chopped
½ a teaspoon of sugar
1 leek, chopped
2 x 400g of chopped tomatoes
1 potato, peeled and chopped
410g of chickpeas drained and rinsed
2 cloves of garlic, finely chopped
1 tablespoon of dried mixed Italian herbs
1 tbsp of finely chopped rosemary
Salt and pepper
1. Put the vegetables in a large saucepan with the garlic, rosemary, Italian herbs,
stock and sugar. Season with salt and pepper and stir. Cover and cook gently for 25
minutes or until the vegetables are tender.
2. Add the tomatoes to the pan and then using your hand blender carefully puree until
smooth. Keep the blade part of the blending shaft immersed in the soup to avoid
splashing. To avoid damage to the pan, we do not recommend that you blend soup in
a non-stick pan.
3. Once it is smooth, add the chickpeas and heat through, stirring occasionally and
seasoning to taste.
4. Serve warm with toasted French bread and melted cheese.
Chicken Tikka Marinade
2 cloves of garlic (peeled)
½ tablespoon garam masala
½ fresh red chilli (deseeded)
1 teaspoon of tomato puree
15g of fresh ginger
100g of coriander leaves
1 tablespoon of vegetable oil
400g of chicken breast
50g of yoghurt
1. Add all the ingredients to the hand blender beaker, excluding the chicken. Use your
hand blender to puree the paste until it is smooth.
2. Cut the chicken breast into chunks and then place it in a bowl. Pour the paste onto
the chicken and stir so that it is evenly coated.
3. Leave it covered, preferably overnight and then cook the chicken either under a hot
grill, on a barbeque or in your favourite curry sauce.
10
Cod with a Parmesan Crust and Tomato Sauce
2 tbsp of olive oil
25g of butter
4x cod loins (skinned and boned)
A handful of fresh thyme (leaves picked,
storks removed)
1 ½ slices of white bread (a couple of days
old works best, but not stale)
½ can of chopped tomatoes
40g of freshly grated parmesan
Mixed Italian herbs
The zest of one lemon
½ tsp of sugar
The juice of two lemons
Salt and pepper
1. Roughly tear the bread and put it into the chopping bowl. Then add the parmesan
and lemon zest. Chop for about a minute until the mixture resembles breadcrumbs.
2. Heat the olive oil in a large frying pan on a medium heat and lay the fish in it to that
they are all laying flat on the base of the pan and cover with a lid.
3. Cook for about 3 minutes and then place pieces of the butter around the fish. Pour
in the half of the lemon juice and the thyme leaves. Cook for a further 5 minutes,
depending on the thickness of the fish, until it is cooked. You can test this by gently
testing with a fork to see whether the fish is soft and flaky.
4. In a separate pan slowly heat the tomatoes, and stir in the sugar and the rest of the
lemon juice. Season to taste.
5. Spoon a little of the oil and lemon juice in the frying pan over the fish and then
sprinkle the breadcrumb mixture over.
6. Place the pan under a grill for 1-2 minutes and let the crust turn golden.
7. The fish tastes delicious served on a bed of risotto with the tomato sauce drizzled
around it.
Tomato and avocado salsa
4 large ripe tomatoes
1 small red onion
1 red chilli
2 medium-ripe avocados (halved, stoned)
½ teaspoon ground cumin
2 tablespoons extra virgin olive oil
½ teaspoon ground coriander
8 tablespoons of coriander leaves
Juice of 1 lime
salt and black pepper
1. Roughly chop the tomatoes, avocado and onion into big chunks and add to the
chopping bowl along with the other ingredients. Chop with quick pulses until all the
ingredients are combined.
2. Serve with tortillas or sliced vegetables.
11
recipes
Pesto
60g basil - leaves only
1 teaspoon rock salt flakes
20 large spinach leaves – tough stalks
discarded, blanched for 30 seconds in
boiling water
3 cloves garlic, peeled
1 tablespoon flat-leaf parsley leaves,
blanched
60g Parmesan, freshly grated
55g pine nuts
150ml extra virgin olive oil
2 tablespoons Ricotta cheese (optional)
1. Blend the basil, spinach, parsley and salt the using the chopper bowl or blender
attachment on your hand blender. Process until smooth.
2. Add the Parmesan, pine nuts and olive oil, and process until emulsified.
3. Scrape the mixture into a bowl and fold in the ricotta cheese. Ricotta is not traditional
but it helps to prevent the oil separating. Only add the ricotta if you are going to use
the sauce within a couple of days.
4. To preserve the sauce for longer, eliminate the ricotta from the recipe and place the
contents into a clear glass jar, and pour in a little olive oil to cover the surface of the
pesto. Cover the jar and refrigerate.
5. Serving ideas are as a delicious pasta sauce or slice chicken breasts and fill with the
pesto, then wrap with parma ham and bake!
Hearty Hummus
410g can of chick peas in salted water
60ml extra virgin olive oil
2 cloves garlic, peeled
2 teaspoons of cumin powder
2 teaspoons of light tahini
Salt and freshly ground black pepper
2 tablespoon of Greek yogurt
Garnish
Juice of half a lemon
Olive oil and cayenne pepper.
1. Drain the chick peas, reserving the liquid.
2. Place 75ml of the reserved liquid along with the rest of the ingredients the beaker of
your hand blender and use the chopping blade to process.
3. The finished hummus should be smooth and creamy.
4. Transfer what you need to a serving dish, drizzle over a little more olive oil and
sprinkle with cayenne pepper.
5. Pour the rest into an airtight container and refrigerate until needed.
12
Zesty Eton Mess
Any dessert made with crushed meringue needs to be eaten almost immediately,
otherwise the meringue with begin to soften and disintegrate once it is mixed with any
moisture.
2 - 3 shop bought meringue nests (or
1 tbsp lemon Juice
homemade if you prefer), crushed.
1 tbsp Icing sugar
300ml double cream
4 large mint leaves
200 g strawberries
Zest of 1 lime
200g raspberries
Mint leaves to garnish
1. Place 100g of the strawberries and 100g of the raspberries into the mini chopper. Add
the lemon juice and icing sugar and process until smooth. Pass the mixture through a
sieve to remove any pips, adjust the sweetness if required. Chill.
2. Place the cream into a suitable bowl and blend until softly peaking.
3. Place the remainder of the strawberries into the chopper bowl with the mint leaves.
Roughly chop together using by pressing the on button in short pulses.
4. Add the remainder of the raspberries, chopped strawberries and mint, zest and
crushed meringue to the cream and softly fold through.
5. Place into a suitable glass dish or wine glass and drizzle with the fruit sauce. Stir the
sauce through the mixture to create a swirled effect using a skewer.
6. Garnish with some extra mint if desired.
For an alternative dessert, why not keep the meringue nests whole, top with the thick
cream and berries and drizzle with the homemade fruit sauce.
Homemade Chocolate fudge sauce
Great for an ice cream, pancake or meringue topping
1 x 410g Condensed milk
300g dark chocolate chips
125g soft brown sugar
50g butter
1 tbsp vanilla extract
1. Place the evaporated milk, chocolate chips and sugar into a heavy based saucepan.
Slowly bring to the boil, stirring continuously.
2. Once the mixture is boiling, reduce the heat and simmer for 2-3 minutes. Remove
from the heat and set aside to cool for 10 minutes. At this stage the mixture can be
removed from the pan to aid the cooling process, but this is not necessary.
3. Place the butter and vanilla extract into the chocolate sauce and using the hand
blender attachment, blend all the ingredients together until smooth and glossy.
4. Use to your requirements. This sauce will keep perfectly in your refrigerator for up to
2 weeks. Store in a sealable container away from strong smelling foods.
13
recipes
Oreo Cookie Milkshake
6-7 Oreo Cookies
150ml of milk
3 scoops of vanilla ice cream
A good squeeze of chocolate syrup
1. Place the Oreo cookies into the chopping bowl and process with your hand blender
using short pulses until crushed.
2. Pour the biscuit crumbs into your hand blender beaker and then add the ice cream,
milk and chocolate syrup.
3. Use your hand blender’s blending attachment to mix all the ingredients together.
Blueberry Smoothie
1 small banana, broken into bite sized
pieces
150 g blueberries
175ml chilled apple juice
150 ml natural yoghurt.
1. Place all the ingredients into the blender beaker and blend for 30 seconds until
smooth.
2. To serve, pour into a glass.
Raspberry Sparkler
4 whole raspberries
50 ml passion fruit liqueur
300ml chilled Prosecco
200ml chilled cranberry juice
Mint leaves to garnish.
1. Place the liqueur and cranberry juice into the blender beaker, and blend for 20
seconds.
2. Top up with the chilled Prosecco.
3. Place two whole raspberries into two cocktail glasses then fill with the cocktail.
4. Add a touch of crushed ice and garnish with the mint
14
cleaning and storage
Ensure that the appliance is switched off and unplugged from the supply socket
if it is left unattended and before assembling, disassembling or cleaning.
Never immerse any part of the appliance or power cord and plug in water or any
other liquid.
Never use harsh, abrasive or caustic cleaners to clean this appliance.
The blades have very sharp edges. Take care when handling or cleaning them.
Clean the motor unit and the blending attachment with a damp cloth only. Use a washing
up brush to get rid of any stubborn food deposits which have stuck around the blade.
The chopping bowl and measuring beaker can be cleaned in the dishwasher.
After processing very salty food, you should rinse the blades right away. Also, be careful
not to use excessive amounts of cleaner or de-scaler in your dishwasher.
Storing
Store the hand blender in its packing or in a clean, dry place, out of the reach of children,
ensuring all parts are dismantled.
15
connection to the mains supply
This appliance is fitted with either a moulded or rewirable BS1363, 13 amp plug. The fuse
should be rated at 3 amps and be ASTA approved to BS1362.
If the fuse in a moulded plug needs to be changed, the fuse cover must be refitted. The
appliance must not be used without the fuse cover fitted.
If the plug is unsuitable, it should be dismantled and removed from the supply cord
and an appropriate plug fitted as detailed below. If you remove the plug it must not be
connected to a 13 amp socket and the plug must be disposed of immediately.
The wires of the mains lead are coloured in accordance with the following code:
BLUE – NEUTRAL
BROWN – LIVE
The wire which is coloured Blue, must be connected to the terminal which is marked with
the letter N or coloured Black.
The wire which is coloured Brown, must be connected to the terminal which is marked
with the letter L or coloured Red.
If any other plug is used, a 3 amp fuse must be fitted either in the plug or adaptor or at the
distribution board.
CAUTION: DO NOT CONNECT EITHER WIRE TO THE EARTH TERMINAL IN THE
PLUG WHICH IS MARKED E OR WITH THE EARTH SYMBOL ( ) OR COLOURED
GREEN OR GREEN AND YELLOW.
This symbol indicates that this unit is a Class II appliance and therefore an earth
connection is not required.
Plug should be BS1363/A approved
Fit a 3 Amp Fuse
3 Amp Fuse
BLUE
(Neutral)
BROWN
(Live)
Ensure that the outer sheath of the cable
is firmly held by the clamp
16
after sales service
These appliances are built to the very highest of standards. There are no user serviceable
parts. Follow these steps if the unit fails to operate:
1. Check the instructions have been followed correctly.
2. Check that the fuse has not blown.
3. Check that the mains supply is functional.
If the appliance will still not operate, return the appliance to the place it was purchased for
a replacement. To return the appliance to the Customer Service Department, follow the
steps below:
1. Pack it carefully (preferably in the original carton). Ensure the unit is clean.
2. Enclose your name and address and quote the model number on all correspondence.
3. Give the reason why you are returning it.
4. If within the guarantee period, state when and where it was purchased and include
proof of purchase (e.g. till receipt).
5. Send it to our Customer Service Department at the address below:
Customer Service Department
Jarden Consumer Solutions (Europe) Limited
Middleton Road
Royton
Oldham
OL2 5LN, UK.
Telephone: 0161 621 6900 Fax: 0161 626 0391
e-mail: [email protected]
17
guarantee
Please keep your receipt as this will be required for any claims under this guarantee.
This appliance is guaranteed for 1 year after your purchase as described in this
document.
During this guaranteed period, if in the unlikely event the appliance no longer functions
due to a design or manufacturing fault, please take it back to the place of purchase, with
your till receipt and a copy of this guarantee.
The rights and benefits under this guarantee are additional to your statutory rights, which
are not affected by this guarantee. Only Jarden Consumer Solutions (Europe) Limited
(“JCS (Europe)”) has the right to change these terms.
JCS (Europe) undertakes within the guarantee period to repair or replace the appliance,
or any part of appliance found to be not working properly free of charge provided that:
•
you promptly notify the place of purchase or JCS (Europe) of the problem; and
•
the appliance has not been altered in any way or subjected to damage, misuse,
abuse, repair or alteration by a person other than a person authorised by JCS
(Europe).
Faults that occur through, improper use, damage, abuse, use with incorrect voltage, acts
of nature, events beyond the control of JCS (Europe), repair or alteration by a person
other than a person authorised by JCS (Europe) or failure to follow instructions for use
are not covered by this guarantee. Additionally, normal wear and tear, including, but not
limited to, minor discoloration and scratches are not covered by this guarantee.
The rights under this guarantee shall only apply to the original purchaser and shall not
extend to commercial or communal use.
If your appliance includes a country-specific guarantee or warranty insert please refer
to the terms and conditions of such guarantee or warranty in place of this guarantee or
contact your local authorized dealer for more information.
Waste electrical products should not be disposed of with Household waste. Please
recycle where facilities exist. E-mail us at enquiries [email protected] for further
recycling and WEEE information.
Jarden Consumer Solutions (Europe) Limited
Middleton Road
Royton
Oldham
OL2 5LN
UK
18
19
VHB109_VHB140_Iss_3
08/13
93495-2