1
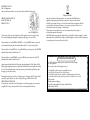
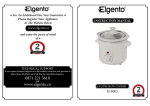
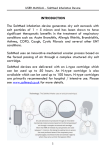
125W
To extend your warranty by a further year
please register your appliance
at the website below
www.elgento.co.uk
TECHNICAL SUPPORT
If you require technical support or in the unlikely event that your purchase is faulty
please telephone our Helpline for immediate assistance.
0871 221 3619
INSTRUCTION MANUAL
Hand Mixer
Guarantee.
This product is guaranteed for 12 months from the date of the original purchase.
If any defect arises due to faulty materials or workmanship the faulty products must be returned
to the place of purchase. Refunds or replacement are at the discretion of the Retailer .
The following conditions apply:
The product must be returned to the retailer with the proof of purchase.
The product must be installed and used in accordance with the instructions contained in this
instruction guide.
For domestic purposes. ONLY.
It does not cover wear and tear, damage, misuse or consumable parts.
PFD has limited responsibility for incidental or consequential loss or damage.
Valid in the UK and Eire only.
Technical Specification.
Product Code E12001EGL
23136030
AC: 220V-240V 50Hz
Power 125W
Parts Identification
Sutton House,
Berryhill Road,
Fenton
Stoke on Trent
Staffordshire,
ST4 2NL.
USING YOUR MIXER
1. For the first use, cleaning the beaters. Before assembling the mixer, be sure the power
cord is unplugged from the power outlet and the speed selector is on the “0” position.
2. Assemble beaters into mixer. Beaters are used for beating eggs or similar food.
Note: Beaters can be inserted in either socket.
3. Plug in the power source.
4.Turn the speed selector to your desired setting, there is 5 setting. The appliance will start
working.
Warning: Do not stick knife, metal spoons, fork and so on into bowl when operating.
5. The max operation time per time shall not exceed 3 minutes and minimum 10 minutes
rest time must be maintained between two consecutive cycles.
6.When mixing is completed, turn the speed selector to 0 position, unplug the cord from
power outlet.
7. If necessary you can scrape the excess food particles from the beaters by rubber or
wooden spatula.
8.Hold the beaters with one hand and press the Ejection button firmly down with the
other hand, remove the beaters.
Note: Remove the beaters only at the 0 setting, and make sure the power cord is
unplugged from the power outlet before removing the beaters. Never pressing the Ejector
button when the appliance is operating.
CLEANINGAND MAINTENANCE
1. Unplug the appliance and wait it completely cool down before cleaning.
2. Wipe over the outside surface of the unit with a dampened cloth and polish with a soft
dry cloth.
3. Wipe any excess food particles from the power cord.
4. Wash the beaters in warm soapy water and wipe dry. The beaters may be washed in the
dishwasher.
Caution: the mixer cannot be immersed in water or other liquid.
COOKERY TIPS
1. Refrigerated ingredients, such as butter and eggs, them should be at room temperature
before mixing begins. Set these ingredients out ahead of time.
2. To eliminate the possibility of shells or deteriorated-off eggs in your recipe, break eggs
into separate container first, then adding to the mixture.
3. Do not over-beat. Be careful that you only mix/blend mixtures until recommended in
your recipe. Fold into dry ingredients only until just combined. Always use the low
speed.
4. Climatic conditions. Seasonal temperature changes, temperature of ingredients and
their texture variation from area to area all play a part in the required mixing time and the
results achieved.
5. Always start mixing at lower speed. Gradually increase to the recommended speed as
stated in the recipe.
SPEED GUIDE
SPEED MIXING TASKS
1 Stir Use when stirring liquid ingredients or when mixing dry and liquid ingredients together alternately in a recipe. Use when preparing any of the ready prepared or packaged instant puddings
2 Mix Use when a recipe calls for combining ingredients together. Use for quick
breads or muffins that require a brisk action, just enough to blend (setting 3 and4 are same).
3 Blend Use when preparing cake mixes or for directions calling for medium speed. Use to cream butter and sugar together.
4 Beat Use when preparing a frosting from a recipe or package. Use when whipping cream
for desserts.
5 Whip Use to mash potatoes to develop a light and fluffy texture. Use when whipping egg whites.
IMPORTANT SAFEGUARDS
Before using the electrical appliance, the following basic precautions should always be
followed including the following:
1. Read all instructions.
2. Before use check that the voltage of your wall outlet correspond to the one on the rating plate which is on the bottom of the appliance.
3. Do not operate the appliance with a damaged cord or after malfunction or has been damaged in any manner.
4. Do not let cord hang over edge of table or counter or hot surface.
5. Do not immerse cord or the body of mixer into water as this would give rise to electric shock.
6. If the supply cord is damaged, it must be replaced by a qualified person in order to avoid a hazard.
7. Close supervision is necessary when used near children .
8. Do not place an appliance on or near a hot gas or on a heated oven.
9. Never eject beaters or dough hooks when the appliance is in operation.
10. Do not leave mixer unattended while it is operating.
11. Unplug from outlet while not in use, before putting on or taking off parts, and before
cleaning.
12. The use of attachments not recommended or sold by the manufacturer may cause fire,
electric shock or injury
13. Remove beaters from mixer before washing.
14.Always check that the control is OFF before plugging cord into wall outlet. To disconnect, turn the control to OFF, then remove plug from wall outlet.
15. Avoid contacting with moving parts.
16.Keep hands, clothing, as well as spatulas and other utensils away from beaters during
operation to reduce the risk of injury to persons, and/or damage to the mixer.
17.This appliance is not intended for used by children unless they have been given supervision or instruction concerning use of the appliances by a person responsible for their safety.
18. Children should be supervised to ensure that they do not play with the appliance.
19. Switch off the appliance before changing accessories or approaching parts which move in use.
20. Do not use outdoors.
21.Save these instructions.
HOUSEHOLD USE ONLY
Imported & Distributed throughout the U.K.By PFD. ST4 2NL | www.elgento-products.co.uk
ELECTRICAL SAFETY
Class 1 Configuration
The wires in the mains lead are coloured in accordance with the following code:
GREEN/YELLOW: EARTH (E)
BLUE: NEUTRAL (N)
BROWN: LIVE (L)
Class 1 Configuration
As the colours of the wires in the mains lead of this appliance may not correspond with
the coloured markings identifying the terminals in your plug, proceed as follows:
The wire which is coloured GREEN & YELLOW (or coloured GREEN) must be connected
to the terminal in the plug which is marked with the letter “E” or by the earth symbol .
Disposal of Unit
Disposal instructions for Elgento items in accordance with the WEEE directive.
Appliances bearing the symbol shown here may not be disposed of in domestic
rubbish. You are required to dispose of old electrical and electronic appliances like this
separately. Please visit www.recyclemore.co.uk, or www.recylcenow.co.uk for access
to information about the recycling of electrical items.
Please visit www.weeeireland.ie for access to information about the recycling of
electrical items purchased in Ireland.
The WEEE directive, introduced in August 2006, states that all electrical items must be recycled,
rather than taken to landfill. Please arrange to take this appliance to your local Civic Amenity site
for recycling, once it has reached the end of its life.
The wire which is coloured BLUE (or coloured BLACK) must be connected to the NEUTRAL
terminal which is marked with the letter “N”.
The wire which is coloured BROWN (or coloured RED) must be connected to the LIVE
terminal which is marked with the letter “L”.
Always ensure that the Mains Cord is fixed into the plug through the Cord Guard or Cable
Clamp, (plug wiring diagram above), and that the Cord Guard screws are tightened to clamp
the cord (outer sheath and inner coloured wires) into position in the plug. Make sure that
the plug top is also fitted securely.
This appliance must be protected by a 13 Amp fuse in a 13 Amp type (BS1363) plug. Should
you need to replace the fuse, use only a 13Amp ASTA approved BS1362 fuse (13A).
OPERATIONAL GUIDELINES
It is important to ensure the correct Plug Adaptor is used when operating in a country not
using the UK 13 Amp socket system. If in doubt, consult a qualified electrician.
Declaration of Conformity
We PFD Ltd Declare that this product conforms to all the following
product legislation
In accordance with the following directive(s):
2004/108/EEC. The Electromagnetic compatibility Directive
2006/95EC. The LVD directive (Low Voltage Directive)
2002/95/EC. The RoHS. Directive. (Restriction of Hazardous substances Directive)
1935/2004/EC Materials & Articles in Contact with Food. (LFBG section 30, 31 & 35)
Peter Bowden
Quality Assurance Manager
Sutton House, Berryhill Road, Fenton, Stoke-On-Trent,
Staffordshire, ST4 2NL.