1
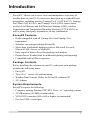
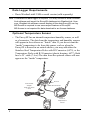
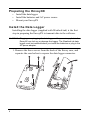
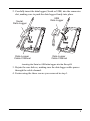
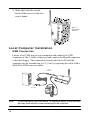
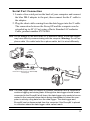
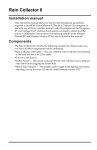
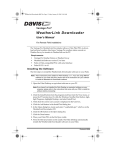
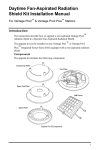
GETTING
STARTED
GUIDE
Envoy8X ™
R
!"#$##%&' %#
#(
FCC Part 15 Class B Registration Warning
This equipment has been tested and found to comply with the limits for a Class B digital
device, pursuant to Part 15 of the FCC Rules. These limits are designed to provide reasonable protection against harmful interference in a residential installation. This equipment generates, uses, and can radiate radio frequency energy and, if not installed and
used in accordance with the instructions, may cause harmful interference to radio communications.
However, there is no guarantee that interference will not occur in a particular installation.
If this equipment does cause harmful interference to radio or television reception, which
can be determined by turning the equipment on and off, the user is encouraged to try to
correct the interference by one or more of the following measures:
• Reorient or relocate the receiving antenna.
• Increase the separation between the equipment and receiver.
• Connect the equipment into an outlet on a circuit different from that to which the
receiver is connected.
• Consult the dealer or an experienced radio/TV technician for help.
Changes or modification not expressly approved in writing by Davis Instruments may void
the warranty and void the user's authority to operate this equipment.
FCC ID: IR2DWW6312
IC: 378810-6312
EC EMC Compliance
This product complies with the essential protection requirements of the EC EMC Directive 2004/108/EC; Low Voltage Directive 2006/95/EC; and Eco-Design Directive 2005/32/
EC>0.5 watt no-load adapter; and ETSI EN300-220.
Envoy8X Getting Started Guide
(Product Number: 6318
Davis Instruments Part Number: 7395.318 Rev. A (1/26/11)
© Davis Instruments Corp. 2011. All rights reserved. Information in this document subject
to change without notification. WeatherLink, Vantage Vue, and Vantage Pro, WeatherLink
are registered trademarks of Davis Instruments. Envoy is a trademark of Davis Instruments. Windows, Access and Excel are trademarks of Microsoft Corporation. MySQL is a
trademark of Oracle Corporation.
Davis Instruments Quality Management System is ISO 9001 certified.
®
3465 Diablo Avenue, Hayward, CA 94545-2778 U.S.A.
510-732-9229 • Fax: 510-732-9188
E-mail: [email protected] • www.davisnet.com
Introduction
TM
Envoy8X allows you to store, view and manipulate a vast array of
weather data on your PC. It can receive data from up to eight different
transmitters, including wireless Vantage Pro2 (6152 & 6153), Vantage
Pro2 Plus (6162 & 6163), and Vantage Vue® (6250) sensor suites;
wireless Leaf Wetness and Soil Moisture Stations (6345); wireless
Temperature and Temperature/Humidity Stations (6372 & 6382); as
well as many third-party transmitters; in any combination.
TM
Envoy8X Features
• Radio compatible with all Vantage Pro2 and Vantage Vue
transmitters
• Software can manage multiple Envoy8Xs
• Stores data in relational databases such as Microsoft Access®,
Microsoft SQL Server, or MySQL®.
• Easy export of data to Excel for graphing and analysis.
• Export data to WeatherLink for additional plotting and reporting.
• Compatible with all Davis repeaters
Package Contents
Before installing the software on your PC, make sure your package
includes the following items:
• Envoy8X
• Two #6 x 1” screws for wall mounting
• Weather Data Transfer Utility for Envoy8X software CD
• AC Adapter
System Requirements
Envoy8X requires the following:
• Computer running Windows XP -SP3, Vista , or 7 operating systems
• 32 MB memory (64 MB recommended)
• VGA/SVGA monitor (800 x 600 or higher recommended)
• One free USB or serial port
®
®
1
Data Logger Requirements
• Davis WeatherLink® USB or serial version (sold separately)
Note: A WeatherLink data logger is required. You may choose to install WeatherLink software and import the Envoy8X database into WeatherLink. However, WeatherLink software cannot display all the data Envoy8X can log.
MS Excel® is required to use some export features of Envoy8X.
MS Access is not required for data download to an Access database.
Optional Temperature Sensor
• The Envoy8X has an internal temperature-humidity sensor, as well
as a barometer. The data from the temperature and humidity sensors
will appear in the software as “Inside” data. If you do not want the
“inside” temperature to be from this sensor, such as when the
Envoy8X is housed in an outside shelter, you may add either the
Stainless Steel Temperature Probe with RJ Connector (6475), or the
Temperature Probe with RJ Connector (plastic housing, 6477). Both
have a 25’ cable (7.6 m) The data from the optional sensor will now
appear as the “inside” temperature.
Envo
y8X
R
RJ Jack
Insert Power
Adaper
Plug and rotate
to fit
RJ Connector
External
Temperature
Sensor
2
Before You Install Envoy8X
Install the transmitting stations you will be using. Make sure that each
transmitter has a unique Transmitter ID (TX ID). (The factory default on
all transmitters is TX ID 1.) Refer to the transmitting station manual for
information on setting or changing the Transmitter ID.
You will need to know the Transmitter ID and transmitting station type
(such as Vantage Pro2 ISS or Leaf Wetness & Soil Moisture/
Temperature) when you configure the Envoy8X. If any transmitting
station is going through a repeater or repeaters, you will also need the
Repeater ID (A-H) of the last repeater before the Envoy8X. List your
transmitters and repeaters to refer to during setup of your Envoy8X.
Transmitting Station
TX ID
Type
(1-8)
Repeater
ID
(A-H)
Transmitting Station
Location
Note: You can add transmitting stations in the future. Make sure that you assign
each an unused Transmitter ID.
3
Preparing the Envoy8X
•
•
•
Install the data logger
Install the batteries and AC power source
Mount your Envoy8X
Install the Data Logger
Installing the data logger (supplied with WeatherLink) is the first
step in preparing the Envoy8X to transmit data to the software.
CAUTION: Plugging or unplugging the data logger while power is applied to the
Envoy8X can lock up or damage the logger. The WeatherLink data
logger must be installed before you install the batteries or plug in the
AC power adapter.
1. Remove the three screws from the back of the Envoy case, and
separate the case halves to expose the data logger connector.
Env
oy
8X
4
R
2. Carefully insert the data logger (Serial or USB) into the connector
slot, making sure to push the data logger firmly into place.
Serial
Data Logger
Data Logger
Cable Channel
USB
Data Logger
Data Logger
Cable Channel
Inserting the Serial or USB data logger into the Envoy8X
3. Rejoin the case halves, making sure the data logger cable passes
through the cable channel.
4. Fasten using the three screws you removed in step 1.
5
Install or Replace the Batteries
Note: Before installing batteries and/or AC adapter, make sure the data logger is
already installed. If replacing batteries, see below.
1. Remove the battery cover on the back of the Envoy8X case by
pressing on the arrow embossed on the cover and sliding the cover
away from the case.
2. Insert three AA-cell batteries, negative terminal (flat side) first.
The Envoy8X emits two beeps if the start-up test is successful. If
you do not hear two beeps, check your battery orientation and
reinstall the batteries. If you hear no beeps again, contact Davis
InstrumentsTechnical Support (see page 14.).
3. Replace the battery cover on the case.
To replace the batteries:
1. Make sure data logger is installed. Download any data in the data
logger and plug in the power adapter to retain power while batteries
are replaced.
Note: If you are unable to plug in the power adapter you will need to reset the
time and date in your Envoy8X after replacing batteries. Refer to your
Envoy8X software Help files for instructions.
2. Follow the steps above. You may put the date on the space provided
on the label on the back of the Envoy8X for future reference.
6
Connecting AC Power
The operating battery power for Envoy8X is up to 5 months, depending on the number of transmitters being received. Envoy8X is supplied with an optional AC power adapter that can be used as an
addtional power source.
1. Make sure data logger is installed. Locate the power adapter jack
on the end of the Envoy case next to the data logger output cable.
AC Power
Jack
Envoy8
X
R
AC Power
Adapter
To
Computer
Power
Adapter
Plug
2. Insert the power adapter plug into the power jack, and plug the
adapter into the outlet. You may need to rotate the power adapter
plug, especially if using an external temperature sensor. Plug the
power adapter into the outlet.
If this is the initial power-up (that is, no batteries were installed),
the Envoy8X emits two beeps if the start-up test is successful. If
you do not hear two beeps, check to make sure the adapter is
plugged in correctly. If so, contact Davis Instruments Technical
Support (see page 14).
7
Mount Your Envoy8X
You can place your Envoy8X on your desktop, install it on a wall
near your computer, or install it with the optional Multi-Purpose
Shelter (7728). Here are some guidelines for placing your Envoy8X.
Envoy8X Location
Place the Envoy8X in a location where it is easily accessible and can
be easily connected to a computer. For more accurate readings:
• Avoid placing the Envoy8X in direct sunlight. This may cause
erroneous inside temperature and humidity readings and may
damage the unit.
•
Avoid placing the Envoy8X near radiators or heating/air conditioning ducts.
• If mounting the Envoy8X on a wall, choose an interior wall.
Avoid exterior walls that tend to heat up or cool down depending
on the weather.
The range of the radio transmission depends on several factors.
Typical maximum ranges are:
• Line of sight: 1000 feet (300 m).
• Under most conditions: 200 - 400 feet (60 - 120 m).
Other range and transmission considerations include:
• Range may be reduced by walls, ceilings, trees, foliage, a metal
roof or other large metal structures or objects such as aluminum
siding, metal ducts, and metal appliances, such as refrigerators.
• Frequency interferers also reduce transmission distance. Cordless phones (900 MHz) are a common example of frequency
interference.
• Transmission between wireless units may be obscured by
something unidentifiable, or by some obstacle that can’t be
worked around.
Note:
8
For best results, orient transmitting antennas and the Envoy8X
antenna so that the orientation and angles of the antennas are parallel
to each other.
For better reception over greater distances or for weaker signals,
consider using a Wireless Repeater (#7626 or 7627) or Long-Range
Repeaters (#7653 or 7654) to strengthen the signal or increase the
distance between your transmitters and Envoy8X.
Wall Mounting the Envoy8X
1. Use the provided wall mounting template on the next page as an
example of hole spacing and alignment when installing your
Envoy8X.
2. Use the template as a guideline for the hole markings on the wall
where you want to mount the Envoy8X, and use a pencil to mark
the location for the two mounting screws.
The screws should be 3.25'' (82.5
mm) apart and lined up vertically.
3. Drill the marked locations with a
3/32'' or 7/64'' (2.2 to 2.7 mm)
Drill 3/32"
drill bit.
or 7/64"
(~2.2 to 2.7mm)
4. Drive the two #6 x 1'' (3.5 mm x
Holes
25 mm) pan head self-threading
screws into the wall.
5. Leave at least a 1/8'' (3 mm)
3.25"
space between the wall and the
(82.55mm)
heads of the screws.
9
6. Slide the keyholes on the
back of the case over the two
screw heads.
#6 X 1"
Pan-Head
Screws
Envoy8
X
Local Computer Installation
USB Connection
Locate a free USB port on your computer and connect the USB
connector of the 8’ cable to the port, and connect the Mini-B connector
to the data logger. The connection between the Envoy8X and the
computer can be extended up to 16' (5 m) by replacing the cable with a
Mini-B-to-USB connector cable.
Mini-B
Connector
y8
X
En
vo
R
USB
Connector
Note:
10
Do not attempt to use more than a 16' extension cable, or the data logger may have difficulty communicating with the computer.
Serial Port Connection
1. Locate a free serial port on the back of your computer and connect
the blue DB-9 adapter to the port, then connect the the 8’ cable to
the adapter.
2. Plug the short cable coming from the data logger into the 8' cable.
The connection between the Envoy8X and the computer can be
extended up to 40' (12 m) using a Davis Standard 4-Conductor
Cable, product number 07876-040.
Note: Do not attempt to use more than 40' of extension cable, or the data logger
may have difficulty communicating with the compute. Warning: Do not use
phone cable. Our cable looks like a phone cable, but it is wired differently.
9-Pin
Adapter
(Blue DB-9)
8' (2.5 m) Cable
En
vo
y8
X
R
Optional 40' (12 m) 4-Conductor
Extension Cable (Davis p/n 07876-040)
and Coupler
AC Power
Adapter
Note: The data logger does not require a constant connection with a computer to
continue logging and storing data. Although the data logger should remain
connected to the Envoy8X at all times, the data logger only needs to be connected to the computer when data is being downloaded or when the computer is actively using data from the data logger. The data logger and
Envoy8X can be disconnected from the computer if the Envoy8X is placed
in a location where the data logger cable cannot reach.
11
Software Installation and Setup
Before You Install the Software
Before you run Weather Data Transfer Utility for Envoy 8X for the first
time, you must first decide which database to use. Here are some basic
considerations for selecting your database:
• MS Access is included with Envoy8X software and requires no
additional purchase or setup to use. Access is the easiest to use and is
recommended for single-user installations. The maximum size for an
Access database is 2 gigabytes. If you want to log data frequently,
the size of the database increases rapidly and your data should be
backed up at least once a month. Access databases should also be
compacted on a regular basis. Weather Data Transfer Utility for
Envoy8X will automatically compact the Access database when you
exit, so it is a good idea to close the program regularly to allow the
database to be compacted and repaired.
• Either MySQL or MS SQL Server, should be used for installations
with many sensors and large amounts of data. They are very
powerful databases which can support large amounts of data and
multiple simultaneous connections. Both are fast, stable and easy to
set up, but complicated to maintain. MS SQL is more expensive than
MySQL. If you use MySQL or MS SQL Server, you should have IT
personnel who have the knowledge to maintain these database
servers. To use MySQL, MS SQL Server, you must purchase the
software, and install it before running Envoy8X software for the first
time. (A free version of MySQL can be downloaded from the
MySQL web site.)
12
Installing Weather Data Transfer Utility for
Envoy8X Software
The following installation was completed in a Windows 7 operating
system. The process may vary depending on your operating system and
the installation type.
1. Insert the CD. If the install program does not appear automatically,
run Setup.exe from the CD.
2. Click Next in the Welcome dialog box.
3. Read the License Agreement and click Yes in the dialog box.
4. The Destination Folder dialog box displays.
5. Select a directory or destination folder for storing the Weather Data
Transfer Utility for Envoy8X or accept the default destination folder
and click Next.
Note: Selecting the Everyone button is usually the best choice for ease of use.
6. Installation is completed. Click Finish to exit the Setup. You should
see the Weather Data Transfer Utility for Envoy8X icon on your
desktop and also in the Start - All Programs menu.
13
Using Your Software
The first time you use the software, you will set up the database and add
your Envoy8X, and configure the transmitting stations. You should
refer to the copious Help files for instructions on each of these steps.
You can access Help by clicking the Help menu command, by clicking
the Help button that appears on most dialog boxes, or by pressing F1 on
your keyboard.
Contacting Davis Technical Support
If you have questions about the software, or encounter problems
installing or using the software, please contact Davis Technical Support.
Most questions can be answered on the phone.
(510) 732-7814 – Monday through Friday, 7:00 a.m. to 5:30 p.m.
Pacific Time.
(510) 670-0589 – Fax to Technical Support.
[email protected] – E-mail to Technical Support.
[email protected] – E-mail to Davis Instruments.
www.davisnet.com – Product documentation is available on the
Weather Support section of our web site. Watch for FAQs and other
updates.
En
vo
y8
X
R
14