1
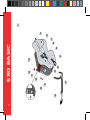
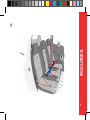
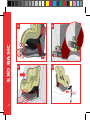
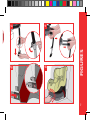
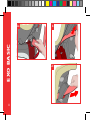
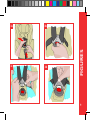
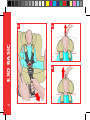
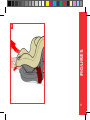
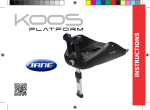
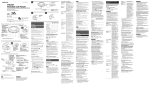
INSTRUCTIONS
español / english / français
italiano / polski / Русский
2
EXO BASIC
español
13
english
27
français
41
italiano
55
polski
59
Русский
83
3
A
4
8
EXO BASIC
3
5
9
6
14
19
2
1
10
11
12
13
20
4
7
15
17
16
18
B
B
C
D
FIGURES
A
E
5
EXO BASIC
6
1a
1b
1c
1d
1f
1g
1h
FIGURES
1e
7
EXO BASIC
2a
8
2b
2c
3b
3c
3d
FIGURES
3a
9
EXO BASIC
3e
10
4a
4b
FIGURES
5
11
12
EXO BASIC
Instrucciones generales
A-Partes de la silla EXO BASIC
B-Partes de su automóvil
Prestaciones de su silla EXO BASIC
1 Instalación con anclajes isofix + support leg SEMI-UNIVERSAL
2 Instalación con cinturón de tres puntos
3 Instalación del bebé en el asiento
4 Regulación del arnés
5 Reclinado de la silla
Atención
Recomendaciones
Mantenimiento
15
16
17
18
20
21
21
22
22
23
24
25
español
ÍNDICE
13
EXO BASIC
14
Su nuevo EXO BASIC de JANÉ es un asiento
diseñado para proteger al niño en el automóvil
desde los 9 meses aproximadamente (desde 9
Kg. de peso) hasta aproximadamente 4 años de
edad (18 Kg. de peso).
EXO BASIC ha superado las exigentes pruebas
de seguridad de la directiva Europea ECE 44/04
para el grupo 1.
EXO BASIC al tener pata anti-rotación es una
silla de la categoría “semi-universal”. Esto
quiere decir que la silla solo se puede montar
en los vehículos que aparecen en la “lista de
vehículos” adjunta a este manual. Actualizaciones de esta lista las puede encontrar en
nuestra página Web: HYPERLINK “http://
www.jane.es” www.jane.es
Es muy importante que lea atentamente estas
instrucciones antes de usar la silla EXO BASIC
por primera vez. Asegúrese que todos aquellos
que alguna vez la vayan a usar también estén
familiarizados con su correcta instalación y
uso. Se ha comprobado que un porcentaje
importante de usuarios de sillas de seguridad
no instalan correctamente la silla, por eso, entender los manuales de instrucciones y aplicar
correctamente lo que dicen es tan importante
para la seguridad como la propia silla.
Guarde las instrucciones y la guía rápida en
el compartimiento situado en un lateral de la
base, consúltelas en caso de duda. También
puede encontrarlas en nuestra página Web:
www.jane.es
INSTRUCCIONES GENERALES
•Su asiento EXO BASIC puede ser instalado tanto en el asiento delantero, si no lleva Air-Bag, como en
el trasero de su automóvil. De todas formas, se aconseja instalarlo en los asientos traseros. Si lo coloca
en el asiento delantero del automóvil, éste NO debe tener AIR-BAG o debe estar desconectado.
•Es válido sólo para automóviles dotados con cinturones automáticos de tres puntos de anclaje,
homologados según el reglamento ECE-16 u otras normas equivalentes. NO usar con un cinturón de
dos puntos de anclaje.
•No todos los sistemas de seguridad son exactamente iguales, por lo que aconsejamos que compruebe su EXO BASIC en el automóvil que vaya a ser montado.
•Es muy importante no utilizar productos de segunda mano, ya que JANÉ sólo puede garantizar la
total seguridad en artículos usados por su primer comprador.
•JANÉ recomienda sustituir su asiento EXO BASIC por uno nuevo cuando haya sido sometido a violentas tensiones después de un accidente.
•Compruebe que todos los cinturones están en su correcta posición y debidamente ajustados a su
EXO BASIC. Vigile que ningún cinturón esté enroscado. Debe hacer entender al niño que bajo ningún
concepto manipule los cinturones o los enganches del mismo.
•Esta silla está concebida para su uso en el automóvil, por lo que no se debe usar fuera del mismo.
español
Con el fin de proteger adecuadamente al niño y, asegurar su confort y sujeción dentro del
automóvil será necesario que respete las siguientes instrucciones:
15
EXO BASIC
A - Partes de la silla EXO BASIC
16
1_ Peana, base
2_ Asiento
3_ Cabezal
4_ Tirador ajuste altura cabezal
5_ Hebilla 5 puntos
6_ Tensor arnés
7_ Cinta de hombros
8_ Acolchado hombros
9_ Cinta entrepiernas
10_ Anclajes Isofix
11_ Botones desbloqueo ISOfix
12_ Pomo regulación Isofix
13_ Paso cinturón abdominal automóvil
14_ Bloqueo cinturón hombros
15_ Palanca regulación reclinado
16_ Compartimiento instrucciones
17_ Pata anti-rotación
18_ Palanca ajuste altura pata
anti-rotación
19_ Guías ISOfix
20_ Manual de instrucciones
Cinturón de tres puntos de anclaje. Consta de
dos partes bien diferenciadas:
D Cinturón de dos puntos de anclaje. ATENCIÓN.
No se puede instalar la silla EXO BASIC con este
tipo de cinturones.
A Parte sub-abdominal o de hombros, que desde la hebilla pasa por el pecho y los hombros.
B Parte abdominal, es la que pasa por encima
de las piernas.
C Hebilla.
E Anclajes ISOfix. Los anclajes están situados
en la intersección entre el asiento y el respaldo.
No todas las plazas ni todos los automóviles
disponen de estos anclajes, consulte el manual
de su automóvil para más información.
español
B - Partes de su automóvil
17
Prestaciones de su silla EXO BASIC
EXO BASIC
La silla EXO BASIC ha sido diseñada con los últimos avances en materia de seguridad y confort:
18
1.E XO BASIC puede instalarse con cinturones
de seguridad de tres puntos o con anclajes ISOfix.
2.E XO BASIC dispone de una pata “support
leg” como sistema anti-rotación.
3.La altura de los cinturones de hombros se
ajusta sin necesidad de retirar las cintas. Esta
acción se ha unido a un cabezal que protege
mejor en caso de choque lateral a la vez que
sostiene la cabeza.
4.El interior del asiento esta recubierto con
material absorbente de impactos. Aunque solo
se exige utilizar este material en el área de la
cabeza, su EXO BASIC lo tiene en toda la superficie en contacto con su hijo, incluso en los
pies.
5.La silla dispone de amplias ventanas de aireación.
El asiento EXO BASIC se debe instalar en el SENTIDO DE LA MARCHA. Preferentemente en los asientos
traseros y nunca en asientos dotados con Air-Bag frontal. Si quiere instalar la silla con los anclajes
ISOFIX, asegúrese que la plaza donde va a instalarla dispone de los anclajes.
ATENCIÓN. LA POSICIÓN CARA A LA MARCHA ESTÁ TOTALMENTE DESACONSEJADA PARA
BEBÉS DE MENOS DE 9 KG. DE PESO.
español
Instalación de la silla en el automóvil:
19
1 Instalación con anclajes ISOFIX + support leg. SEMI-UNIVERSAL
EXO BASIC
Junto a las instrucciones, encontrará una lista de vehículos que determina qué modelos son aptos para
la instalación del conjunto SEMI-UNIVERSAL. Si su coche no aparece en la lista póngase en contacto
con el vendedor.
Para una correcta instalación siga los siguientes pasos:
1a Extraiga los anclajes ISOfix (10) girando el
pomo (12) situado en el frontal de la base.
1e Ajuste la altura del support leg para que
esta se apoye en el suelo del vehículo.
1b Guíe ambos anclajes hacia los ejes y presione hasta que ambos lados queden bloqueados,
dos señales verdes en los anclajes (10) le indicarán que ambos están anclados. Si una o ambas señales fueran rojas, vuelva a intentarlo.
1f Para retirar el accesorio Support leg apriete
los pulsadores que se encuentran debajo del
reposapiés y tire hacia fuera.
1c Gire el pomo (12) en sentido contrario para
que la silla se ajuste contra el respaldo del automóvil.
20
1d Introduzca el accesorio Support leg hasta
que llegue al final y escuche un “click”.
Para retirar la silla cuando se usa ISOfix:
1g Libere los anclajes deslizando ambos botones de desbloqueo (11) hacia el interior. Las
señales en los anclajes (10) se verán en rojo.
1h Retire la silla. Puede guardar los anclajes
ISOfix dentro de la base girando del pomo
(12).
2 Instalación con cinturón de tres puntos
2b Deslice la cinta de hombros del cinturón del
automóvil por la pinza (14) de la parte alta del
asiento, solo la del lado contrario a la hebilla.
Cierre la pinza.
2c Presione la EXO BASIC contra el asiento y
tense manualmente el cinturón del automóvil.
3 Instalación del bebé en el asiento
3a Afloje el arnés tirando de las cintas por encima de la hebilla mientras presiona el botón
tensor.
que está sentado en el fondo y con la espalda
erguida. Junte los extremos superiores de las
hebillas.
3b Desabroche la hebilla (5). Para facilitar la
instalación del bebé en la silla, puede sujetar
los cinturones en las cintas de los laterales.
3d Introdúzcalos en el cierre y presione hasta
oír un clic.
3c Coloque al bebé en el asiento asegurando
español
2a Coloque la silla EXO BASIC en la posición
más reclinada (ver apartado 5, reclinado de la
silla). Pase la hebilla del cinturón de tres puntos
entre la peana y la silla (13) y abróchela.
3e Tire de la cinta tensora (6).
21
EXO BASIC
4 Regulación del arnés
Ajuste de la altura de la cinta de hombros.
Compruebe con el niño correctamente sentado en la silla, la posición adecuada de las cintas de hombros. Éstas deben estar ligeramente por encima de los hombros del bebé. EXO BASIC dispone de 5
posiciones de cinturón, al ajustar la altura se desplaza el cabezal. Para cambiar la altura siga los
siguientes pasos:
4a Tire de la anilla situada sobre el cabezal (4),
esto desbloqueará el cabezal.
4b Desplace el cabezal (3) hasta la posición
que necesite el bebé y suelte la anilla. Mueva
el cabezal hasta oír un clic de bloqueo. Tire del
cabezal para comprobar que está sujeto.
5 Reclinado de la silla
La silla EXO BASIC se reclina por medio de una
palanca situada en la parte frontal de la silla
(16). Dispone de 4 posiciones.
22
Para reclinar la silla, tire de la palanca (16) y
deslice el asiento hacia la posición deseada.
•No deje nunca al niño solo.
•Cualquier alteración o adición al dispositivo
sin la oportuna autorización de JANÉ puede
alterar gravemente la seguridad del sistema de
retención.
•No seguir cuidadosamente las instrucciones
para el correcto uso del sistema de retención
puede ser peligroso para la seguridad del niño.
•Este dispositivo de seguridad no puede ser
usado sin su tapizado, ni ser reemplazado por
otro que no sea el original, ya que éste forma
parte integrante de las características de segu-
ridad del sistema.
•Compruebe que la silla ha sido colocada correctamente.
•Asegúrese que el cinturón no ha quedado
pillado entre los asientos abatibles o puertas.
•NO utilizar la silla en el sentido de la marcha
para bebés de menos de 9 Kg. de peso
español
ATENCIÓN
23
EXO BASIC
RECOMENDACIONES
24
•Guarde este libro de instrucciones para futuras consultas. Llévelo siempre en su compartimiento situado en el lateral de la base (17).
•Asegúrese de que dentro del automóvil, tanto el equipaje como cualquier otro objeto susceptible de causar daños en caso de accidente
estén debidamente fijados o resguardados.
•El asiento EXO BASIC deberá estar fijado
debidamente con los cinturones de seguridad,
aunque no se esté utilizando, ya que en caso de
accidente podría resultar despedido provocando daños a los ocupantes del vehículo.
•Recuerde no usar el asiento EXO BASIC en
automóviles dotados de air-bag frontal, a no
ser que pueda ser desconectado o desactivado,
caso que deberá consultar con el fabricante o
comercio vendedor de su automóvil.
No exponga el tapizado al sol durante largos
periodos. Mientras la silla no esté en uso cúbrala o guárdela en el compartimiento porta
equipajes.
Lave las partes de plástico con agua templada y jabón, secando posteriormente todos los
componentes concienzudamente. El tapizado
puede desmontarse para ser lavado. Siga las
siguientes instrucciones:
Desenfundar el cabezal y los protectores de
hombros. Retirar el tapizado alrededor del ala
de la silla. Abrir el velcro de la parte central y
retirar el tapizado.
Lavar con una temperatura nunca superior a
30ºC.
Para montar de nuevo la tapicería siga los mismos pasos a la inversa.
Tanto para su seguridad como para la buena
conservación de este producto, es importante
que haga una revisión periódica en cualquiera
de nuestros talleres oficiales.
español
MANTENIMIENTO
25
EXO BASIC
INFORMACIÓN SOBRE LA GARANTÍA
26
Este artículo dispone de garantía según lo estipulado en la ley 23 / 2003 de 10 de julio. Conservar la
factura de compra, es imprescindible su presentación en la tienda donde adquirío el producto para
justificar su validez ante cualquier reclamación.
Quedan excluídos de la presente garantía aquellos defectos o averías producidas por un uso inadecuado del artículo o el incumplimiento de las
normas de seguridad y mantenimiento descritas
en las hojas de instrucciones y en las etiquetas de
lavado, así como los elementos de desgaste por
uso normal y manejo diario.
La etiqueta que contiene el número de chasis de su
modelo, no debe ser arrancada bajo ningún concepto, contiene información importante.
Atención:
Para obtener la máxima seguridad y atención sobre su nuevo JANÉ, es muy importante que rellene
la tarjeta de registro que encontrará en la página
www.jane.es
El registro le permitirá informarse, si es necesario,
de la evolución y mantenimiento de su producto.
También, siempre que lo desee, le podremos informar de nuevos modelos o noticias que consideremos pueden ser de su interés.
General Instructions
A-Parts of the EXO BASIC seat
B-Parts of your vehicle
Features of your EXO BASIC seat
1 Installation with the ISOFIX fasteners + the support leg. SEMI-UNIVERSAL
2 Installation with a three-point seat belt
3 Installing the baby in the seat
4 Adjusting the harness
5 Reclining the seat
Warning
Recommendations
Maintenance
29
30
31
32
34
35
35
36
36
37
38
39
english
TABLE OF CONTENTS
27
EXO BASIC
28
Your new EXO BASIC from JANÉ is a seat designed to protect the child in the car from approximately 9 months (from 9 Kg. in weight) up to
approximately 4 years old (18 Kg. in weight).
EXO BASIC has passed the safety requirements
covered by the European directive ECE 44/04
for group 1.
Because the EXO BASIC has the anti-rotation
leg it is categorised as a “semi-universal” car
seat. This means that the seat can only be fitted in the vehicles shown in the “vehicle list”
enclosed with this manual. Updates made to
this list can be found on our web page: www.
jane.es
It is very important that you read these instructions carefully before using the EXO BASIC car
seat for the first time. Make sure that everyone who is ever going to use the car seat also
knows how to install it and use it. It has been
demonstrated that a significant number of car
seat users do not install their seats correctly,
that’s why understanding the instructions and
applying them correctly is as important for
safety as the actual seat itself.
Keep the instructions and the quick guide in the
compartment on one side of the base, consult
them if you have any doubts. You can also find
them on our web page: www.jane.es
GENERAL INSTRUCTIONS
•Your EXO BASIC seat can be installed on the front seat, if it does not have an Air Bag, or on the back
seat of the vehicle. It is advisable to install it on the back seat. If you fit it onto the front seat of the
vehicle, it must NOT be fitted with an AIR BAG or it must be disconnected.
•It is only valid for vehicles fitted with automatic 3-point seat belts, certified under regulation ECE-16
or other equivalent regulations. DO NOT use with a 2-point seat belt.
•Not all safety systems are exactly the same, therefore we recommend you test your EXO BASIC in
the vehicle in which it is going to be fitted.
•It is very important not to use second-hand products, since JANÉ can only guarantee complete
safety for articles used by the original buyer.
•JANÉ recommends you replace your EXO BASIC seat with a new one when it has been subjected to
significant strain after an accident.
•Check that all the seat belts are in the correct position and duly fitted to your EXO BASIC. Make sure
that no seat belt is twisted. The child must understand that under no circumstances is he to play with
the seat belts or the fastening elements.
•This seat is designed for use in the car and must not be used out of it.
english
In the aim of suitably protecting the child and, ensuring his comfort and safety in the vehicle, it is important to respect the following instructions:
29
EXO BASIC
A - Parts of your EXO BASIC seat
30
1_ Base
2_ Seat
3_ Headrest
4_ Lever to adjust the headrest height
5_ 5-point buckle
6_ Harness tightening adjuster
7_ Shoulder straps
8_ Shoulder strap padding
9_ Crotch strap
10_ Isofix fastening points
11_ ISOfix unlocking buttons
12_ Isofix adjustment handle
13_ Vehicle abdominal seat belt guide
14_ Shoulder belt lock
15_ Lever to adjust the reclining angle
16_ Instruction compartment
17_ Anti-rotation leg
18_ Lever to adjust the height of the
anti-rotation leg
19_ ISOfix guides
20_ Instruction manual
Three-point fastening seat belt. Consisting of
two distinguishable parts:
A Sub-abdominal or shoulder part, that goes
from the buckle over the chest and the shoulders.
B Abdominal part, this is the part that goes
over the top of the legs.
D Two-point fastening seat belt. WARNING.
The EXO BASIC seat can not be installed with
this type of seat belt.
E ISOfix fasteners. The fasteners are situated
at the intersection between the seat and the
backrest. Not all seats or all vehicles have these
fasteners, consult your vehicle manual for more
information.
english
B - Parts of your vehicle
C Buckle.
31
Features of your EXO BASIC seat
EXO BASIC
The EXO BASIC seat has been designed with the latest advances in safety and comfort:
32
1.E XO BASIC can be installed with three-point
seat belts or ISOfix fasteners.
2. EXO BASIC is fitted with a support leg as an
anti-rotation system.
3.The height of the shoulder straps can be
adjusted without having to take the straps off.
This action is connected to the headrest that
gives greater protection in the event of a side
impact while at the same time it supports the
head.
4. The interior of the seat is covered with shock
absorbing material. Although regulations state
that this material only has to be used on the
head area of the seat, your EXO BASIC uses it
on the whole surface in contact with your child,
even on the foot area.
5. The seat is fitted with large ventilation windows.
The EXO BASIC seat should be installed FACING FORWARDS. Preferably on rear seats and never on
seats that are fitted with a frontal airbag. If you want to install the seat with the ISOFIX fasteners,
make sure that the vehicle seat is fitted with the fasteners.
WARNING. THE FACING FORWARDS POSITION IS COMPLETELY INADVISABLE FOR BABIES
THAT WEIGH LESS THAN 9 KG.
english
Installing the seat in the vehicle:
33
1 Installation with the ISOFIX fasteners + the support leg. SEMI-UNIVERSAL
Together with the instructions, you will find a list of vehicles that shows which models are compatible
with SEMI-UNIVERSAL installation. If your car is not on the list get in touch with the retailer.
EXO BASIC
For correct installation follow the steps below:
34
1a Extract the ISOfix fasteners (10) turning the
handle (12) found on the front of the base.
1e Adjust the height of the support leg so that
it is supported by the floor of the vehicle.
1b Guide both fasteners to the axles and press
until both sides are locked into place, two
green signals will appear on the fasteners (10)
when they are correctly fastened. If one or both
of the signals are red, try again.
1f To remove the Support Leg accessory press
the buttons found underneath the footrest and
pull outwards.
1c Turn the handle (12) in the opposite direction so the seat adjusts itself against the backrest of the vehicle.
1d Insert the support leg accessory until it reaches the end and you hear it click.
To remove the seat when using ISOfix:
1g Release the fasteners by sliding both unlocking buttons (11) inwards. The signals on the
fasteners (10) will turn red.
1h Remove the seat. The ISOfix fasteners can
be stored in the base by turning the handle
(12).
2 Installation with a three-point seat belt
2b Slide the shoulder strap of the vehicle seat
belt through the clip (14) on the top part of the
seat, only on the opposite side from the buckle.
Close the clip.
2c Press the EXO BASIC against the seat and
manually tighten the vehicle seat belt.
3 Installing the baby in the seat
3a Loosen the harness pulling the straps
over the buckle while pressing the tightening
button.
that he is sitting as far back as possible and
with the backrest upright. Join together the
upper ends of the buckles.
3b Unfasten the buckle (5). To make it easier to
install the baby in the seat, you can fasten the
seat belts in the side straps.
3d Insert them in the lock and press until it
clicks.
3c Position the baby in the seat making sure
english
2a Place the EXO BASIC seat in the most reclined position (see section 5, reclining the seat).
Pass the three-point seat belt buckle between
the base and the seat (13) and fasten it.
3e Pull the tightening strap (6).
35
EXO BASIC
4 Adjusting the harness
Adjusting the height of the shoulder strap.
When the child is sitting correctly in the seat, check that shoulder straps are in the right position. They
should be slightly above the baby’s shoulders. EXO BASIC has 5 seat belt positions, on adjusting the
height the headrest moves. To change the height, follow the steps below:
4a Pull the ring situated on the headrest (4),
this will unlock the headrest.
4b Move the headrest (3) into the position suitable for the baby and release the ring. Move
the headrest until you hear the locking click.
Pull the headrest to check that it is secure.
5 Reclining the seat
The EXO BASIC seat is reclined by using a lever
situated on the front part of the seat (16). It
has 4 positions.
36
To recline the seat, pull the lever (16) and slide
the seat to the required position.
•Never leave the child alone.
•Any alteration or addition to the product
without the express authorisation of JANÉ may
seriously affect the safety of the retention system.
•If you do not carefully follow the instructions
for the correct use of the retention system it
may endanger your child’s safety.
•This safety device must not be used without
its upholstery, nor may it be replaced by another one that is not the original, as it forms an
integral part of the safety characteristics of the
system.
•Check that the seat has been positioned correctly.
•Make sure that the seat belt has not got trapped between the folding seats or doors.
•DO NOT use the seat facing forwards for babies that weigh less than 9 Kg.
english
WARNING
37
EXO BASIC
RECOMMENDATIONS
38
•Keep this instruction booklet for future reference. Always store it in the compartment
found on the side of the base (17).
•In the vehicle make sure that all baggage as
well as any other object that could cause injury
in the event of an accident is duly secured or
stored.
•The EXO BASIC seat should be duly fastened
with the seat belts, even when it is not in use,
as in the event of an accident it could be flung
about causing injury to the occupants of the
vehicle.
•Remember not to use the EXO BASIC seat
in vehicles fitted with a frontal airbag, unless
it can be disconnected or deactivated, which
should be consulted with the vehicle manufacturer or retailer.
Do not expose the upholstery to sunlight for
long periods of time, while the seat is not in
use cover it up or store it in the luggage compartment.
Wash the plastic parts with soap and warm
water, then carefully dry all the components.
The upholstery can be removed for washing.
Follow the instructions listed below:
Take the cover off the headrest. Remove the
upholstery from around the wing of the seat.
Undo the Velcro on the central part and take
the upholstery off.
Wash at a temperature that does not exceed
30ºC.
To fit the upholstery again, follow the same
steps in reverse order.
For your safety and the good conservation of
this product, it is important to bring it to one of
our official workshops for regular inspections.
english
MAINTENANCE
39
EXO BASIC
INFORMATION ABOUT THE GUARANTEE
40
This article comes with a guarantee in accordance
with the provisions of law 23 / 2003 of 10th July.
Keep your receipt as proof of purchase, it is essential to present the receipt in the shop where
you bought the product to confirm validity of the
guarantee in the event of any problems.
This guarantee excludes any defects or breakages
caused by inappropriate use of the article or inobservance of the safety and maintenance rules
listed in the instruction pages and on the care
labels, as well as faults caused by wear and tear
through normal use and daily handling.
The label displaying the chassis number of the
model should never be taken off, it contains important information.
Notice:
For the maximum safety and care of your new
JANÉ product, it is very important that you complete the registration card found on the web page
www.jane.es
This registration means we can inform you, if
necessary, of the evolution and maintenance of
your product. Additionally, if you would like, we
can also inform you about new models or news
that we think may be useful for you.
Instructions Générales
A-Lexique du siège EXO BASIC
B-Lexique de votre automobile
Les atouts de votre siège EXO BASIC
1 Installation des ancrages ISOFIX + support leg. SEMI-UNIVERSEL
2 Installation avec ceinture à 3 points
3 Installation du bébé dans le siège
4 Réglage du harnais
5 Inclinaison du siège
Attention
Recommandations
Entretien
43
44
45
46
48
49
49
50
50
51
52
53
français
ÍNDEX
41
EXO BASIC
42
Votre nouveau siège-auto EXO BASIC de JANÉ
a été conçu pour protéger les enfants dans
l’automobile à partir de 9 mois approximativement (à partir de 9 kg.) et jusqu’à 4 ans
approximativement (poids:18 kg.).
EXO BASIC a passé avec succés les tests les plus
exigeants en matière de sécurité et répond à la
norme Européenne ECE 44/04 pour le groupe 1.
EXO BASIC avec sa jambe de force anti-rotation fait partie des sièges de la catégorie «
semi-universelle ». Ce qui signifie que ce siège
ne peut se monter que dans les véhicules indiqués dans la « liste de véhicules » jointe à
ce manuel.
Des actualisations de cette liste se trouvent sur
notre page Web : www.jane.es
Il est très important de lire attentivement ces
instructions avant d’utiliser le siège EXO BASIC pour la première fois. Vérifiez que toutes
les personnes qui vont s’en servir, soient elles
aussi familiarisées avec sa correcte installation
et utilisation. On c’est rendu compte qu’un
fort pourcentage d’utilisateurs de sièges auto
n’installent pas correctement le siège. Comprendre les manuels d’instructions et appliquer
correctement ce qu’ils disent est aussi important pour la sécurité que le siège lui-même.
Gardez les instructions et le guide d’utilisation
rapide dans le casier situé sur le côté de la base,
consultez-les en cas de doute. Vous pouvez
aussi les trouver sur notre site www.jane.es
INSTRUCTIONS GÉNÉRALES
•Son siège-auto EXO BASIC peut être aussi bien installé sur le siège avant, si l’Air-Bag n’est pas mis,
que sur l’assise arrière de votre automobile. De toute façon, on conseille plutôt de l’installer sur les sièges arrière. Toutefois si vous l’installer sur le siège avant de l’automobile, celui-ci NE doit pas avoir
d’Air-Bag ou celui-ci doit être déconnecté.
•Il est homologué pour les automobiles avec ceintures automatiques à trois points d’ancrage, conformément au règlement ECE/16 ou autres normes équivalentes. Ne pas utiliser avec une ceinture
à deux points d’ancrage.
•Tous les dispositifs de sécurité ne sont pas exactement identiques, c’est la raison pour laquelle nous vous conseillons d’essayer votre EXO BASIC dans l’automobile où il sera installé.
•Il est important de ne pas utiliser de produits de seconde main, car JANÉ ne peut garantir une totale sécurité que pour les articles achetés par le premier acheteur.
•JANÉ recommande de remplacer le siège EXO BASIC par un nouveau quand celui-ci a subi un choc
violent suite à un accident.
•Vérifiez que toutes les ceintures sont correctement installées et ajustées à votre EXO BASIC. Vérifiez
qu’aucune sangle n’est entortillée. Vous devez faire comprendre à l’enfant qu’il ne doit sous aucun prétexte toucher aux ceintures, ni aux systèmes de fermeture.
•Ce siège a été conçu pour une utilisation dans l’automobile, on ne doit pas l’utiliser à d’autres fins.
français
Pour protéger l’enfant comme il se doit, assurer son confort et une retenue efficace dans
l’automobile on doit respecter les instructions suivantes:
43
EXO BASIC
A - Lexique du siège EXO BASIC
44
1_ Socle, base
2_ Siège
3_ Appui-tête
4_ Système de réglage hauteur appui-tête
5_ Boucle harnais de sécurité à 5 points
6_ Tensionneur du harnais
7_ Sangle d’épaules
8_ Protection matelassée des épaules
9_ Sangle d’entre-jambes
10_ Ancrages Isofix
11_ Boutons de déblocage ISOfix
12_ Molette de réglage Isofix
13_ Guide sangle abdominale automobile
14_ Blocage sangle d’épaules
15_ Manette de réglage inclinaison
16_ Compartiment instructions
17_ Jambe de force
18_ Levier d’ajustement hauteur
jambe de force
19_ Guides ISOfix
20_ Manuel d’instructions
Ceinture à 3 points d’ancrage. Deux parties
bien différenciées:
A Partie sous-abdominale ou des épaules, qui
part de la boucle et passe par la poitrine et les
épaules.
B Partie abdominale, c’est celle qui passe pardessus les jambes.
D Ceinture à 2 points d’ancrage. ATTENTION:
On ne peut pas installer le siège-auto EXO
BASIC avec ce type de ceintures.
E Ancrages ISOfix. Les points d’ancrage se
situent à l’intersection de l’assise et du dossier.
Tous les sièges et toutes les automobiles ne disposent pas de ces points d’ancrage, pour plus
d’informations consultez le manuel de votre
automobile.
français
B - Lexique de votre automobile
C Boucle de fermeture.
45
Les atouts de votre siège EXO BASIC
EXO BASIC
Le siège EXO BASIC a été conçu selon les dernières avancées en matière de sécurité et de confort:
46
1.E XO BASIC peut être installé avec les ceintures de sécurité à 3 points ou les ancrages
ISOfix.
2.E XO BASIC dispose d’une jambe de force
« support leg » comme système anti-rotation.
3.La hauteur des ceintures d’épaule se règle
sans avoir besoin d’enlever les sangles. À cette
amélioration on a ajouté une têtière qui tout en
maintenant la tête protège plus efficacement
en cas de choc latéral.
4.L’intérieur du siège est recouvert d’un
matériau d’absorption des chocs. Bien que
l’utilisation de ce matériau ne soit exigée que
pour la zone de la tête, votre EXO BASIC en
possède sur toute la surface en contact avec
votre enfant, même au niveau des pieds.
5.Le siège auto dispose d’amples fenêtres de
ventilation.
Le siège EXO BASIC doit être installé dans le SENS DE LA MARCHE. De préférence sur les sièges arrière
et jamais sur un siège doté d’un AirBag frontal. Si vous voulez installer le siège avec les ancrages ISOFIX, vous devez vérifier que la place où vous l’installerez dispose de points d’ancrage.
ATTENTION: LA POSITION DANS LE SENS DE LA MARCHE EST TOUT À FAIT DÉCONSEILLÉE
AUX ENFANTS PESANT MOINS DE 9 KG.
français
Installation du siège dans l’automobile:
47
EXO BASIC
1 Installation des ancrages ISOFIX + support leg. SEMI-UNIVERSEL
48
Avec les instructions, vous trouverez une liste des véhicules qui détermine les modèles qui sont aptes pour l’installation de l’ensemble SEMI-UNIVERSEL. Si votre voiture n’apparait pas sur cette liste,
mettez-vous en contact avec le vendeur.
Pour une installation correcte, suivez les étapes suivantes:
1a Enlevez les ancrages ISOfix (10) en faisant
tourner la molette (12) située sur la partie frontale de la base.
1b Guidez les deux ancrages vers les pivots et
poussez jusqu’à ce que les deux côtés restent
bloqués, deux signaux verts sur les ancrages
(10) vous indiqueront que les deux sont enclenchés. Si un ou les deux signaux sont rouges,
essayez de nouveau.
1e Ajustez la hauteur du support leg pour que
ce dernier touche le plancher du véhicule.
1f Pour retirer l’accessoire support leg appuyez
sur les boutons poussoir qui se situent sous le
repose-jambes et tirez vers l’extérieur.
1c Tournez la molette (12) dans le sens contraire pour que le siège s’ajuste contre le dossier
de l’automobile.
Pour enlever le siège avec l’installation ISOfix:
1g Libérez les ancrages en faisant coulisser les
deux boutons de déblocage (11) vers l’intérieur.
Les signaux sur les ancrages (10) seront rouges.
1d Introduisez l’accessoire support leg pour
qu’il arrive jusqu’au fond et qu’on entende un
“click”.
1h Retirez le siège. Vous pouvez garder les
ancrages ISOfix dans la base en tournant la
molette (12).
2 Installation avec ceinture à 3 points
2b Faites passer la sangle d’épaule de la ceinture de l’automobile dans la pince (14) de la
partie haute du siège, seulement celle du côté
opposé à la boucle. Fermez la pince.
2c Poussez l’EXO BASIC contre le siège et tendez manuellement la ceinture de l’automobile.
3 Installation du bébé dans le siège
3a Détendez le harnais en ramenant les sangles par-dessus la boucle de fermeture tout en
appuyant sur le tensionneur.
qu’il est bien assis dans le fond et avec le dos
bien redressé. Assemblez les extrémités des
boucles de la partie supérieure.
3b Ouvrez la boucle (5). Pour faciliter
l’installation du bébé dans le siège, vous
pouvez retenir les ceintures sur les côtés.
3d Introduisez-les dans le système de fermeture et appuyez jusqu’au clic sonore.
3c Installez le bébé dans le siège en vérifiant
français
2a Installez le siège EXO BASIC dans la position la plus basse (voir chapitre 5, inclinaison
du siège). Faites passer la boucle de la ceinture
à trois points entre le socle et le siège (13) et
bouclez-la.
3e Tirez sur la sangle du tensionneur (6).
49
EXO BASIC
4 Réglage du harnais
Ajustement de la hauteur des sangles des épaules.
Vérifiez avec l’enfant correctement assis dans le siège, la position adéquate pour les sangles des
épaules. Ces dernières doivent passer légèrement au-dessus des épaules du bébé. EXO BASIC dispose
de 5 positions de ceinture, lorsqu’on ajuste la hauteur l’appui-tête se déplace. Pour changer la hauteur,
suivez les étapes suivantes:
4a Tirez sur l’anneau situé sur l’appui-tête (4),
cela débloquera l’appui-tête.
4b Déplacez l’appui-tête (3) jusqu’à obtenir
la position souhaitée pour le bébé et lâchez
l’anneau. Bougez l’appui-tête jusqu’au clic sonore indiquant le blocage. Tirez sur l’appui-tête
pour vérifier qu’il est bien fixé.
5 Inclinaison du siège
Le siège-auto EXO BASIC s’incline grâce à un
levier situé sur la partie frontale (16). Il dispose
de 4 positions.
50
Pour incliner le siège, tirez sur la manette (16)
et mettez le siège dans la position désirée.
•Ne laissez jamais l’enfant seul.
•Une détérioration du dispositif, un ajout ou
une modification quelconque sans l’autorisation de JANE peut altérer gravement la sécurité
de ce système de retenue.
•Ne pas suivre attentivement les instructions
pour utiliser correctement le système de retenue peut s’avérer dangereux pour la sécurité de
l’enfant.
•Ce dispositif de sécurité ne peut pas être uti-
lisé sans sa housse, ni être remplacé par une
autre non agréée, car cette dernière fait partie
intégrante du dispositif de sécurité.
•Assurez-vous que le siège-auto a été correctement installé.
•Vérifiez que la ceinture n’est pas restée coincée entre les sièges rabattables ou les portières.
•NE pas utiliser le siège-auto dans le sens de
la marche pour des bébés pesant moins de 9
Kg.
français
ATTENTION
51
EXO BASIC
RECOMMANDATIONS
52
•Gardez ce manuel d’instructions pour pouvoir
le consulter ultérieurement. Emmenez-le toujours dans son compartiment situé sur le côté de
la base (17).
•Vérifiez qu’à l’intérieur de l’automobile,
l’équipement comme tout autre objet susceptible de pouvoir blesser en cas d’accident, est
correctement fixé et retenu.
•Le siège-auto EXO BASIC devra être correctement fixé avec les ceintures de sécurité, même
lorsqu’on ne l’utilise pas, car en cas d’accident
il pourrait être projeté et blesser les occupants
du véhicule.
•Souvenez-vous qu’on ne doit pas utiliser le
siège-auto EXO BASIC dans les autos avec un
air-bag frontal, à moins de pouvoir le déconnecter ou le désactiver, ce dont vous devrez
vous informer auprès du fabricant ou revendeur de votre automobile.
Ne laissez pas la housse exposée en plein soleil durant une longue période, lorsque vous
n’utilisez pas le siège recouvrez-le ou rangezla dans le compartiment range-accessoires.
Lavez les parties en plastique avec de l’eau
tiède et du savon, puis séchez l’ensemble
consciencieusement. La housse peut se retirer pour être lavée. Suivez les instructions
suivantes:
Déhousser l’appui-tête. Retirer la partie de la
housse située tout autour du siège. Ouvrir le
velcro situé sur la partie centrale et retirer la
housse.
Ne jamais laver à une température supérieure
à 30°C.
Pour remettre la housse en place, suivre ces
mêmes étapes dans le sens inverse.
Pour votre sécurité comme pour la bonne conservation de ce produit, il est très important
que vous effectuiez un contrôle périodique
dans un de nos ateliers.
français
ENTRETIEN
53
EXO BASIC
INFORMATIONS SUR LA GARANTIE
54
Cet article dispose d’une garantie comme stipulé
dans la loi 23 / 2003 du 10 juillet 2003. Conserver
le ticket de caisse, sa présentation dans le magasin où vous avez acquis le produit est indispensable pour justifier toute réclamation.
Sont exclues de la présente garantie les défectuosités et les pannes dues à une utilisation inadéquate du produit, ou liés à un manquement aux
normes de sécurité ou d’entretien décrites dans
les pages d’instructions et sur les étiquettes de
lavage, de même que les éléments usés par une
utilisation normale et journalière.
L’étiquette qui contient le numéro du châssis de
votre modèle, ne doit être arrachée sous aucun
prétexte, elle contient des informations très importantes.
Attention:
Pour obtenir un maximum de sécurité et
d’attentions, il est très important que vous remplissiez la carte d’enregistrement que vous trouverez sur la page www.jane.es
L’enregistrement vous permettra de vous informer, si nécessaire, sur l’évolution et l’entretien
de votre produit. De même, si vous le souhaitez,
nous pourrons vous informer sur les nouveaux
modèles et les informations pouvant vous intéresser.
Istruzioni generali
A-Parti del seggiolino EXO BASIC
B-Parti della vostra auto
Prestazioni del vostro seggiolino EXO BASIC
1 Installazione con ancoraggi ISOFIX + support leg. SEMI-UNIVERSALE
2 Installazione con cintura a tre punti
3 Collocazione del bebè nel seggiolino
4 Regolazione dell’imbragatura
5 Inclinazione del seggiolino
Attenzione
Raccomandazioni
Manutenzione
57
58
59
60
62
63
63
64
64
65
66
67
italiano
INDICE
55
EXO BASIC
56
Il vostro nuovo EXO BASIC di JANÉ è un seggiolino auto disegnato per proteggere il bambino
a partire dai 9 mesi circa (9 Kg. di peso) fino
ai 4 anni di età approssimativamente (18 Kg.
di peso).
EXO BASIC ha superato le rigide prove di sicurezza della direttiva Europea ECE 44/04 per il
gruppo 1.
Poiché è dotato di barra antirotazione, EXO
BASIC è un seggiolino di categoria semi-universale. Ciò significa che il seggiolino si può
montare solo sui veicoli che compaiono sulla
“lista dei veicoli” allegata al presente manuale. La lista sempre aggiornata è disponibile sul
nostro sito web www.jane.es
È molto importante leggere attentamente le
presenti istruzioni prima di utilizzare il seggiolino EXO BASIC per la prima volta. Assicurarsi
che tutti coloro che lo useranno siano informati
riguardo l’installazione e l’uso corretti. È stato
provato che una elevata percentuale di utilizzatori di seggiolini di sicurezza non installa correttamente il seggiolino. Perciò, comprendere
i manuali di istruzioni e applicare correttamente ciò che dicono è importante per la sicurezza
quanto il seggiolino stesso.
Conservare le istruzioni e la guida rapida nel
compartimento situato nella parte laterale della base, consultarle in caso di dubbio. Si possono anche trovare nella nostra pagina Web:
www.jane.es
ISTRUZIONI GENERALI
•Il vostro seggiolino EXO BASIC può essere installato sia sul sedile anteriore, se non è dotato di AirBag, che su quello posteriore dell’auto. In ogni caso, si consiglia l’installazione sui sedili posteriori. Se
si colloca sul sedile anteriore dell’auto, questo NON deve essere provvisto di AIR-BAG o deve essere
scollegato.
•È valido esclusivamente per auto dotate di cinture automatiche a tre punti di ancoraggio, omologate
secondo il regolamento ECE-16 o altre norme equivalenti. NON usare con una cintura a due punti di
ancoraggio.
•Non tutti i sistemi di sicurezza sono esattamente uguali, ragion per cui si consiglia sempre di controllare l’EXO BASIC da montare nell’auto.
•È molto importante non utilizzare prodotti di seconda mano, JANÉ solo garantisce la totale sicurezza
degli articoli usati dal suo primo acquirente.
•JANÉ raccomanda di sostituire il seggiolino EXO BASIC per uno nuovo nel caso in cui sia stato sottoposto a violente tensioni dopo un incidente.
•Controllare che tutte le cinture si trovino nella loro corretta posizione e debitamente allacciate al
vostro EXO BASIC. Verificare che nessuna cintura sia attorcigliata. Bisogna far comprendere al bambino che non deve in nessun caso manipolare le cinture o gli agganci delle stesse
•Questo seggiolino è stato creato per essere usato esclusivamente nell’auto, non deve essere usato
fuori dalla stessa.
italiano
Allo scopo di proteggere adeguatamente il bambino e di garantire il suo comfort e fissaggio
all’interno dell’auto, sarà necessario rispettare le seguenti istruzioni:
57
EXO BASIC
A- Parti del seggiolino EXO BASIC
58
1_ Pedana, base
2_ Seduta
3_ Poggiatesta
4_ Tirante regolazione altezza poggiatesta
5_ Fibbia 5 punti
6_ Tensore imbragatura
7_ Cinture pettorali
8_ Spallacci
9_ Cinghia spartigambe
10_ Ancoraggi Isofix
11_ Bottoni sblocco ISOfix
12_ Pomello regolazione Isofix
13_ Passante cintura addominale auto
14_ Blocco cinture pettorali
15_ Leva regolazione reclinazione
16_ Scompartimento istruzioni
17_ Barra antirotazione
18_ Leva regolazione altezza
barra antirotazione
19_ Guide ISOfix
20_ Manuale di istruzioni
Cintura a tre punti di ancoraggio. Consta di due
parti ben differenziate:
A Parte sub-addominale o delle spalle, che dalla fibbia passa per il petto e le spalle.
B Parte addominale, è quella che passa sulle
gambe.
D Cintura a due punti di ancoraggio. ATTENZIONE. Non si può installare il seggiolino EXO
BASIC con questo tipo di cinture.
E Fissaggi ISOfix. I fissaggi sono situati nell’intersezione tra il sedile e lo schienale. Non tutti
i sedili né tutte le auto dispongono di questi
fissaggi, per più informazioni consultare il manuale della vostra auto.
italiano
B- Parti della vostra auto
C Fibbia.
59
Prestazioni del vostro seggiolino EXO BASIC
EXO BASIC
Il seggiolino EXO BASIC è stato disegnato grazie agli ultimi avanzi in materia di sicurezza e comfort:
60
1.Il seggiolino EXO BASIC è stato disegnato
grazie agli ultimi avanzi in materia di sicurezza
e comfort:
2.E XO BASIC è dotato di una barra “support
leg” come sistema anti-rotazione.
3.L’altezza delle cinture delle spalle si regola
senza bisogno di ritirare le cinghie. Questo sistema è unito ad un poggiatesta che protegge
meglio in caso di urto laterale e contemporaneamente sostiene la testa.
4.L’interno della seduta è ricoperto con un materiale che assorbe gli impatti. Anche se è ob-
bligatorio utilizzare questo materiale solo nella
zona della testa, il seggiolino EXO BASIC ne è
rivestito in tutta la superficie a contatto con il
bambino, compresa la zona dei piedi.
5. Il seggiolino è dotato di ampie finestrelle di
areazione.
Il seggiolino EXO BASIC deve essere installato nella DIREZIONE DI MARCIA. Preferibilmente sui sedili
posteriori e mai su sedili dotati di Air-Bag frontale. Se si desidera installare il seggiolino con i fissaggi
ISOFIX, assicurarsi che il posto in cui sarà installato disponga dei fissaggi adeguati.
ATTENZIONE. LA POSIZIONE VISO VERSO LA MARCIA È TOTALMENTE SCONSIGLIATA PER
BEBÈ CON MENO DI 9 KG. DI PESO.
italiano
Installazione del seggiolino nell’automobile:
61
EXO BASIC
1 Installazione con ancoraggi ISOFIX + support leg. SEMI-UNIVERSALE
Insieme alle istruzioni, troverà una lista di veicoli che indica quali modelli sono adatti per l’installazione
del set SEMI-UNIVERSALE. Se il suo veicolo non compare nella lista, si metta in contatto con il rivenditore.
Per una corretta installazione osservare le istruzioni seguenti:
1a Estrarre gli ancoraggi ISOfix (10) girando il
pomello (12) che si trova sulla parte frontale
della base.
1b Portare entrambi gli ancoraggi a contatto
con gli assi e premere fino a che entrambi i lati
restano bloccati. Due segnali verdi sugli ancoraggi (10) ne indicheranno il corretto fissaggio.
Se uno o entrambi i segnali dovessero essere
rossi, ripetere l’operazione.
1c Girare il pomello (12) in senso contrario affinché il seggiolino aderisca allo schienale del
sedile dell’auto.
62
1d Introdurre l’accessorio support leg fino in
fondo. Si dovrà sentire un “clic”.
1e Regolare l’altezza del support leg in modo
che appoggi sul fondo del veicolo.
1f Per rimuovere l’accessorio support leg, premere i pulsanti che si trovano sotto il poggiapiedi e tirare verso l’esterno.
Per togliere il seggiolino quando si usa
ISOfix:
1g Sganciare gli ancoraggi spostando entrambi
i pulsanti di sblocco (11) verso l’interno. I segnali sugli ancoraggi (10) diventeranno rossi.
1h Rimuovere il seggiolino. Gli ancoraggi ISOfix possono essere riposti dentro la base girando il pomello (12).
2 Installazione con cintura a tre punti
2b Far passare la parte pettorale della cintura
del veicolo attraverso la pinza (14) della parte
alta del seggiolino (solo quella che si trova sul
lato contrario alla fibbia). Chiudere la pinza.
2c Premere il seggiolino EXO BASIC contro il
sedile e tendere manualmente le cinture del
veicolo.
3 Collocazione del bebè nel seggiolino
3a Allentare l’imbragatura tirando le cinghie
sopra la fibbia mentre si preme il bottone tensore.
3c Collocare il bebè nella seduta assicurandosi
che sia seduto correttamente e con la spalla
dritta. Unire le estremità superiori delle fibbie.
3b Sbottonare la fibbia (5). Per facilitare la collocazione del bebè nel seggiolino, si possono
fissare le cinture nelle cinghie dei laterali.
3d Introdurle nella chiusura e premere fino ad
udire un clic.
3e Tirare la cinghia di tensione (6).
italiano
2a Portare il seggiolino EXO BASIC nella posizione più reclinata (vedi paragrafo 5, reclinazione del seggiolino). Far passare la fibbia delle
cinture a 3 punti tra la base e il seggiolino (13)
e agganciarla.
63
EXO BASIC
4 Regolazione dell’imbragatura
Regolazione dell’altezza della cinghia delle spalle.
Con il bambino correttamente seduto sul seggiolino, verificare la posizione adeguata delle cinture
pettorali. Devono trovarsi leggermente al di sopra delle spalle del bambino. EXO BASIC dispone di
5 posizioni delle cinture. Per regolare l’altezza spostare il poggiatesta compiendo le seguenti operazioni:
4a Tirare l’anello situato sul poggiatesta (4),
che sbloccherà il poggiatesta.
4b Spostare il poggiatesta (3) fino alla posizione idonea al bebè e rilasciare l’anello.
Muovere il poggiatesta fino a udire un clic di
blocco. Tirare il poggiatesta per comprovarne
il fissaggio.
5 Inclinazione del seggiolino
Il seggiolino EXO BASIC si reclina per mezzo di
una leva situata nella parte frontale del seggiolino (16). Dispone di 4 posizioni.
64
Per reclinare il seggiolino tirare la leva (16) e
spostare il seggiolino fino alla posizione desiderata.
•Non lasciare mai il bambino da solo.
•Qualsiasi alterazione o aggiunta al dispositivo senza l’opportuna autorizzazione di JANÉ
può alterare gravemente la sicurezza del sistema di ritenuta.
•Non seguire attentamente le istruzioni per il
corretto uso del sistema di ritenuta può essere
pericoloso per la sicurezza del bambino.
•Questo dispositivo di sicurezza non può
essere usato senza il suo rivestimento, né es-
sere sostituito con un altro che non sia quello
originale, giacché forma parte integrante delle
caratteristiche di sicurezza del sistema.
• Comprovare che il seggiolino sia stato collocato correttamente.
•Assicurasi che la cintura non sia rimasta impigliata tra i sedili abbattibili o le porte.
•NON utilizzare il seggiolino nella direzione di
marcia per bebè con meno di 9 Kg. di peso
italiano
ATTENZIONE
65
EXO BASIC
RACCOMANDAZIONI
66
•Conservare questo libretto d’istruzioni per
future consultazioni. Tenerlo sempre nel suo
compartimento situato nella parte laterale della base (17).
•Assicurarsi che all’interno dell’auto, i bagagli
e qualsiasi altro oggetto suscettibile di causare
danni in caso d’incidente siano correttamente
fissati o conservati.
•Il seggiolino EXO BASIC dovrà essere debita-
mente fissato con le cinture di sicurezza, anche
nel caso in cui non si stia utilizzando, infatti, in
caso d’incidente, potrebbe urtare violentemente provocando danni ai passeggeri del veicolo.
•Ricordare di non usare il seggiolino EXO BASIC nelle auto provviste di air-bag frontale, a
meno che non venga scollegato o disattivato,
in questo caso bisognerà consultare il fabbricante o rivenditore dell’auto.
MANUTENZIONE
Lavare a una temperatura non superiore a
30°C.
Per montare di nuovo il rivestimento seguire gli
stessi passi al contrario.
È importante sottoporre il prodotto a una revisione periodica in uno qualunque dei nostri
centri ufficiali, sia per la sua sicurezza che per
la buona conservazione del prodotto stesso.
italiano
Non esporre il rivestimento al sole durante
lunghi periodi, quando non si usa il seggiolino
coprirlo o conservarlo nel portabagagli.
Lavare le parti di plastica con acqua tiepida
e sapone, asciugando posteriormente tutti gli
elementi attentamente. Il rivestimento si può
smontare per essere lavato. Seguire le seguenti
istruzioni:
Sfoderare la testata. Togliere il rivestimento
attorno all’ala del seggiolino. Aprire il velcro
situato nella parte centrale e rimuovere il rivestimento.
67
EXO BASIC
INFORMAZIONI SULLA GARANZIA
68
Questo articolo è completo di garanzia, secondo quanto stabilito dalla legge 23 del 10 luglio
2003. Conservare lo scontrino d’acquisto, poiché
in caso di reclami sarà necessario presentarlo al
negozio dove è stato acquistato il prodotto per
dimostrare la validità della garanzia.
Sono esclusi dalla presente garanzia i difetti o
le avarie dovuti a un uso non adeguato del prodotto o al mancato compimento delle norme di
sicurezza e manutenzione descritte nei libretti
di istruzioni e sulle etichette per il lavaggio. Lo
stesso vale per i danni dovuti all’usura in caso di
utilizzo prolungato.
L’etichetta che contiene il numero di telaio del
modello non deve essere rimossa in nessun caso,
dato che contiene informazioni importanti.
Attenzione:
Per garantire la massima sicurezza e consulenza
riguardo il suo nuovo JANÉ, è molto importante
compilare il modulo di registrazione che troverà
sul sito www.jane.es
La registrazione le consentirà di essere informato,
se è necessario, riguardo l’evoluzione e la manutenzione del suo prodotto. Inoltre, sempre se lo
desidera, la potremo informare sui nuovi modelli
o altre novità che riteniamo di suo interesse.
Ogólne Instrukcje
A-Części fotelika EXO BASIC
B-Części pojazdu
Właściwości fotelika EXO BASIC
1 Instalacja za pomocą zaczepów + support leg. System CZĘŚCIOWO UNIWERSALNY
2 Instalacja za pomocą trzypunktowego pasa bezpieczeństwa
3 Zapięcie dziecka w foteliku
4 Regulowanie pasków
5 Ustawianie fotelika
Uwaga
Zalecenia
Konserwacja
71
72
73
74
76
77
77
78
78
79
80
81
polski
SPIS TRESCI
69
EXO BASIC
70
Państwa nowy EXO BASIC firmy JANÉ to fotelik chroniący dziecko podczas jazdy samochodem, przeznaczony dla dzieci w wieku
od około 9 miesięcy (od 9 kg wagi) do około
4 lat (do 18 kg wagi).
Fotelik EXO BASIC zdał wymagające testy
bezpieczeństwa europejskiej dyrektywy ECE
44/04 dla grupy 1.
EXO BASIC został wyposażony w nóżkę
przeciwobrotową i należy do kategorii
„częściowo uniwersalnej”. Oznacza to,
że ten fotelik może zostać zainstalowany
jedynie w samochodach wymienionych na
„liście pojazdów” załączonej do niniejszej
instrukcji obsługi. Mogą Państwo zapoznać
się z aktualizacjami w/w listy na stronie internetowej www.jane.es
Bardzo ważne jest, by przed pierwszym
użyciem fotelika EXO BASIC uważnie przeczytali Państwo niniejszą instrukcję. Prosimy upewnić się, by wszystkie te osoby, które
kiedykolwiek będą używać fotelika, również
zapoznały się z jego prawidłową instalacją i
obsługą. Dowiedziono, że znaczny procent
użytkowników fotelików bezpieczeństwa
nie instaluje ich prawidłowo, dlatego zrozumienie instrukcji obsługi i poprawne wykonanie zawartych w niej zaleceń jest ważne
dla bezpieczeństwa dziecka i samego fotelika.
Należy przechowywać te instrukcje oraz
krótki podręcznik w schowku znajdującym
się z boku podstawy oraz konsultować je
w razie wątpliwości. Można je również
znaleźć na naszej stronie internetowej:
www.jane.es
OGÓLNE INSTRUKCJE
• Państwa fotelik EXO BASIC może zostać zamocowany zarówno na przednim siedzeniu,
jeśli Państwa samochód nie posiada poduszki powietrznej, jak i na tylnym fotelu pojazdu.
Jednakże zalecane jest mocowanie fotelika na tylnich siedzeniach. Jeśli fotelik będzie umieszczony na przednim fotelu pojazdu, to wówczas samochód ten NIE powinien być wyposażony
w PODUSZKĘ POWIETRZNĄ lub powinien mieć ją wyłączoną
• Nadaje się jedynie dla pojazdów wyposażonych w automatyczne trzypunktowe pasy
bezpieczeństwa, homologowane przez regulamin ECE 16 lub inne równoważne przepisy. Nie
stosować z dwupunktowymi pasami bezpieczeństwa.
• Nie wszystkie systemy bezpieczeństwa są takie same, dlatego też zalecamy, byście wypróbowali Państwo foteliki EXO BASIC w tym pojeździe, w którym zostanie on zainstalowany.
• Jest niezwykle istotne nieużywanie produktów z drugiej ręki, ponieważ JANÉ może jedynie
zagwarantować stuprocentowe bezpieczeństwo dla artykułów używanych przez pierwszego
nabywcę.
• JANÉ zaleca zastąpienie fotelika EXO BASIC nowym, jeśli stary fotelik został poddany
gwałtownym naprężeniom po wypadku.
• Należy sprawdzić, czy wszystkie pasy bezpieczeństwa znajdują się we właściwej pozycji i czy
odpowiednio przylegają do fotelika EXO BASIC. Należy się upewnić, czy żaden z pasów nie
jest poskręcany. Należy wytłumaczyć dziecku, że w żadnym wypadku nie może ruszać pasów
bezpieczeństwa lub ich zapięć.
• Ten fotelik został zaprojektowany do stosowania go wewnątrz pojazdu i z tego też względu
nie powinien być używany poza nim.
polski
Aby właściwie zabezpieczyć dziecko oraz zapewnić mu komfort i właściwe zapięcie wewnątrz
pojazdu, konieczne będzie, byście przestrzegali Państwo poniższych instrukcji:
71
EXO BASIC
A- Części fotelika EXO BASIC
72
1_ Stelaż, podstawa
2_ Siedzisko
3_ Zagłówek
4_ Uchwyt do regulacji wysokości zagłówka
5_ Zapięcie pięciopunktowe
6_ Napinacz pasków
7_ Pasek barkowy
8_ Ochraniacze na ramiona wyścielane gąbką
9_ Pasek kroczny
10_ Zaczepy Isofix
11_ Przyciski odblokowujące system ISOfix
12_ Pokrętło do regulacji Isofix
13_ Opaska na biodrowy pas bezpieczeństwa
pojazdu
14_ Blokada pasa barkowego
15_ Płytka do regulacji ustawienia fotelika
16_ Schowek na instrukcję obsługi
17_ Nóżka przeciwobrotowa
18_ Przycisk do regulacji długości nóżki
przeciwobrotowej
19_ Uchwyty ISOfix
20_ Instrukcja obsługi
Trzypunktowy pas bezpieczeństwa. Składa
się z dwóch części:
A Część górna lub barkowa, która wychodzi ze sprzączki i opasuje klatkę piersiową
i ramiona.
B Część biodrowa pasa, która jest zapinana
wokół pasa.
C Sprzączka.
D Dwupunktowy pas bezpieczeństwa. UWAGA. Nie można instalować fotelika EXO BASIC z pasami bezpieczeństwa tego typu.
E Uchwyty ISOfix. Uchwyty znajdują się w
szczelinie pomiędzy siedziskiem a oparciem. Nie wszystkie siedzenia ani też nie
wszystkie pojazdy są wyposażone w te
uchwyty, należy zapoznać się z instrukcjami
obsługi pojazdu w celu uzyskania dodatkowych informacji.
polski
wa
B- Części pojazdu
73
Właściwości fotelika EXO BASIC
EXO BASIC
Fotelik EXO BASIC został wyposażony w najnowocześniejsze osiągnięcia w dziedzinie
bezpieczeństwa i komfortu:
74
1.Fotelik EXO BASIC może być mocowany
za pomocą trzypunktowych pasów bezpieczeństwa lub zaczepów ISOfix.
2.EXO BASIC został wyposażony w akcesorium „support leg” pełniące rolę zabezpieczenia przeciwobrotowego.
3.Wysokość pasków barkowych jest regulowana bez konieczności odpinania ich. Do
w/w właściwości należy zaliczyć zagłówek,
który lepiej chroni główkę dziecka w przypadku zderzenia bocznego i służy także do
lepszego podtrzymywania główki.
4. Wnętrze fotelika jest pokryte materiałem absorbującym uderzenia. Chociaż zastosowanie tego materiału jest wyłącznie
obowiązkowe w przypadku zagłówka, to w
foteliku EXO BASIC został on zastosowany
na całej powierzchni będącej w styczności
dzieckiem, nawet w oparciu na nogi.
5.Fotelik został wyposażony w duże otwory
wentylacyjne.
Fotelik EXO BASIC powinien być instalowany W KIERUNKU JAZDY. Zaleca się instalowanie fotelika
na tylnich siedzeniach i nigdy nie należy go instalować na siedzeniach wyposażonych w przednią
poduszkę powietrzną. Jeśli chcą Państwo zainstalować fotelik za pomocą zaczepów ISOFIX, należy
się upewnić czy siedzenie, na którym będzie on instalowany, jest wyposażone w te uchwyty.
UWAGA. ODRADZA SIĘ STOSOWANIE POZYCJI W KIERUNKU JAZDY W PRZYPADKU
NIEMOWLĄT O WADZĘ MNIEJSZEJ NIŻ 9 KG.
polski
Instalowanie fotelika w samochodzie:
75
1 Instalacja za pomocą zaczepów + support leg. System CZĘŚCIOWO UNIWERSALNY
Do niniejszej instrukcji została dołączona lista pojazdów określająca, w których modelach
możliwa jest instalacja zespołu z systemem CZĘŚCIOWO UNIWERSALNYM. Jeśli Państwa pojazdu nie ma na tej liście, proszę skontaktować ze sprzedawcą.
EXO BASIC
W celu poprawnej instalacji należy postępować wg poniższych wskazówek:
76
1a Wysunąć zaczepy ISOfix (10) obracając
pokrętło (12) na przedzie podstawy.
1b Ustawić obydwa zaczepy naprzeciw
otworów i docisnąć do momentu ich zablokowania, dwie zielone kreski w okienkach (10) pokażą, czy obydwa zaczepy zostały
zamocowane. Jeżeli obydwa okienka
zostały zaznaczone na czerwono, należy
ponownie zamocować zaczepy.
1c Obrócić pokrętło (12) w przeciwnym
kierunku po to, by fotelik został dociśnięty
do oparcia samochodu.
1d Włożyć akcesorium support leg do oporu do momentu, kiedy zabrzmi charakterystyczny dźwięk zatrzaśnięcia.
1e Wyregulować długość akcesorium support leg, tak, by opierało się o podłogę
samochodu.
1f Aby zdemontować akcesorium Support
leg, nacisnąć przyciski znajdujące się pod
podnóżkiem i pociągnąć za akcesorium do
przodu.
Aby odinstalować fotelik przy zastosowaniu systemu ISOfix:
1g Odblokować zaczepy, równocześnie
dociskając obydwa przyciski odblokowania
(11) do środka. Okienka zaczepów (10)
zostaną zaznaczone na czerwono.
1h Wyjąć fotelik. Można schować zaczepy
ISOfix w podstawie obracając pokrętło (12).
2 Instalacja za pomocą trzypunktowego pasa bezpieczeństwa
2b Przeciągnąć pas barkowy pasa bezpieczeństwa przez zacisk (14) w górnej części
siedzenia, zlokalizowany po przeciwnej
stronie niż sprzączka pasa. Zamknąć zacisk.
2c Docisnąć EXO do siedzenia samochodu i
napiąć ręcznie pas bezpieczeństwa.
3 Zapięcie dziecka w foteliku
3a Poluzować paski poprzez pociągnięcie
za paski nad sprzączką, naciskając równocześnie na przycisk napinacza.
3b Odpiąć sprzączkę (5). Aby uprościć czynność zapinania dziecka w foteliku, można
przytrzymać pasy za boki.
3c Posadzić dziecko na foteliku, upewniw-
szy się, że siedzi prosto i jest dosunięte do
oparcia. Złączyć górne końce sprzączki.
polski
2a Umieścić fotelik EXO BASIC w najbardziej
rozwartej pozycji (patrz punkt 5, regulacja
oparcia). Przeciągnąć sprzączkę trzypunktowego pasa bezpieczeństwa pomiędzy
ramą i fotelikiem (13) i zapiąć ją.
3d Włożyć je do zamka i docisnąć, aż zaskoczą.
3e Pociągnąć za pasek napinający (6).
77
EXO BASIC
4 Regulowanie pasków
Regulowanie wysokości paska barkowego.
Sprawdzić, czy dziecko siedzi w foteliku we właściwej pozycji i skontrolować prawidłowe ustawienie pasków barkowych. W/w paski powinni znajdować się nieco ponad ramionami niemowlęcia.
EXO BASIC posiada 5 pozycji pasków, podczas regulacji ich wysokości zmienia się pozycja
zagłówka. Aby zmienić ustawienie zagłówka, należy postępować wg poniższych wskazówek:
4a Pociągnąć za kółeczko znajdujące się w
zagłówku (4), dzięki czemu zagłówek zostanie odblokowany.
5 Ustawianie fotelika
Pozycja fotelika EXO BASIC jest ustawiana za pomocą drążka znajdującego się w
jego przedniej części (16). Dysponujemy
pięcioma pozycjami.
78
4b Wysunąć zagłówek (3) do potrzebnej wysokości i puścić kółeczko. Poruszać
zagłówkiem aż do momentu, kiedy zaskoczy. Pociągnąć za zagłówek celem sprawdzenia, czy jest zablokowany.
Aby ustawić fotelik w danej pozycji, należy
nacisnąć przycisk (16) i przesunąć fotelik do
pożądanej pozycji.
• Nigdy nie należy pozostawiać dzieci bez
opieki.
• Wszelkie zmiany lub akcesoria do urządzenia nieautoryzowane przez JANÉ mogą
poważnie naruszyć zabezpieczenia systemu
bezpieczeństwa biernego.
• Niedokładne przestrzeganie instrukcji
obsługi służących do właściwego zastosowania systemu bezpieczeństwa biernego
może stanowić zagrożenie dla bezpieczeństwa dziecka.
• To urządzenie bezpieczeństwa nie może
być stosowane bez swojego pokrowca,
który nie może zostać zastąpiony nieoryginalnym pokrowcem, ponieważ stanowi on
integralną część właściwości ochronnych
systemu.
• Należy sprawdzić, czy fotelik został poprawnie zamocowany.
• Należy sprawdzić, czy pas bezpieczeństwa
nie został przytrzaśnięty przez rozkładane
siedzenia lub drzwi.
• NIE należy stosować fotelika ustawionego w kierunku jazdy dla dziecka o wadzę
mniejszej niż 9 kg.
polski
UWAGA
79
EXO BASIC
ZALECENIA
80
• Zachować te instrukcje do przyszłych konsultacji. Instrukcje powinny zawsze znajdować się
w schowku mieszczącym się z boku podstawy
(17).
• Upewnić się, by wewnątrz samochodu zarówno bagaże jak i wszelkie inne przedmioty
mogące spowodować obrażenia w razie wypadku były właściwie zamocowane lub schowane.
• Fotelik EXO BASIC powinien być odpowiednio
zamocowany za pomocą pasa bezpieczeństwa,
nawet jeśli nie jest w danej chwili używany,
ponieważ w razie wypadku może zostać rzucony
powodując obrażenia u pasażerów pojazdu.
• Należy pamiętać o niestosowaniu fotelika EXO
BASIC w pojazdach wyposażonych w przednią
poduszkę powietrzną, chyba że istniałaby
możliwość jej odłączenia lub dezaktywacji,
którą to opcję należy skonsultować z producentem lub z punktem sprzedaży pojazdu.
KONSERWACJA
Rozpiąć pokrowiec w środkowej części i
ściągnąć go.
Prać w temperaturze nieprzekraczającej 30ºC.
Aby ponownie założyć pokrowiec należy
wykonać powyższe instrukcje w odwrotnej
kolejności.
W celu zapewnienia bezpieczeństwa i utrzymania produktu w odpowiednim stanie, należy go
poddawać okresowym przeglądom w dowolnym
warsztacie JANÉ.
polski
Nie wystawiać pokrowca na działanie promieni
słonecznych przez dłuższy okres czasu, jeśli fotelik nie jest używany w danej chwili przykryć
go lub schować go do bagażnika.
Części plastikowe myć letnią wodą i mydłem,
starannie susząc potem wszystkie te elementy. Pokrowiec można zdjąć w celu wyprania.
Należy w tym celu przestrzegać poniższych
instrukcji:
Zdjąć pokrowiec z zagłówka. Zdjąć pokrowiec
okalający skrzydło siedzenia.
81
EXO BASIC
INFORMACJA GWARANCYJNA
82
Niniejszy produkt objęty jest gwarancją zgodnie
z ustawą 23/2003 z 10 lipca 2003 roku. Prosimy o
zachowanie dowodu zakupu, gdyż w razie jakichkolwiek reklamacji konieczne jest jego przedstawienie w miejscu zakupu produktu.
Gwarancja nie obejmuje wad lub uszkodzeń
powstałych w wyniku nieodpowiedniego
użytkowania artykułu lub niestosowania się do
zasad bezpieczeństwa i konserwacji, opisanych
w niniejszej instrukcji obsługi oraz na etykietach
dotyczących prania. Gwarancja nie obejmuje
również części podlegających normalnemu
zużyciu, związanemu z codzienną eksploatacją.
Pod żadnym pozorem nie należy odrywać tabliczki z numerem podwozia modelu, ponieważ
zawiera ona ważne informacje.
Uwaga:
Aby zapewnić optymalne bezpieczeństwo i
uzyskać więcej informacji dotyczących Państwa
nowego produktu JANÉ, prosimy o wypełnienie
formularza rejestracyjnego znajdującego się na
stronie www.jane.es
Po rejestracji będą Państwo mogli śledzić
nowości związane z Państwa produktem oraz,
w razie konieczności, zapoznać się z instrukcją
jego konserwacji. Ponadto, za Państwa zgodą,
będziemy mogli informować Państwa o nowych
modelach i innych nowościach, które mogłyby
Państwa zainteresować.
Общая Инструкция
A-Устройство Автокресла ЕXO BASIC
B-Части салона вашего автомобиля
Особенности Вашего Кресла ЕXO BASIC
1 Установка с креплениями ISOFIX + опорная стойка ПОЛУУНИВЕРСАЛЬНАЯ
2 Установка с трехточечным ремнем безопасности
3 Усадить ребенка в кресло
4 Отрегулировать плечевые ремни по высоте
5 Регулировка наклона автокресла
Внимание
Рекомендации
Уход
85
86
87
88
90
91
91
92
92
93
94
95
pусский
СОДЕРЖАНИЕ
83
EXO BASIC
84
Вашa новaя модель EXO BASIC от JANEэто кресло, разработаноe для защиты
в автомобиле ребенка от 9 месяцев (вес
ребенка от 9 кг) и примерно до 4 лет (вес
ребенка 18 кг).
Kонструкция EXO BASIC соответствует
самим строгим требованиям Европейского Стандарта Безопасности ECE 44/04 для
группы 1.
EXO BASIC оснащено стойкой, предотвращающей вращение и поэтому относится к «полууниверсальной» категории. Это означает,
что кресло можно устанавливать только в
автомобилях, которые имеются в «перечне
автомобилей», являющимся приложением к
данному руководству пользователя. Обновление этого списка можно найти на нашей
Web-странице: www.jane.es
Очень важно внимательно прочитать данные инструкции перед установкой кресла
EXO BASIC в первый раз. Убедитесь, что все
взрослые, которые когда-нибудь будут пользоваться этим креслом, ознакомлены с его
правильной установкой и использованием.
Проверено, что во многих случаях кресла
безопасности устанавливают неправильно.
Поэтому понять инструкции по эксплуатации
и правильно применять их, также важно для
безопасности ребенка, как и само кресло.
Храните руководство по эксплуатации в специально отведенном для этого месте в боковой части основания автокресла. Eсли у Вас
возникнут вопросы в процессе пользования
креслом, читайте Руководство по эксплуатации. Руководство по эксплуатации кресла
ЕХО также можно найти на нашей странице
Web: www.jane.es.
Чтобы обеспечить максимальную безопасность ребенка и его комфорт в автомобиле, необходимо соблюдать следующую инструкцию:
• Ваше кресло EXO BASIC может быть установлено как на переднем, если оно не оборудовано воздушной подушкой безопасности, так и на заднем сиденье автомобиля. В большинстве случаев, рекомендуется устанавливать его на заднем сиденье. Если Вы устанавливаете кресло на переднем сиденье, оно не должно быть оборудовано воздушной подушкой
безопасности, или она должна быть отключена.
• Автокресло можно использовать только в автомобилях, оборудованных инерционными
ремнями безопасности с креплением в 3-х точках, что отвечает Европейскому Стандарту
Безопасности ECE-16 или другим аналогичным нормам. НЕ пользоваться ремнем с креплением в 2-х точках.
• Не все системы безопасности одинаковы, поэтому мы советуем Вам опробовать кресло
ЕХО BASIC в автомобиле, где оно будет установлено.
• Очень важно не пользоваться автокреслом, бывшим в употреблении, так как JANE может
гарантировать полную безопасность только изделий, используемых их непосредственным
покупателем.
• JANE рекомендует заменить Ваше кресло EXO BASIC, поврежденное в результате аварии
на новое.
• Проверьте правильное положение всех ремней безопасности и убедитесь, что они затянуты должным образом. Проверьте, чтобы ни один ремень не был перекручен. Объясните
Вашему ребенку, что нельзя играть ремнем безопасности или его застежками.
• Это кресло предназначено для использования в автомобиле, поэтому оно не должно использоваться вне автомобиля.
pусский
ОБЩАЯ ИНСТРУКЦИЯ
85
EXO BASIC
A- УСТРОЙСТВО АВТОКРЕСЛА ЕХО BASIC
86
1_ Основание, база
2_ Кресло
3_ Подголовник
4_ Регулятор высоты подголовника
5_ Пряжка 5 точек
6_ Натяжное приспособление
7_ Плечевой ремень
8_ Мягкие плечевые накладки
9_ Поперечный ремень (между ножек)
10_ Крепежные элементы Isofix
11_ Кнопки разблокировки ISOfix
12_ Ручка регулировки Isofix
13_ Метки для автомобильного поясного ремня
14_ Блокиратор плечевого ремня безопасности
15_ Рычаг, регулирующий наклон
16_ Отсек для хранения инструкций
17_ Стойка, предотвращающая вращение
18_ Рычаг, регулирующий высоту стойки,
предотвращающей вращение
19_ Направляющие ISOfix
20_ Руководство пользователя
Ремень безопасности с креплением в трех
точках. Состоит из двух частей:
A Ремень безопасности с креплением в
трех точках. Состоит из двух частей:
B Поясной ремень, который проходит над
ножками.
C Пряжка.
D Ремень безопасности с креплением в
двух точках. ВНИМАНИЕ. Нельзя устанавливать кресло ЕХО BASIC на пассажирском месте, оборудованном ремнями безопасности такого типа.
E Крепление ISOfix. Крепление находится
между сиденьем и спинкой. Не все сиденья
и не все автомобили имеют эти крепления.
Более подробную информацию Вы найдете в руководстве по эксплуатации.
pусский
B- Части салона вашего автомобиля
87
Особенности Вашего кресла ЕХО BASIC
EXO BASIC
Кресло ЕХО BASIC было сконструировано, учитывая последние достижения в области
безопасности и комфорта:
88
1.EXO BASIC можно устанавливать при
помощи трехточечного ремня безопасности или крепления ISOfix.
2. EXO BASIC оснащено стойкой “support
leg”, являющейся системой предотвращающей вращение.
3.Синхронная регулировка высоты подголовника и внутренних ремней. При регулировании высоты плечей не нужно отодвигать ремешки. Плечевые ремни связаны с
подголовником, который хорошо защищает голову в случае бокового удара.
4.Внутренняя поверхность кресла покрыта материалом поглощающим энергию
удара. Несмотря на то, что требуется использовать данный материал только в
области головы, Ваше кресло EXO BASIC
покрыто им на всей поверхности, соприкасающейся с ребенком, включая зону
ножек.
5. Кресло имеет большие отверстия для
вентиляции.
Кресло EXO BASIC должно устанавливаться по ходу движения автомобиля. Предпочтительно на задних сиденьях и никогда не устанавливайте кресло на переднем сиденье, оборудованном воздушной подушкой безопасности, если она не отключена. Если Вы хотите установить кресло с креплением ISOFIX, убедитесь, что место где Вы собираетесь установить его
оборудовано данным креплением.
ВНИМАНИЕ. ПОЛОЖЕНИЕ ЛИЦОМ ПО ХОДУ ДВИЖЕНИЯ АВТОМОБИЛЯ НЕ РЕКОМЕНДУЕТСЯ ДЛЯ ДЕТЕЙ С ВЕСОМ МЕНЕЕ 9 КГ.
pусский
Установка кресла в автомобиле:
89
1 Установка с креплениями ISOFIX + опорная стойка ПОЛУУНИВЕРСАЛЬНАЯ
Вместе с инструкциями Вы найдете перечень автомобилей, в которых можно устанавливать ПОЛУУНИВЕРСАЛЬНУЮ систему. Если Вашего автомобиля нет в этом списке, свяжитесь с продавцом.
EXO BASIC
Для правильной установки выполняйте следующие шаги:
1a Извлеките крепления ISOfix (10), поворачивая рукоятку (12), расположенную на фронтальной стороне основания.
1b Соедините оба крепления со стержнями и нажимайте до тех пор, пока обе части
не заблокируются. Два зеленых сигнала на
креплениях (10) укажут, что крепежные элементы зафиксированы. Если один или оба
индикатора будут красными, повторите все
сначала.
1c Поверните рукоятку (12) в противоположном
направлении для того, чтобы кресло прижалось к сидению автомобиля.
90
1d Вставляйте опорную стойку до конца,
пока не услышите щелчок.
1e Отрегулируйте высоту опорной стойки,
чтобы она упиралась в дно автомобиля.
1f Чтобы убрать опорную стойку нажмите на
кнопки, находящиеся под подставкой для ног
и потяните на себя.
Чтобы снять кресло, установленное при
помощи ISOfix:
1g Освободите крепления, передвинув кнопки разблокировки (11) внутрь. Индикаторы
креплений (10) будут красными.
1h Снимите кресло. Вы можете спрятать крепления ISOfix внутри основания, поворачивая рукоятку (12).
2 Установка с трехточечным ремнем безопасности
2b Проденьте плечевой автомобильный ремень в зажим (14) верхней части сидения,
только со стороны противоположной пряжке. Закройте зажим.
2c Прижмите кресло EXO BASIC к сидению
и затяните вручную автомобильный ремень
безопасности.
3 Усадить ребенка в кресло
3a Ослабьте ремень, потянув за ремешки
над пряжкой, одновременно надавливая на
кнопку натяжного приспособления.
3b Расстегните пряжку (5) Чтобы легче было
посадить ребенка в кресло, можете поддерживать ремни боковыми ремешками.
3c Посадите ребенка в кресло, проверив, что
он сидит глубоко в кресле и с прямой спиной.
Соедините верхние концы пряжек.
pусский
2a Установите кресло EXO BASIC в положение наибольшего наклона (смотреть раздел
5, наклон кресла). Пропустите пряжку трехточечного ремня между базой и креслом (13)
и застегните ее.
3d Вставьте их в замок и жмите, пока не
услышите щелчок.
3e Потяните за натяжное приспособление
для ремня (6).
91
EXO BASIC
4 Отрегулировать плечевые ремни по высоте.
Проверьте, чтобы плечевые ремни правильно проходили через плечи ребенка, они
должны находится немного выше плечей.
С ребенком, сидящим в кресле, проверьте правильное положение плечевых ремней.
Плечевые ремни должны находиться немного выше плечей ребенка. EXO BASIC имеет 5 положений ремня, при регулировке высоты перемещается подголовник.
4a Потяните за кольцо, расположенное
на подголовнике (4).
5 Регулировка наклона автокресла
Угол наклона кресла меняется при
помощи рычага, расположенного на
передней панели кресла (16). Имеет 4
уровней наклона спинки.
92
4b Установите подголовник (3) в положение удобное Вашему малышу и отпустите кольцо. Подвигайте подголовник,
пока не услышите щелчок фиксации.
Толкните подголовник, чтобы убедиться что он закреплен надежно.
Чтобы изменить угол наклона кресла,
потяните рычаг (16) и установите кресло в нужное положение.
• Никогда не оставляйте ребенка без
присмотра.
• Любое изменение или добавление в
устройство без соответствующего разрешения JANE может серъезно нарушить систему безопасности сиденья.
• Несоблюдение инструкции по правильниму использованию удерживающего устройства может быть опасным
для ребенка.
• Это кресло нельзя использовать без
его обивки или заменять другой, не
являющейся оригинальной, поскольку
обивка является составной частью системы безопасности сиденья.
• Проверьте, что кресло установлено
правильно.
• Убедитесь, что ремень безопасности
не защемило дверцей или сиденьями.
• НЕ устанавливать кресло лицом к дороге, если вес ребенка меньше 9 кг.
pусский
ВНИМАНИЕ
93
EXO BASIC
РЕКОМЕНДАЦИИ
94
• Сохраните эту инструкцию для дальнейших обращений к ней. Возите ее всегда в боковом отсеке основания кресла
(17).
• Убедитесь, что Ваш багаж и все предметы, которые могут причинить какойлибо вред во время аварии, закреплены
должным образом или находятся в надежном месте.
• Кресло EXO BASIC должно быть надежно пристегнуто ремнями безопас-
ности, даже если им не пользуются, так
как в случае аварии оно может нанести
травмы пассажирам автомобиля.
• Помните, что кресло ЕХО BASIC нельзя
устанавливать на переднем пассажирском сиденье, в автомобиле, оборудованном воздушной подушкой безопасности, если она не отключена или не
дезактивирована, об этом Вы должны
получить консультацию у изготовителя
или продавца Вашего автомобиля.
УХОД
Стирать при температуре не выше 30º C.
Чтобы надеть чехол выполняйте все в
обратном порядке.
В целях безопасности и для сохранности данного изделия важно, чтобы его
периодически осматривали в любой из
наших официальных мастерских.
pусский
Не оставлять обивку надолго под прямыми солнечными лучами. Если Вы не
пользуетесь креслом, накройте его или
храните в багажном отделении.
Детали из пластика мойте теплым
мыльным раствором, затем тщательно
вытирая их. Обивку можно снять для
стирки. Соблюдайте следующую инструкцию:
Снять обивку с подголовника. Снять
обивку с боковин кресла. Открыть застежку (липучку) в центральной части и
снять обивку.
95
EXO BASIC
ИНФОРМАЦИЯ О ГАРАНТИИ
96
Данное изделие имеет гарантию, предусмотренную законом 23 / 2003 от 10 июля.
Сохраните товарный чек, необходимый
для предъявления в магазине, где Вы
приобрели изделие, для подтверждения
юридической силы в случае любой рекламации.
Данная гарантия не распространяется на
дефекты и поломки, которые являются
результатом неправильной эксплуатации
или нарушения норм безопасности и ухода, описанных в инструкции и на этикетке
по правилам стирки, как и на элементы
естественного износа, появившиеся при
нормальном ежедневном пользовании.
Ни в коем случае не срывайте этикетку с
номером шасси Вашей модели, она содержит важную информацию.
Внимание:
Для максимальной надежности и заботы
о Вашем новом изделии фирмы JANÉ,
очень важно чтобы Вы заполнили регистрационный талон, который Вы найдете
на странице www.jane.es
Регистрация позволит Вам получать информацию, в случае необходимости, об
изменениях и об уходе за вашим изделием. Также всегда, когда Вы пожелаете,
мы можем информировать Вас о новых
моделях и новостях, которые, мы полагаем, будут интересными для Вас.
AFTER SALES SERVICES - EUROPE
FRANCE
PORTUGAL
ITALIA
CZECK REPUBLIC
www.lomatex.com
[email protected]
Tel. 04-37-40-81-71
[email protected]
Te 0351234721040
Janè Service Italia
Via Conche 21
35010 Cadoneghe (Padova)
Tel. 049 8874950
Fax. 049 8879280
[email protected]
POLSKA
www.jane.pl
[email protected]
Tel.012 61 44 151
RUSSIA
GERMANY
[email protected]
UK
[email protected]
Tel. 0420267908455
www.johnstonprams.co.uk
[email protected]
Tel. 028 9084 9045
www.janebaby.ru
[email protected]
Tel. 495 3336379
TALLERES OFICIALES - SPAIN
ALBACETE
Pol. Ind. Campollano C/E 69
Tel. 967 24 10 17
LA CORUÑA
C/ San Vicente, 35
Tel. 981 23 68 63
ALICANTE
C/Crevillente, 15
Tel.96 525 06 97
LEÓN
C/ Tte. Andrés Gonzalez, 1
Tel. 987 20 96 10
BADAJOZ
Ctra. Corte de Pelea, 75
tel. 924 98 31 94
MADRID
C/ Yarumal, 6
local comercial N 2
Tel. 91 763 22 38
BARCELONA
C/ Del Lliri. 5 y 7
Tel. 93 285 05 13
BILBAO
C/ Cordelería, 14
Tel. 94 499 52 16
CÓRDOBA
C/ Gran Capitán, 41
Tel. 957 47 51 76
GIJÓN
C/ San José, 67
Tel. 985 39 49 39
GIRONA
C/ Avda. Cistaller, 3
Tel. 972 29 21 54
Sant Joan Les Fonts
FOR OTHER COUNTRIES
please contact our export department
[email protected]
GRANADA
Dr. Jaime Garcia Royo
s/n bajos
junto estación ferrocarril
Tel. 958 27 87 16
GRAN CANARIA
C/ Alfonso XIII, 8
Tel. 677 31 28 04
MÁLAGA
C/ Antonio Martelo, 2-4
Tel. 952 31 91 31
PALMA DE MALLORCA
C/ Gremio Zapateros, 51
Pol. Ind. Son Castelló
Tel. 971 43 08 60
SEVILLA
C/ Feria, 73
Tel 954 90 23 79
VALENCIA
C/ Borrull, 27
Tel. 96 392 10 79
ZARAGOZA
C/ Conde de Aranda, 45
Tels. 976 43 81 70
y 976 28 45 61
97
JANÉ, S.A. Pol. Industrial Riera de Caldes
C/Mercaders, 34-08184 Palau Solità i Plegamans (BARCELONA) SPAIN
Telf. +34 93 703 18 00 - Fax: +34 93 703 18 04 - email: [email protected] - www.jane.es
IM-1476-01