1
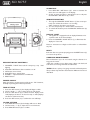
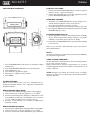
SLD 3075 F
DESCRIZIONE COMANDI
Italiano
USO DELL’ALLARME
1. Premere il tasto ALM ON/ALM OFF (2) 1 volta per attivare
l’allarme, l’icona apparirà sul display.
2. All’ora impostata l’allarme si attiva. Per spegnerla premere
il tasto ALM ON/ALM OFF (2) 1 volta.
FUNZIONE SNOOZE
1. Tramite il tasto SNOOZE/LIGHT(1) potete spegnere momentaneamente l’allarme mentre sta suonando.
Dopo 5 minuti l’allarme riprende a suonare.
2. È possibile spegnere momentaneamente l’allarme più volte.
3. Per spegnere definitivamente l’allarme premere il tasto ALM
ON/ALM OFF (2) 1 volta.
ILLUMINAZIONE DISPLAY
1. Questo apparecchio è dotato di una illuminazione del display
di tipo elettroluminescente che gli conferisce una grande
visibilità e una perfetta visione di tutto il display.
2. Premete il tasto SNOOZE\LIGHT (1) per illuminare il display
per 5 secondi.
Nota: un uso eccessivo della illuminazione può accorciare la
durata delle batterie.
RESET
Se l’unità non funziona correttamente, premere il tasto RESET(6)
per ripristinare l’apparecchio.
1. Tasto SNOOZE/LIGHT, interruzione momentanea sveglia/
illuminazione
2. Tasto ALM ON/ALM OFF, allarme inserito-disinserito
3. Tasto SET,formato ora,
4. Tasto ALM Set, regolazione sveglia
5. Manopola +/- regolazione Ora e Minuti
6. Tasto RESET
ALIMENTAZIONE
Aprite il vano batterie posto sul retro dell’apparecchio e
inserite due batterie formato “AA” rispettando attentamente
le polarità indicate.
REGOLAZIONE OROLOGIO
1. Premere il tasto SET(3) il display inizierà a lampeggiare.
2. Usare la manopola +/-(5) per regolare l’ora e i minuti.
3. Premere nuovamente il tasto SET(3) per selezionare il modo
di visualizzazione dell’ora: 12H (visualizza l’ora in formato
12 ore) o 24H (visualizza l’ora in formato 24 ore).
4. Premere il tasto SET(3) per confermare l’apparecchio
emetterà un beep.
REGOLAZIONE ALLARME
1. Premere il tasto ALM SET(4) il display inizierà a lampeggiare.
2. Usare la manopola +/-(5) per regolare l’ora e i minuti.
3. Premere nuovamente il tasto ALM SET(4) per confermare.
CURA E MANUTENZIONE
Estraete la batteria se avete intenzione di non usare l’apparecchio
per un lungo periodo di tempo.
Pulite la parte esterna del Vostro apparecchio con un panno
morbido leggermente inumidito; evitate assolutamente l’uso di
solventi o abrasivi.
TREVI persegue una politica di continua ricerca e sviluppo.
Pertanto i prodotti possono presentare caratteristiche diverse
da quelle descritte.
SLD 3075 F
English
ALARM USE
1. Press ALM ON / OFF button (2) 1 times to activate the
alarm, the icon will appear on the display.
2. At the set time the alarm is activated. To turn it off press
the ALM ON / OFF button (2) 1 times.
SNOOZE FUNCTION
1. Through the SNOOZE / LIGHT button (1) You can temporarily turn off the alarm when it is sounding.
After 5 minutes, the alarm sounds again.
2. You can temporarily turn off the alarm several times.
3. To switch off the alarm press the ALM ON / OFF button (2)
1 time.
DISPLAY LIGHT
1. This appliance is equipped with an display illumination for a perfect view of the entire display.
2. Press the SNOOZE \ LIGHT button (1) to illuminate the display for 5 seconds.
Note: an excessive use of light could result in a reduced battery life.
RESET
If the unit does not operate properly, press the RESET button (6)
to restore the product.
DESCRIPTION OF CONTROLS
1. SNOOZE / LIGHT button,clock temporary stop / dial
lighting
2. ALM ON / OFF button, alarm switches on-off
3. SET button, time format,
4. ALM SET button, setting alarm
5. KNOB+ / - adjustment Hours and Minutes
6. RESET button
POWER SUPPLY
Open the battery compartment and fit in two “AA” batteries,
carefully respecting the indicated polarities.
TIME SETTING
1. Press the SET button (3), the display will begin to flash.
2. Use the knob + / - (5) to adjust the hour and minute.
3. Press the SET button (3) to select the time display mode:
12H (displays the time in 12-hour format) or 24H (displays
the time in 24-hour format).
4. Press the SET button (3) to confirm the unit will beep.
ALARM SETTING
1. Press ALM SET button (4) the display will start to flash.
2. Use the knob + / - (5) to adjust the hour and minute.
3. Press ALM SET button (4) to confirm.
CARE AND MAINTENANCE
Remove batteries if you do not intend using the device for a
long period of time.
Clean the outsides of your device using a damp soft cloth, and
at all times avoid using chemicals and abrasives.
TREVI follows a policy of ongoing research and development.
The products may therefore have features different from those
described.
Français
SLD 3075 F
DESCRIPTION DES COMMANDES
UTILISATION DE L’ALARME
1. Appuyez sur la touche ALM ON / OFF (2) 1 fois pour activer
l’alarme, l’icône apparaîtra sur l’écran.
2. Au moment de régler l’alarme est activée. Pour éteindre
appuyez sur la touche ALM ON / OFF (2) 1 fois.
FONCTION SNOOZE
1. Avec la touche SNOOZE / LIGHT (1) vous pouvez désactiver
temporairement l’alarme quand il sonne.
Après 5 minutes, l’alarme se déclenche à nouveau.
2. Vous pouvez désactiver temporairement l’alarme à plusieurs
reprises.
3. Pour éteindre l’alarme, appuyez sur la touche ALM ON /
OFF (2) 1 fois.
ECLAIRAGE DE L’AFFICHEUR
1. Cet appareil est équipé d’un éclairage de l’écran pour une vue parfaite sur la totalité de l’écran.
2. Appuyez sur la touche SNOOZE \ LIGHT (1) pour éclairer l’écran pendant 5 secondes.
Remarque: ne pas trop utiliser cette fonction, car cela peut
diminuer la durée de vie des piles.
RESET
Si l’appareil ne fonctionne pas correctement, appuyez sur la
touche RESET (6) pour remettre le produit.
1. Touche SNOOZE / LIGHT, horloge temporaire arrêt /
éclairage du cadran
2. Touche ALM ON / OFF, l’alarme se met en marche-arrêt
3. Touche SET, format de l’heure,
4. Touche SET ALM, réglage de l’alarme
5 BOUTON + / -. Heures d’ajustement et procès-verbaux
6. Touche RESET
ALIMENTATION
Ouvrir le logement des piles et installer deux piles format “AA”
en respectant scrupuleusement les polarités indiquées.
REGLAGE DE L’HORLOGE
1. Appuyez sur le Touche SET (3), l’écran se met à clignoter.
2. Utilisez les bouton + / - (5) pour régler l’heure et les minutes.
3. Appuyez sur le Touche SET (3) pour sélectionner le mode
d’affichage de l’heure: 12H (affiche l’heure au format 12
heures) ou 24H (affiche l’heure au format 24 heures).
4. Appuyez sur le Touche SET (3) pour confirmer l’appareil
émet un bip.
REGLAGE DE L’ALARME
1. Appuyez sur la touche ALM SET (4) l’écran se met à clignoter.
2. Utilisez la bouton + / - (5) pour régler l’heure et les minutes.
3. Appuyez sur la touche ALM SET (4) pour confirmer.
ENTRETIEN ET REPARATION
Lorsque l’appareil reste longtemps sans fonctionner, il faut
retirer les piles.
Nettoyer l’extérieur de l’appareil à l’aide d’un chiffon doux et
légèrement humide. Il est strictement interdit d’utiliser des
solvants ou des abrasifs.
Compte tenu de la politique de recherche et de développement
continu, suivie par TREVI, les produits présentés sont à tout
moment susceptibles d’évolution ou de modifications et peuvent
donc avoir des caractéristiques différentes de celles décrites.
SLD 3075 F
Deutsch
BESCHREIBUNG DER BEDIENUNGSELEMENTE
Weckfunktion
1. Durch die SNOOZE / LIGHT-Taste (1) Sie können vorübergehend den Wecker auszuschalten, wenn es ertönt.
Nach 5 Minuten ertönt der Alarm erneut.
2. Können Sie schalten den Alarm mehrmals.
3. Um den Alarm auszuschalten, drücken Sie die ALM ON /
OFF-Taste (2) 1 Mal.
Rückseitige Beleuchtung des Displays
1. Dieses Gerät ist mit einem Display-Beleuchtung für eine
perfekte Sicht auf das gesamte Display ausgestattet.
2. Drücken Sie die SNOOZE \ LIGHT-Taste (1), um das Display
für 5 Sekunden zu beleuchten.
Anmerkung: Ein übertriebener Einsatz der Beleuchtung führt zu
einer kürzeren Lebensdauer der Batterien.
RESET
Wenn das Gerät nicht ordnungsgemäß funktioniert, drücken
Sie die RESET-Taste (6) um ein Produkt zu wiederherzustellen.
1.
2.
3.
4.
5.
6.
SNOOZE / LIGHT Taste, Uhr vorübergehenden Stop/ Wahl Beleuchtung
ALM ON / OFF Taste, schaltet Alarm-AusSET Taste, Zeitformat,
ALM SET Taste, Einstellung der Alarm
KNOPF + / - Anpassung Stunden und Minuten
RESET Taste
Speisung
Das Batteriefach öffnen und zwei Batterien vom Typ “AA” unter
Beachtung der angezeigten Polung einlegen.
Einstellung der Uhrzeit
1. Drücken Sie die SET-Taste (3), wird die Anzeige zu blinken.
2. Mit den Knopf + / - (5), um die Stunden und Minuten einzustellen.
3. Drücken Sie die SET-Taste (3), um die Zeitanzeige-Modus zu
wählen:12H (zeigt die Uhrzeit im 12-Stunden-Format) oder
24H (zeigt die Uhrzeit im 24-Stunden-Format)
4. Drücken Sie die SET-Taste (3), um das Gerät piept bestätigen.
Einstellung des Alarms
1. Presse ALM SET Taste (4) die Anzeige zu blinken.
2. Mit den Knopf + / - (5), um die Stunden und Minuten einzustellen.
3. Presse ALM SET Taste (4) zu bestätigen.
Benutzung des Alarms
1. Presse ALM ON / OFF-Taste (2) 1 Mal, um den Alarm zu aktivieren, wird das Symbol auf dem Display angezeigt.
2. Bei der eingestellten Zeit wird der Alarm aktiviert. Um sie auszuschalten, drücken Sie die ALM ON / OFF-Taste (2) 1 mal.
Pflege und Wartung
Die Batterien aus dem Gerät entfernen, falls es für einen längeren
Zeitraum nicht benutzt werden soll.
Die Außenseite Ihres Geräts mit einem weichen, leicht angefeuchtetem Tuch reinigen; die Verwendung von Lösungsmittel
oder scheuernden Produkten unbedingt vermeiden.
TREVI verfolgt eine Politik der ständigen Forschung und
Entwicklung. Deshalb können die Eigenschaften der Produkte
von den hier beschriebenen abweichen.
SLD 3075 F
DESCRIPCIÓN DE LOS MANDOS
Español
alarma, el icono aparecerá en la pantalla.
2. A la hora programada se activa la alarma. Para desactivarlo pulse el botón ALM ON / OFF (2) 1 vez.
FUNCIÓN SNOOZE
1. Mediante el botón SNOOZE / LIGHT (1) Puede apagar
temporalmente la alarma cuando está sonando.
Después de 5 minutos, la alarma suena de nuevo.
2. Puede apagar temporalmente la alarma varias veces.
3. Para apagar la alarma, pulse el boton ALM ON / OFF (2) 1
vez.
MONITOR ILUMINADO
1. Este aparato está equipado con una iluminación electroluminiscente que le da un alto perfil y una vista perfecta de
toda la pantalla.
2. Presione en el botón SNOOZE / LIGHT (1) para iluminar
la pantalla.
Nota: un uso excesivo de la iluminación puede reducir la
duración de las baterías.
RESET
Si la unidad no opera correctamente, pulse el botón RESET (6)
para devolver el producto.
1. Botón SNOOZE / LUZ interrupción momentánea de
alarma / iluminación
2. Botón ALM ON / OFF ALM, interruptores de alarma de
encendido y apagado
3. Botón SET, formato de hora,
4. Botón ALM Set, ajuste de la alarma
5. Perilla +/- ,ajuste de Horas y Minutos
6. Botón RESET
ALIMENTACIÓN
Abrir el compartimiento baterías e introducir dos baterías
formato “AA” respetando cuidadosamente las polaridades
indicadas.
REGULACIÓN RELOJ
1. Presione el botón SET (3), la pantalla comienza a parpadear.
2. Utilice la perilla + / - (5) para ajustar la hora y los minutos.
3. Presione el botón SET (3) para seleccionar el modo de
visualización de la hora: 12H (muestra la hora en formato de
12 horas) o 24h (muestra la hora en formato de 24 horas).
4. Presione el botón SET (3) para confirmar la unidad emitirá
un pitido.
REGULACIÓN ALARMA
1. Presione ALM SET (4), la pantalla comenzará a parpadear.
2. Utilice la perilla + / - (5) para ajustar la hora y los minutos.
3. Presione el botón de nuevo ALM SET (4) para confirmar.
USO DE LA ALARMA
1. Presione ALM ON / OFF ALM (2) 1 vez para activar la CUIDADOS Y MANTENIMIENTO
Extraer las baterías en caso de dejar aparato fuera de uso por
un largo período de tiempo.
Limpiar la parte externa del aparato con un paño suave ligeramente humedecido; evítese por completo el uso de solventes
o abrasivos.
TREVI aplica una política de continua investigación y desarrollo
por lo que los productos pueden presentar características
diferentes de aquéllas aquí descritas.
SLD 3075 F
Note
SLD 3075 F
Avvertenze per il corretto smaltimento del prodotto.
Il simbolo riportato sull’apparecchiatura indica che il rifiuto deve essere oggetto di “raccolta separata” pertanto il prodotto non deve essere
smaltito insieme ai rifiuti urbani.
L’utente dovrà consegnare il prodotto presso gli appositi “centri di raccolta differenziata” predisposti dalle amministrazioni comunali, oppure
consegnarlo al rivenditore contro acquisto di un nuovo prodotto.
La raccolta differenziata del rifiuto e le successive operazioni di trattamento, recupero e smaltimento favoriscono la produzione di apparecchiature con materiali riciclati e limitano gli effetti negativi sull’ambiente
e sulla salute causati da una gestione impropria del rifiuto.
Lo smaltimento abusivo del prodotto comporta l’applicazione di
sanzioni amministrative.
Precautions for correct disposal of the product.
The symbol shown on the equipment indicates that waste must be
disposed of in “separate collection” and so the product must not be
disposed of together with urban waste.
The user must take the product to special “separate waste collection
centres” provided by local government, or deliver it to the retailer
against the purchase of a new product.
Separate collection of waste and subsequent treatment, recycling
and disposal operations promotes the production of equipment with
recycled materials and limits negative effects on the environment and
on health caused by improper handling of waste.
Illegal disposal of the product leads to the enforcement of administrative penalties.
Recommandations pour l’élimination correcte du produit.
Le symbole figurant sur l’appareil indique que le produit fait l’objet
d’une “ collecte séparée “. C’est pourquoi, le produit ne doit pas être
éliminé avec les déchets urbains.
L’utilisateur doit remettre le produit auprès de “ décharges spécialisées
de collecte séparée “ prévues par les autorités locales, ou bien le
rendre au revendeur quand il achètera un nouvel appareil équivalent.
La collecte séparée du produit et les opérations successives de
traitement, recyclage et élimination favorisent la production d’appareils
composés par des matériaux recyclés ainsi que permettent d’éviter
des effets négatifs sur l’environnement et sur la santé des personnes
suite à une gestion impropre du déchet.
Toute élimination abusive du produit entraîne l’application de sanctions
administratives.
Hinweise zur ordnungsgemäßen Entsorgung des Produkts.
Das auf dem Gerät angebrachte Symbol weist darauf hin, dass das
Altgerät “getrennt zu sammeln” ist und das Produkt daher nicht zusammen mit dem Gemeindeabfall entsorgt werden darf.
Der Benutzer muss das Produkt zu den entsprechenden, von der
Gemeindeverwaltung eingerichteten “Wertstoffsammelstellen” bringen
oder dem Händler beim Kauf eines neuen Produkts übergeben.
Die getrennte Müllsammlung und anschließende Aufbereitung,
Wiederverwertung und Entsorgung fördern die Herstellung von Geräten
Correct Disposal Warnings
unter Verwendung wiederverwerteter Materialien und vermindern die
negativen Auswirkungen auf die Umwelt und Gesundheit in Folge einer
falschen Müllverwaltung.
Die widerrechtliche Entsorgung des Produkts führt zur Auferlegung von
Verwaltungsstrafen.
Advertencias para la correcta eliminación del producto.
El símbolo que aparece en el aparato indica que el residuo debe
ser objeto de “recogida selectiva” por tanto el producto no se debe
eliminar junto con residuos urbanos.
El usuario deberá entregar el producto a los “centros de recogida
selectiva” creados por las administraciones municipales o bien al
distribuidor cuando adquiera un nuevo producto.
La recogida selectiva del residuo y las sucesivas operaciones de
tratamiento, recuperación y eliminación favorecen la fabricación de
aparatos con materiales reciclados y limitan los efectos negativos en
el medio ambiente y la salud causados por una gestión incorrecta del
residuo.
La eliminación abusiva del producto da lugar a la aplicación de
sanciones administrativas.
Advertências para a correcta demolição do produto.
O símbolo indicado na aparelhagem indica que o resíduo deve ser
objecto de “recolha separada” portanto o produto não deve ser
desmantelado junto dos resíduos urbanos.
O utilizador deverá entregar o produto nos apropriados “centros de
recolha diferenciada” predispostos pelas administrações comunais,
ou entregá-lo ao revendedor em troca de uma compra de um novo
produto.
A recolha diferenciada do resíduo e as sucessivas operações de
tratamento, recuperação e desmantelamento favorecem a produção de
aparelhagens com materiais reciclados e limitam os efeitos negativos
no ambiente e na saúde causados por uma gestão imprópria do
resíduo.
O desmantelamento abusivo do produto comporta a aplicação de
sanções administrativas.
Προειδοποιήσεις για τη σωστή διάθεση του
προϊόντος.
Το σύμβολο που απεικονίζεται επάνω στη συσκευή υποδεικνύει
ότι το απόβλητο πρέπει να αποτελέσει αντικείμενο “χωριστής
συλλογής” ως εκ τούτου το προϊόν δεν πρέπει να διατίθεται
μαζί με τα αστικά απόβλητα.
Ο χρήστης θα πρέπει να παραδώσει το προϊόν στα ειδικά
“κέντρα διαφοροποιημένης συλλογής” που έχουν διευθετηθεί
από τις δημοτικές διοικήσεις, ή να το παραδώσει στο κατάστημα
πώλησης με την αγορά ενός νέου προϊόντος.
Η διαφοροποιημένη συλλογή του αποβλήτου και οι ακόλουθες
επεμβάσεις επεξεργασίας, ανάκτησης και διάθεσης βοηθούν την
παραγωγή συσκευών με ανακυκλωμένα υλικά και περιορίζουν
τις αρνητικές επιπτώσεις για το περιβάλλον και την υγεία που
προκαλούνται από την ακατάλληλη διαχείριση του αποβλήτου.
Η αυθαίρετη διάθεση του προϊόντος συνεπάγεται την εφαρμογή
διοικητικών κυρώσεων.
SLD 3075 F
Warranty
GARANZIA
1. L’apparecchio è garantito per 24 mesi dalla data di fabbricazione
indicata sull’etichetta applicata sul prodotto.
2. L a g a r a n z i a s i a p p l i c a s o l o a d a p p a r e c c h i ,
non manomessi, riparati da centri assistenza
TREVI, essa comprende la riparazione dei componenti per
difetti di fabbricazione con l’esclusione di etichette, manopole
e parti asportabili.
3. TREVI non risponde di danni diretti o indiretti a cose o/e persone
causati dall’uso o sospensione d’uso dell’apparecchio.
WARRANTY
1. This unit is guaranteed for a period of 24 months from the date
of production printed on the product itself or on label on product.
2. The warranty is valid only if the unit has not been tampered
with. The warranty is valid only at authorized TREVI assistance
centres, that will repair manufacturing defects, excluded replacement of labels and removable parts.
3. TREVI is not liable for damage to people or things caused by the
use of this unit or by the interruption in the use of this unit.
CONDITIONS DE GARANTIE
1. L’appareil est garanti pendant une période de 24 mois de la date
de fabrication indiquée sur l’étiquette se trouvant sur le produit.
2. La garantie n’est appliquée que sur les appareils non altérés,
ayant été réparés chez un Service Après-Vente TREVI. Elle
comprend la réparation des composantes à la suite de défauts
de fabrication, à l’exclusion d’étiquettes, boutons de réglage et
parties amovibles.
3. TREVI ne répond pas des dommages directs ou indirects aux
choses et/ou aux personnes entraînés pendant l’usage ou la
suspension d’usage de l’appareil.
GARANTIEBESTIMMUNGEN
1. Das Gerät hat eine Garantie von 24 Monaten ab dem Herstellungsdatum. Das Herstellungsdatum ist auf der am Produkt
angebrachten Etikette angegeben.
2. Die Garantie gilt nur für Geräte, an denen nicht selbst ausgeführte
Reparaturen erfolgt sind, sondern die von TREVI-Kundendienststellen durchgeführt wurden. Die Garantie umfaßt die Reparatur
von Bauteilen, wenn diese auf Herstellungsfehler zurückzuführen
sind. Die Garantie gilt hingegen nicht für Etiketten, Drucktasten,
Knöpfe und entfernbare Teile.
3. TREVI haftet nicht für direkte oder indirekte Sach- und/oder
Personenschäden, die vom Gebrauch des Gerätes verursacht
worden sind.
CLAUSULAS DE GARANTIA
1. El aparato tiene una garantía de 24 meses a partir de la fecha
de fabricación indicada en la tarjeta sobre el producto.
2. La garantía está aplicada solamente a los productos no desarreglados y reparados por los centros de asistencia TREVI. Además,
la garantía incluye la reparación de los componentes a causa de
defectos de fabricación, con la exclusión de etiquetas, botones
y partes removibles.
3. TREVI no es responsable por daños directos o indirectos a
cosas y/o personas causados por el uso o suspensión del uso
del aparato.
GARANTIA
1. O aparelho tem uma garantia de 24 meses a partir da data de
fabricação indicada na etiqueta que consta no produto.
2. Somente aparelhos não violados, e que foram reparados pelo
Centro de Assistência TREVI incluem-se nesta garantia. Esta
compreende a reparação dos componentes em caso de defeitos
de fabricação com a exclusão de etiquetas, botões e partes que
podem ser extraídas.
3. A TREVI não considera-se responsável por danos directos ou
indirectos, causados pelo uso ou suspensão do uso do aparelho,
à objectos e/ou pessoas.
ΕΓΓΥΗΣΗ
1. Η συσκευηϖ εϖχει εγγυϖηση διαϖρκειαϕ 24
µηνωϖν αποϖ την ηµεροµηνιϖα κατασκευηϖϕ
που αναγραϖφεται στην κολληµεϖνη επαϖνω τηϕ
ετικεϖτα.
2. Η εγγυϖηση εϖχει ισχυϖ µοϖνο για τιϕ συσκευεϖϕ,
στιϕ οποιϖεϕ δεν εϖχει επεµβειϖ κανειϖϕ, τιϕ
επισκευασµεϖνεϕ αποϖ τα κεϖντρα αντιπροσωπειϖαϕ
TREVI και περιλαµβαϖνει την επισκευηϖ των
συστατικωϖν στοιχειϖων που ειϖναι ελαττωµατικαϖ
αποϖ κατασκευηϖϕ εκτοϖϕ των ετικετωϖν,
χειρολαβωϖν και µετακινουϖµενων τµηµαϖτων.
3. Η εταιριϖα TREVI δεν ειϖναι υποϖλογη αϖµεσων ηϖ
εϖµµεσων ζηµιωϖν σε πραϖγµατα ηϖ προϖσωπα
αποϖ κακηϖ χρηϖση ηϖ διακοπηϖ τηϕ χρηϖσηϕ τηϕ
συσκευηϖϕ.
Made in CHINA
Trevi S.p.A.
Strada Consolare Rimini-San Marino, 62
47924 Rimini (Rn) Italia
Tel. 0541/756420
Fax 0541/756430
www.trevi.it
e-mail: [email protected]