1
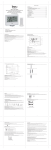
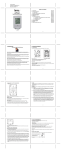
PE-109
Operating Instructions
1.
Ready in just 3 steps !
First ensure that the battery is activated (see chapter 5)
1) Press the ‘MODE’ key until ‘STEP’ appears in the display and the time is shown
2) Press and hold the ‘RESET’ key until the top display of the number of steps is set to zero.
(hold the key for at least 4 seconds)
3) Fasten the PE-109 with the clip to your belt/trouser waistband in front of your body at hip height or
put it in one of your front trouser pockets.
-> and off you go
From the display, you can now see the number of steps in the top line and the current time (not yet set) in
the bottom line.
For more information on the device, please read through the instructions for use in their entirety.
2.
Introduction
Thanks to the 3-axis digital motion sensor, the PE109 pedometer measures in all situations. This digital
pedometer is a highly accurate step counter for your personal step monitoring when walking or running. It
offers additional features that are free for you to use, but are not mandatory.
The main idea behind a pedometer is to make you aware of how many steps you make a day and to
motivate you into additional healthy movement behaviour.
Common speech in Asia says: “He who walks 1000 steps a day will live to be 100 years old”.
It is not quite that easy but you should try to add an additional 3000 steps every day to your daily routine,
for example with a deliberate and vigorous evening walk. You will find that the daily repetition will greatly
increase your health and actually be fun.
The pedometer could be a device to monitor your training. Another option is to include your pulse. For this
Irox offers you a selection of watches with pulse monitoring (www.irox.com), e.g. the Irox Phan X2.
The main features of the PE109 are listed here and their functions will be explained in detail on the following
pages:
- Step counter (up to max. 99,999 steps) and setting of your personal data (body weight, step length, target
steps per day, time format in 12 or 24h format
- Distance in km (conversion of steps by your stride)
- Calories consumed (in kcal)
- Measurement of amount of time walked in minutes
- Automatic recording of all measured data over 7days
- Totalizer for all measurements (number of steps, distance, kcal burned, movement time)
The PE109 has 3 buttons (with the indicated main functions):
MODE
SET
RESET
– Selection of the operating mode (in setting as – key)
– To be used for settings
– Resetting of displays (in setting as + key)
For more details please read the whole manual.
Please ensure that the battery is activated
(See Chapter 5)
3.
How to wear the pedometer correctly
The PE109 is equipped with a 3D digital movement detector that measures every movement, also your
steps, disregarding the position of the device. Because every person moves a bit differently, we recommend
wearing the PE109 as follows:
- In an upright position
- secured tightly by the clip on your belt or trouser waistband
- position on a belt: In the extension of the trouser crease, approximately in the middle between the hip bone
and the middle of the body.
Other carrying modes e.g. in a handbag, coat pocket or other places on the body are possible under certain
circumstances. You must make sure that and how exact the counting is and then chose the correct mode for
you.
However, never wear the pedometer:
----> In the back pocket of your jeans/trousers
----> Too loosely so that it moves as you move
Certain situations and walking styles can influence the preciseness of the pedometer.
These are, for example:
- The pedometer swings along too loosely with your movements thereby measuring “extra steps”
- Dragging your feet will cause problems, as well as wearing sandals or shoes with soft soles. An all too
casual ambling along also makes a correct count difficult.
- You are on or in a vehicle that causes vibrations (bicycle, automobile, train, bus, etc.).
- You sit down or stand up or move in a fixed position.
- Every movement can be interpreted as a step. This means that pulling off the pedometer also counts
steps. Therefore always put it on first and then adjust the setting to 0.
- Your movements will be counted. They are perhaps not always consistent that is why there may be some
deviations to the number of steps you have perhaps counted by yourself at one time. Don’t allow this to
confuse you. A certain counting tolerance (+/- 10%) is normal and will often balance itself out over the day.
What is important though: Even with the error, your own walking performance can still be monitored and
documented. Whether it’s 5000 or 5300 steps is not as important as that you consciously, sufficiently and in
a healthy manner moved your body!
Please note: First steps
The pedometer does not start counting until the 10th step. This means if you take two steps and then
sit again for a while it won’t count anything. But if you stand up and walk for more than 10 steps it
will begin counting which means it begins at 10. So basically no steps are lost.
4.
Set a function (MODE)
Press the ‘MODE’ key repeatedly until you have reached the desired function. You have a selection of the
following functions (the short text shown here in brackets appears at the top of the display):
The time always appears at the bottom of the display – apart from in the 7-day data memory mode!
-
Step counter (STEP)
Distance covered (KM or MILE)
Calories burned (KCAL)
Time active – measurement of amount of time walked in minutes (MIN)
7-day data memory (STEP) – at the bottom, instead of the time, the display shows -1 DAYS
RECORD
Totalizer for all measurements (TOTAL STEP)
‘TOTAL STEP’ is followed by the first function ‘STEP’.
As soon as you have reached the desired function, you can operate the device as described below.
Caution: If you do not press any key for more than 3 minutes or if the device is not moved, the device
automatically switches to a save-battery mode, i.e. the display is switched off. All functions continue to run in
the background. To reactivate the display, either move the device or press one of the keys.
4.1
The function STEP (step counter)
Allows you to set the time and your personal details
You can also use the PE-109 as a quartz watch. You can set the time and your personal details. To use the
additional possibilities of the PE109, you have to enter your personal details. These data are then used to
calculate the following information:
- Distance
- Calories burned
- Graphic display of the steps taken compared with the target for the day (in 10% steps)
Please note:
- The correct setting is important in order to be able to use the memory function correctly. At midnight, your
step data for the day will automatically be stored in the memory and counting for the new day then starts
from zero again.
- Some information (distance, kcal, target) requires the input of your personal details.
Setting
Press and hold the SET key in the STEP mode (approx. 4 seconds) until the ’24-hour’ display starts to flash
and SETUP is displayed in small letters to the right. You can change the setting with the MODE and RESET
keys. With the SET key, you move to the next setting.
Setting sequence (the element to be set flashes):
24/12-hour time display ---> hour setting ----> minute setting ---> unit of step length cm/inch (used for the
bodyweight kg or pounds) ---> step length in the set unit (30-213cm / 12-84 inch)---> your body weight (20220kg / 50-500LB)) ---> target number of steps per day (100-99000 steps can be set in increments of 100 or
1000)
After the last setting in the sequence, namely the target number of steps per day, the setting is completed by
pressing on the SET key and you go back to the time display.
Caution: In the setting mode, if no key is pressed for more than 10 seconds, the change that has been made
is accepted and the setting mode is exited automatically.
Measuring step length
To determine your step length, proceed as follows:
- Walking: walk 10 steps as you normally would, then measure the distance covered and divide it by ten.
Example:
You measure 6.2 metres. 6.2m / 10 (number of steps) = 0.62m (input step length WALK: 62cm).
- Jogging: here, we recommend that you jog at least 50 steps and then use the distance covered in the
calculation.
Step counter
As soon as you start to walk (see “Important” in Chapter 3!), the steps you take are added and displayed.
The distance, kcal and movement time are counted automatically (see Chapter 4.2 – 4.4)
Reset (RESET) the measured data
Press and hold the RESET key for at least 4 seconds. All data in the current measurement are then deleted
(Chapter 4.1 – 4.4: steps, distance, kcal, movement time). You can perform this RESET in all these
functions. However, the data for this deleted measurement are stored in the TOTAL STEP counter!
Caution: If you perform a RESET in the TOTAL STEP mode (Chapter 4.6), all measurement data in the
PE109, incl. the data in the daily memory, are reset to zero.
4.2
The function KM
Distance covered
In this function, the number of steps and the step length you have defined are used to calculate the distance
covered.
This function is reset together with the step counter.
4.3
The function KCAL
Kcal burned
The calories burned during the actual measurement.
Please note: 100g of chocolate are the equivalent of approx. 500 kcal!
This function is reset together with the step counter.
4.4
The function ACTIVITY TIMER (MIN)
Movement timer – measurement of time in minutes when walking
This timer shows for how long you have been active, i.e. the timer starts as soon as the step counter
displays a movement. This means you see at a glance how long it has taken you to take a certain number of
steps. The time is reset together with the step counter.
4.5
The function DATA MEMORY (Memory Mode)
7-day data memory (STEP)
(at the bottom, instead of the time, the display shows -1 DAYS RECORD)
At midnight, the PE109 automatically saves the accumulated data (Chapter 4.1 to 4.4) for the respective
day.
Select the day: with the RESET key (‘-1’ is yesterday, ‘-2’ the day before yesterday, etc.)
Select the measurement data: with the SET key
If the memory is empty, ‘zero’ is displayed.
You cannot delete the memory data individually. Only via total deletion in the TOTAL STEP mode.
4.6
The function TOTAL STEP
Totalizer for all measurements (TOTAL STEP)
The measurement data added since the last complete RESET are collected here.
Select the measurement data: with the SET key
Complete reset (RESET) of the measurement data
Press and hold the RESET key for at least 4 seconds. All measurement data are then deleted, including the
data in the daily memory!
5.
Change / activation of batteries
- The cover of the battery compartment is located on the reverse of the device. You can use a coin to open
the battery compartment (turn in anti-clockwise direction, as the arrow in direction ‘OPEN’).
- With a new device, open the battery compartment and remove the insulating strip.
When using a device with a discharged battery, replace the old battery with a new one, type CR2032 (3V).
Please ensure correct polarity (the positive pole upwards, i.e. visible for you when you insert the battery)!
- Close the battery compartment again (replace cover and then turn gently in clockwise direction). The two
dots (on the left of the cover next to ‘OPEN’) and on the casing must be adjacent, as illustrated above.
6.
Pedometer care
- Do not expose the device to extreme temperatures or direct sunlight over longer periods.
- Avoid blows and shocks of any kind to the device.
- For cleaning use a dry soft cloth that you have moistened with water and a mild cleaning agent. Never use
volatile substances such as benzene, thinner, cleansing agents in spray cans etc..
- When your pedometer is not being used store it in a dry area and out of the reach of small children.
- If the device is activated under extreme coldness it may occur that the display becomes illegible. As soon
as the pedometer is returned to a warm environment the device will function normally.
- Please keep the user’s manual and other documents delivered with the device stored carefully so that you
can reference them at a later point if necessary.
7.
Support
This device is a new development of Irox Development Technology. All information was made and checked
by means of a functioning instrument. It may occur that adjustments and improvements of the device will
take place that due to typographical procedures were not able to be listed in this manual. Should you notice
deviations which make it difficult for you to operate and use the instrument you may at any time download
the latest manual onto your PC free of charge at www.irox.com.
© Irox Development Technology